
Chatbots have become an increasingly popular way for businesses and organizations to provide instant support and services to their customers. However, building a chatbot from scratch can be a time-consuming and complex process. This is where ChatGPT comes in.
ChatGPT is a state-of-the-art language model developed by OpenAI, which uses natural language processing and machine learning algorithms to generate human-like responses to text-based conversations. With ChatGPT, businesses and developers can quickly and easily build intelligent chatbots that can understand and respond to complex queries in a natural and conversational way.
In this tutorial, we will show you how to integrate ChatGPT with FlutterFlow, a low-code platform for building cross-platform applications. With FlutterFlow's visual interface and ChatGPT's natural language processing capabilities, you can build chatbots that can provide fast and accurate responses to customers' inquiries in record time.
We will guide you through the process of creating a chatbot from scratch, integrating ChatGPT with FlutterFlow. By the end of this tutorial, you'll learn to use OpenAI's latest ChatGPT API to create unique conversational experiences for users.
Getting Started
Before we dive into integrating the ChatGPT API in FlutterFlow, let's have a basic understanding of how the API works.
OpenAI has a number of AI models having varying capabilities. But the model that we are going to use today is called gpt-3.5-turbo which is known to be the most capable model featuring enhanced accuracy, faster response times, and improved natural language understanding capabilities.
gpt-3.5-turbo model is also significantly cheaper (about 10x cheaper) than its predecessor text-davinci-003.We will be using their Chat Completion API:
POST https://api.openai.com/v1/chat/completionsIt takes a JSON body in this format:
{
  "model": "gpt-3.5-turbo",
  "messages": [{"role": "user", "content": "Hello!"}]
}
And, returns a response like this:
{
  "id": "chatcmpl-123",
  "object": "chat.completion",
  "created": 1677652288,
  "choices": [{
    "index": 0,
    "message": {
      "role": "assistant",
      "content": "Hello there, how may I assist you today?",
    },
    "finish_reason": "stop"
  }],
  "usage": {
    "prompt_tokens": 9,
    "completion_tokens": 12,
    "total_tokens": 21
  }
}
Now that we have an understanding of how the API body and response looks, let's add the Chat Completion API call to FlutterFlow.
Defining API inside FlutterFlow
Follow the steps below to configure the ChatGPT API:
-
Inside your FlutterFlow project, navigate to the API Calls page from the left menu.
-
Click on the "+" button and select Create API Group.
-
Enter the group name as "OpenAI ChatGPT".
-
Enter the base URL as
https://api.openai.com/v1. -
Add a new header
Content-Type: application/json. -
Click Save.
-
Now, add an API Call inside this group.
-
Enter the API call name as "Send Full Prompt".
-
Select
POSTas the method type. -
Set the endpoint to
/chat/completions. -
Add an additional header
Authorization: Bearer [apiKey](the apiKey will be passed as a variable). -
Add two variables:
apiKeywith type String.promptwith type JSON.
-
The body can be defined like this:
{
  "model": "gpt-3.5-turbo",
  "messages": <prompt>
}
Use the
promptvariable to set themessages. -
Click Add Call.
-
Now, you can Test the API call by going to the Response & Test tab. Provide the required variables and click Test API Call.
-
Once you have a successful response, go to JSON Paths > Recommended tab.
-
Select the JSON paths that you want to use inside the app.
-
Go to the Selected tab and provide a name for each of the paths to make them easily identifiable for later use.
-
Click Save.
This completes the API configuration that we require for communicating with ChatGPT's Chat Completion API. Now, we are ready to use the API for fetching and displaying responses inside the app!
App UI Overview
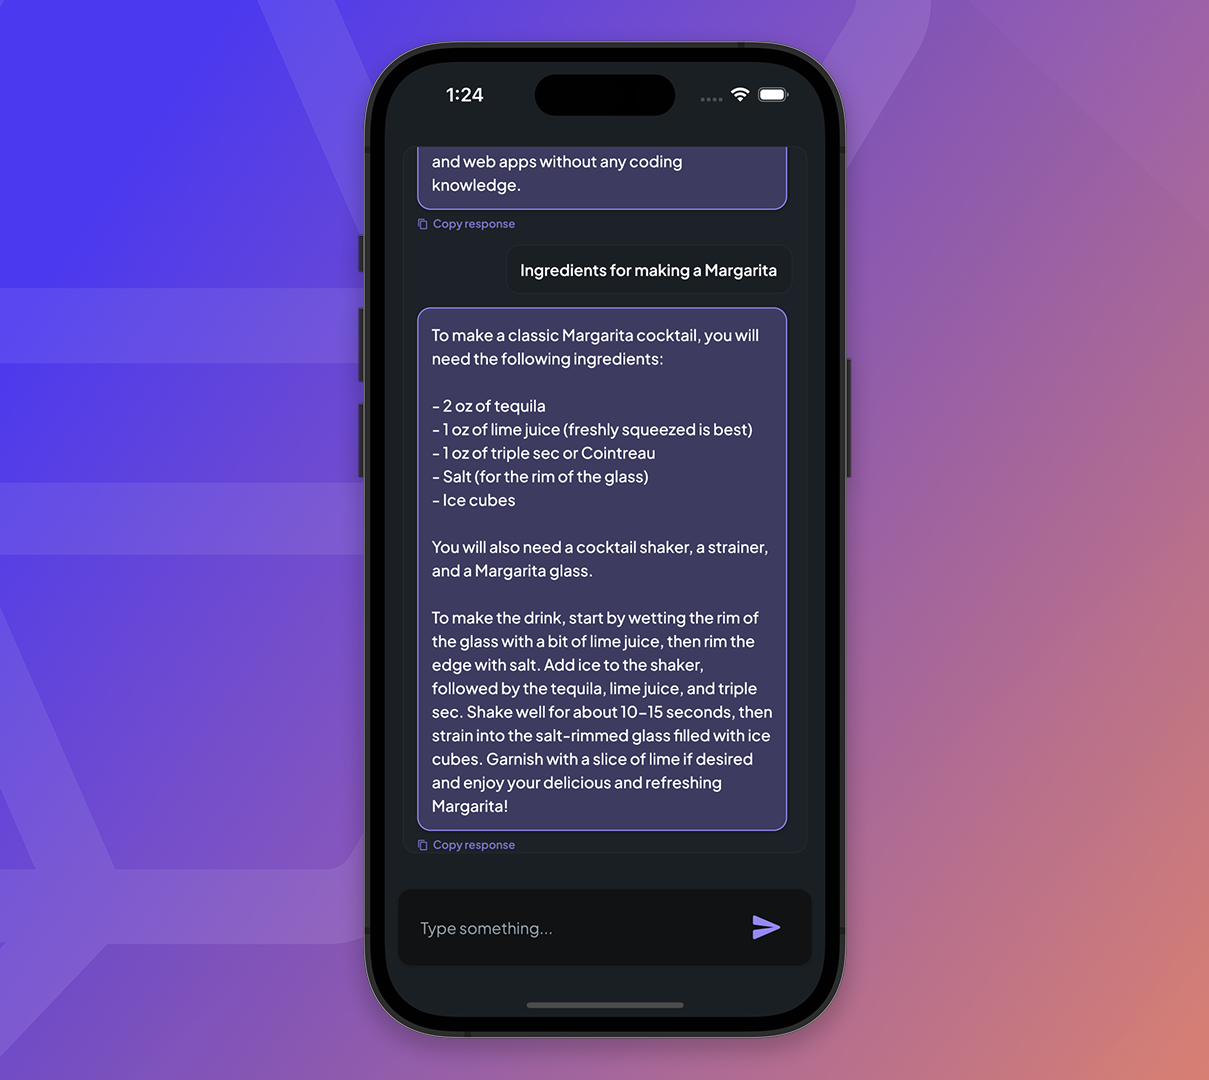
We will create just a single-page app that would be able to take prompts as inputs from the users, fetch responses using the API, and then display them inside chat bubbles.
Final interface will look like this:
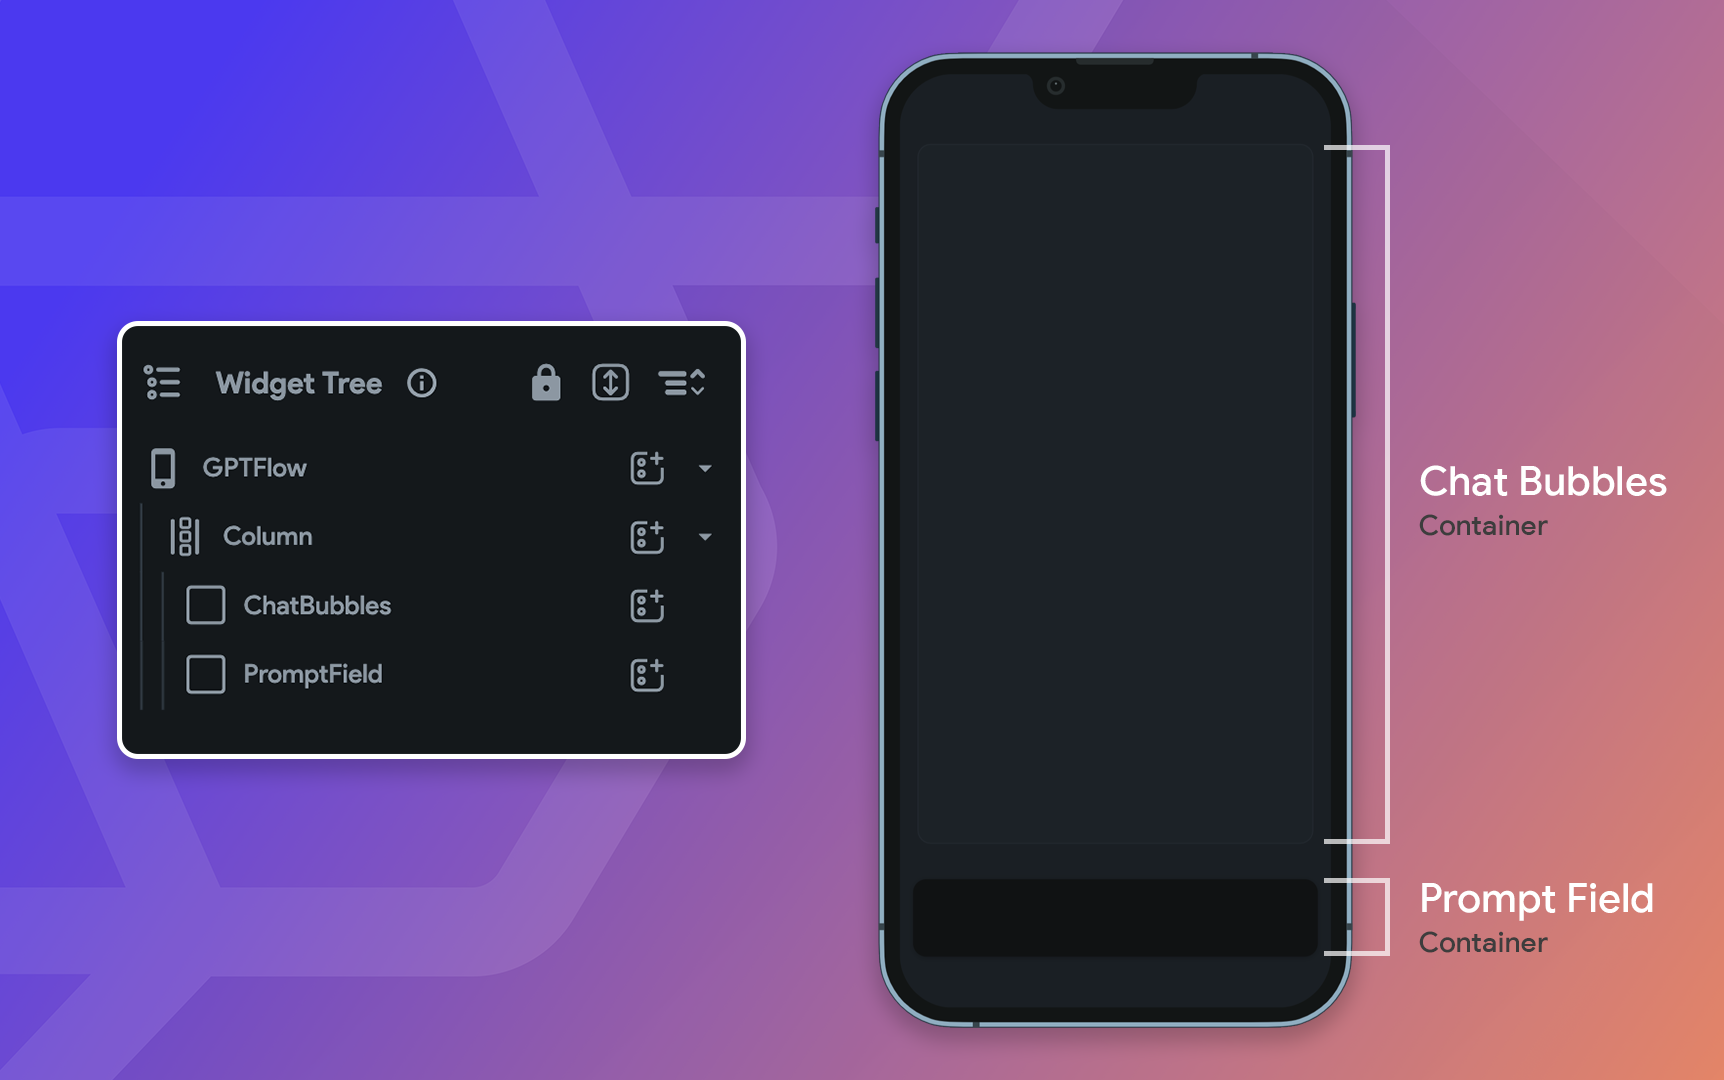
The building of the UI is divided into two parts:
- Chat Bubbles: For displaying the user prompts and ChatGPT's responses in a conventional conversational format.
- Prompt Field: To take the prompt from the user as input and sent it to the ChatGPT API.
Start by adding a Column widget to the page (you can also give it some padding). Then add two Container widgets, make the width to the entire available horizontal space.
Make the first Container Expanded, which we'll use for the chat bubbles, and the other one to display the prompt field.
Building Chat Bubbles
Time to add chat bubbles inside the first Container. Following is an overview of the steps required to achieve that:
- Add a ListView widget inside the ChatBubbles Container.
- Place a Column inside the ListView.
- Main Axis Size: Maximum
- Main Axis Alignment: Start
- Add two Row widgets inside this Column, one for displaying the AI chat bubble and the other one for user chat bubble.
- For the AI chat bubble Row:
- Set the Main Axis Alignment to Start.
- Add Container > Column > Text.
- You can change the container fill color as per your liking (here we have used the primary color with 30% opacity and added a thin border).
- For the User chat bubble Row:
- Set the Main Axis Alignment to End.
- Similarly, add Container > Column > Text (you can use a different Container fill color).
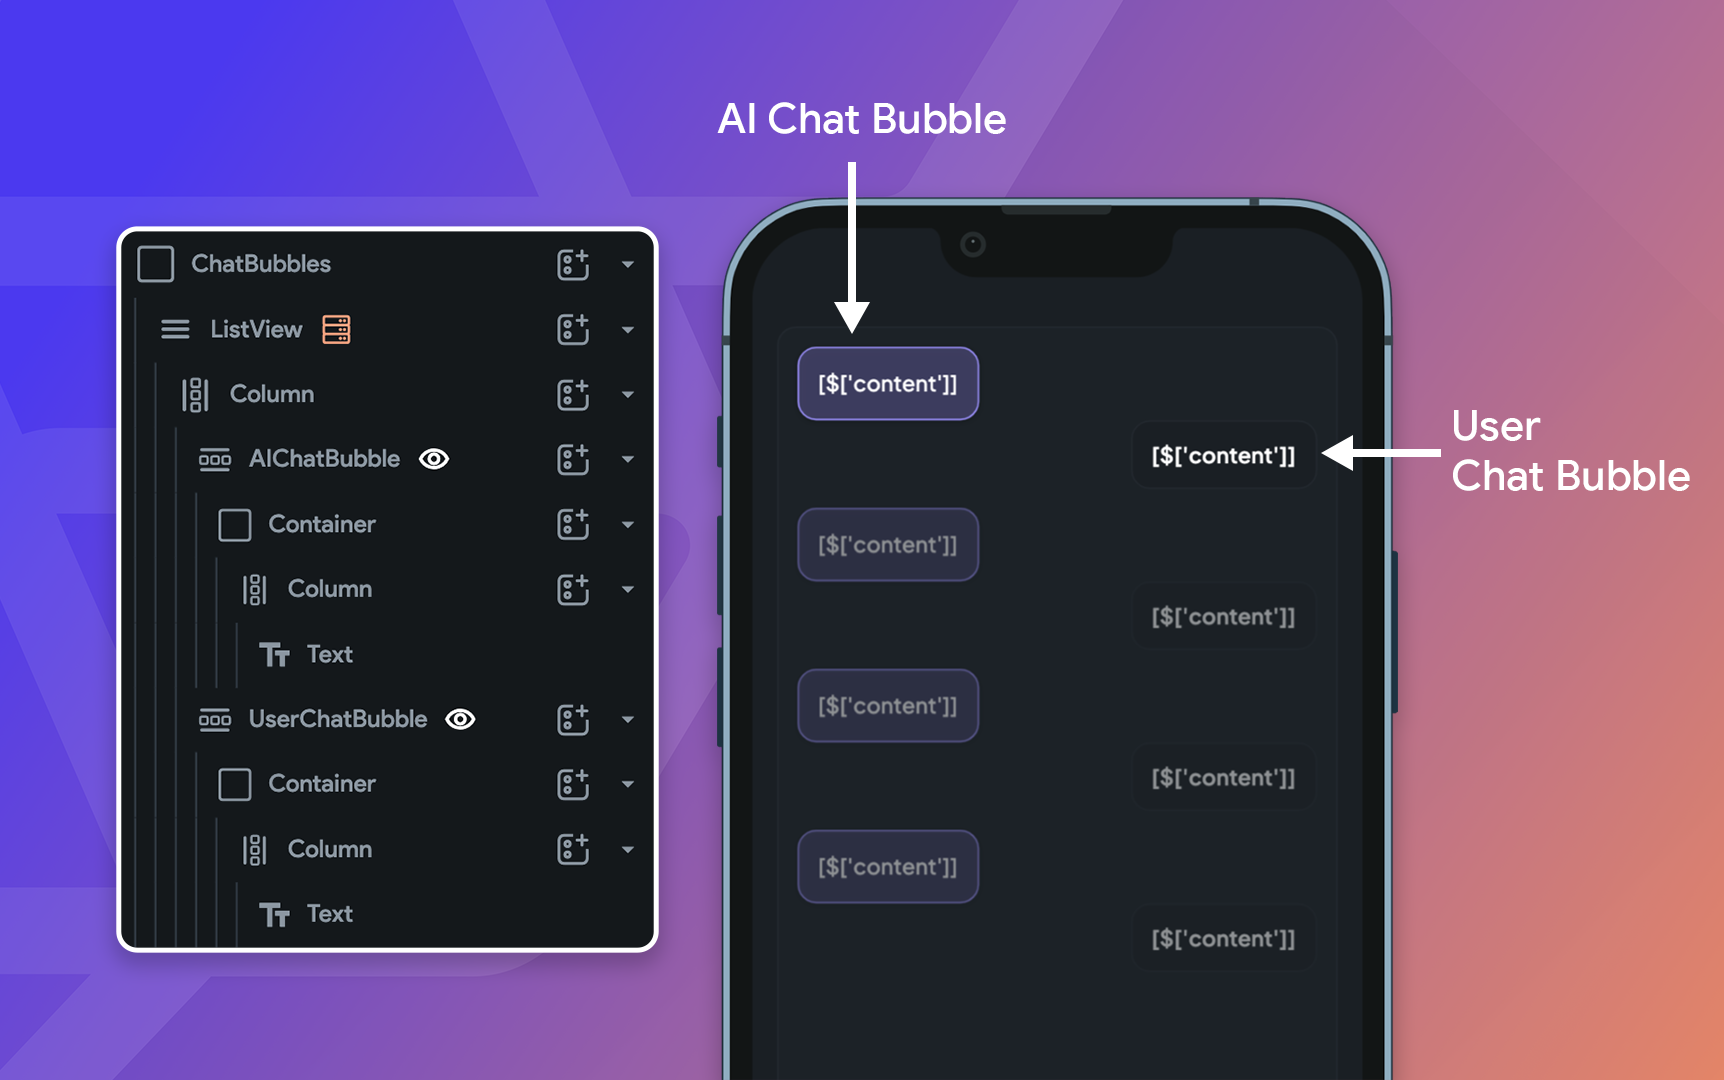
As we start generating dynamic children for this ListView from a list of messages, we would want only one of the Chat bubbles to appear for each message. Later on in this article, we would be using Conditional Visibility on the Rows to determine which one of the chat bubbles to display.
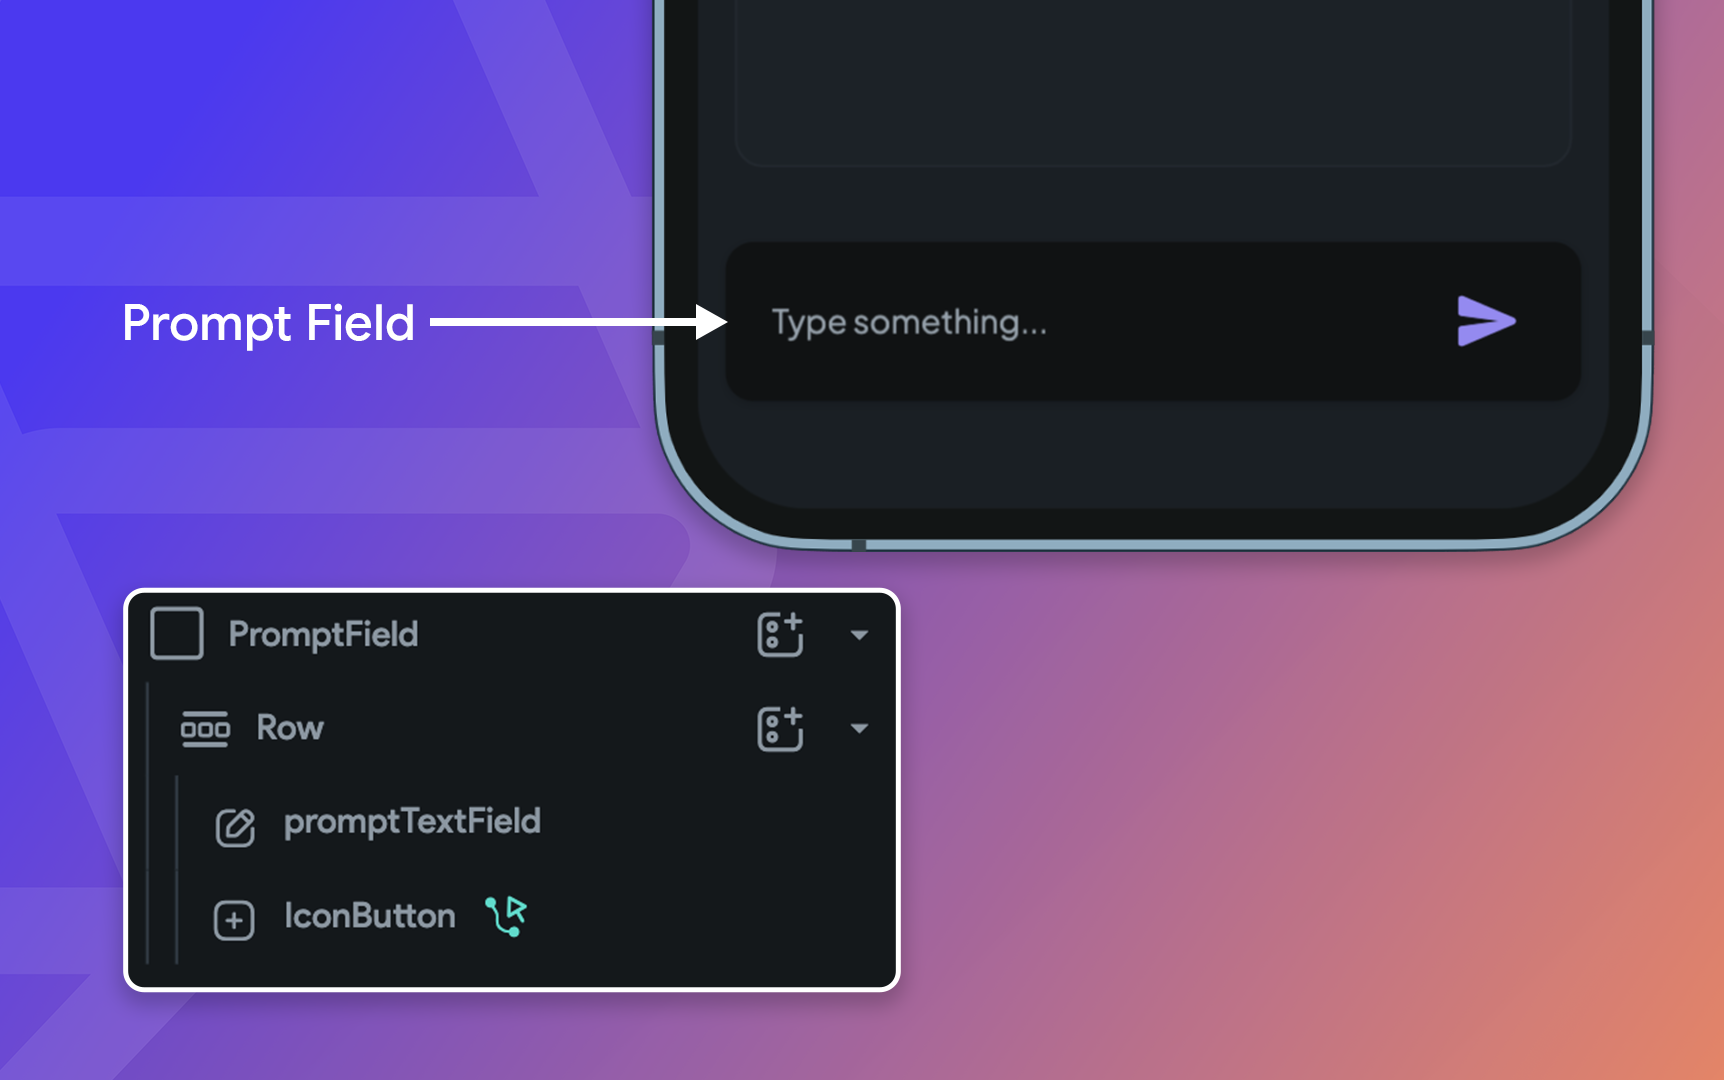
Adding Prompt Field
The prompt field will consist of TextField and IconButton widgets.
- Inside the PromptField Container (second Container), add a Row widget.
- Set Main Axis Size to Maximum.
- Add a TextField widget inside the Row.
- Make it Expanded.
- Set Max Lines to 8 and Min Lines to 1.
- Next, add an IconButton widget inside the Row.
- Change the icon to Send Rounded.
Connecting with API
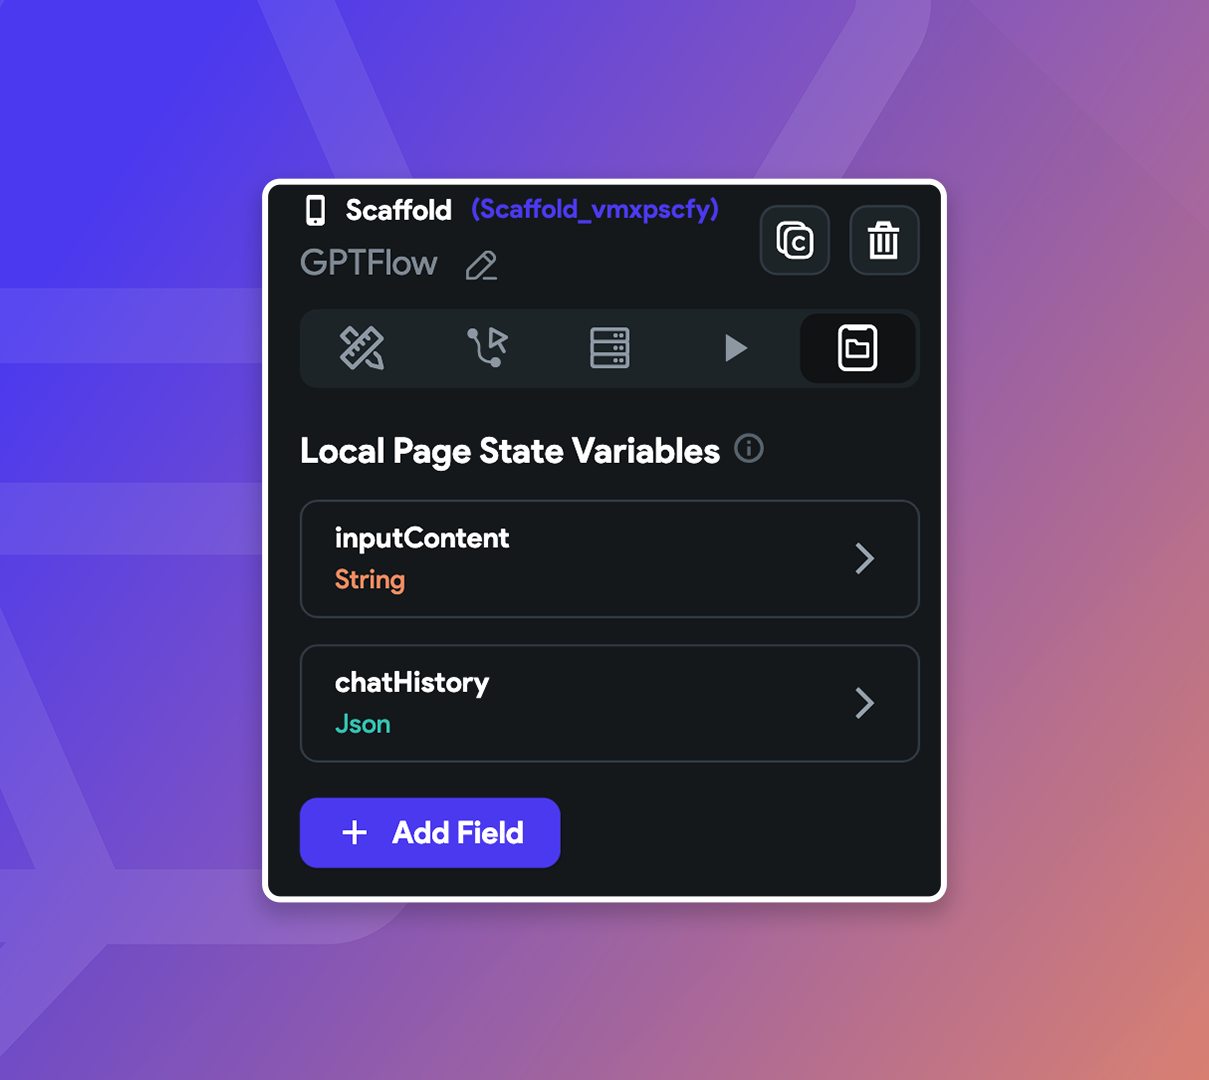
Before we start connecting with the API, we would a few variables to store the data because we want to retain the ChatGPT responses for each session (like a chat history).
Create two Local Page State Variables:
inputContentof type String (can be nullable)chatHistoryof type JSON
We would also need two simple Custom Functions, one for saving to the chat history and the other for converting to the correct message format while sending a prompt.
For the saveChatHistory custom function:
- Return Value: JSON (non-nullable)
- Arguments:
chatHistory(JSON, nullable) andnewChat(JSON, non-nullable)
Function code:
dynamic saveChatHistory(
  dynamic chatHistory,
  dynamic newChat,
) {
  /// MODIFY CODE ONLY BELOW THIS LINE

  // If chatHistory isn't a list, make it a list and then add newChat
  if (chatHistory is List) {
    chatHistory.add(newChat);
    return chatHistory;
  } else {
    return [newChat];
  }

  /// MODIFY CODE ONLY ABOVE THIS LINE
}
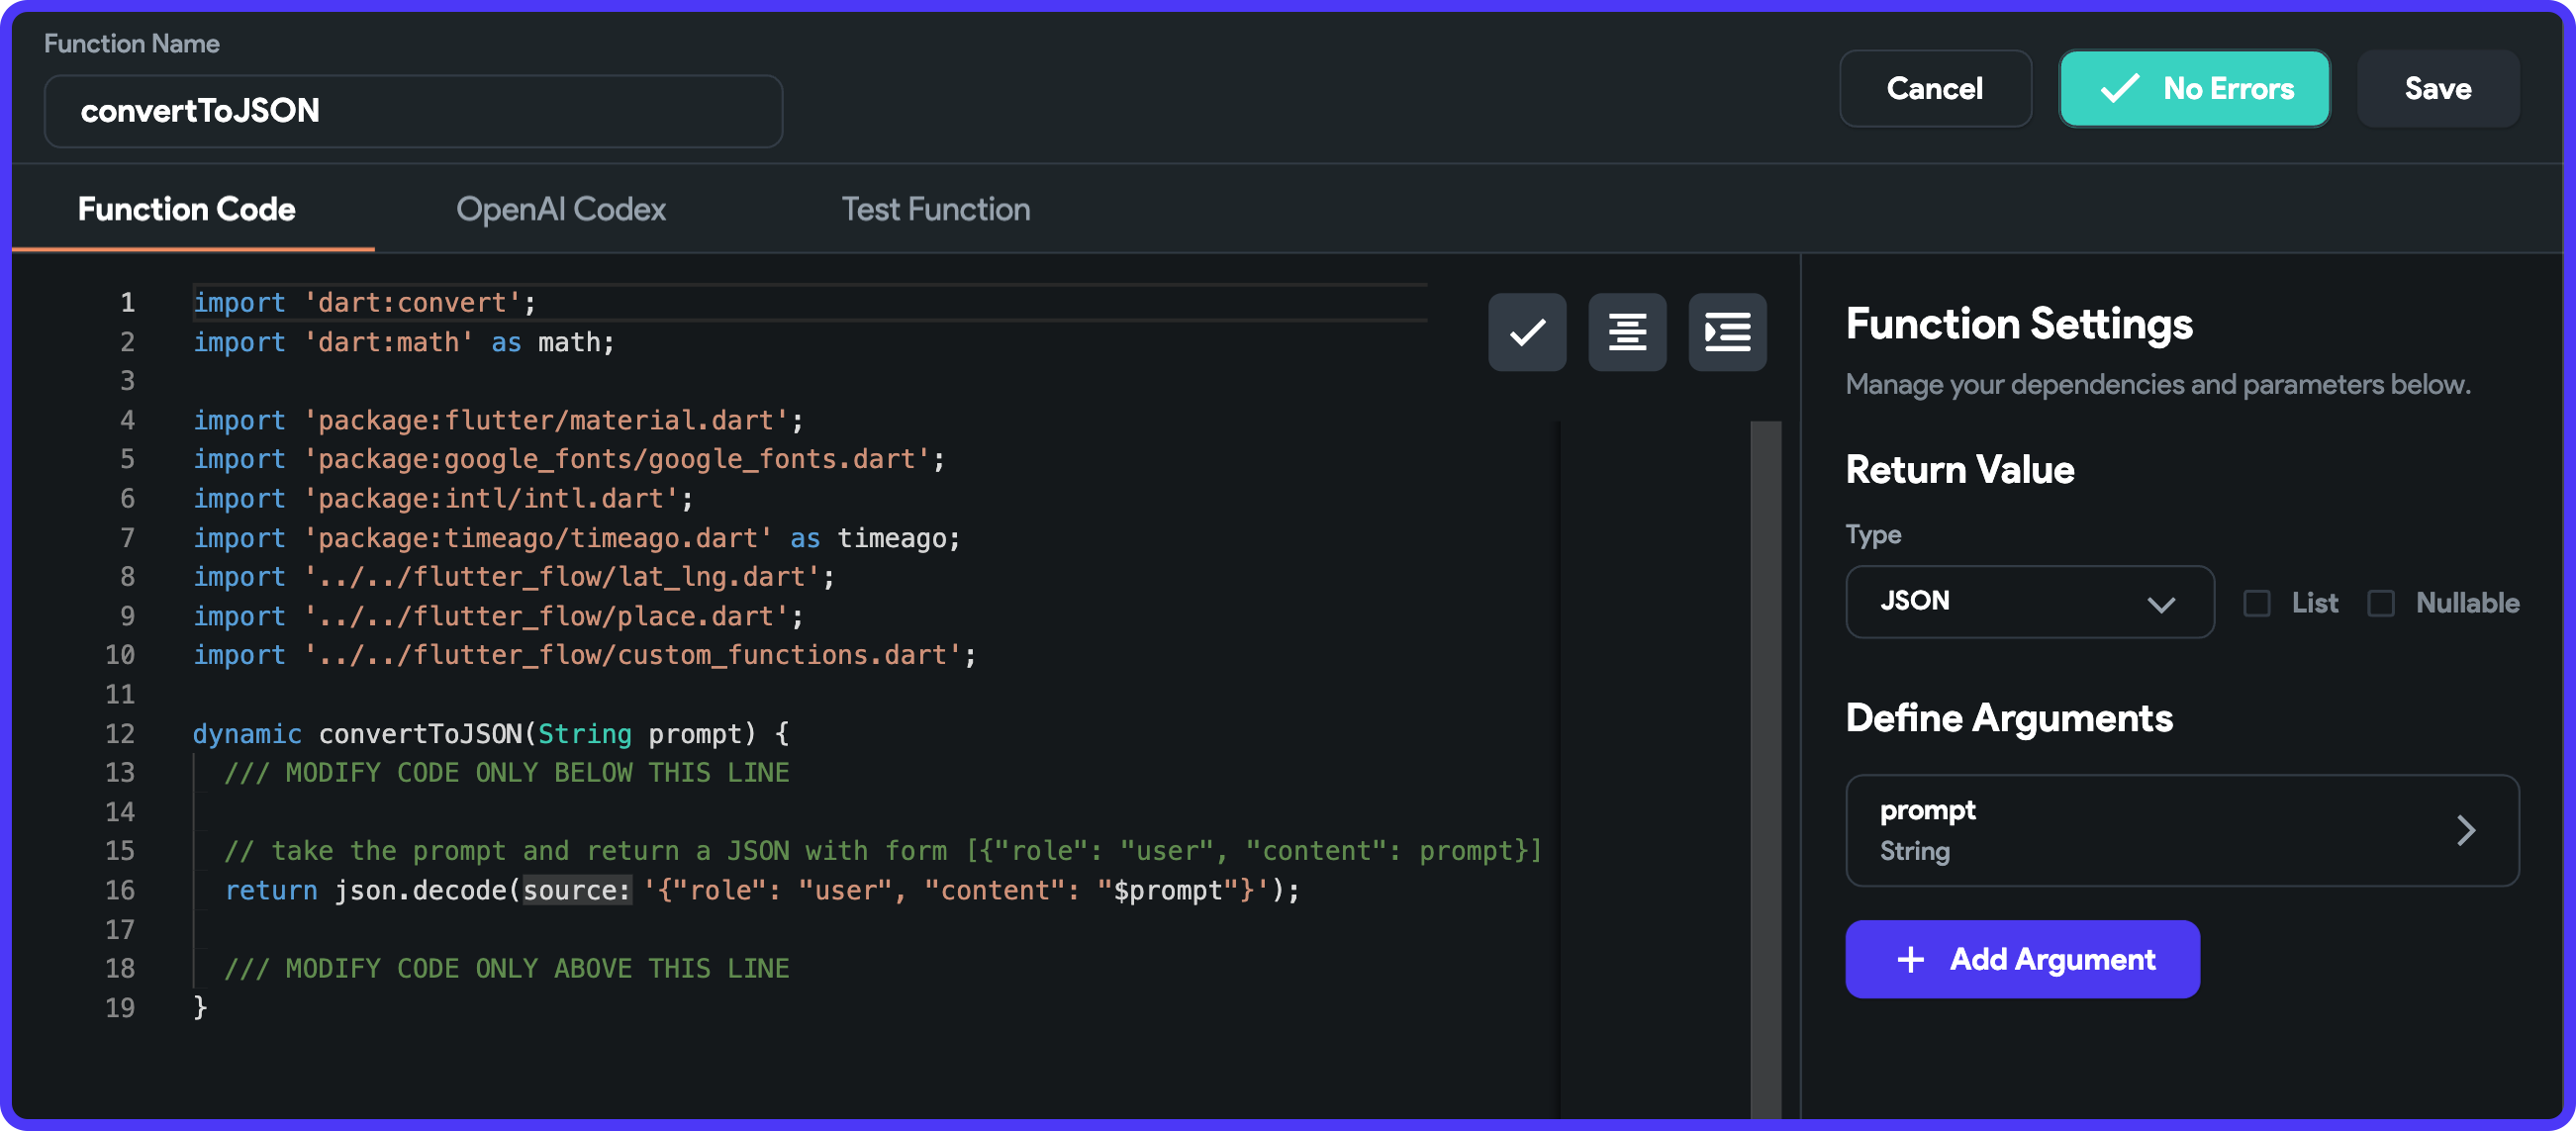
For the convertToJSON custom function:
- Return Value: JSON (non-nullable)
- Arguments:
prompt(JSON, non-nullable)
Function code:
dynamic convertToJSON(String prompt) {
  /// MODIFY CODE ONLY BELOW THIS LINE

  // take the prompt and return a JSON with form
  // [{"role": "user", "content": prompt}]
  return json.decode('{"role": "user", "content": "$prompt"}');

  /// MODIFY CODE ONLY ABOVE THIS LINE
}
The API query should be run when the user types a prompt in the TextField and clicks on the Send icon button. Follow the steps below to implement this:
- Select the Send IconButton.
- From the Properties Panel, go to the Actions tab. Click Open beside the Action Flow Editor.
- First, add an Update Page State action to add the user prompt to the
chatHistoryvariable (have a look at the video below to get a better understanding). - Next, add an API Call action by providing an
apiKeyandprompt. - Add a Conditional Action to check whether the API call was successful.
- If the API call was successful, add the response from ChatGPT to the
chatHistorypage variable. - Add an action to clear the promptTextField.
- Now, add a Wait action with
800msdelay, followed by a Scroll To action to scroll down to the end of the ListView (this would come handy when the response is quite long and user needs to scroll down manually).
Now that we have the API call actions defined, we just have one thing left to do – displaying the user queries and ChatGPT responses inside the bubbles.
- First, select the ListView widget.
- From the Properties Panel, go to the Generate Dynamic Children tab.
- Enter the Variable Name as "chat".
- Select the value from Page State > chatHistory.
- Click Confirm.
- To use the value, select the Text widget inside bubble.
- Click Set from Variable. Set the value from chat Item > JSON Path >
$.content. Similarly, set the value on the other Text widget as well.
To show the correct chat bubble based on whether the message is from the user or from ChatGPT, we'll set Conditional Visibilities on two of the bubbles by checking for the "role" field inside the message.
Here's a brief demo of the final application in action:
You can try out the app here.
Check out the Chat GPT template application on FlutterFlow Marketplace.
Conclusion
There are limitless ideas to implement with the help of ChatGPT and FlutterFlow. Hope this blog helped you in getting started with ChatGPT's latest chat completion API.
To give you a head start, here are some more interesting ideas that you can begin working on:
- AI Recipe App - generate new recipes from a list of ingredients
- AI Cold Email Writer - write cold outreach emails with the help of ChatGPT's API
- AI Support Tool - offer automated support in-app with the help of AI
- AI Grammar Checker - automatically checks what you type for grammar issues using AI
