
As app developers, you know that keeping users engaged during the time of loading is crucial to the success of any app. Although there isn't a one-size-fits-all solution to this problem, you can implement various design techniques depending on your use case.
In this blog, we will focus on a social image sharing app that fetches a lot of dynamic content from the network, including large image files. This is a common use case, and the tips and tricks we will cover here can be applied to other app categories as well, such as e-commerce.
Our primary objective is to improve the image-loading experience for your app users using FlutterFlow. However, we will also briefly cover some other tips and tricks that can help improve the loading experience of your app.
Getting Started
Before going deeper into the implementation, let's make sure we are on the same page and get a better understanding of the target of this blog.
To get you up to pace, here's a Starter Project that you can clone and follow along.
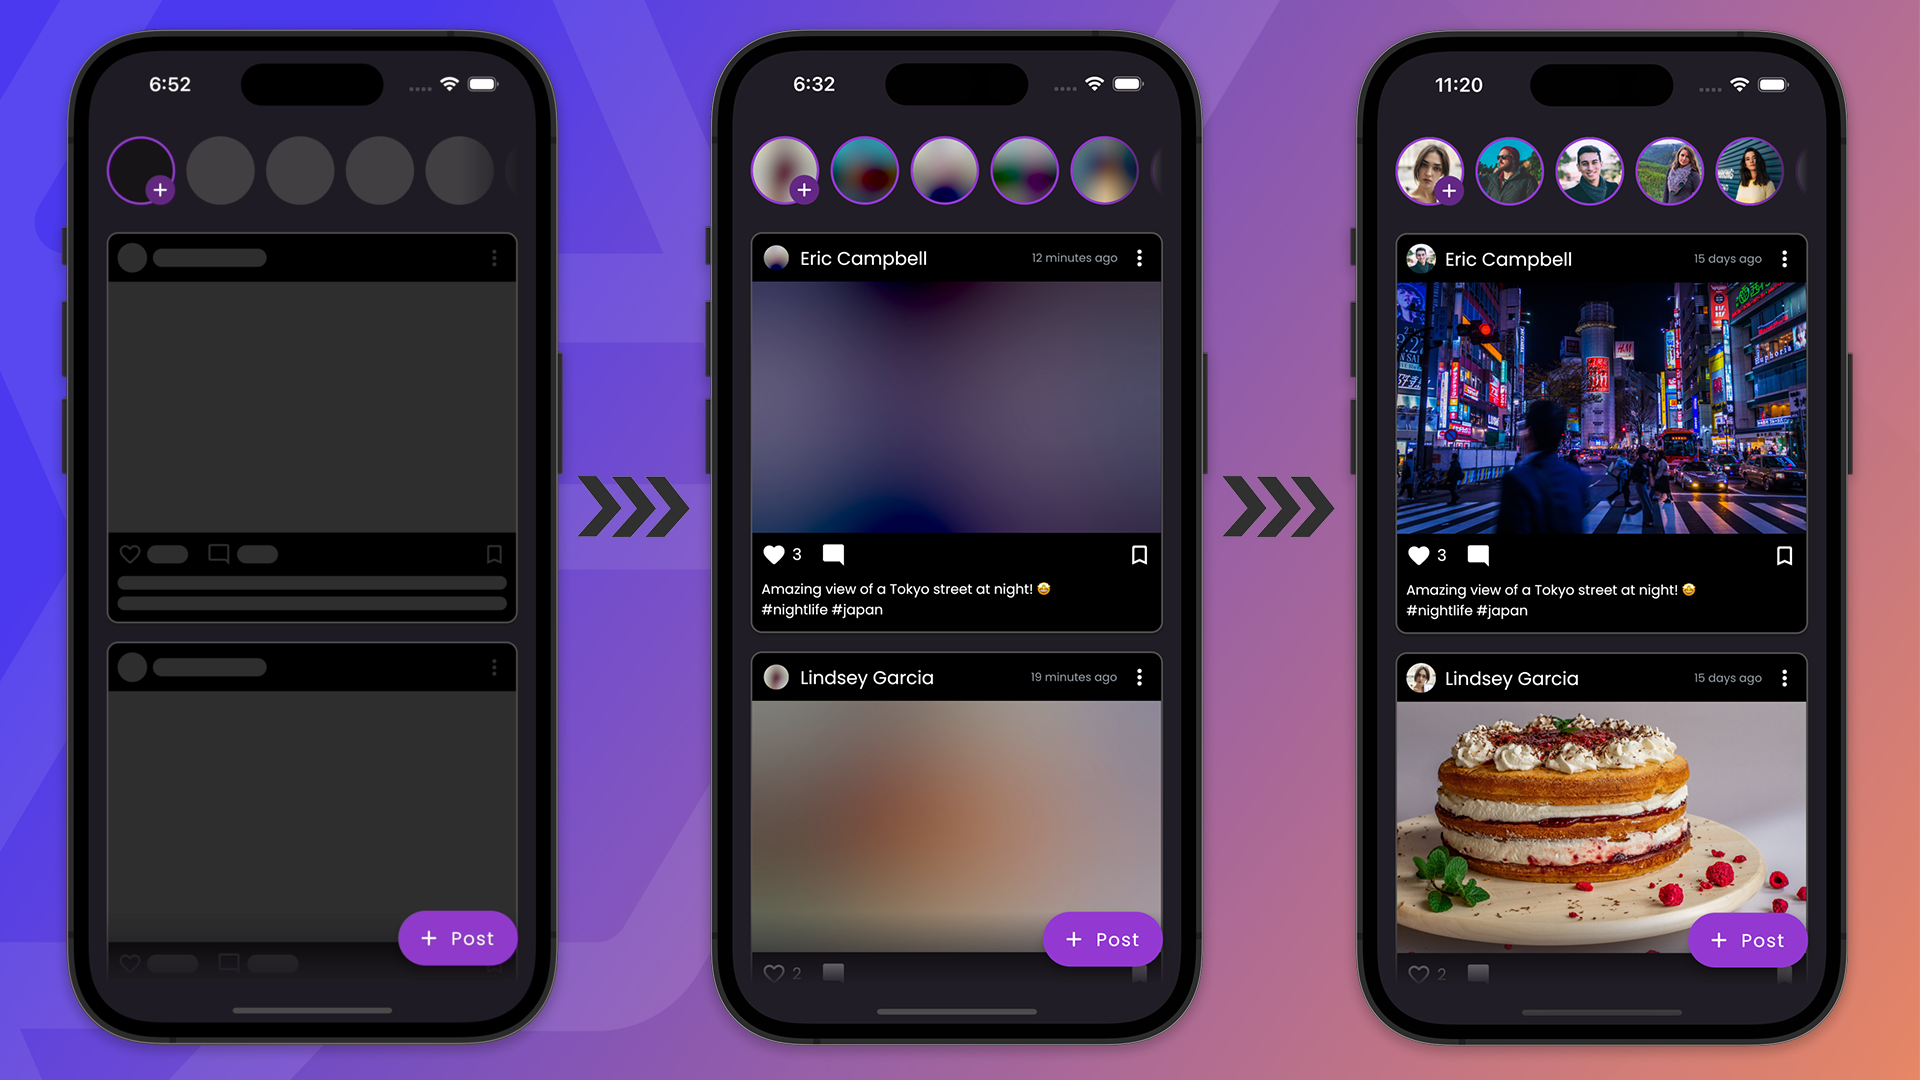
The following video shows an initial app launch on a device (so caching doesn't have any effect):
- LEFT app is using normal image loading, and
- RIGHT app is using BlurHash
The starter project is basically the app on the left (entire screen filled up with empty circles and boxes while loading). And, by the end of this blog, we will try to improve the UX of the app like the one on the right.
Loading large image files from the network can take a while, and during that time we wouldn't want to show empty placeholders or numerous circular progress indicators because that might hurt the user experience. To solve this issue, we'll use a BlurHash image (more about this in a bit).
Let's have a quick run-through of the starter app.
Overview of the app
The starter app consists of six main pages and a few components, some of which we use while the backend query is in progress as loading widgets. The project is structured in these folders:
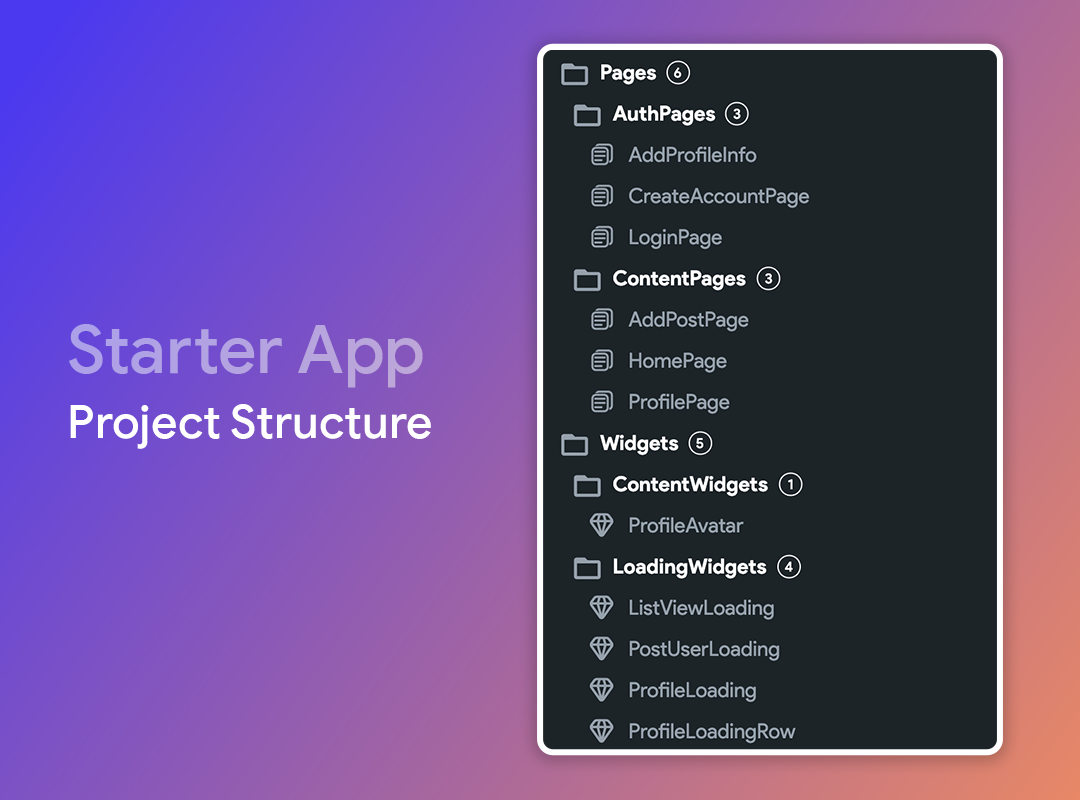
- Pages: Consisting of all the pages used in the app.
- AuthPages: Pages for authenticating the user and getting their profile setup, includes LoginPage, CreateAccountPage, and AddProfilePage.
- ContentPages: Primary pages of the app after authentication, includes HomePage, AddPostPage, and ProfilePage.
- Widgets: Consisting of all the components used in the app.
- ContentWidgets: Widgets for displaying content in the app, includes ProfileAvatar.
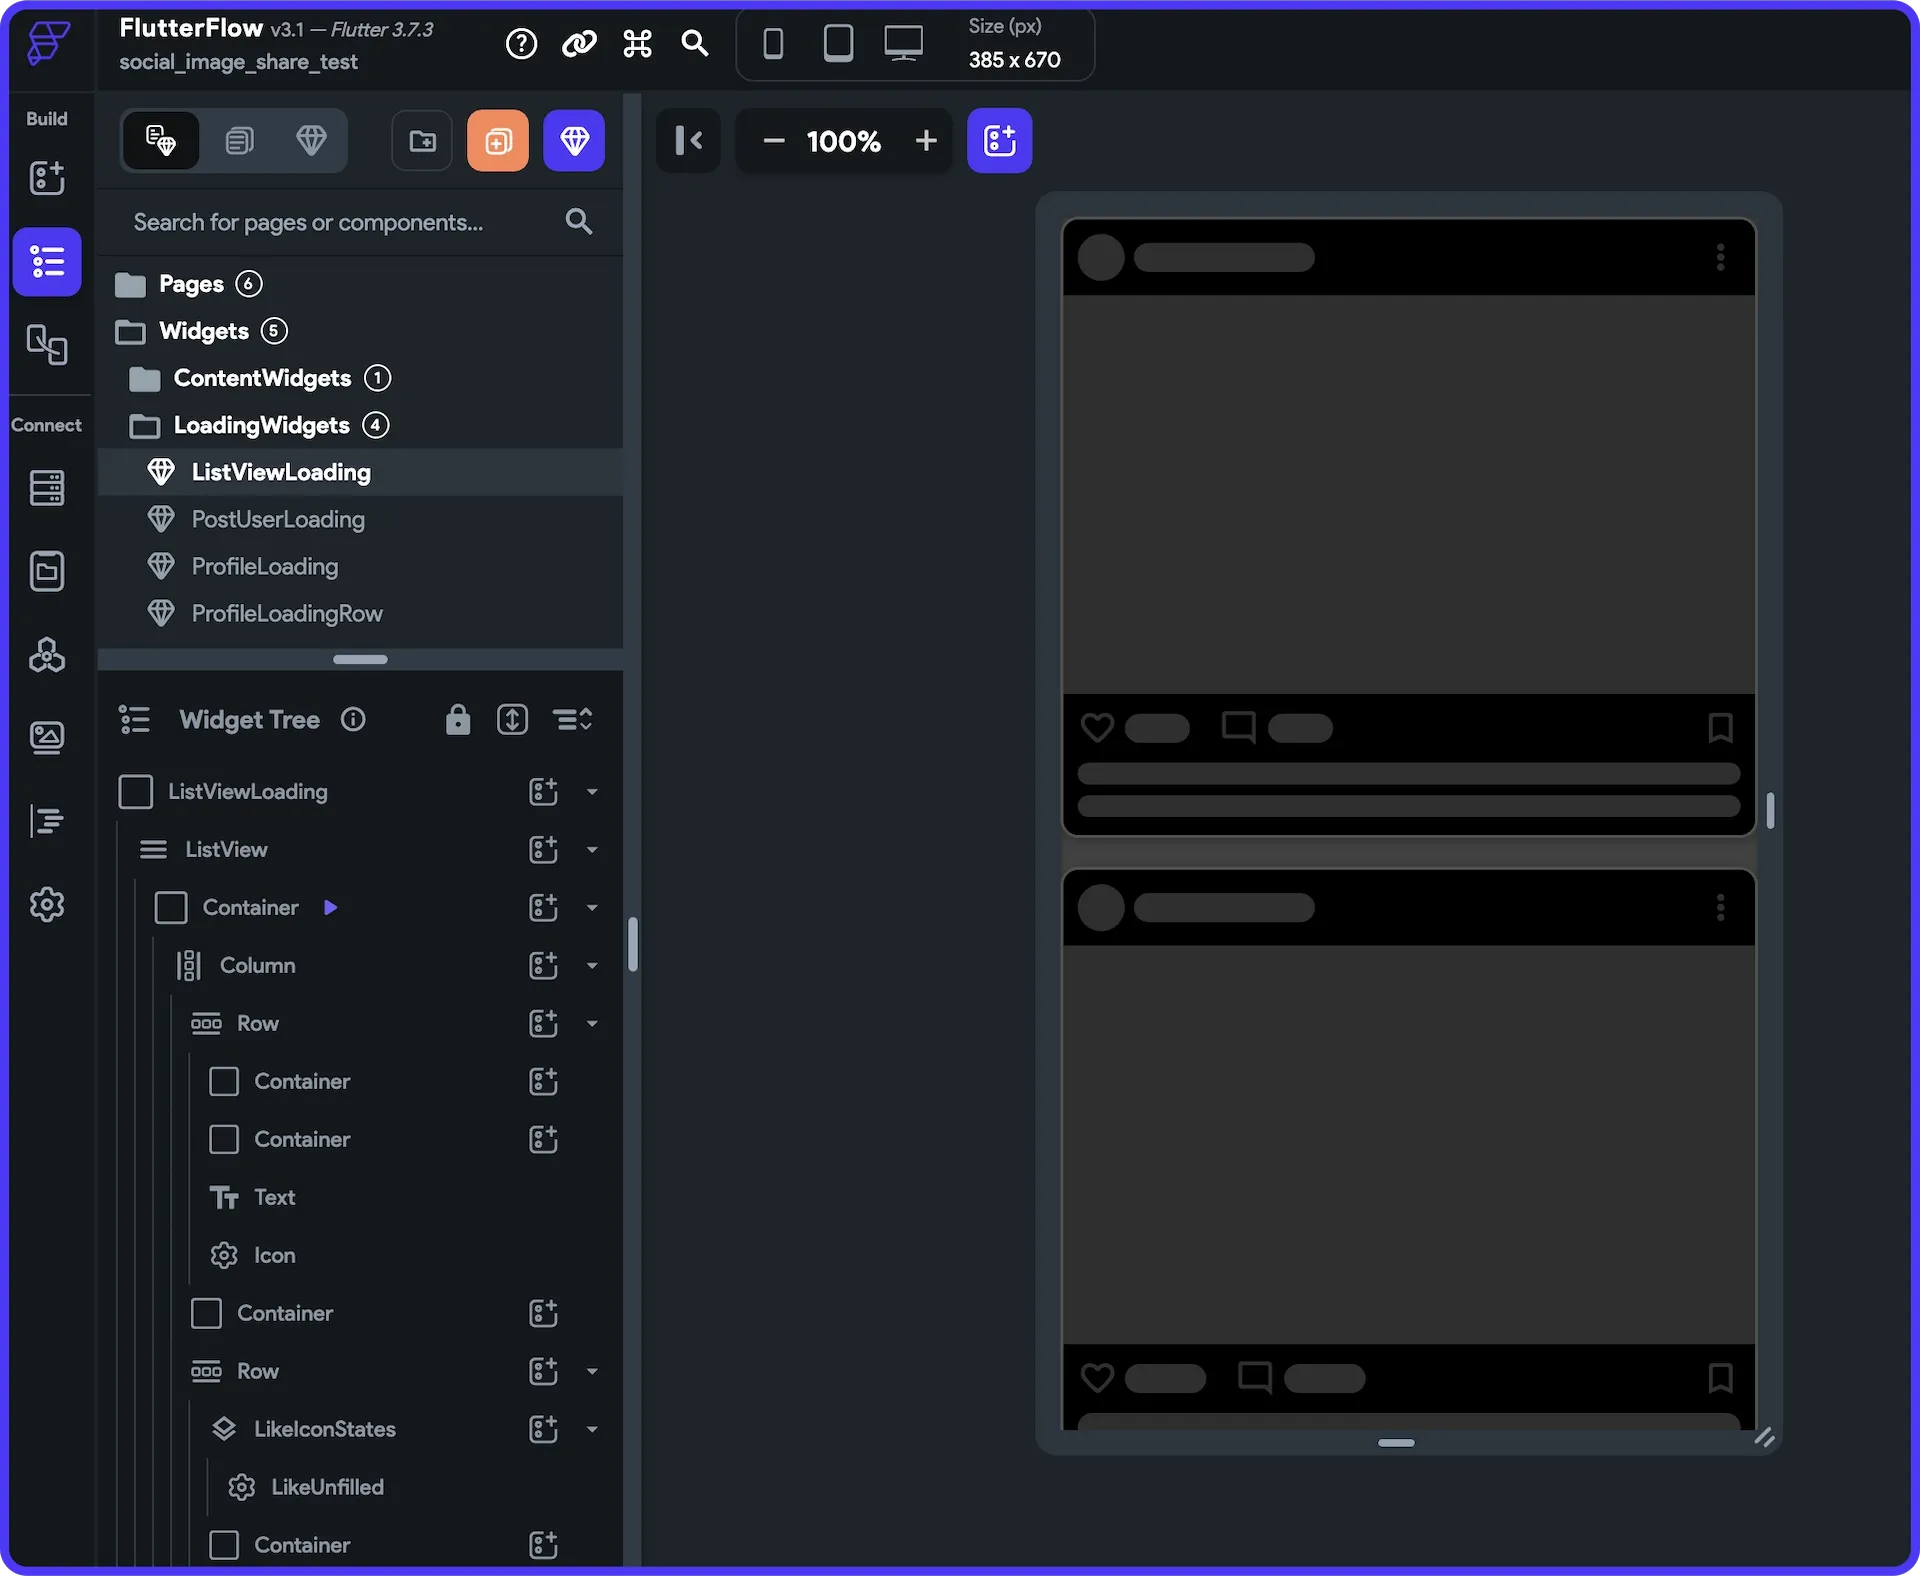
- LoadingWidgets: Widgets used as placeholders during the loading of backend queries, includes ListViewLoading, PostUserLoading, ProfileLoading, and ProfileLoadingRow.
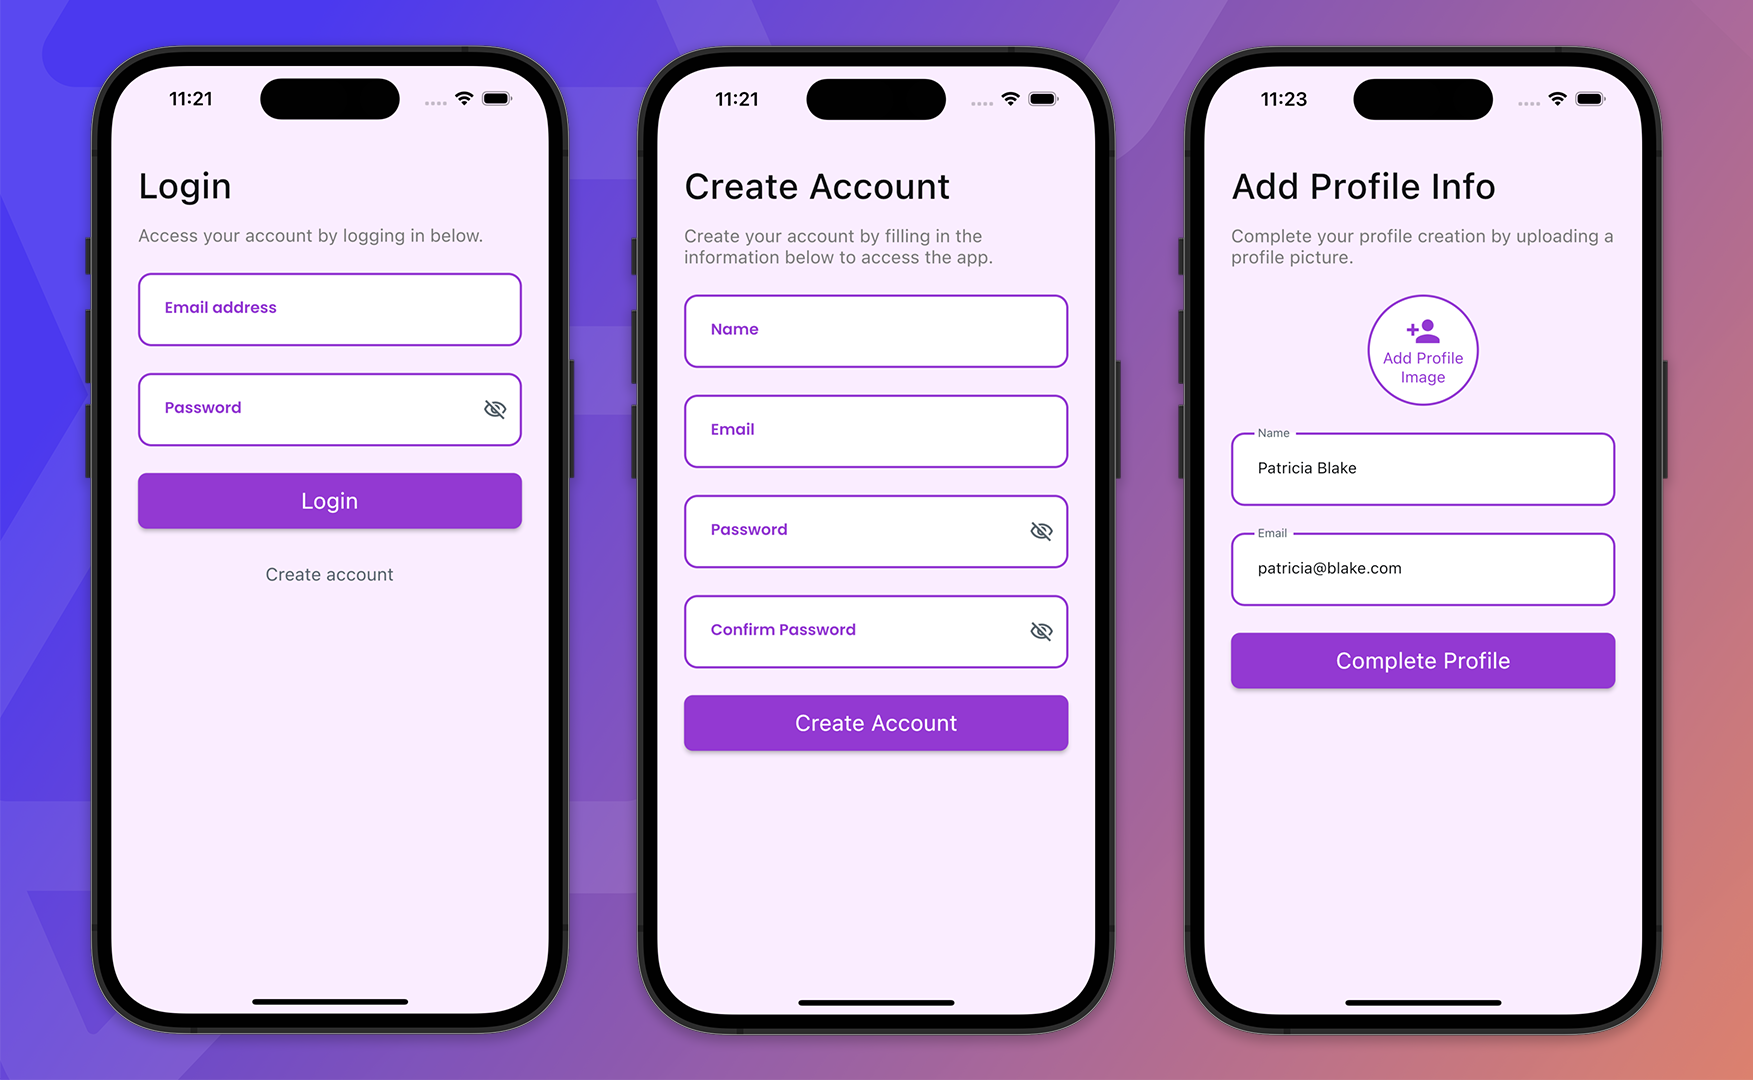
An overview of the AuthPages is as follows:
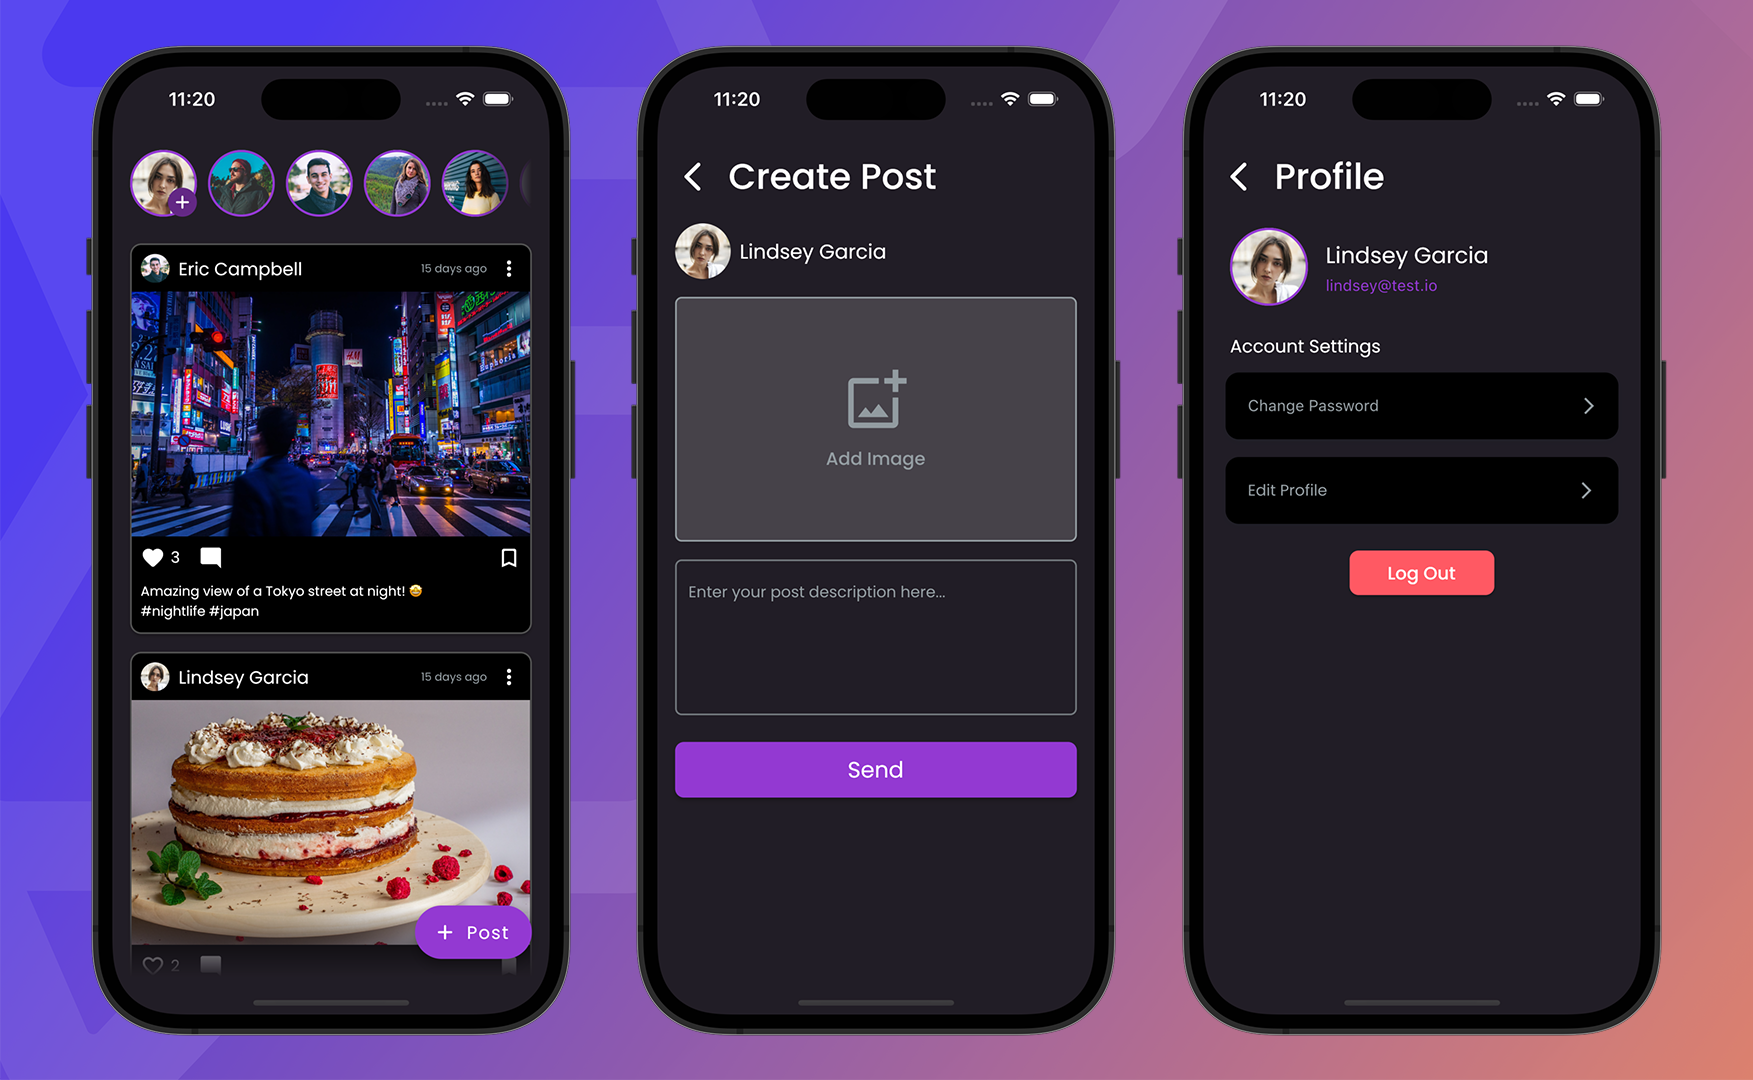
And, the ContentPages consist of these:
For user authentication, it uses Firebase Authentication.
For storing the data, it uses Firestore database having two collections:
users: For storing general user information.posts: For storing the social posts that users share.
For storing the profile photo and post images, it uses Firebase Storage.
What is BlurHash?
BlurHash is a compact representation of a blurred image that can be used as a placeholder while an image is loading in a web or mobile application. It is designed to be very small in size and can be easily transmitted over the network. The concept behind BlurHash is to create a short code that represents the main colors and shapes of an image, rather than transmitting the actual image data.
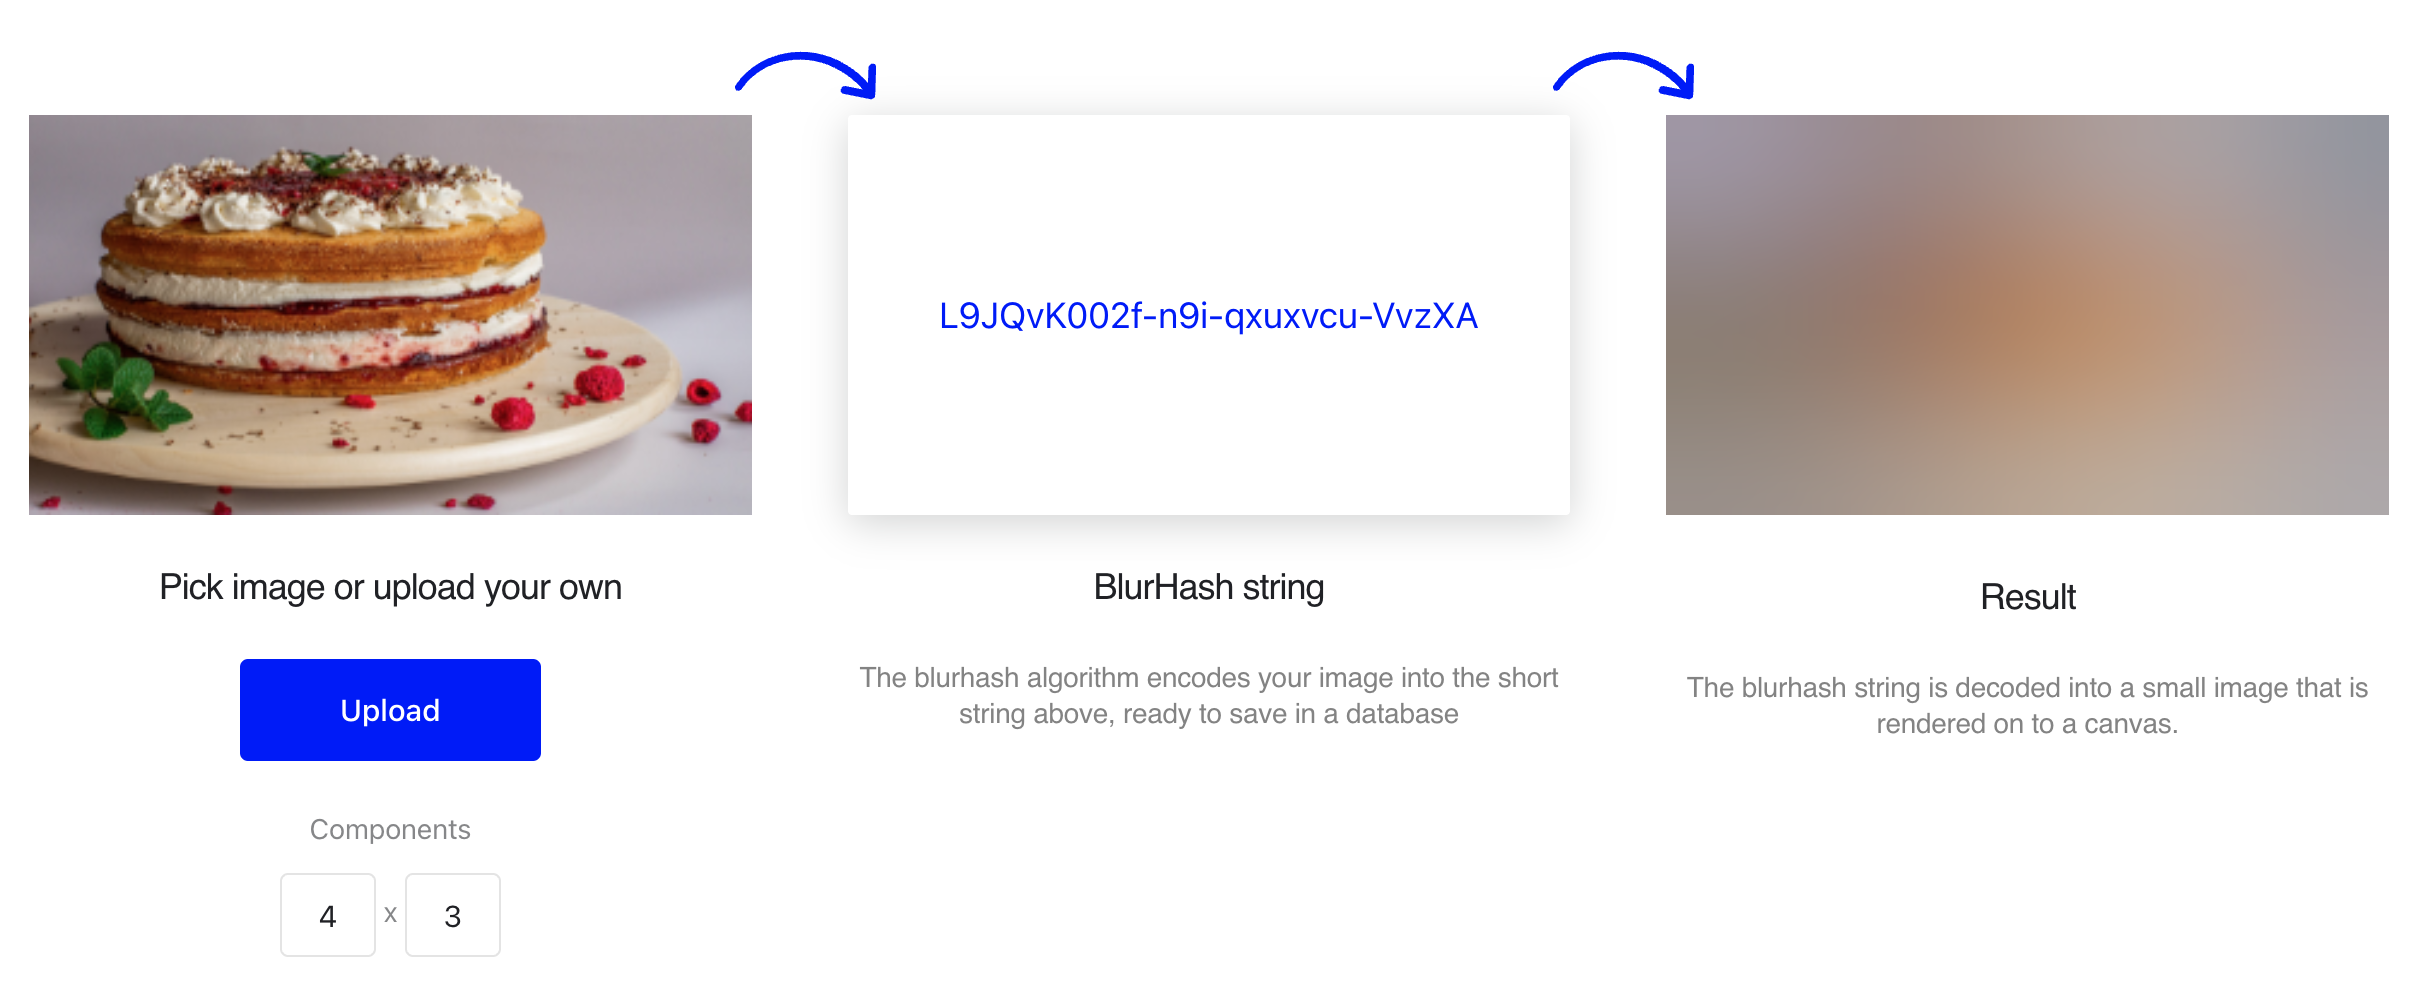
To create a BlurHash, an algorithm takes an image and applies a blur filter to it. The blurred image is then divided into a grid of small squares, and the average color of each square is calculated. The algorithm then combines these colors into a short code of just 20-30 characters. This code can be stored in a database or transmitted over the network to represent the image.
When a web or mobile application needs to display an image, it can use the BlurHash code as a placeholder while the actual image is loading. The code is decoded and used to generate a low-resolution version of the image, which is then gradually replaced by the full-resolution image as it loads. This provides a visual indication to the user that the image is loading, without requiring the application to transmit the full image data.
Now that we have an understanding of how BlurHash works, let's have a look at how you can implement it in Flutter and use inside FlutterFlow.
Custom codes
You will mainly require just two custom codes, one custom action & one custom widget, to implement BlurHash in FlutterFlow:
- Hash Generator (custom action): Takes the image path and generates a BlurHash string.
- Image Hash Preview (custom widget): Loads up a BlurHash string and previews it as an image placeholder.
Hash Generator Action
Let's define a custom action called getImageHash that will just take the image path and return the generated hash as a string. We will use a package called blurhash_dart for encoding the image to a hash.
Create a new custom action:
- Go to the Custom Code page (from the left menu).
- Click "+ Add". Select Action.
- Enter the action name as "getImageHash".
- Define the return value as String (nullable).
- Add an argument as "imagePath" of type ImagePath.
- Add the following Pubspec Dependencies:
http: ^0.13.5(latest version here)image: ^4.0.15(latest version here)blurhash_dart: ^1.2.1(latest version here)
- Generate the boilerplate code and update it with the following:
import 'package:image/image.dart' as img;
import 'package:http/http.dart' as http;
import 'package:blurhash_dart/blurhash_dart.dart';

Future<String?> getImageHash(String imagePath) async {
  http.Response response = await http.get(Uri.parse(imagePath));
  final rawImage = response.bodyBytes;
  final image = img.decodeImage(rawImage);

  if (image != null) {
    final blurHash = BlurHash.encode(image, numCompX: 4, numCompY: 3);
    return blurHash.hash;
  }
  return null;
}
- Click on Save and then click Compile Code. Wait for the compilation to complete. Make sure there are no errors after the compilation is done.
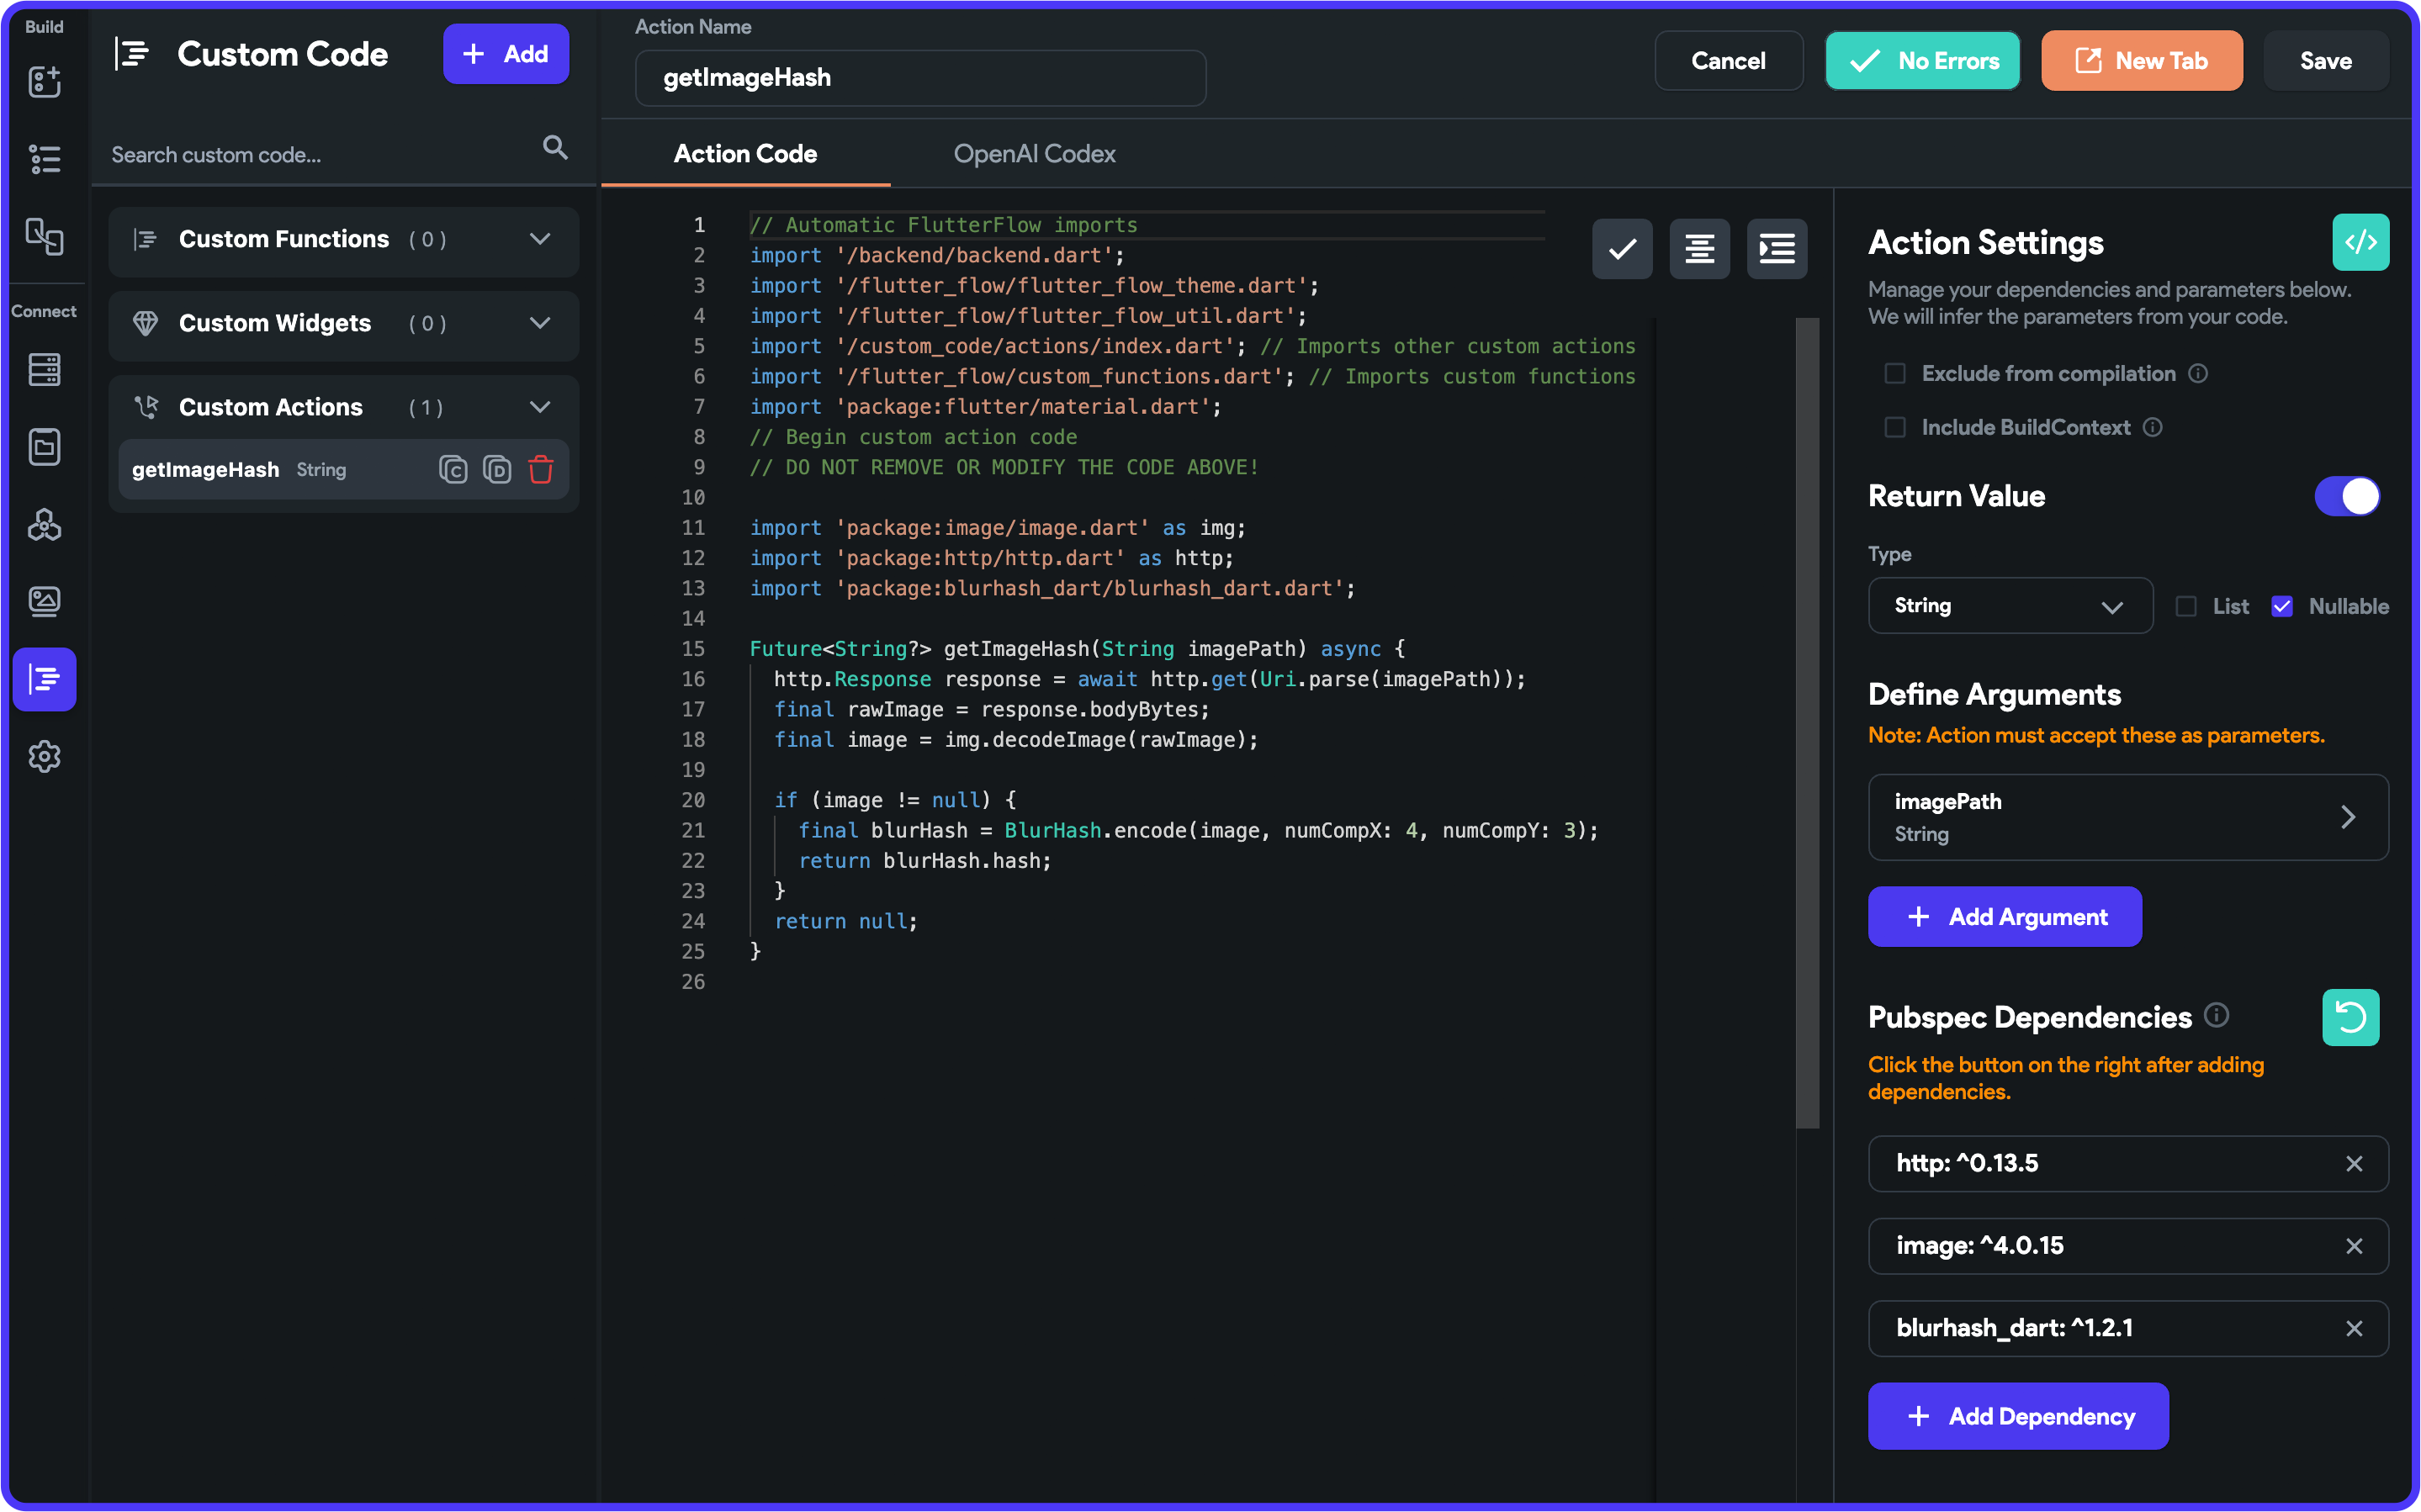
Image Hash Preview Widget
For previewing the BlurHash as a placeholder image, you can use the flutter_blurhash package. We will build a custom widget that will take the image path and the BlurHash as two parameters, it will display the blurred image as a placeholder and will animate to the actual image once it's loaded.
Follow the steps below to build a custom widget:
- Go to the Custom Code page (from the left menu).
- Click "+ Add". Select Widget.
- Enter the widget name as "ImageHashPreview".
- Define the following parameters:
imagePathof type ImagePath.imageHashof type String.
- Add this as a Pubspec Dependency:
flutter _blurhash: ^0.7.0(latest version here)
- Generate the boilerplate code and update it with the following:
import 'package:flutter_blurhash/flutter_blurhash.dart';

class ImageHashPreview extends StatefulWidget {
  const ImageHashPreview({
    Key? key,
    this.width,
    this.height,
    required this.imagePath,
    required this.imageHash,
  }) : super(key: key);

  final double? width;
  final double? height;
  final String imagePath;
  final String imageHash;

  @override
  _ImageHashPreviewState createState() => _ImageHashPreviewState();
}

class _ImageHashPreviewState extends State<ImageHashPreview> {
  @override
  Widget build(BuildContext context) {
    return BlurHash(
      color: Colors.transparent,
      hash: widget.imageHash,
      image: widget.imagePath,
      imageFit: BoxFit.cover,
    );
  }
}
- Click on Save and then click Compile Code. Wait for the compilation to complete. Make sure there are no errors after the compilation is done.
- You can also preview the widget by providing the required values.

The BlurHash widget from the package doesn't have caching built-in, so if you also want to use caching along with the blurred image as the placeholder, follow these steps:
- Remove the
flutter_blurhashdependency and add these two:octo_image: ^1.0.2(latest version here)cached_network_image: ^3.2.3(latest version here)
- Update the code to the following:
import 'package:cached_network_image/cached_network_image.dart';
import 'package:octo_image/octo_image.dart';

class ImageHashPreview extends StatefulWidget {
  const ImageHashPreview({
    Key? key,
    this.width,
    this.height,
    required this.imagePath,
    required this.imageHash,
  }) : super(key: key);

  final double? width;
  final double? height;
  final String imagePath;
  final String imageHash;

  @override
  _ImageHashPreviewState createState() => _ImageHashPreviewState();
}

class _ImageHashPreviewState extends State<ImageHashPreview> {
  @override
  Widget build(BuildContext context) {
    return OctoImage(
      width: widget.width,
      height: widget.height,
      image: CachedNetworkImageProvider(widget.imagePath),
      placeholderBuilder: OctoPlaceholder.blurHash(widget.imageHash),
      fit: BoxFit.cover,
    );
  }
}
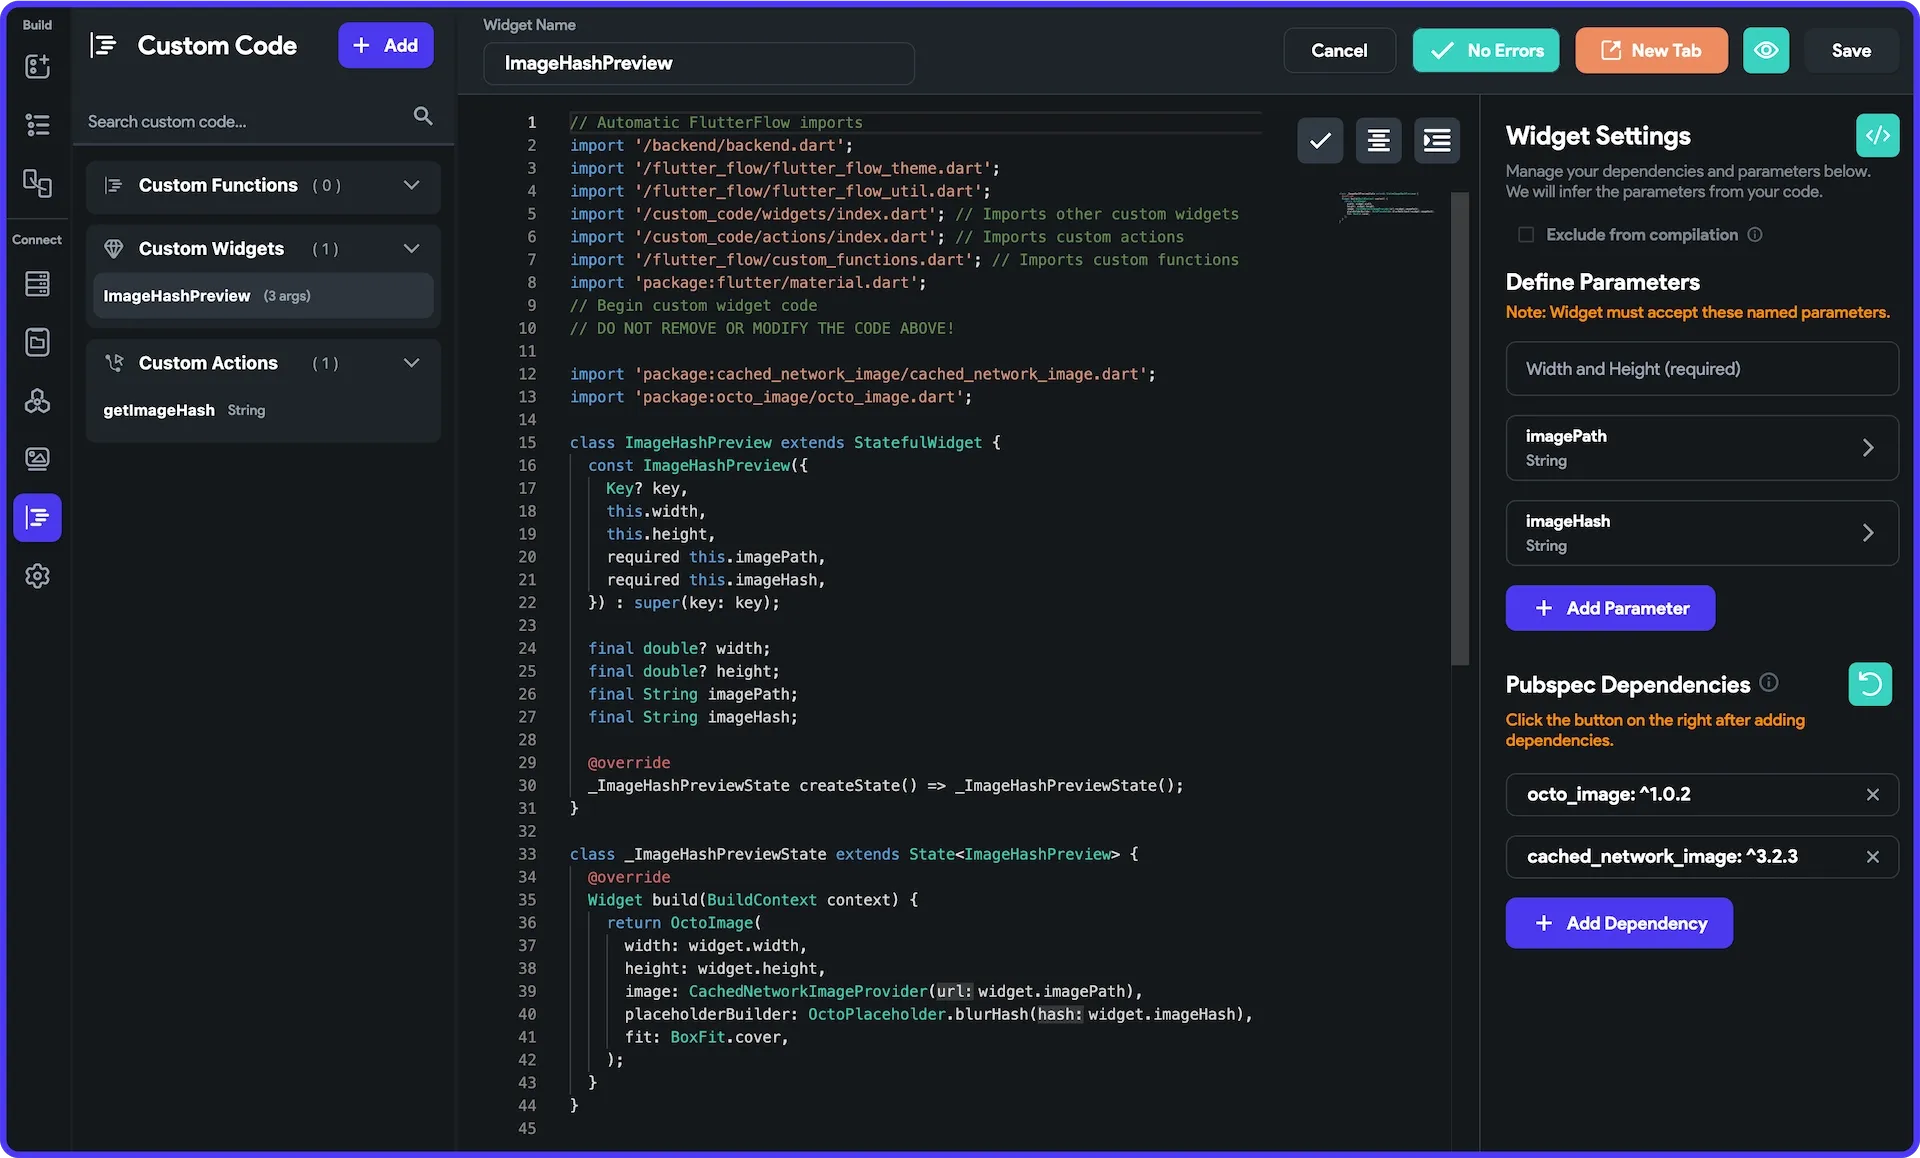
Did you know image caching in FlutterFlow has a built-in cache manager? It takes care of how long the cached images should exist, how many images to cache, and also decides when to re-download the image instead of using the cached one.
Great! 🎉 Now we have the custom codes required for implementing the BlurHash functionality. Next, we'll look into how you can combine these puzzle pieces and complete the implementation.
Implementing in app
Firstly, you will need to make some modifications to the Firestore collection structure so that it's easier to store the image paths and the generated hashes.
The best way for structuring will be creating a new Data Type for Firestore:
- Go to the Firestore tab from the left menu.
- Select the Data Types tab.
- Click "+ Create Data Type". Enter the name as "image".
- Add the following fields:
pathof Type Image Pathhashof Type String
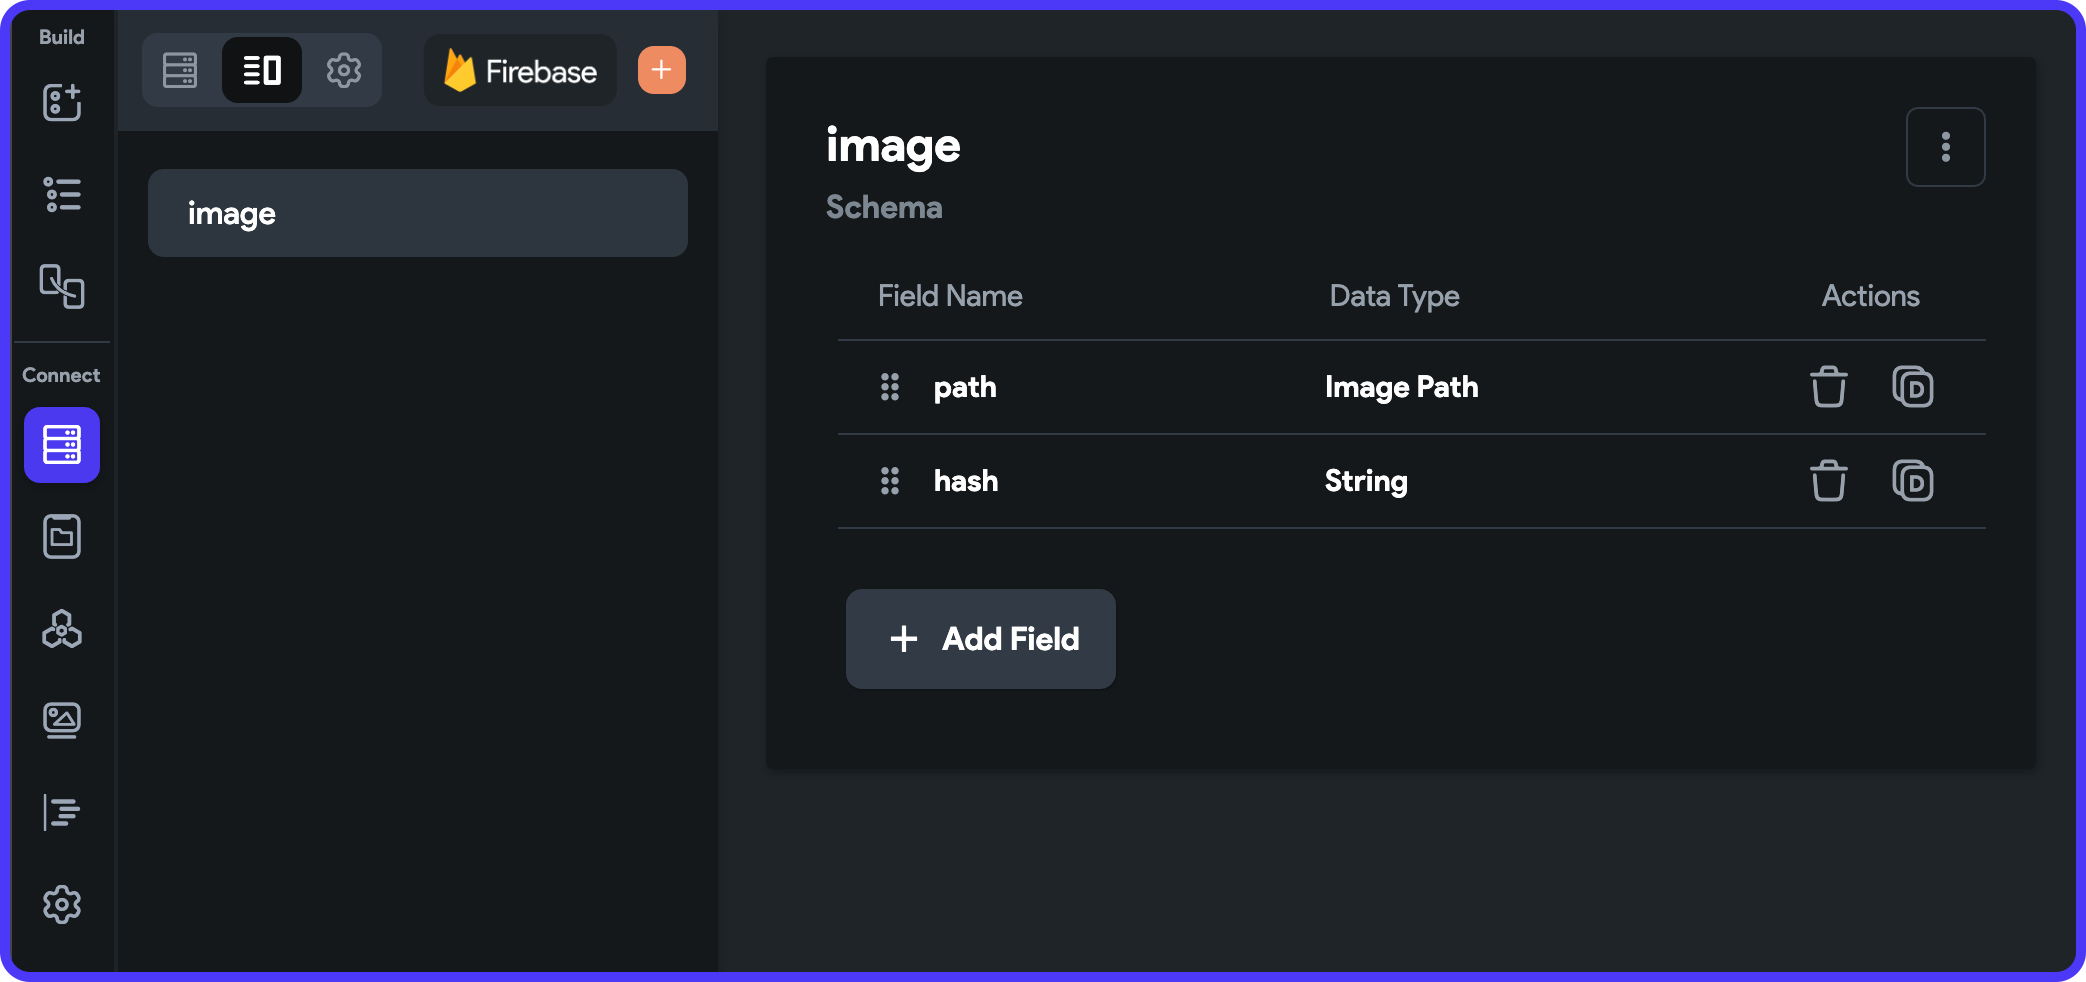
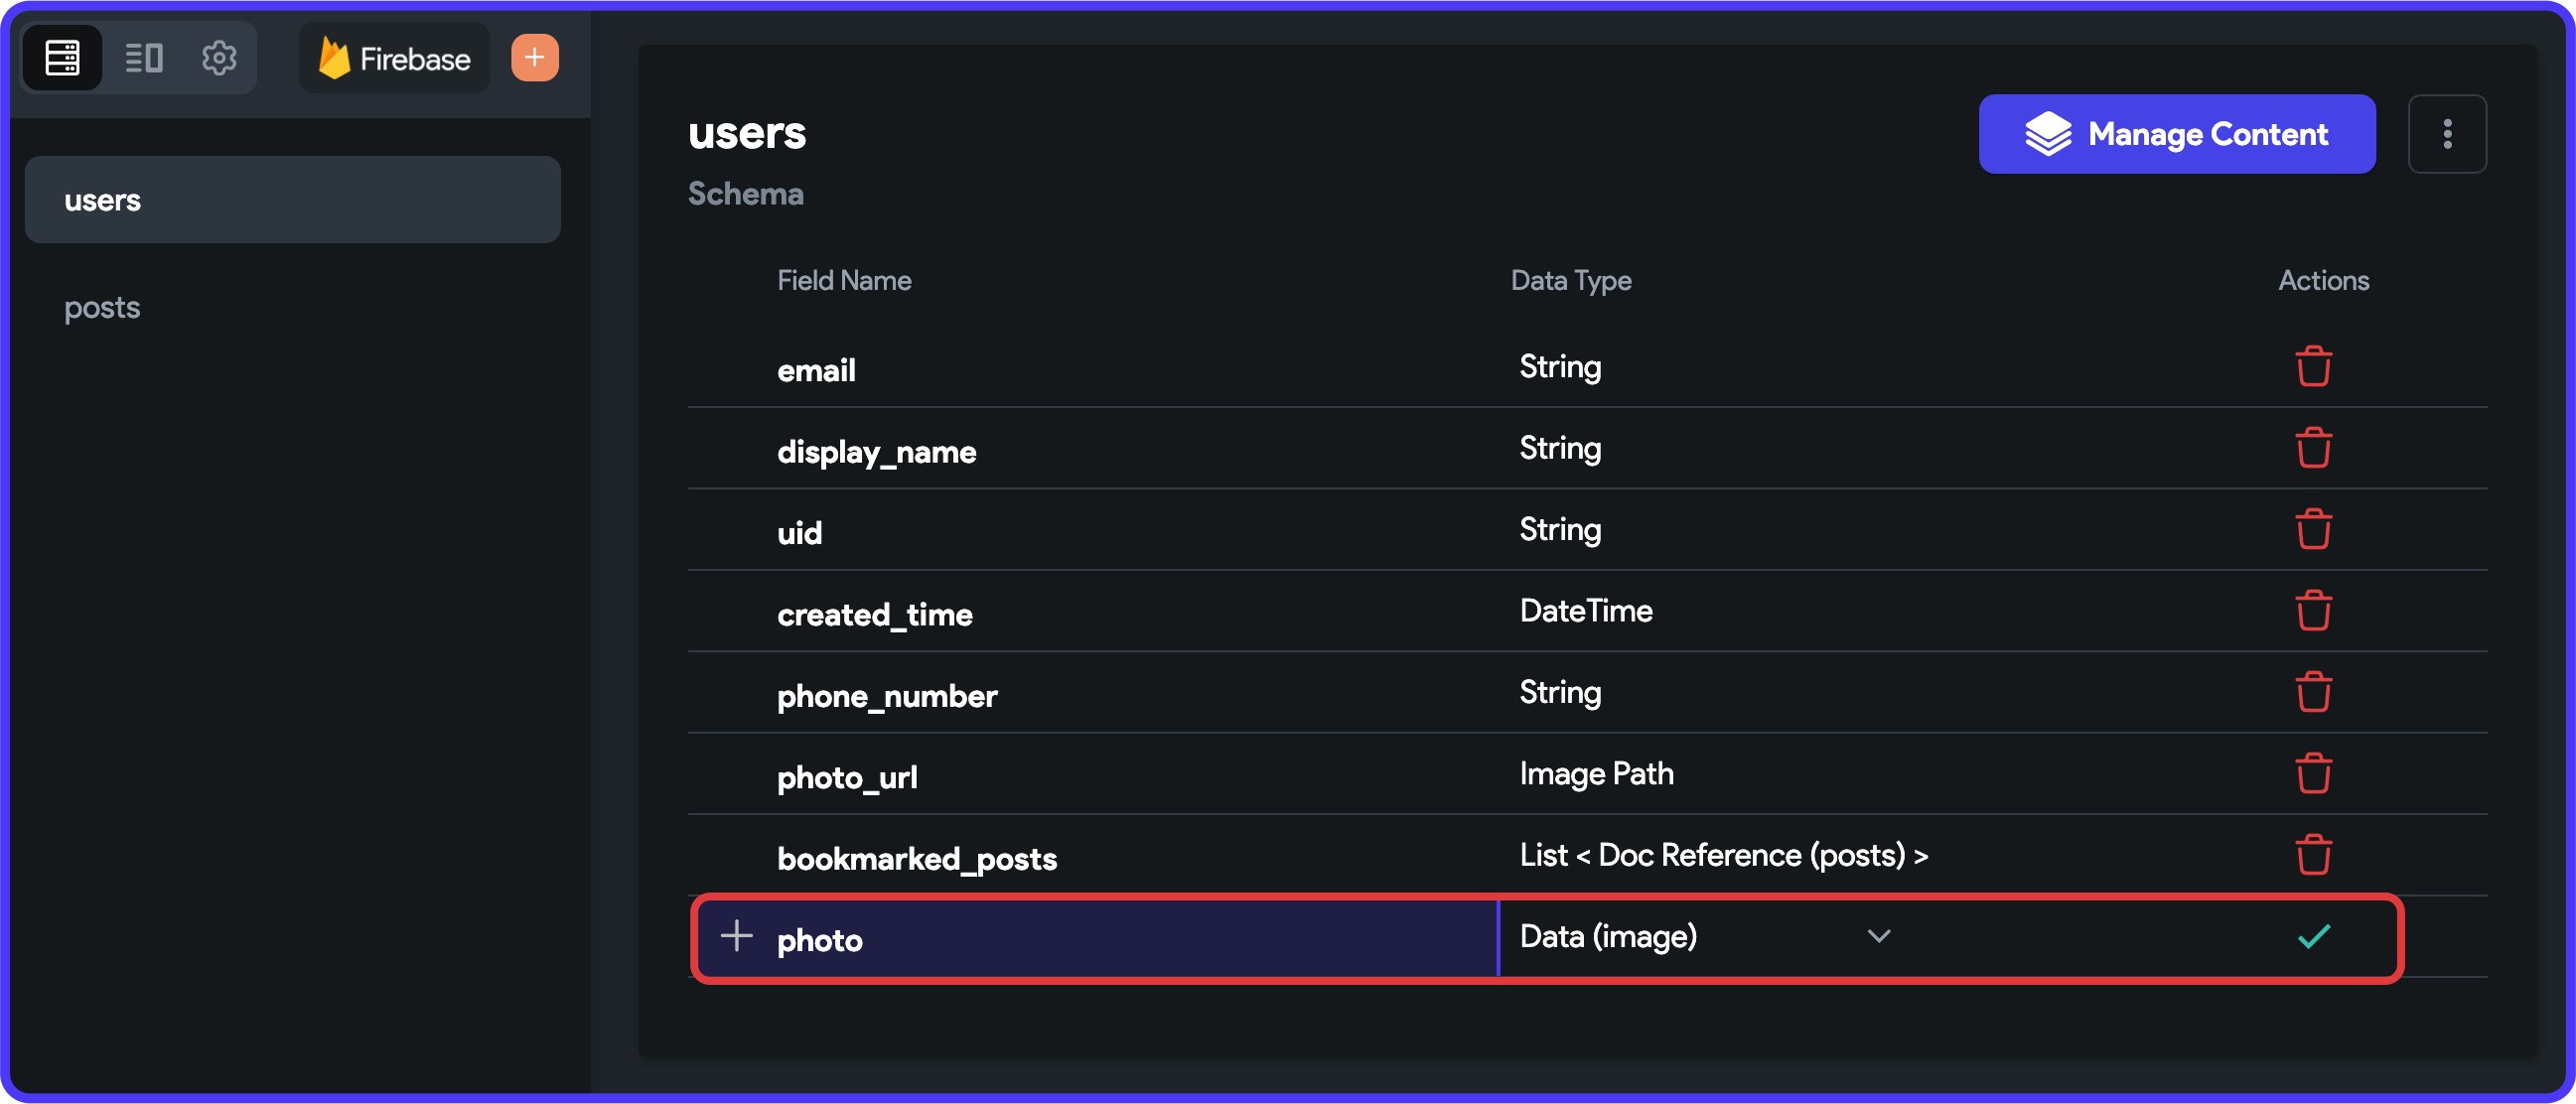
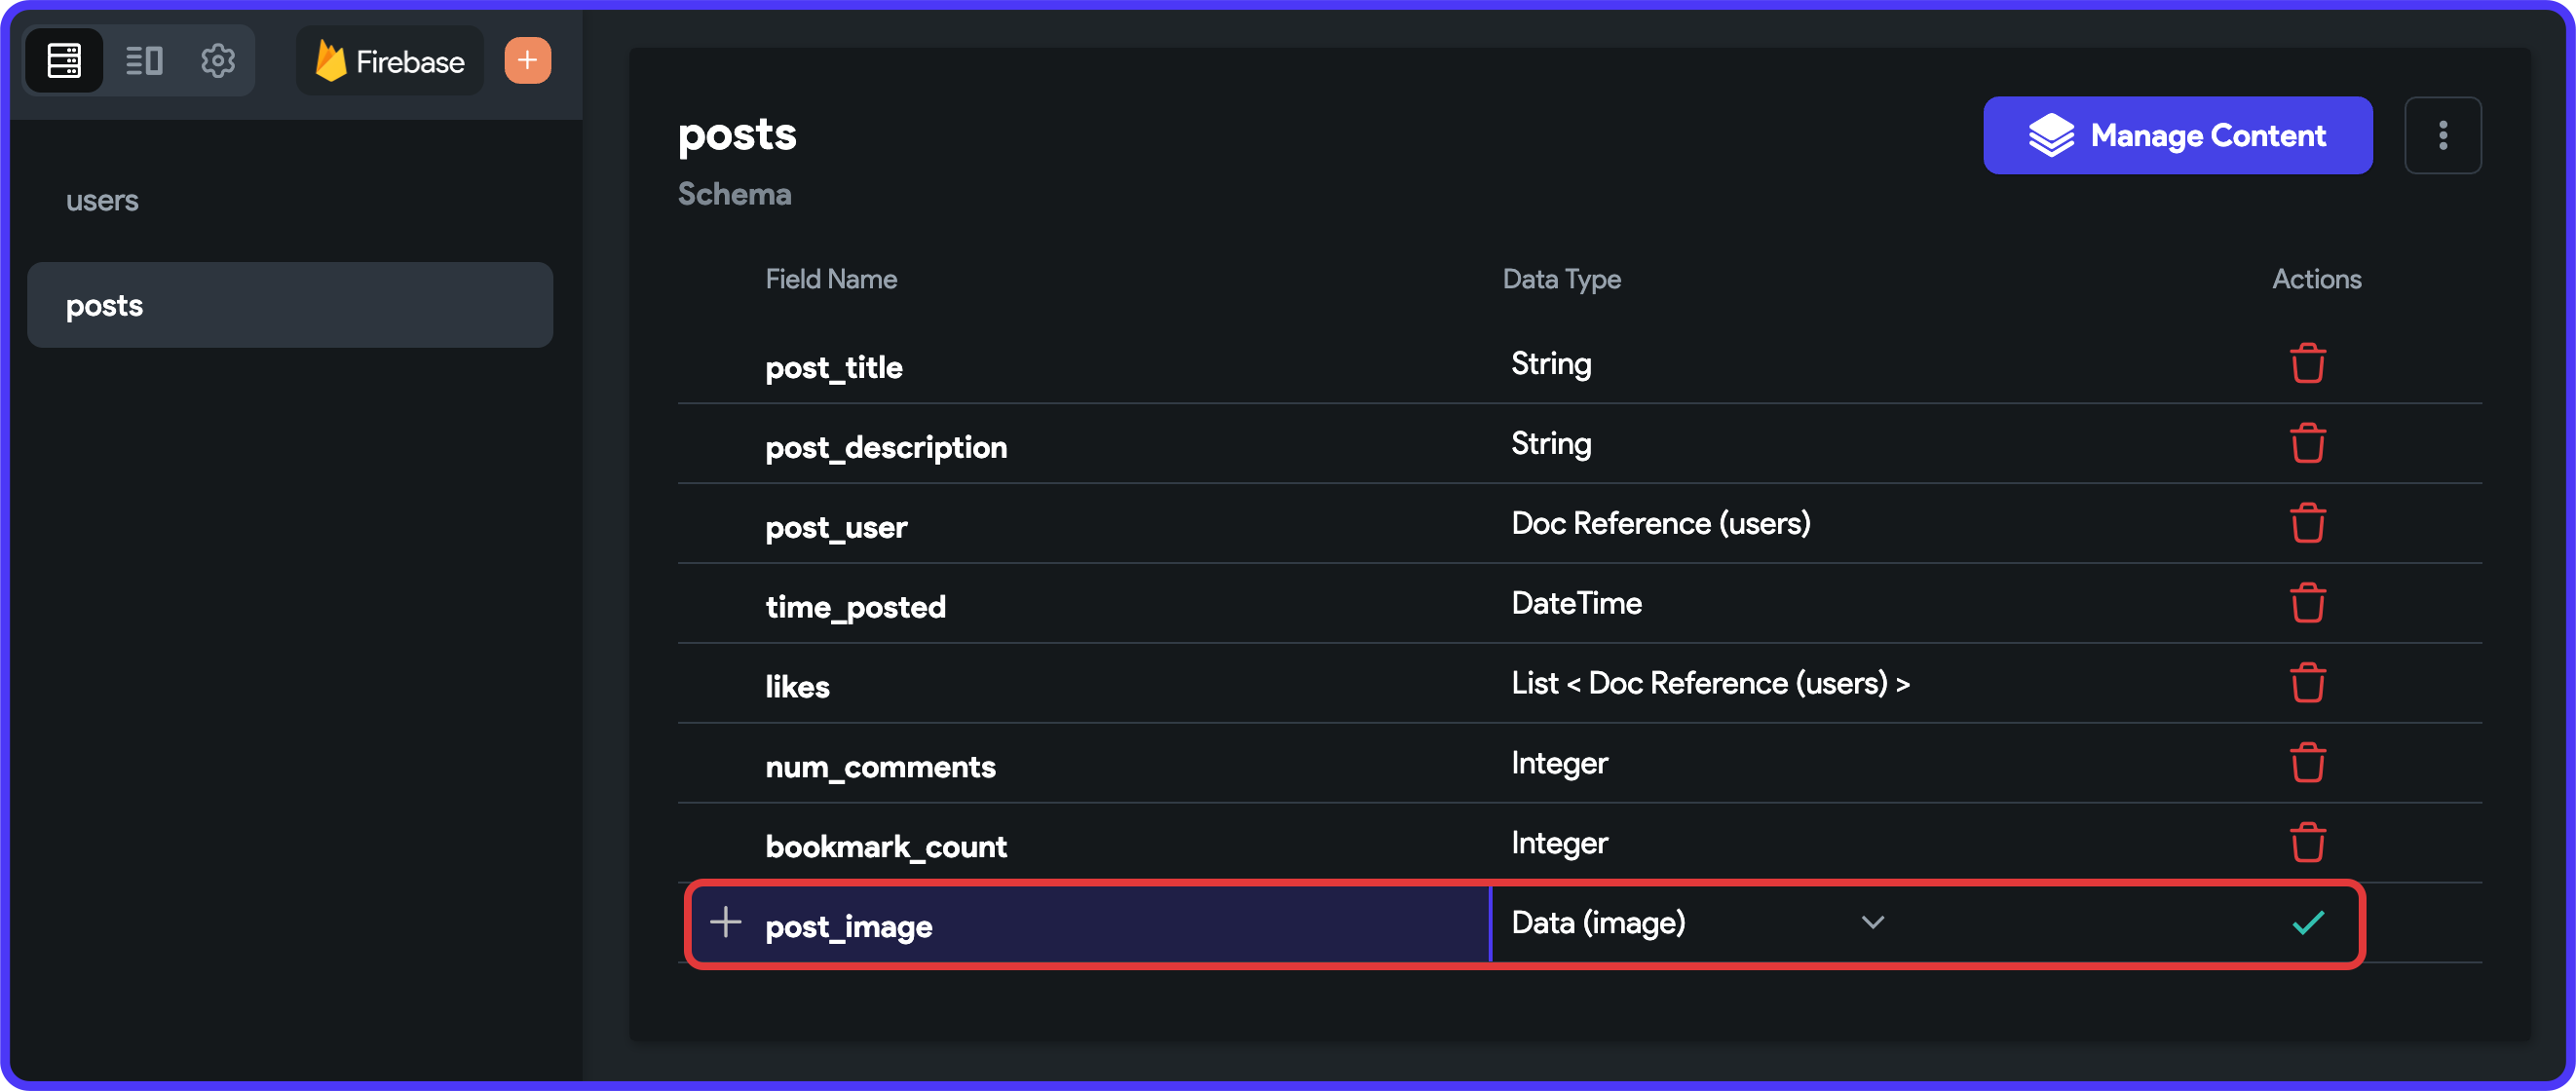
- Now, you can use this new data type while defining fields inside a Firestore collection. Create a new field inside the users collection with name "photo" and Data Type > Image.
- Go to the posts collection and delete the existing post_image field. Create a field with the same name but having Data Type > Image.
Cool, now we have the proper Firestore collection structure for storing images along with their BlurHash.
Update profile photo upload
When anyone uploads a profile photo, it should also generate the BlurHash and store it in Firestore. Our modifications to the Firestore collection will now come in handy for saving the photo and the hash together.
Follow these steps:
- Go to the AddProfileInfo page.
- Select the Complete Profile button.
- From the Properties Panel (right), go to the Actions tab.
- Open the Action Flow Editor.
- If using the starter app, remove all the existing actions except for the navigate action.
- Add an action as Custom Actions > getImageHash.
- Select the
imagePathfrom a variable, Widget State > Uploaded File URL. - Enter the name of the output variable as "imageHash".
- Select the
- Move the Custom Action to the top.
- Then add another action right after this as Firestore > Update Document.
- Select the reference from Authenticated User > User Reference.
- Click Confirm.
- Add the photo field.
- Choose the Update Type as Set Individual Fields.
- Set
pathfield from Widget State > Uploaded File URL. - Set
hashfield from Action Outputs > imageHash. - Click Done.
- We have added the required actions successfully. Click Close to dismiss the dialog.
Update post image upload
You can update the post image upload actions, similar to how we updated for profile photo upload:
- Go to the AddPostPage.
- Select the Send button.
- From the Properties Panel, go to Actions > Action Flow Editor.
- Add the Custom Action > getImageHash. Move it to the top.
- Modify the Update Firestore action to store the
post_imagefield.
Utilize BlurHash widget
To display the images along with their BlurHash placeholder, we'll use the ImageHashPreview widget that we built earlier. There are two places where we need to use this widget, for displaying the user profile photos and for the post images.
Let's start by updating the preview of post images:
- Go to the HomePage.
- Select the Image widget inside the first post, and delete it.
- Select the UI Builder (from the left menu), go to the Components tab.
- Drag and drop the ImageHashPreview custom widget in the appropriate place inside the canvas.
- From the Properties Panel, set the width to infinity and the height to 220 pixels.
- Set the
imagePathfrom posts Document > post_image > path. - Set the
imageHashfrom posts Document > post_image > hash.
To update the profile photos to use the custom widget, follow the steps below:
- Go to the ProfileAvatar component.
- First, add a new Component Parameter,
photoHashof type String. - Now, select ProfileImage (Container) and remove the background image.
- Add another Container inside ProfileImage.
- Make it circular and set its diameter from the component
sizevariable. - Remove the Fill Color of the container.
- Enable the Clip Content toggle.
- Make it circular and set its diameter from the component
- Add the ImageHashPreview widget inside this container as its child.
- Set its width and height to infinity.
- Set the
imagePathfrom photoPath variable. - Set the
imageHashfrom photoHash variable.
- Go back to the HomePage and update the
photoPathand thephotoHashfrom the correct variables (have a look at the following video to get a better understanding).
Congratulations 🥳, you have completed the BlurHash implementation inside FlutterFlow!!!
App in action
You can try out the app by running it either using the Test/Run mode of FlutterFlow or by downloading the project and running it from your system.
The following video demonstrates the app with BlurHash implementation running on an iOS Simulator.
Tips & Tricks
Our focus of this article was just improving the image loading experience for the users. But let's look at another technique you can implement while fetching data from a backend server inside FlutterFlow.
Use skeleton loading components. The starter app already consists of these components, you will find them inside the LoadingWidgets folder.
Here are some guiding steps for building and using a loading component while doing backend queries inside FlutterFlow:
- Create a Custom Component inside your FlutterFlow project.
- Copy and paste the main widget inside this component for which you want to build the skeleton (this is the fastest way to build a skeleton screen and also helps to keep all the dimensions intact).
- Remove all the data from the skeleton loading component and replace with Container(s) having similar dimensions.
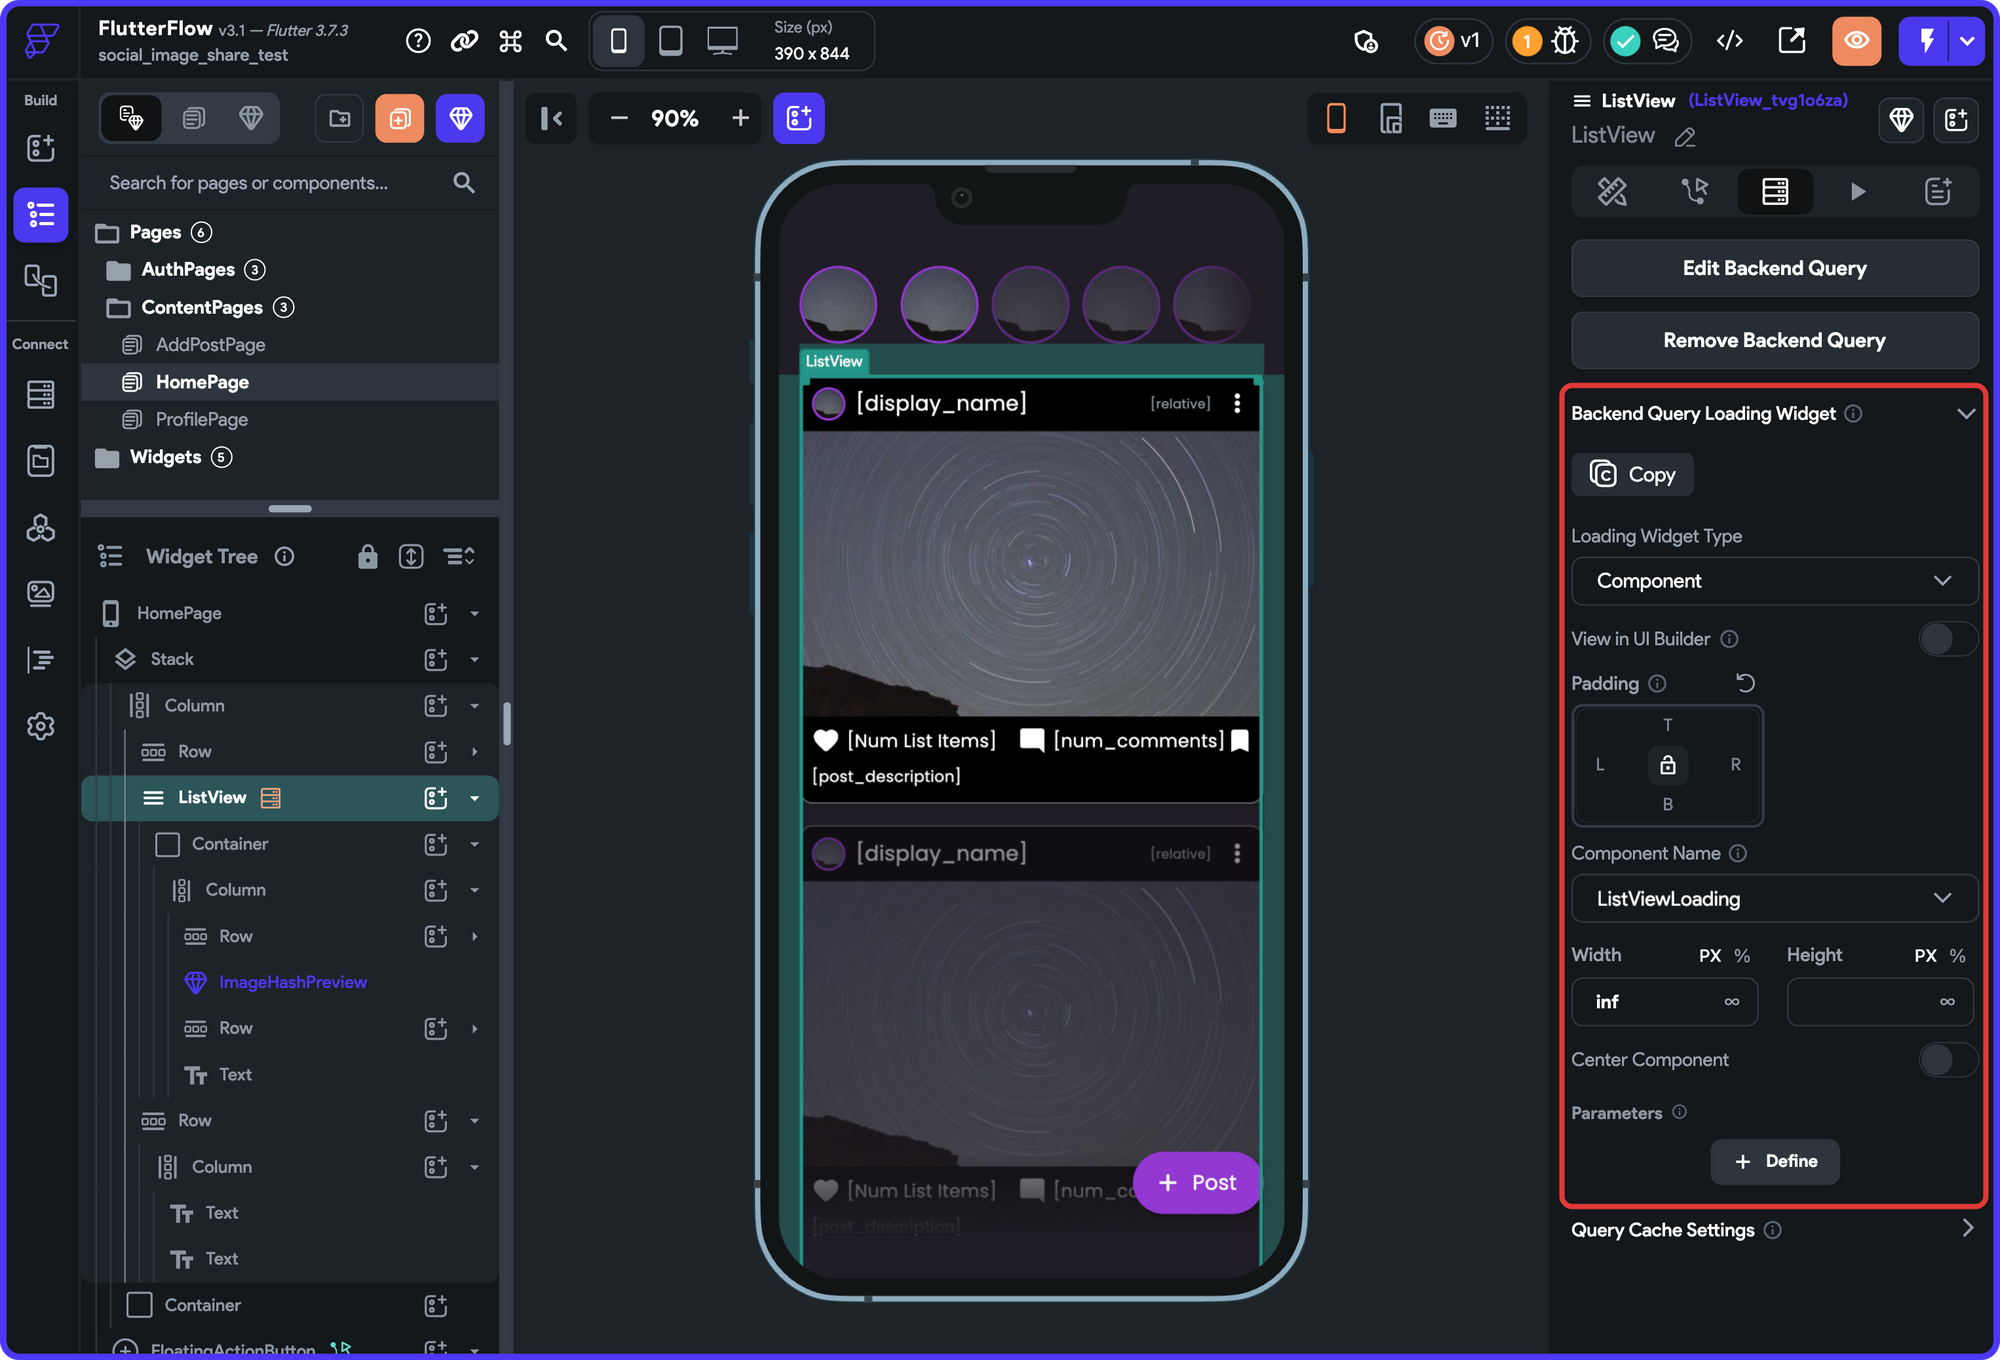
For example, this is how the skeleton loading component looks for the ListView displaying all the user posts:
You can also add a subtle Fade (Ease In Out) animation on page load, and make it loop, for a nice loading effect.
Now, go to the Backend Query of the widget on the main page, and set the component as the Backend Query Loading Widget.
Loading skeleton along with BlurHash creates a nice progressive loading experience for the users instead of a screen filled with empty widgets and circular progress indicators.
Conclusion
There are many tools incorporated inside FlutterFlow to help you achieve a robust user experience in your app (some of them include query loading widget, query caching, image caching, image resize, etc.). Hope this blog helps you to utilize some of these hidden gems to improve the user experience in your app.
Find the clonable version of the completed app here.
