
RevenueCat makes managing in-app purchases and subscriptions a lot simpler by providing a wrapper around Apple's StoreKit and Google Play Billing services. They also offer a robust and scalable backend infrastructure for in-app payments along with built-in purchase validation logic.
In this article, you will learn to configure in-app subscriptions in your FlutterFlow app with the help of RevenueCat integration.
Getting Started
As this article focuses on integrating subscriptions, we won't be designing the primary app interface from scratch. To help you follow along, we have created a starter project that you can clone from here.
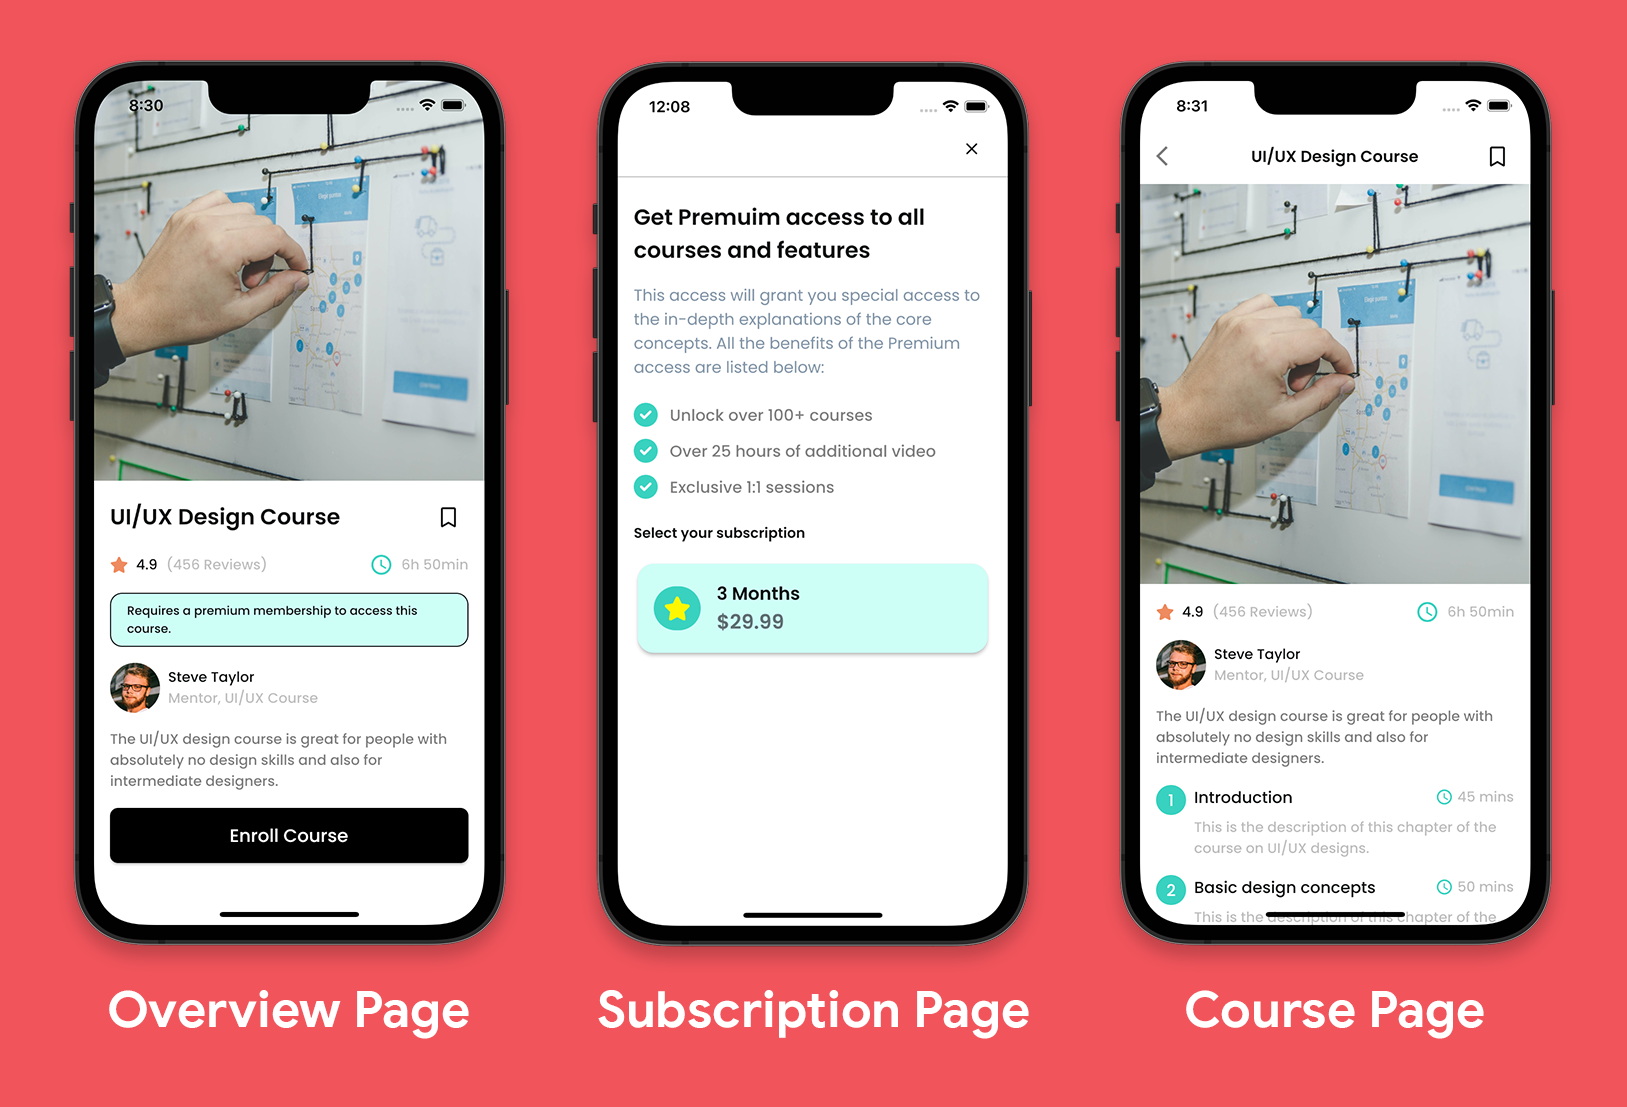
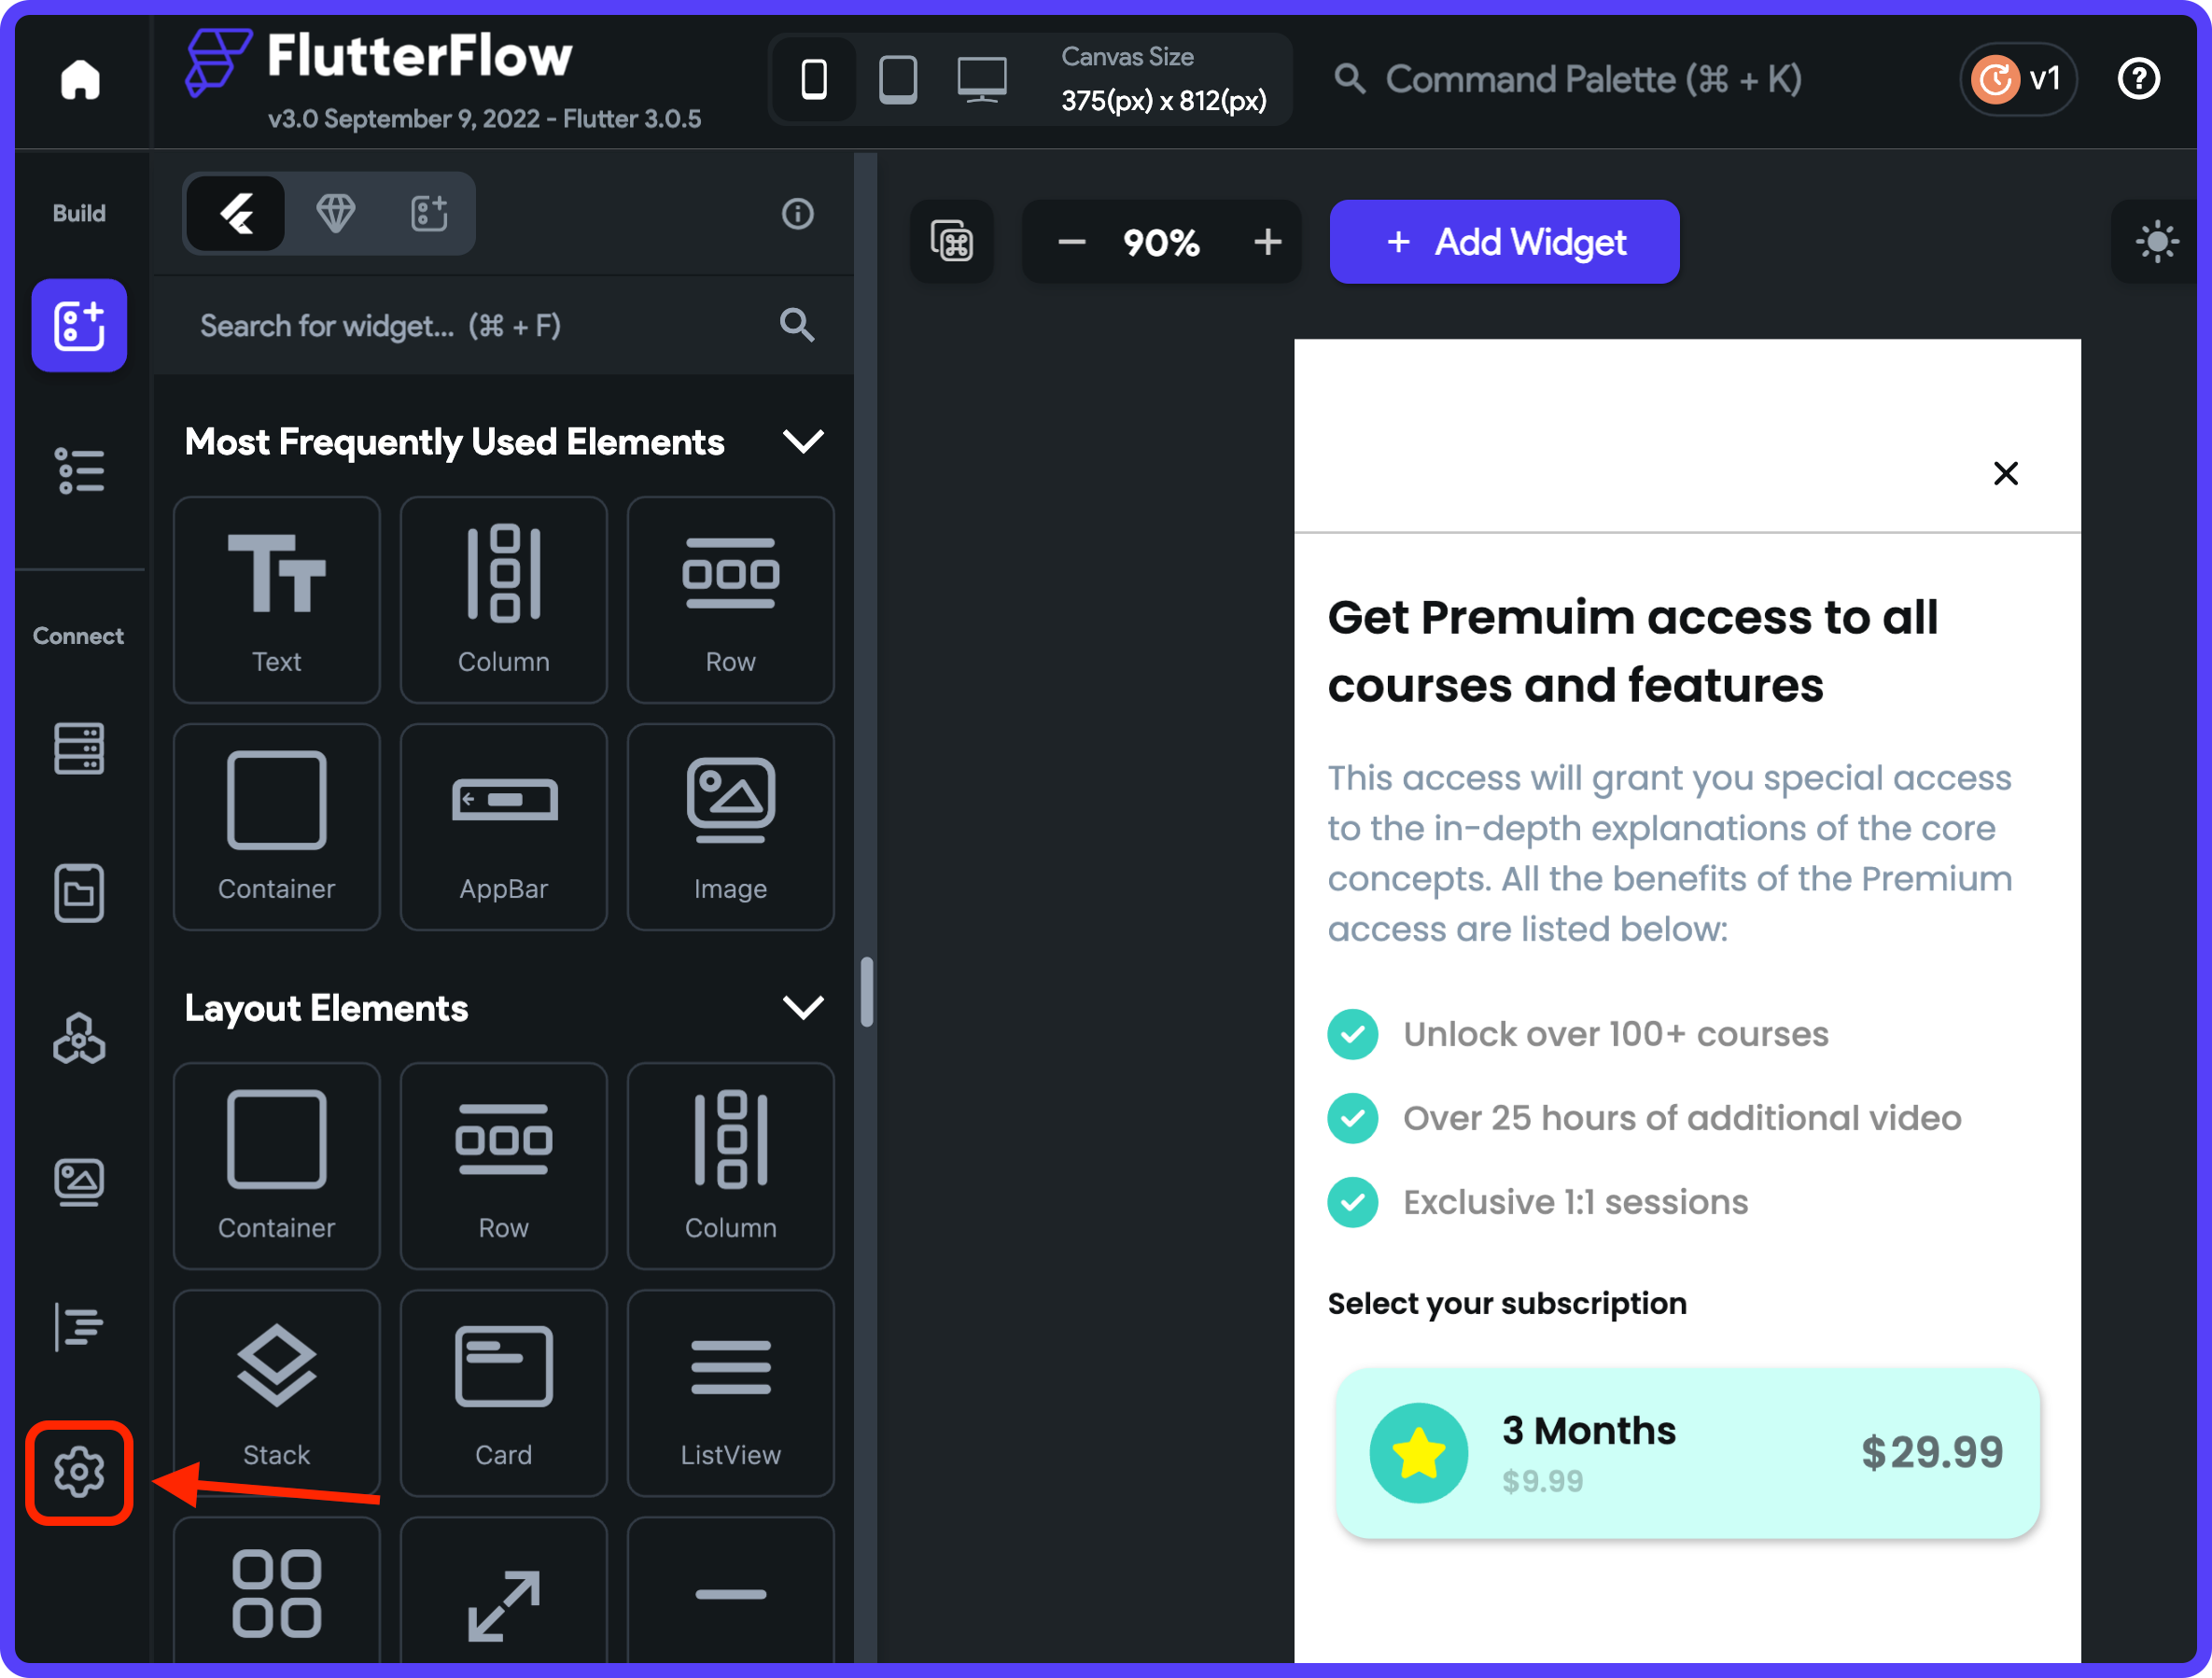
The starter project is a part of an education app where users can get access to a bunch of courses and features by subscribing to the Premium membership. It mainly consists of three screens:
- Overview Page: Shows the details of a course that the user can get access to by purchasing the Premium subscription.
- Subscription Page: Lists all the different Premium subscription plans (3 months, 6 months, and 12 months).
- Course Page: This page can only be accessed by users who have already purchased a Premium subscription.
To integrate in-app purchases in your app, first, you need to deploy it to Google Play Store and Apple App Store (or, you can release your app on a single platform if you want).
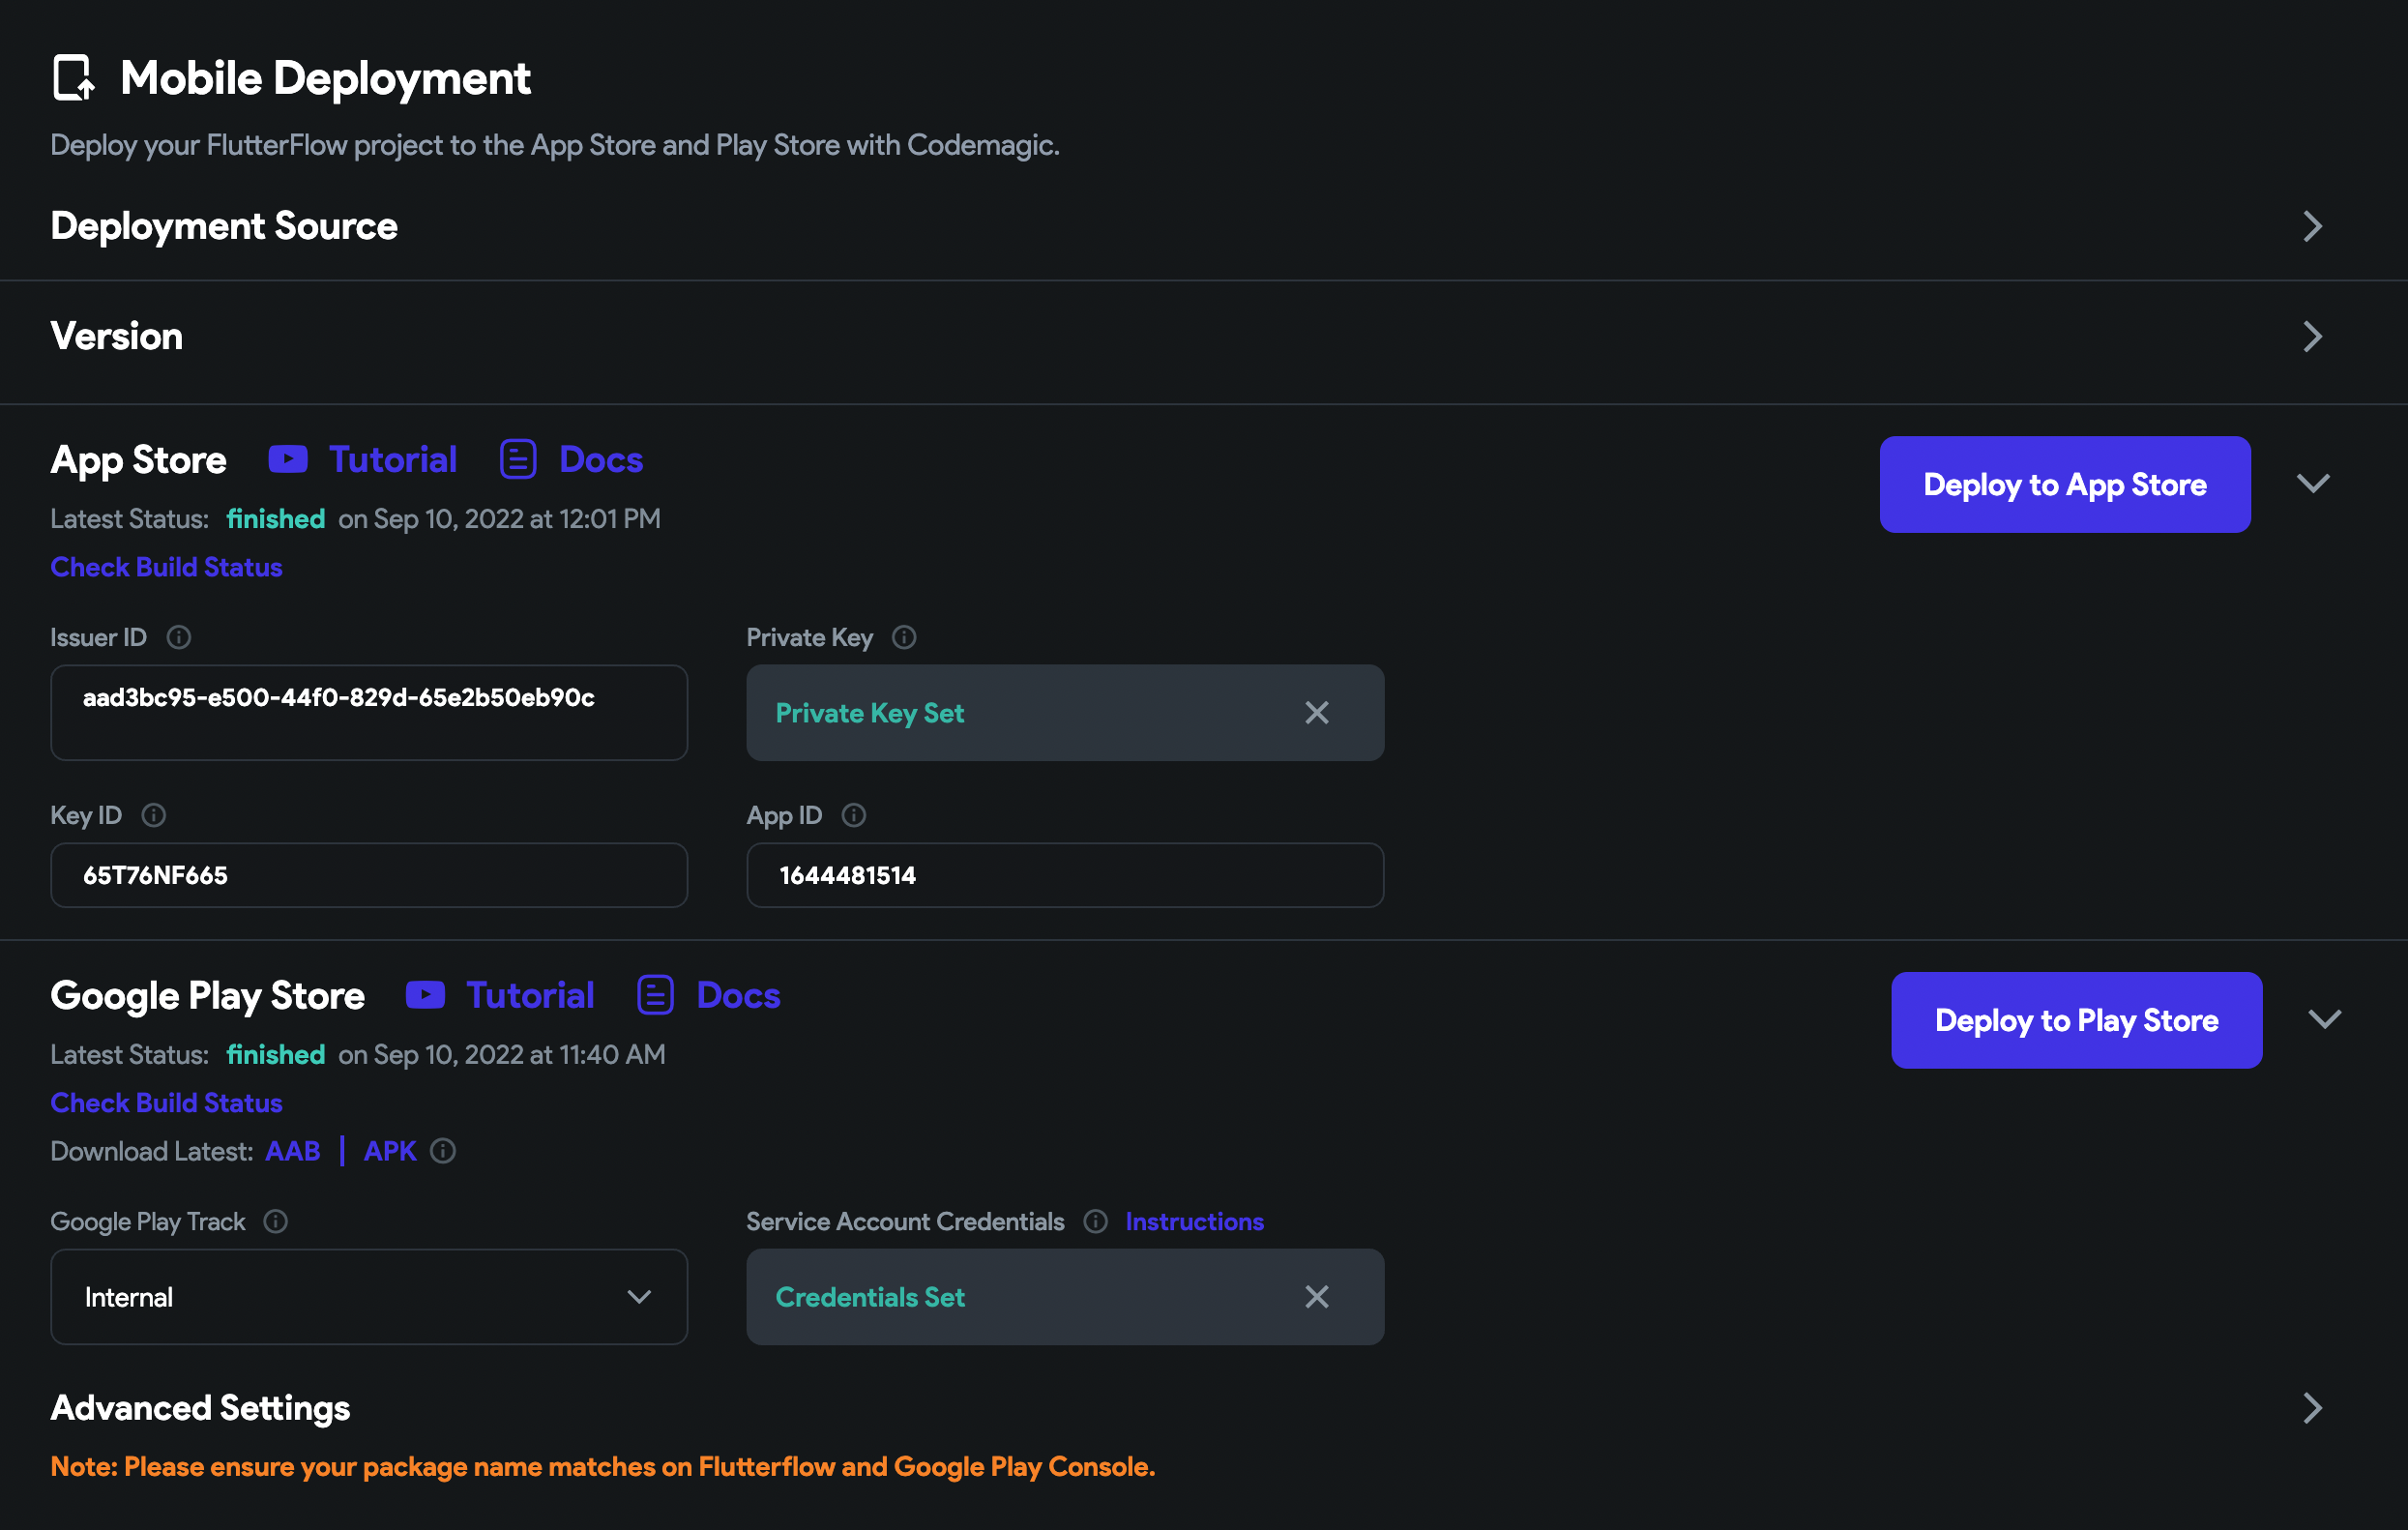
You can deploy your apps directly from FlutterFlow by going to Settings and Integrations > Mobile Deployment.
Follow these guides to configure and deploy your app:
- Google Play Store Deployment (follow up to test track deployment [4.3])
- Apple App Store Deployment
Once your app is successfully deployed, you are ready to move to the next step and set up subscriptions for your Android and iOS apps.
Setup subscriptions
You need to define subscriptions on Google Play Console and Apple App Store Connect before connecting with RevenueCat.
Play Store subscription setup
For configuring subscriptions on Google Play Console, follow the steps below:
- Go to Google Play Console. Log in with your developer account.
- Select the app in which you want to add subscriptions.
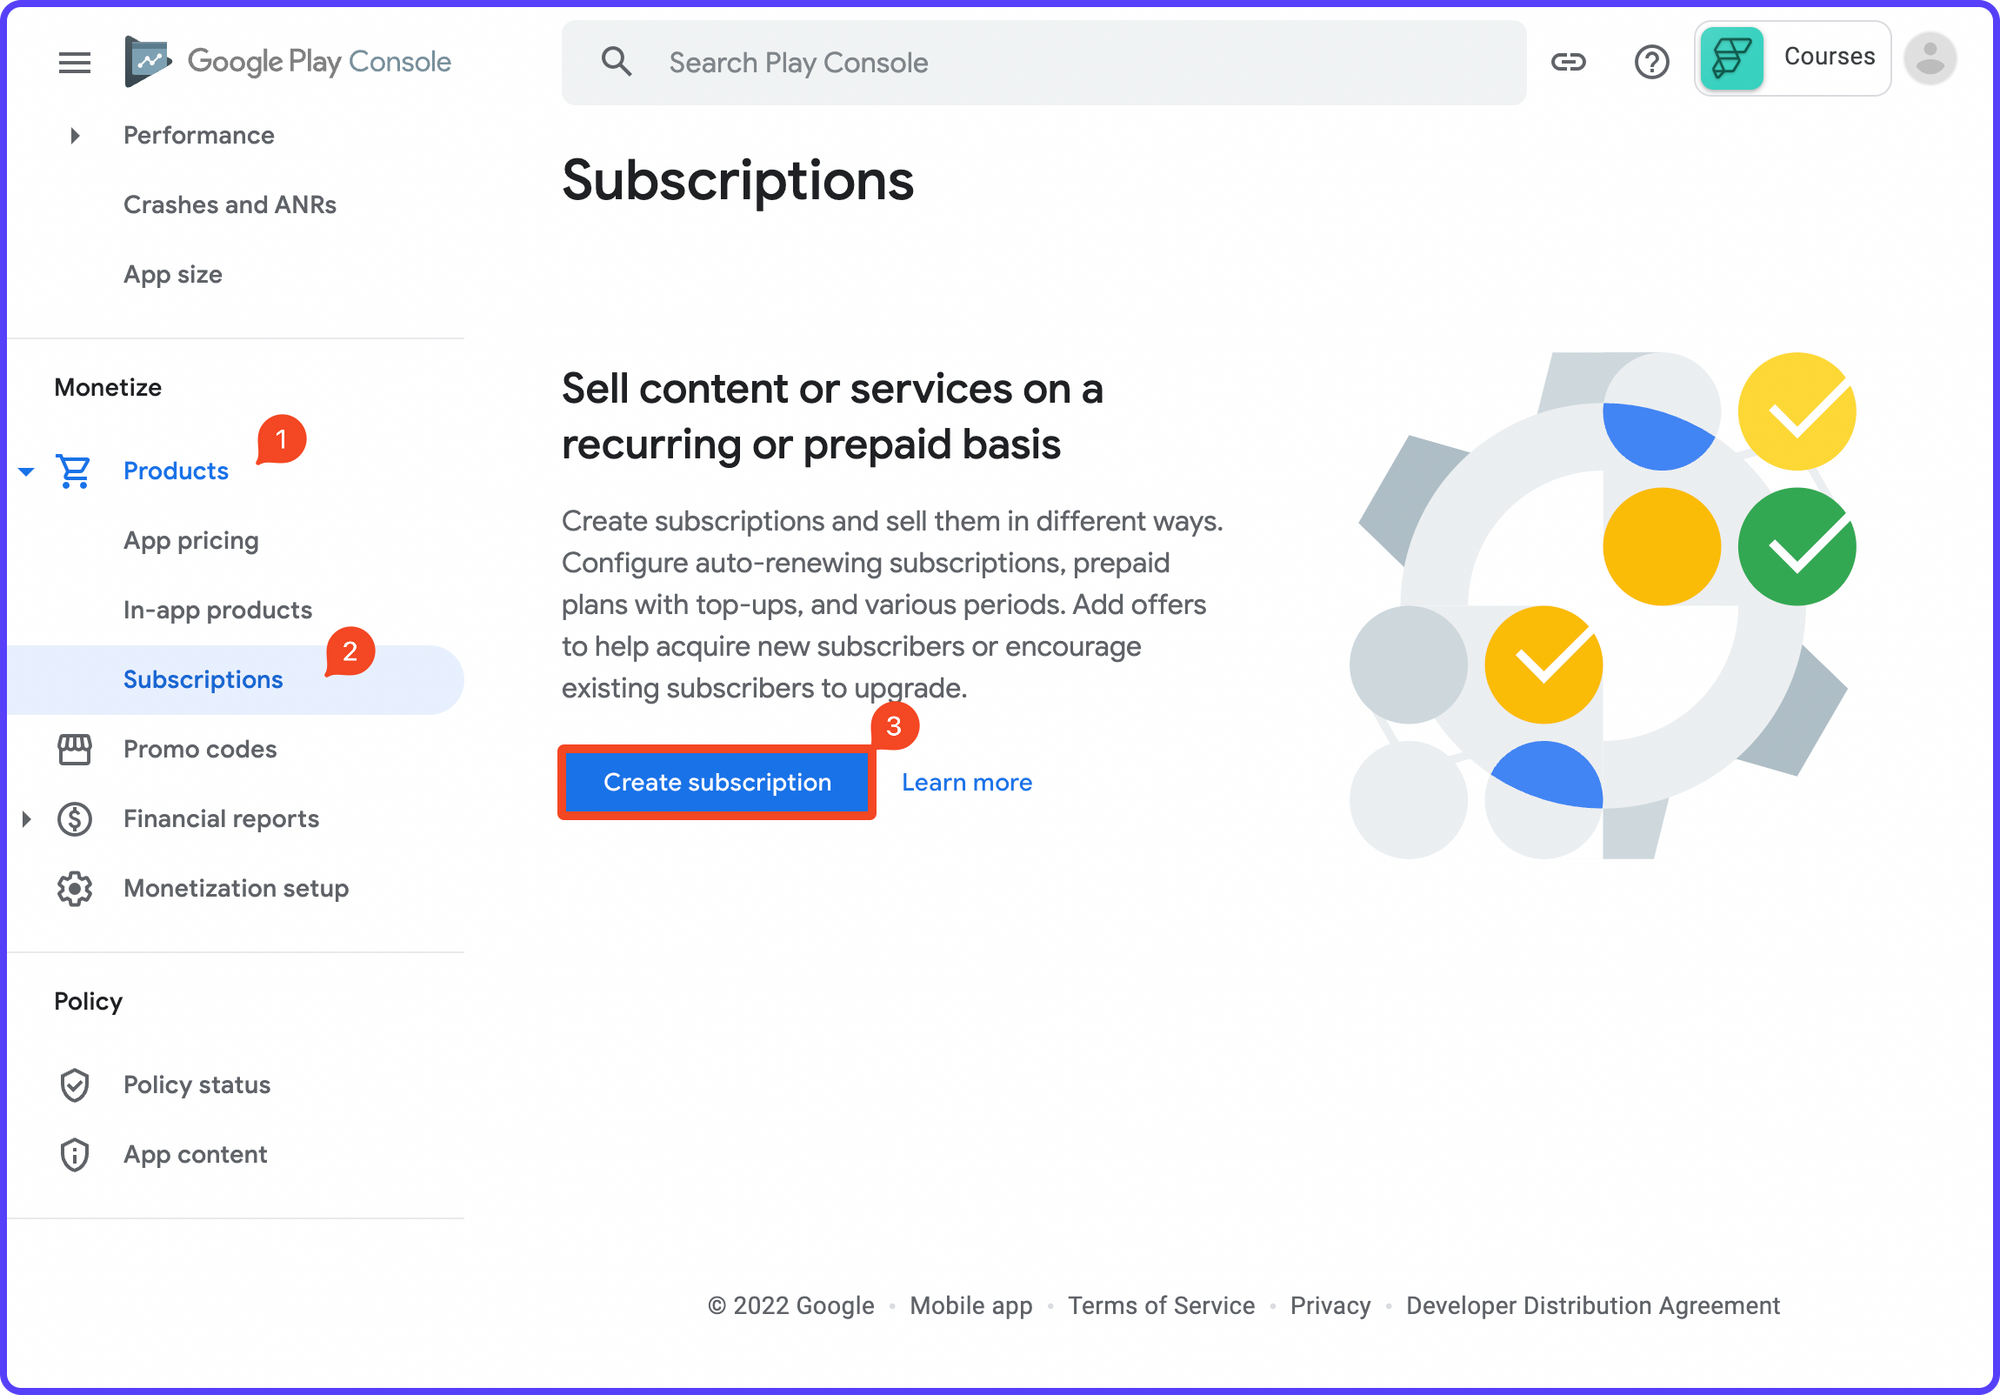
- From the left menu, under the Monetize section, expand the Products category. Select Subscriptions.
After selecting subscriptions, you might see the following message:
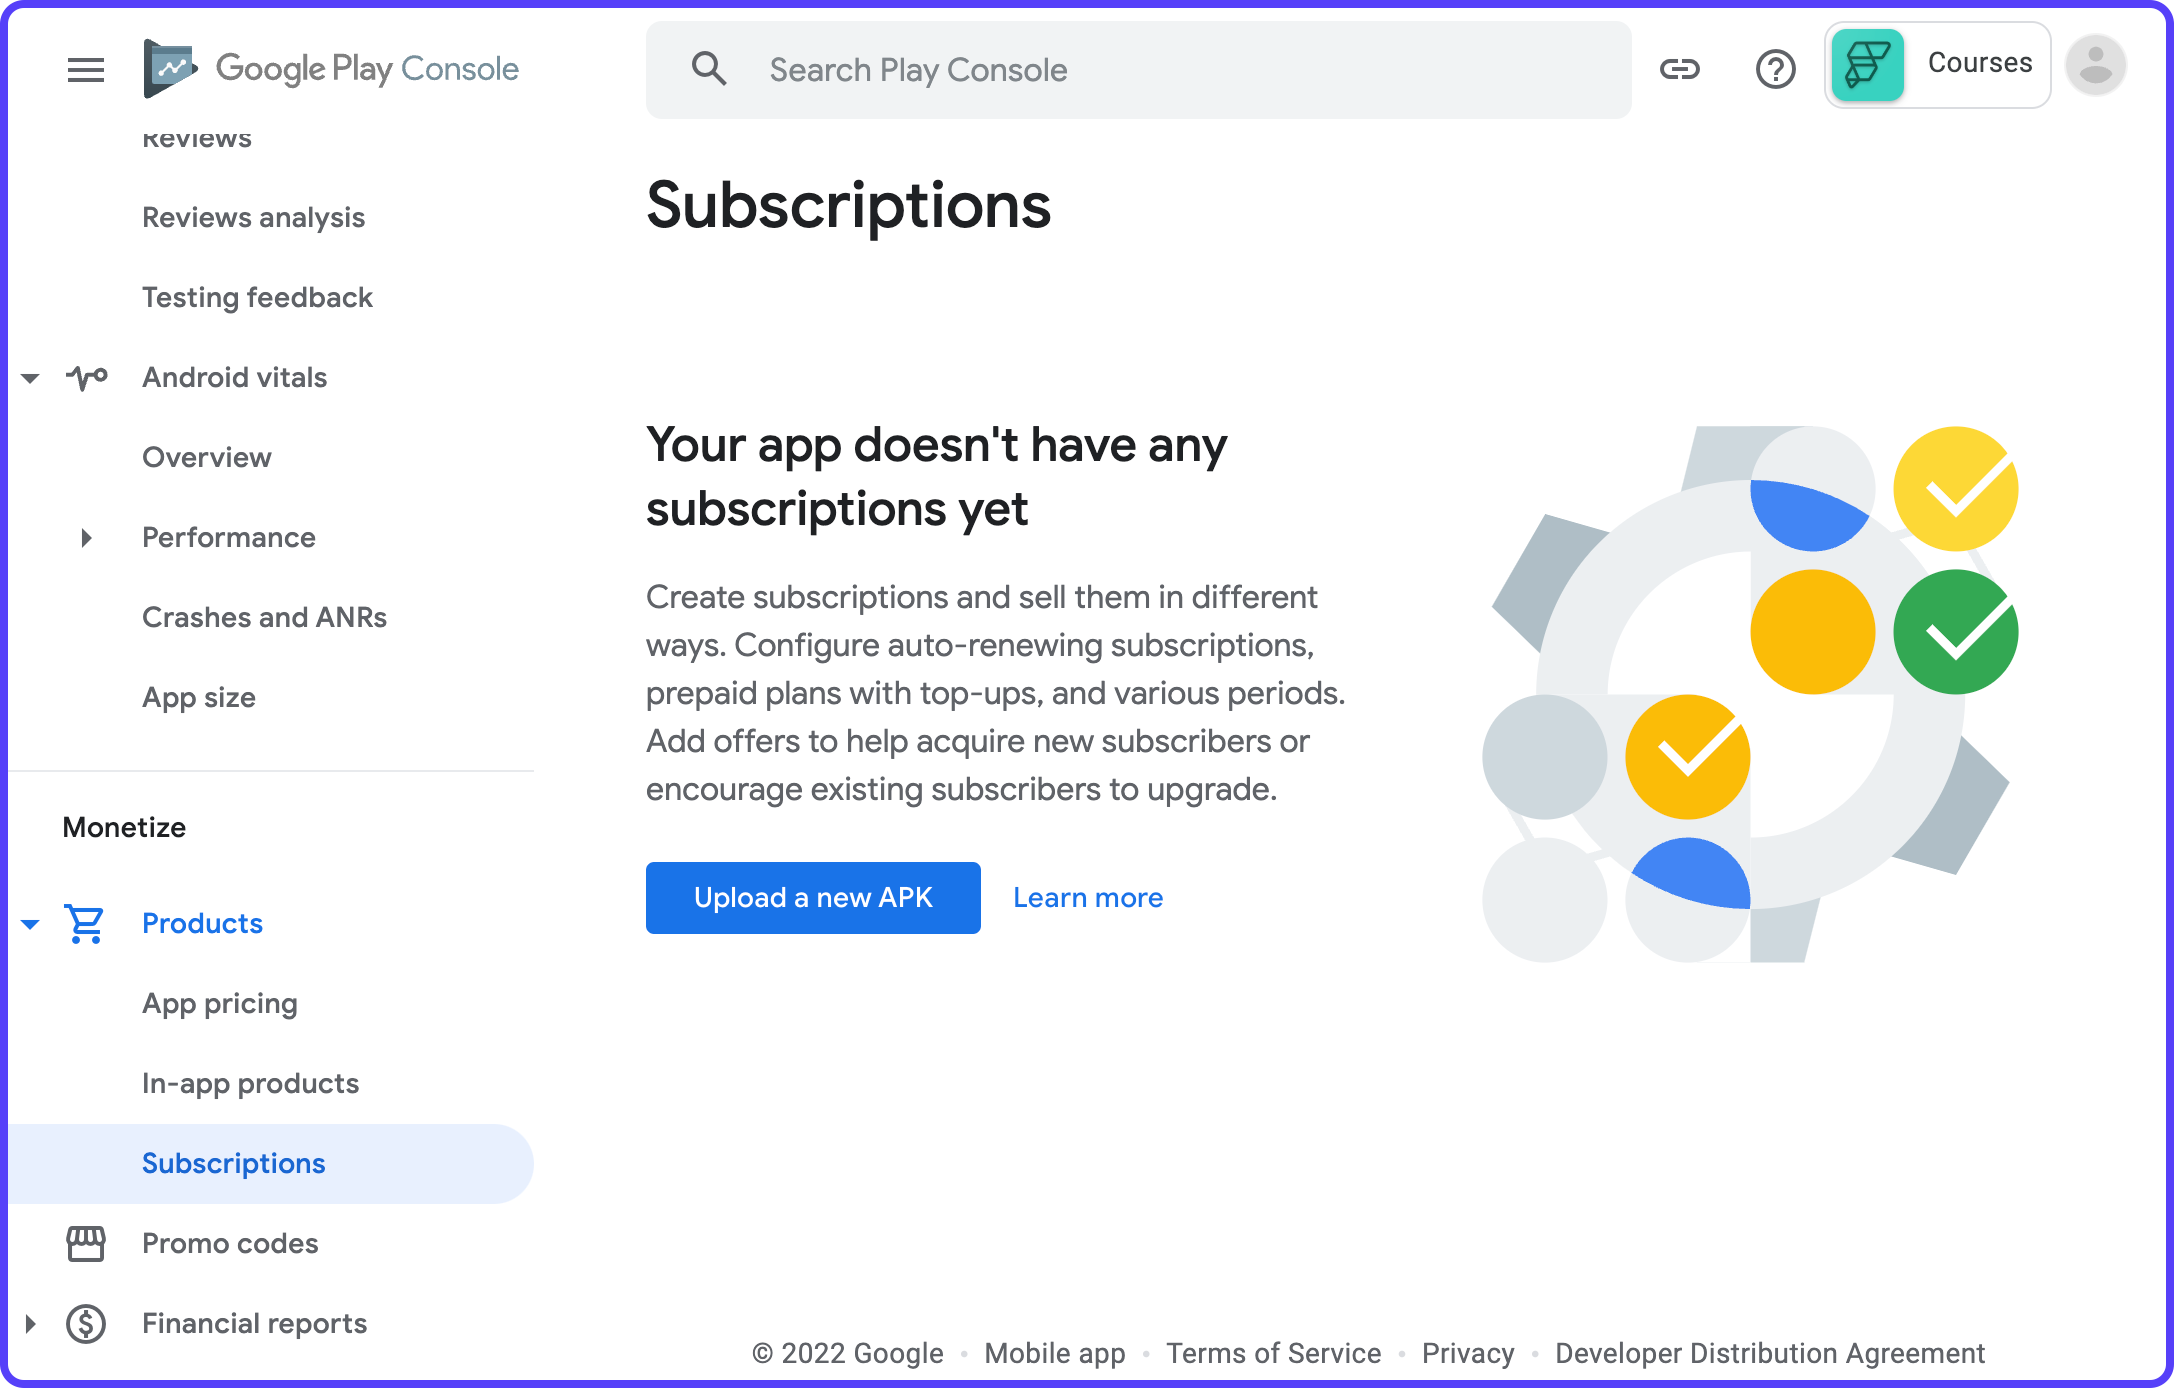
To solve this, do the following:
- Go to your FlutterFlow project.
- Navigate to Settings & Integrations > RevenueCat page (under In App Purchases & Subscriptions section).
- Enable RevenueCat using the toggle.
- Enter any string as your App Store Key and Play Store Key (eg.
testkey). We'll be updating it later. - Go to the Mobile Deployment page and deploy your app again to Google Play Store.
Wait for the Play Store deployment to complete. Now, go back to the Subscriptions page from the Google Play Console. You should see that message is gone, and you will be able to create subscriptions.
Let's start creating the subscriptions:
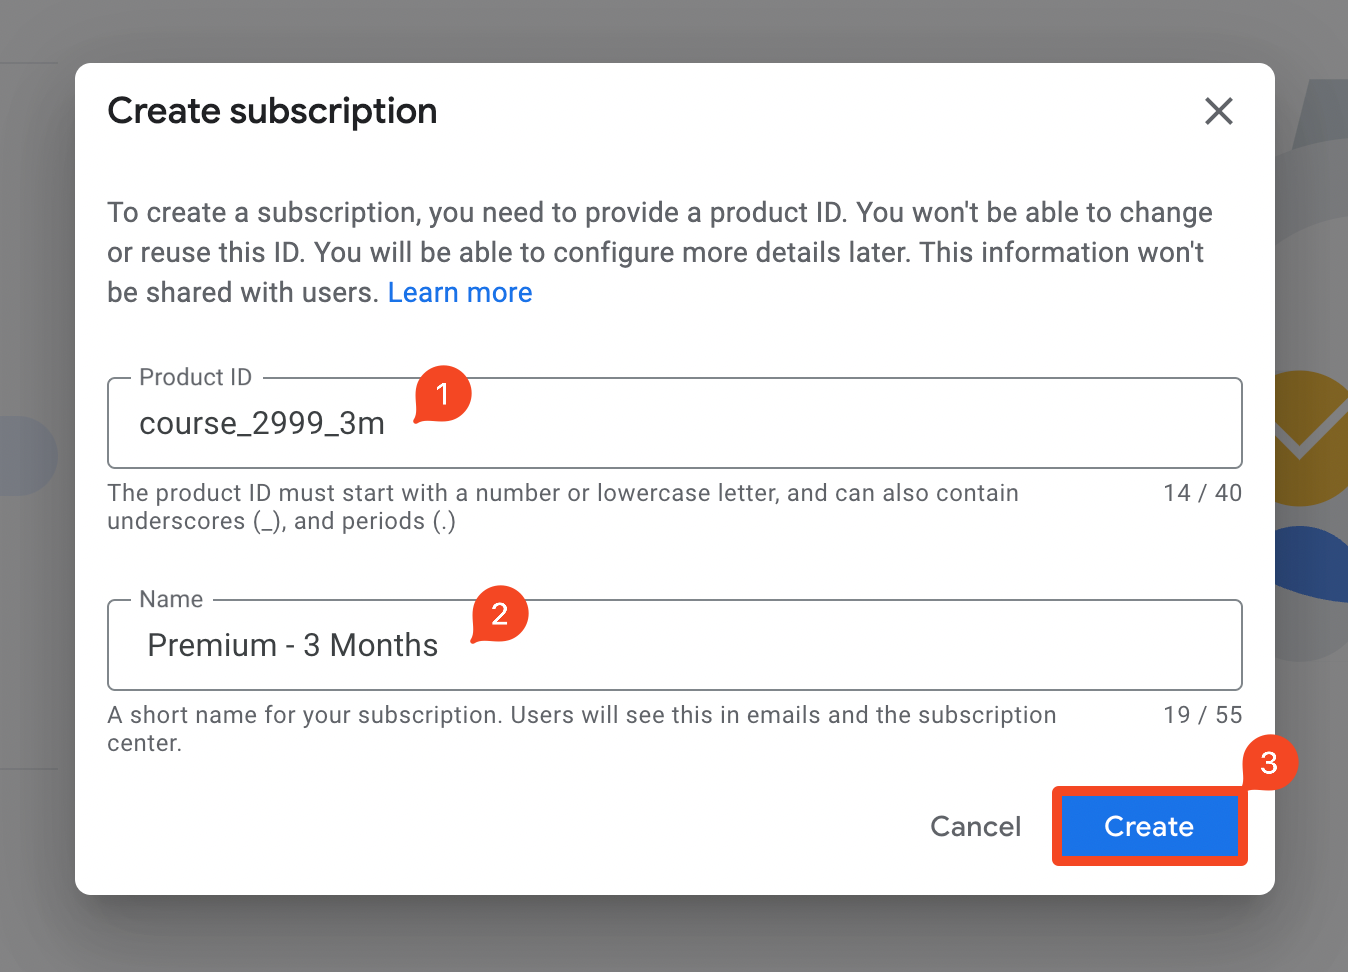
1. From the Monetize > Products > Subscriptions page, click Create subscription.
2. Enter a unique Product ID for your subscription and a publicly viewable Name. Click Create.
For example, we will be creating a subscription for 3 months with:
- Product ID:
course_2999_3m - Name:
Premium - 3 Months
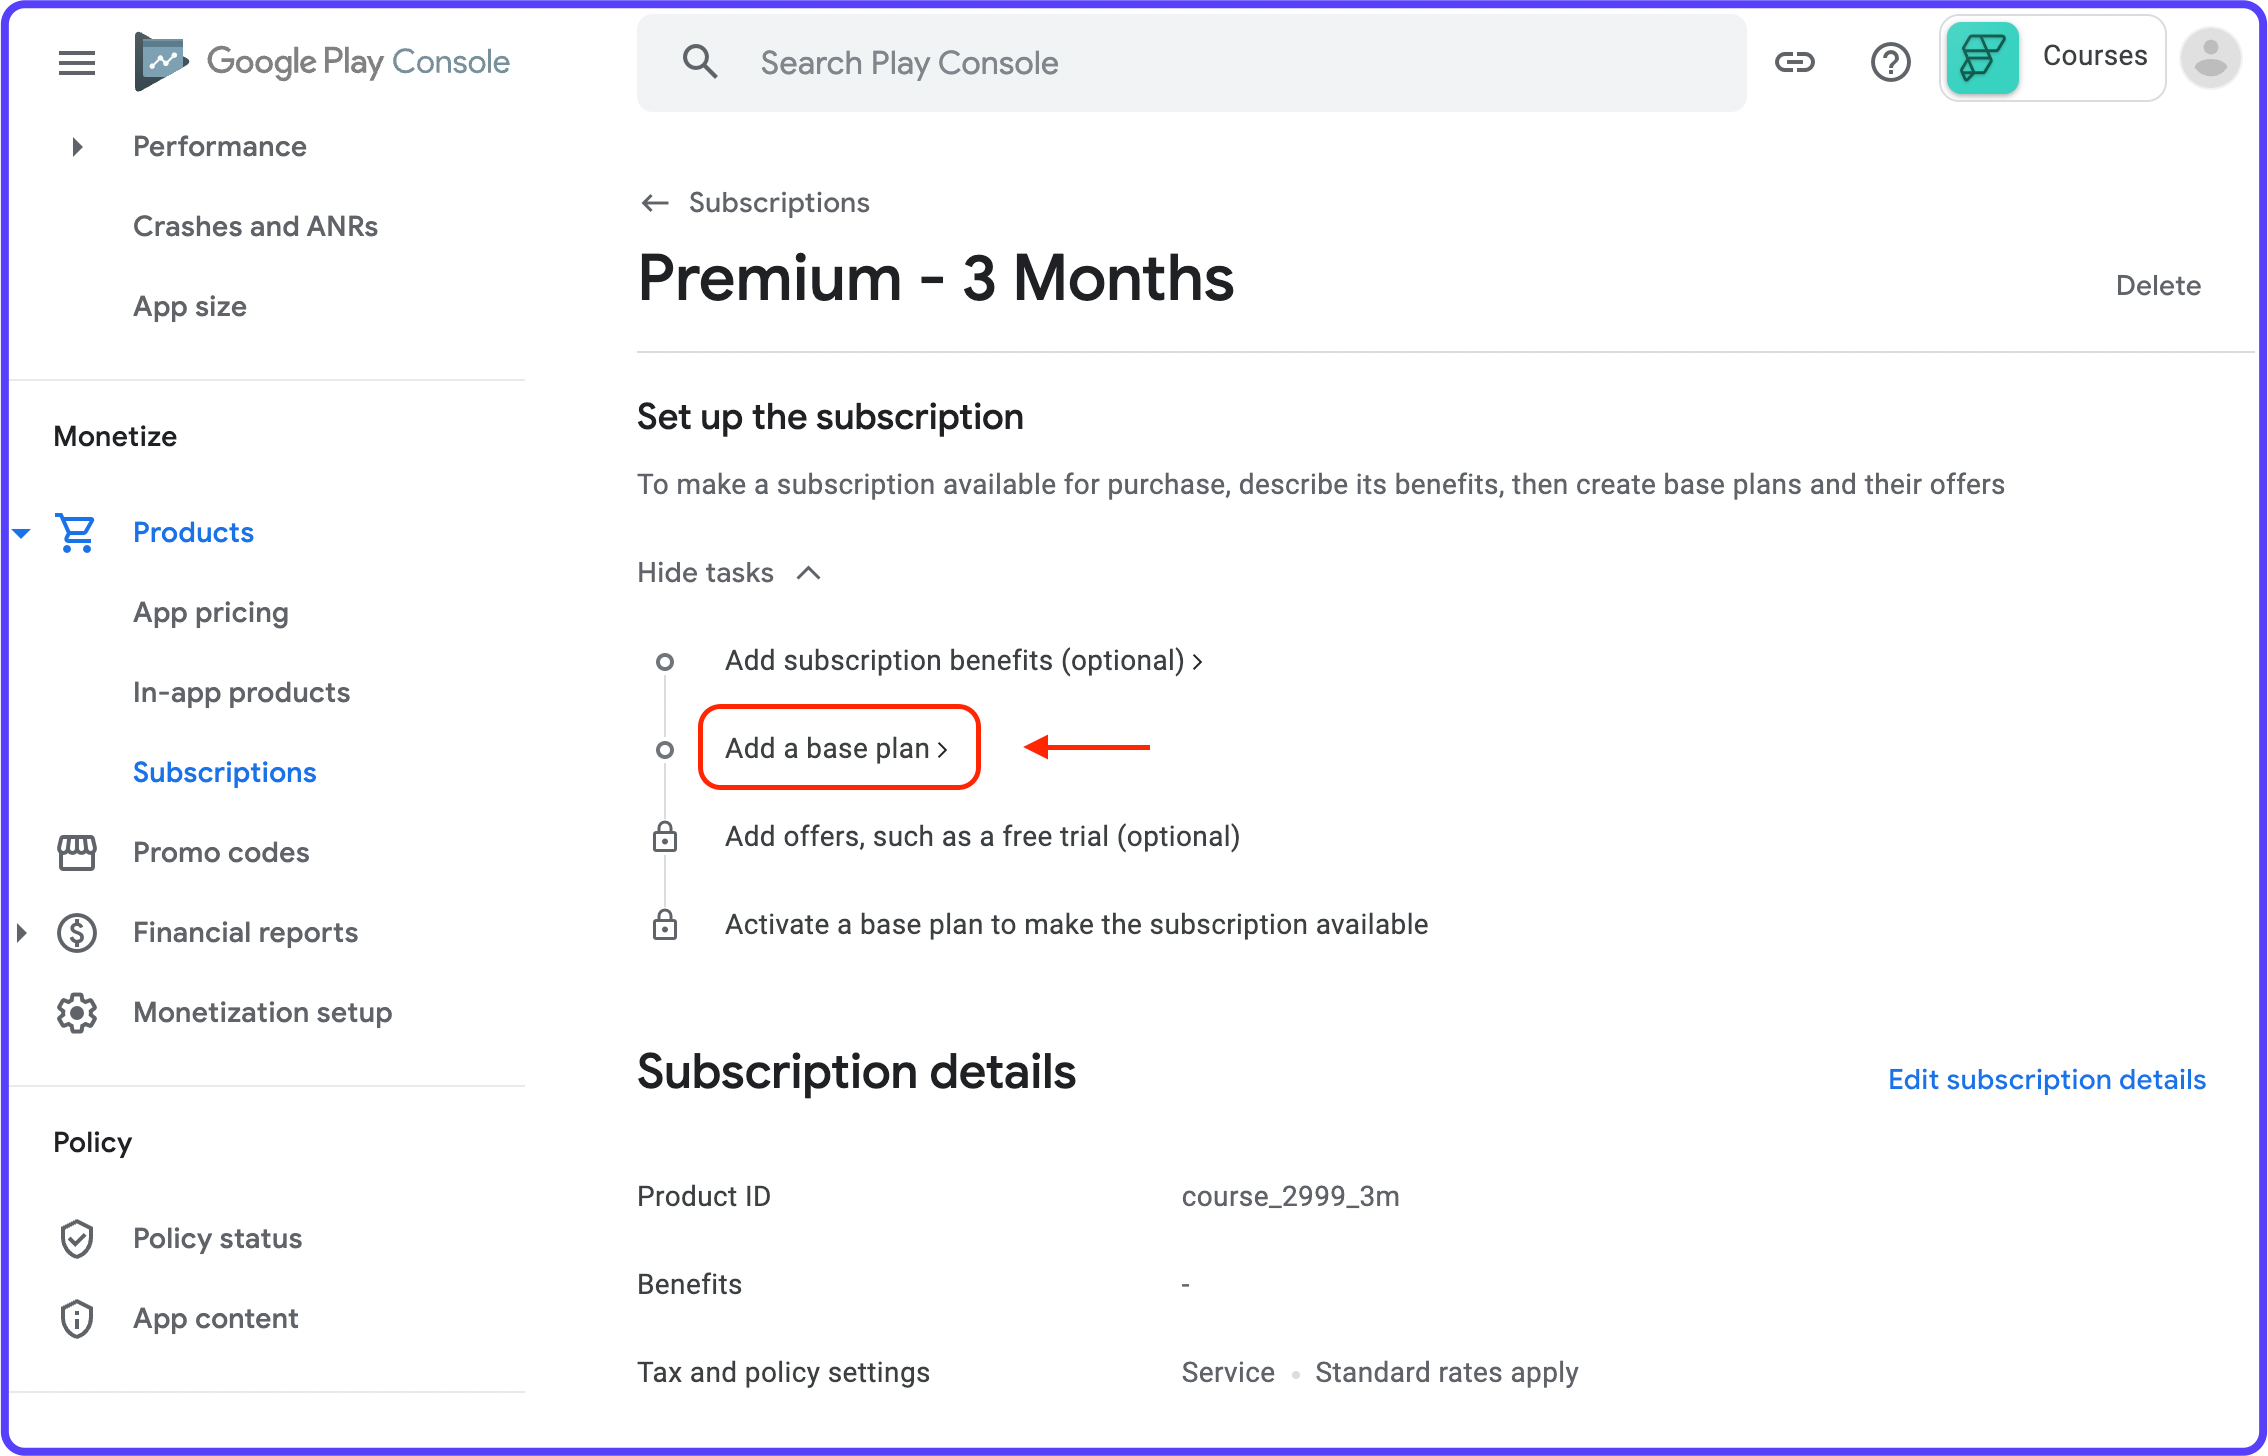
3. Click "Add a base plan".
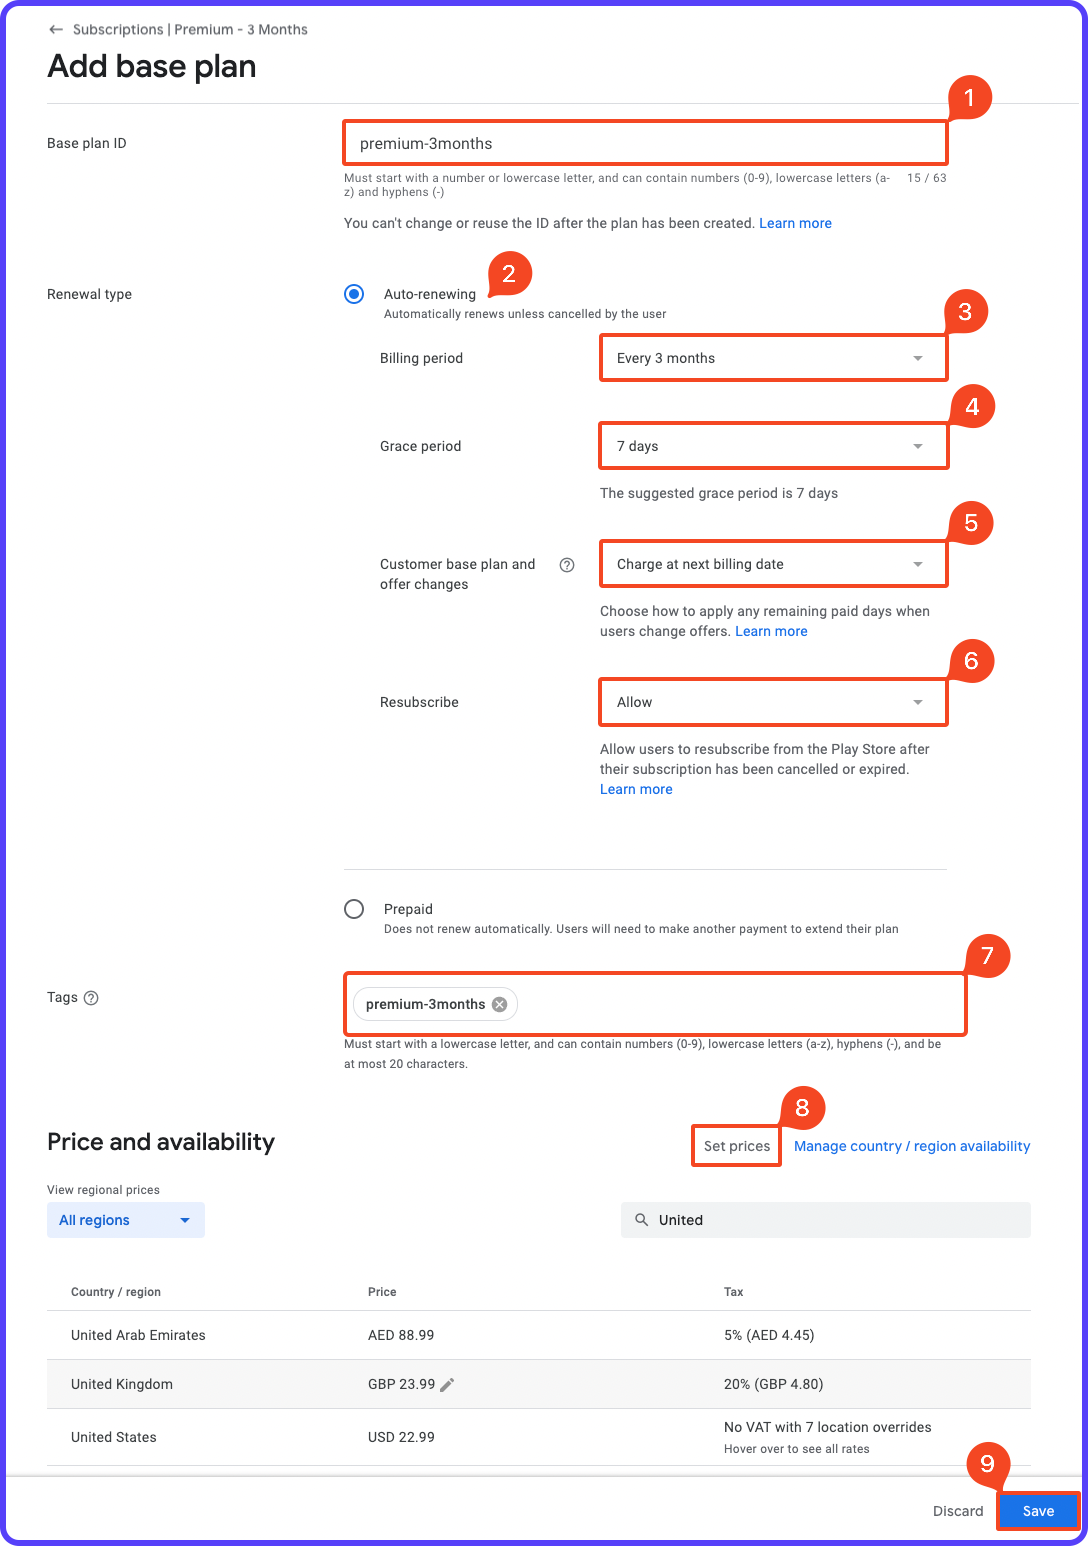
4. Enter the Base plan ID, Renewal type (RevenueCat supports only Auto-renewing), Tags, and Price. Click Save.
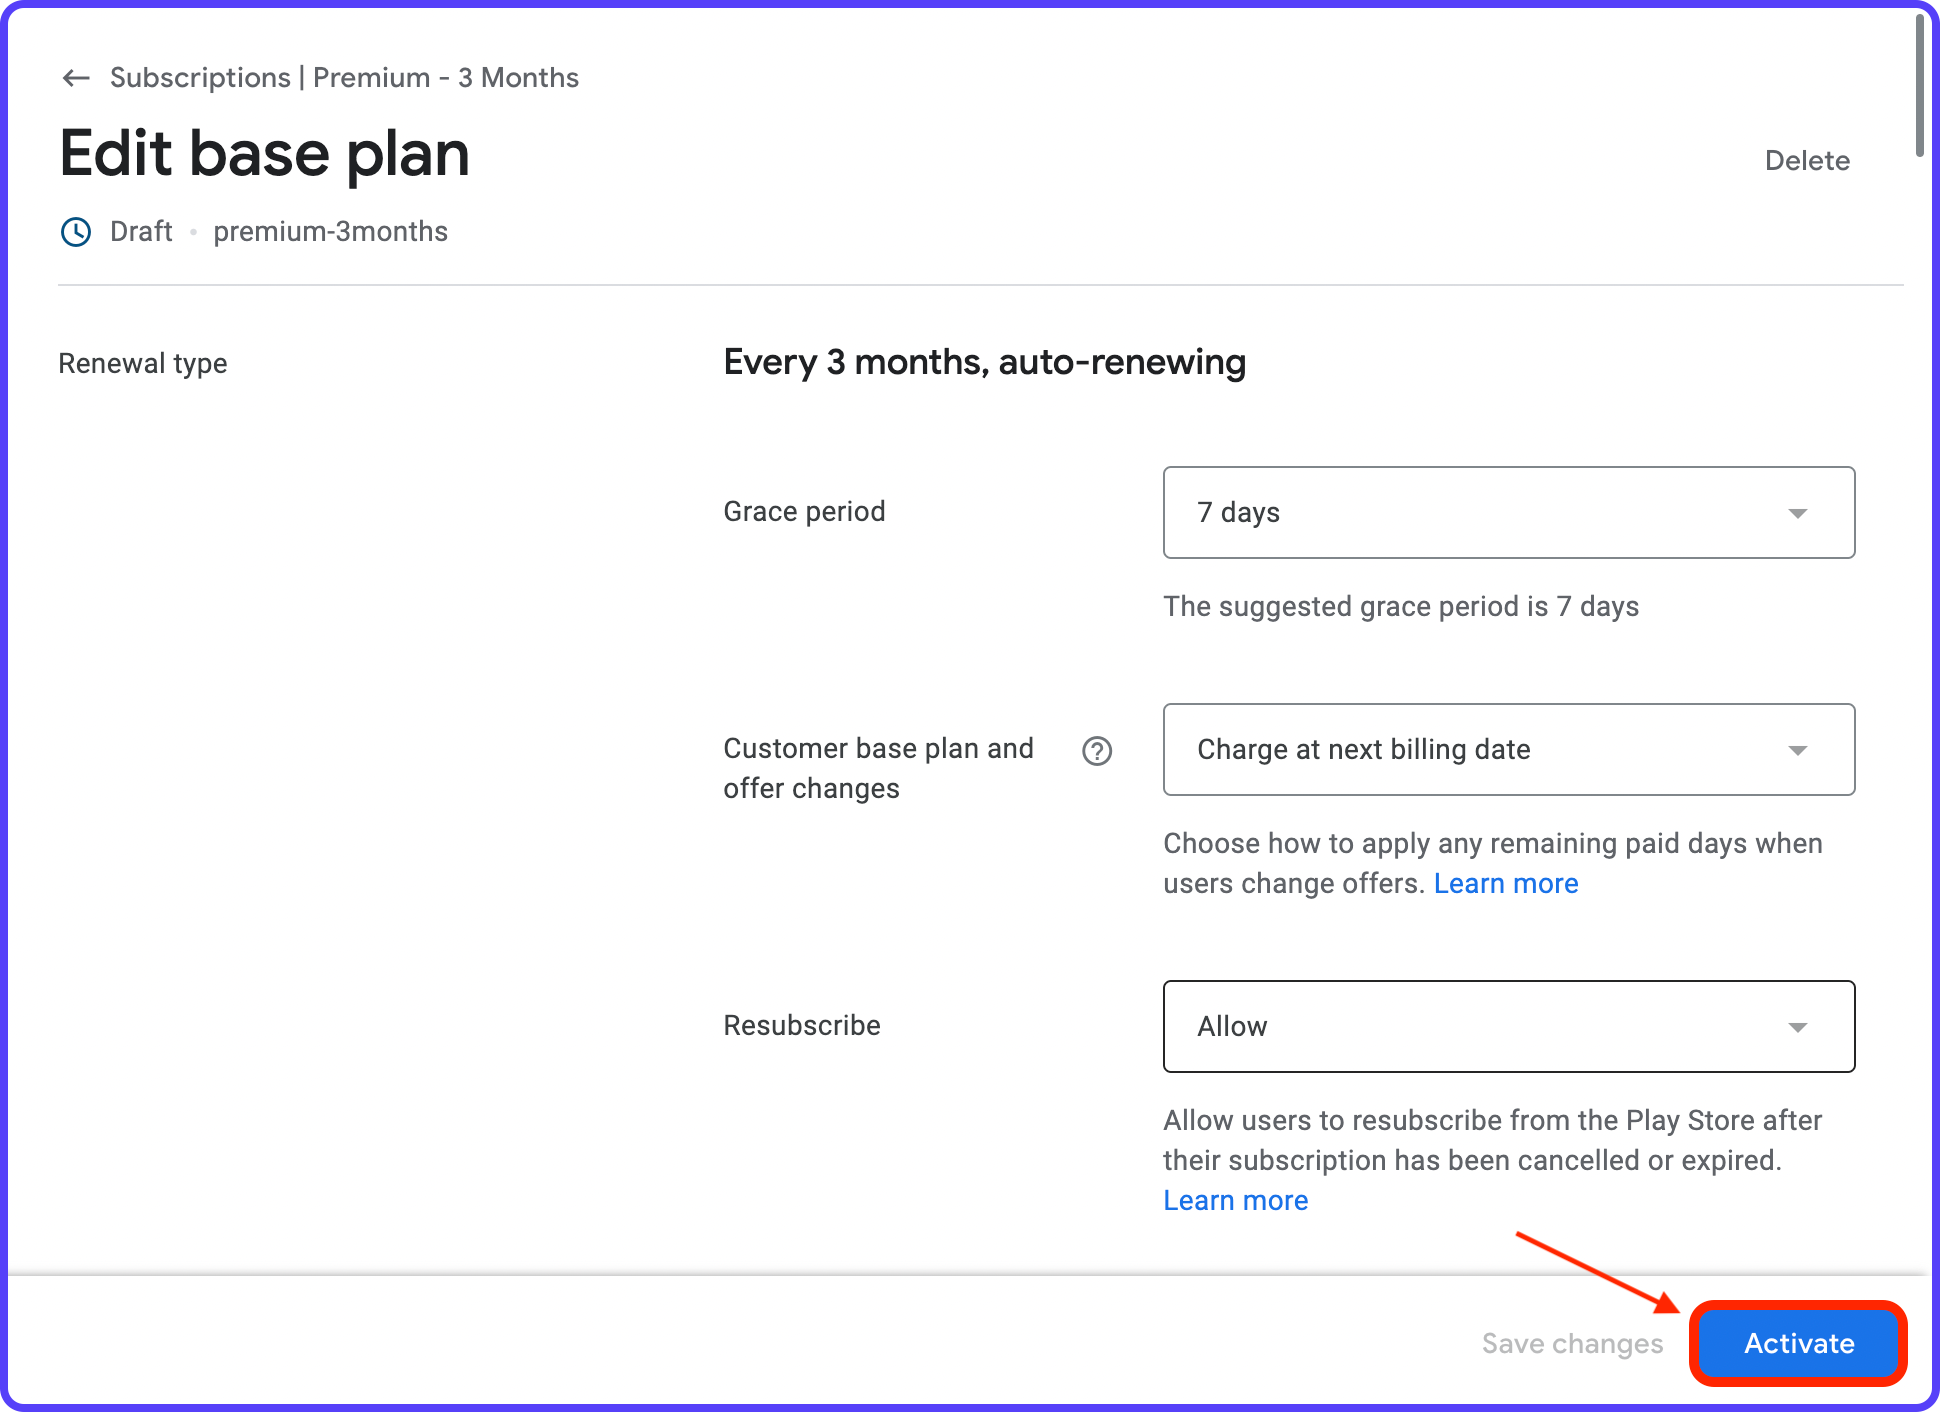
5. Click Activate.
6. Similarly, add two more subscriptions for 6 months and 12 months.
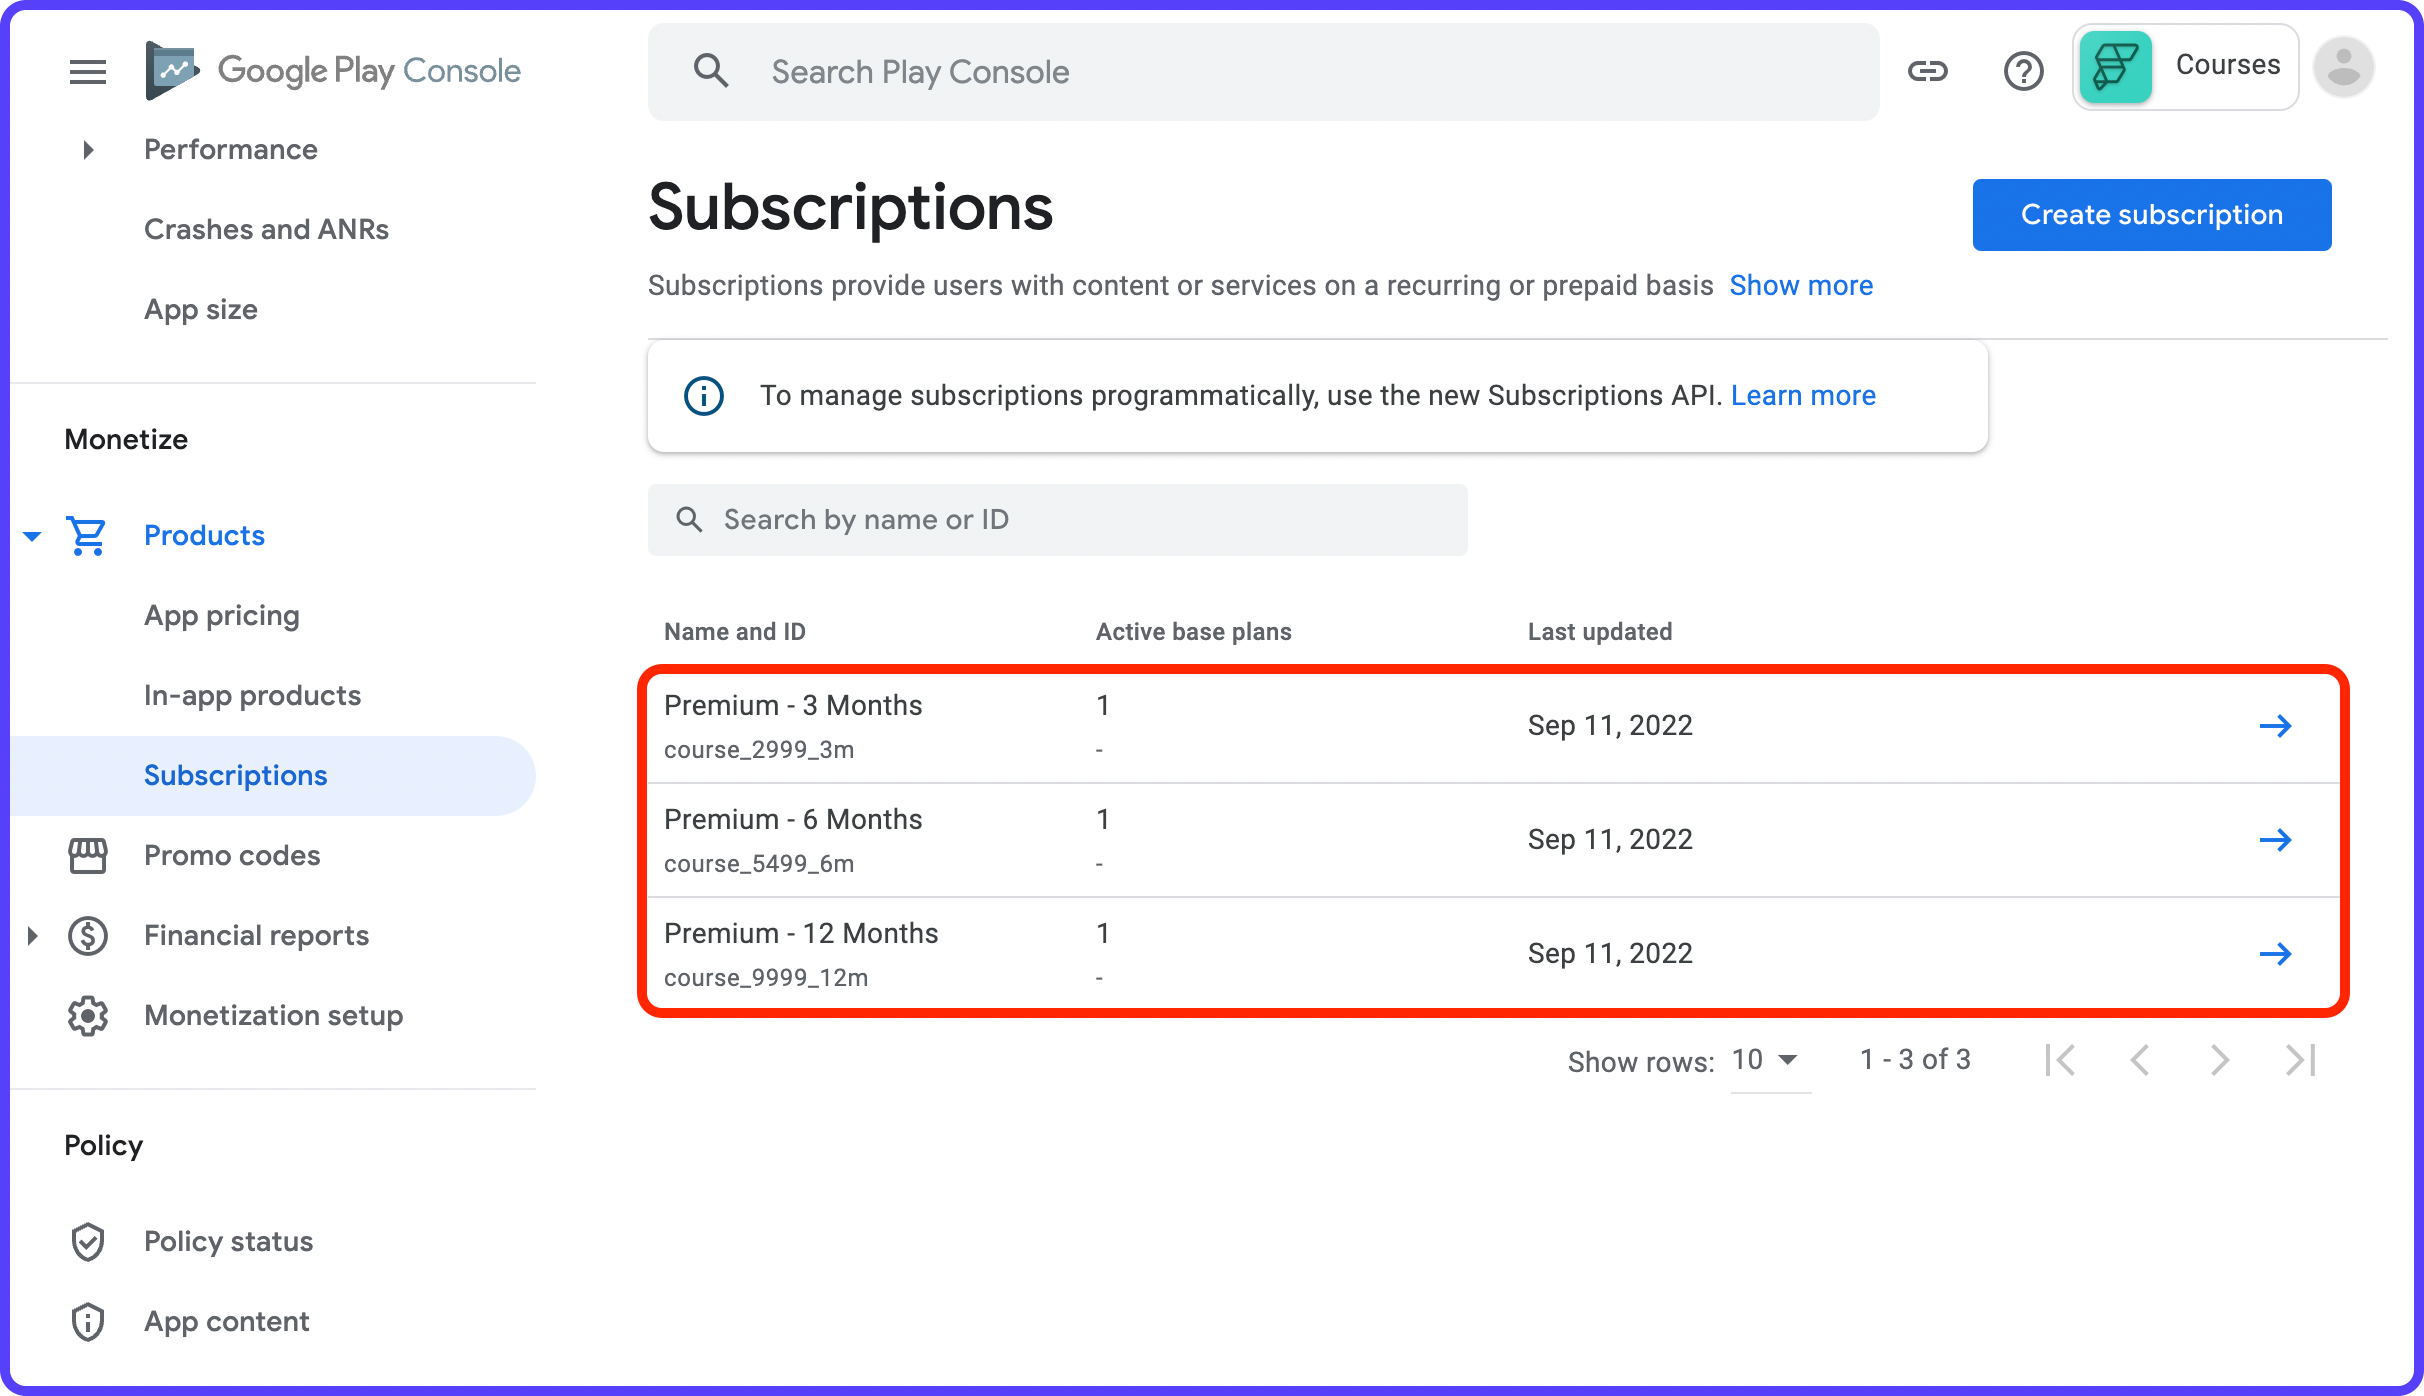
We have used the following details for the subscriptions:
Product ID: course_2999_3m
Name: Premium - 3 Months
Description: Get Premium membership for three months.
Billing Period: 3 Months
Price: $29.99
Product ID: course_5499_6m
Name: Premium - 6 Months
Description: Get Premium membership for six months.
Billing Period: 6 Months
Price: $54.99
Product ID: course_9999_12m
Name: Premium - 12 Months
Description: Get Premium membership for one year.
Billing Period: 12 Months
Price: $99.99
That completes the subscription setup for the Google Play Console. Let's move on to the App Store subscription setup.
App Store subscription setup
Follow the steps below to configure subscriptions on App Store Connect:
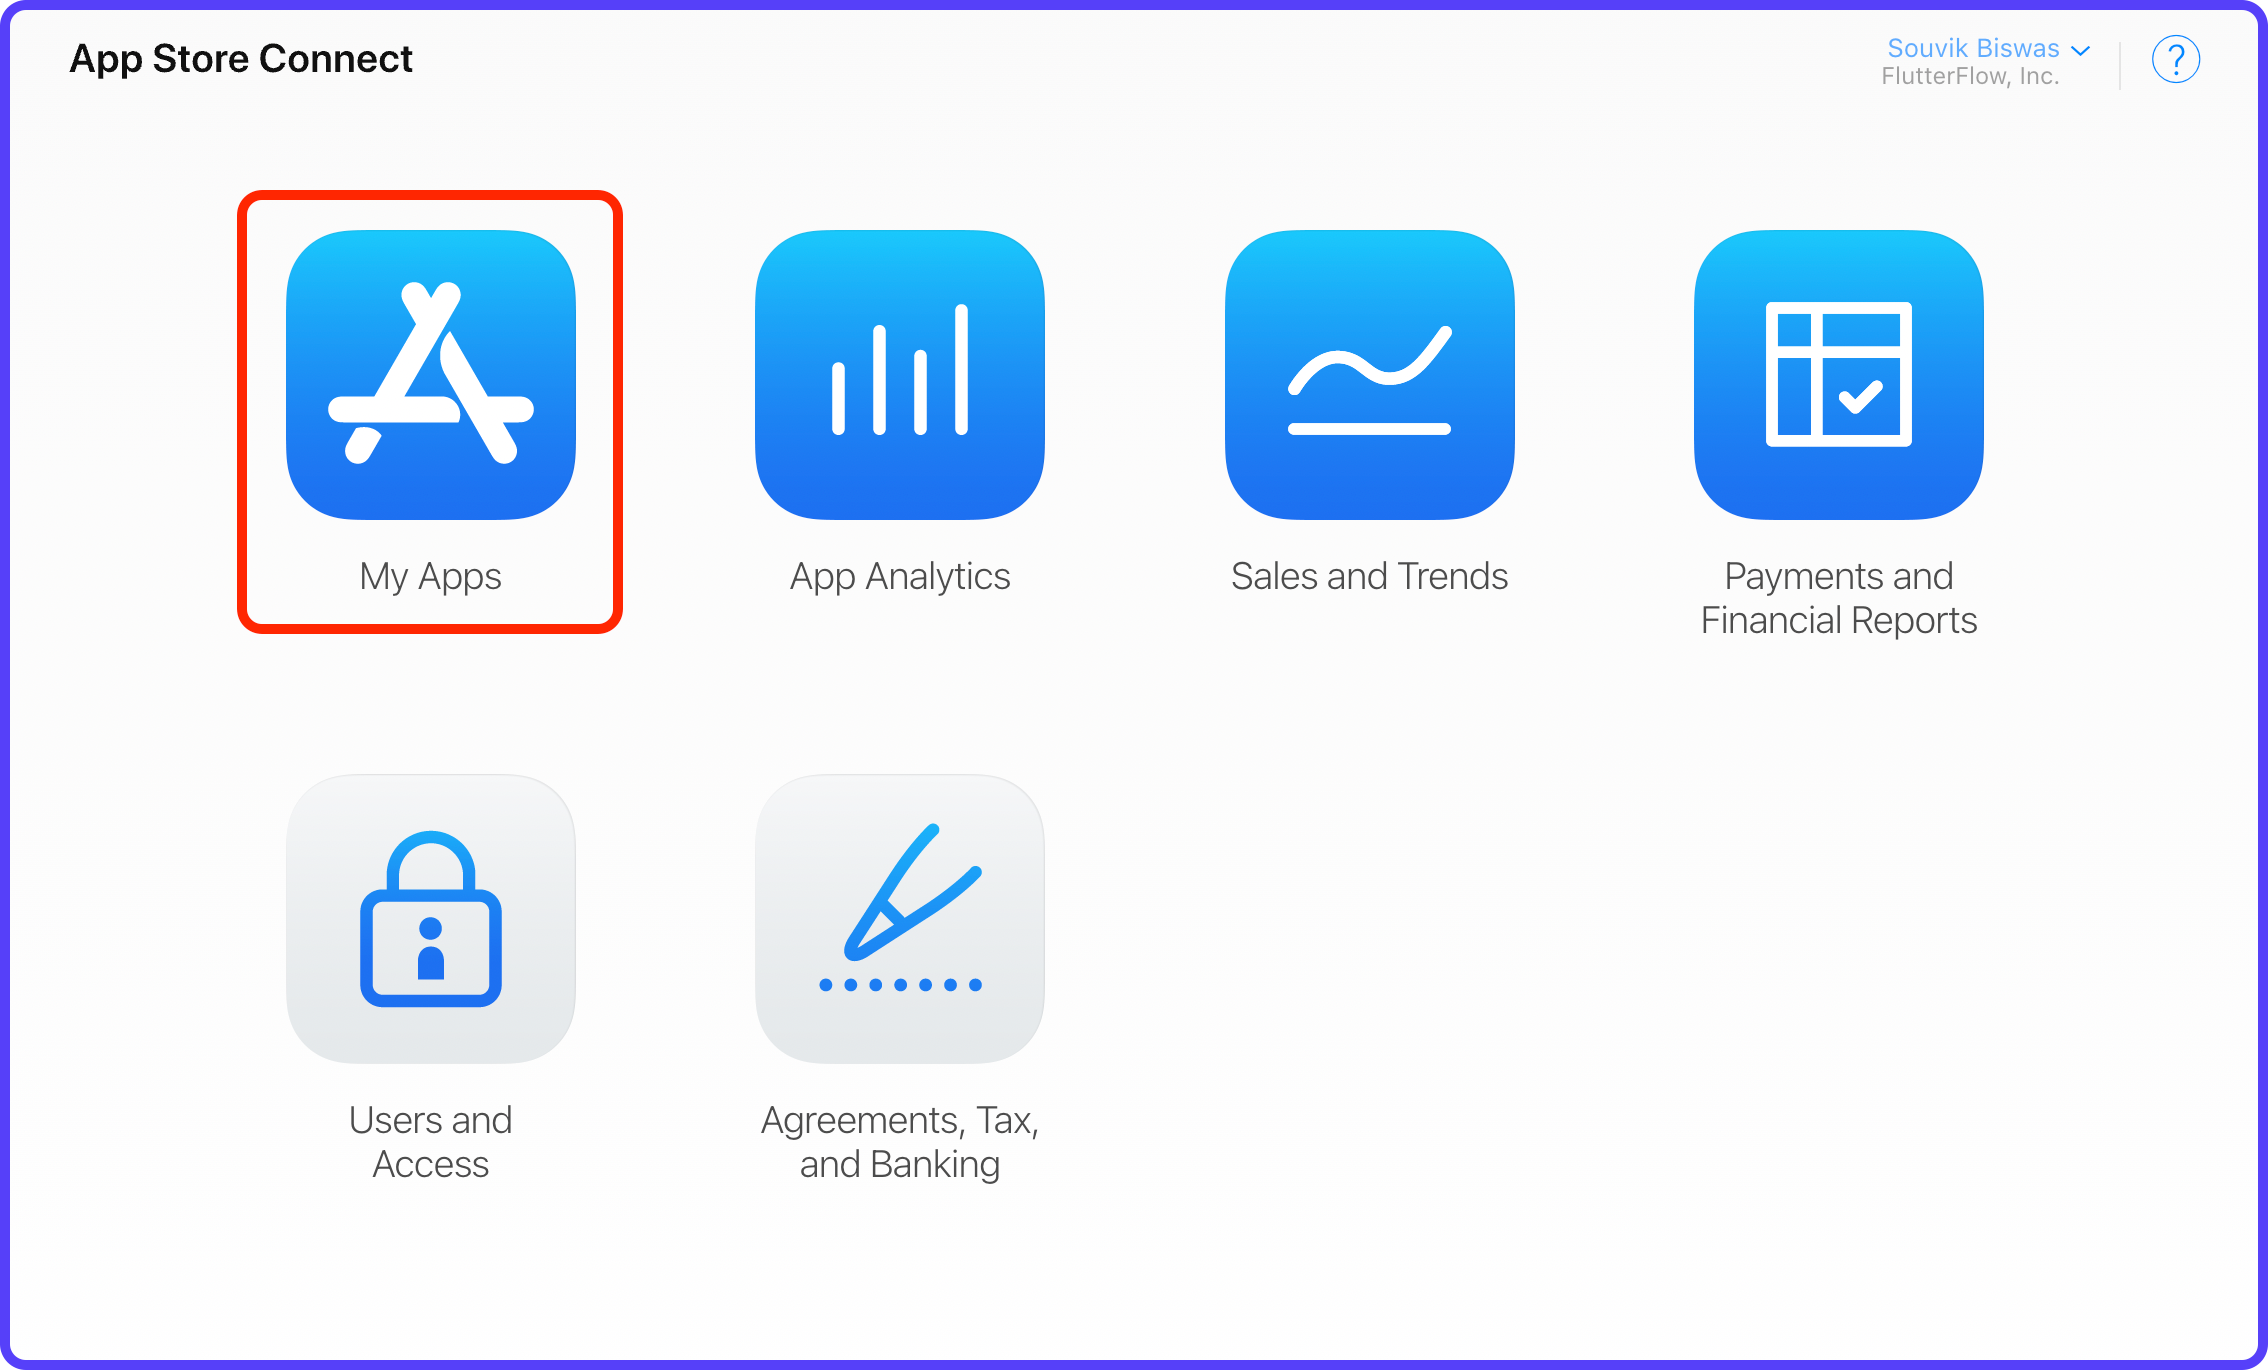
1. Go to App Store Connect and log in with your developer account.
2. Select My Apps.
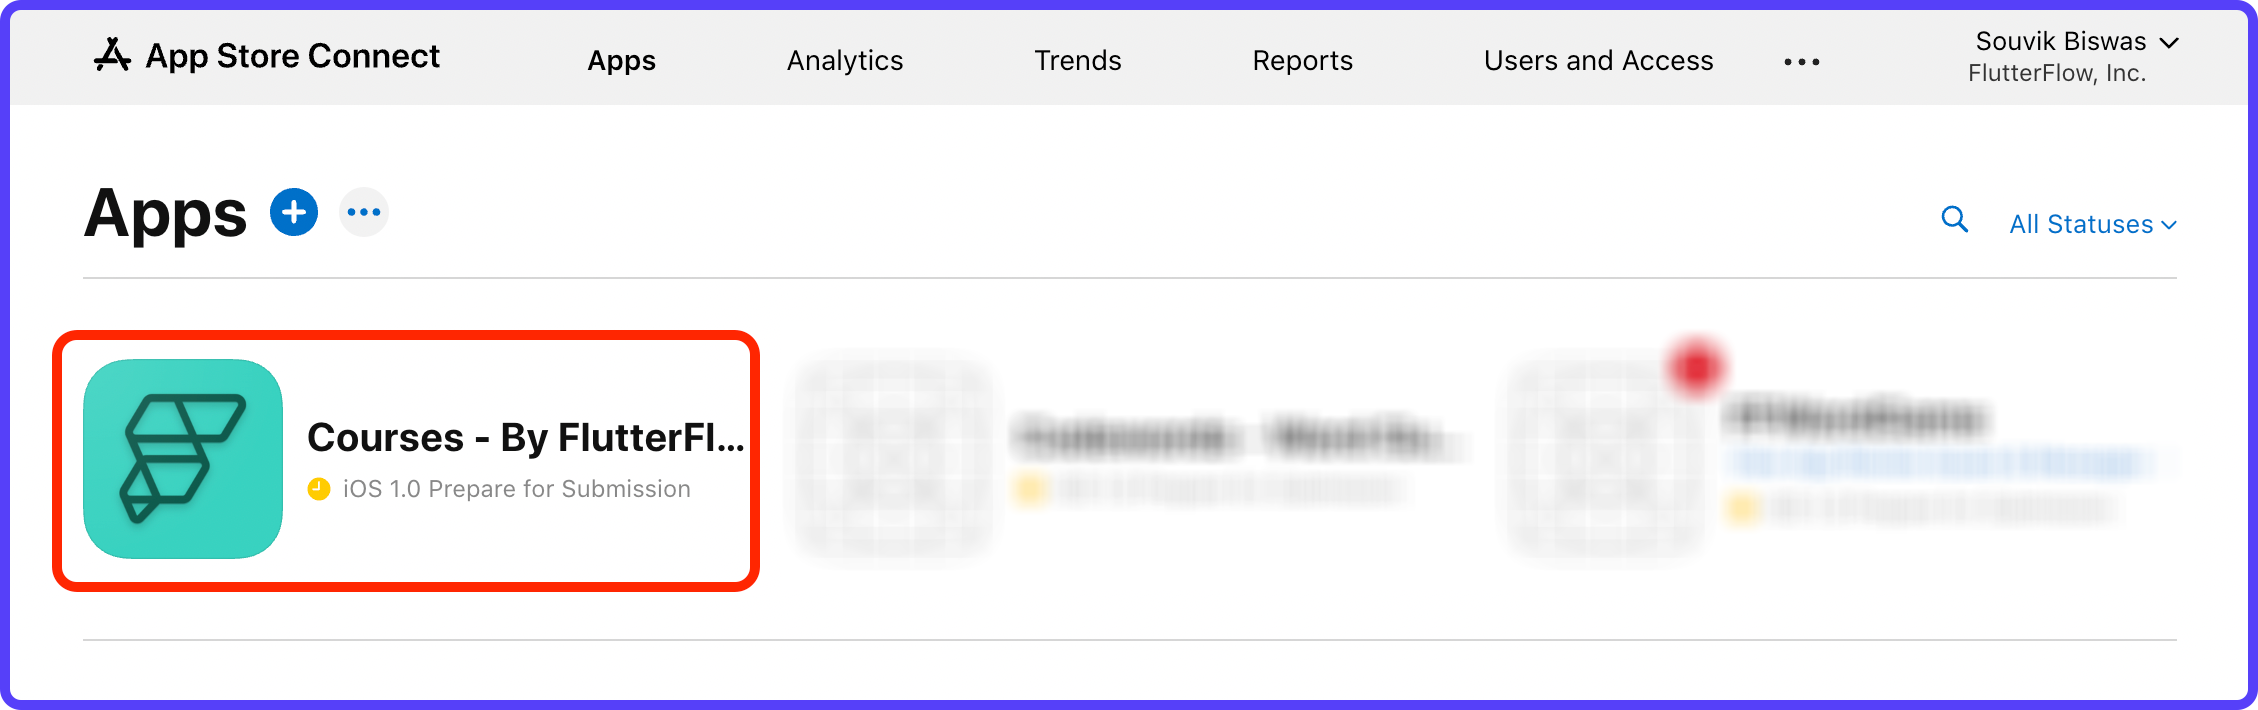
3. Choose the app in which your want to add subscriptions.
4. Select Subscriptions from the left menu and click Create under Subscription Groups.
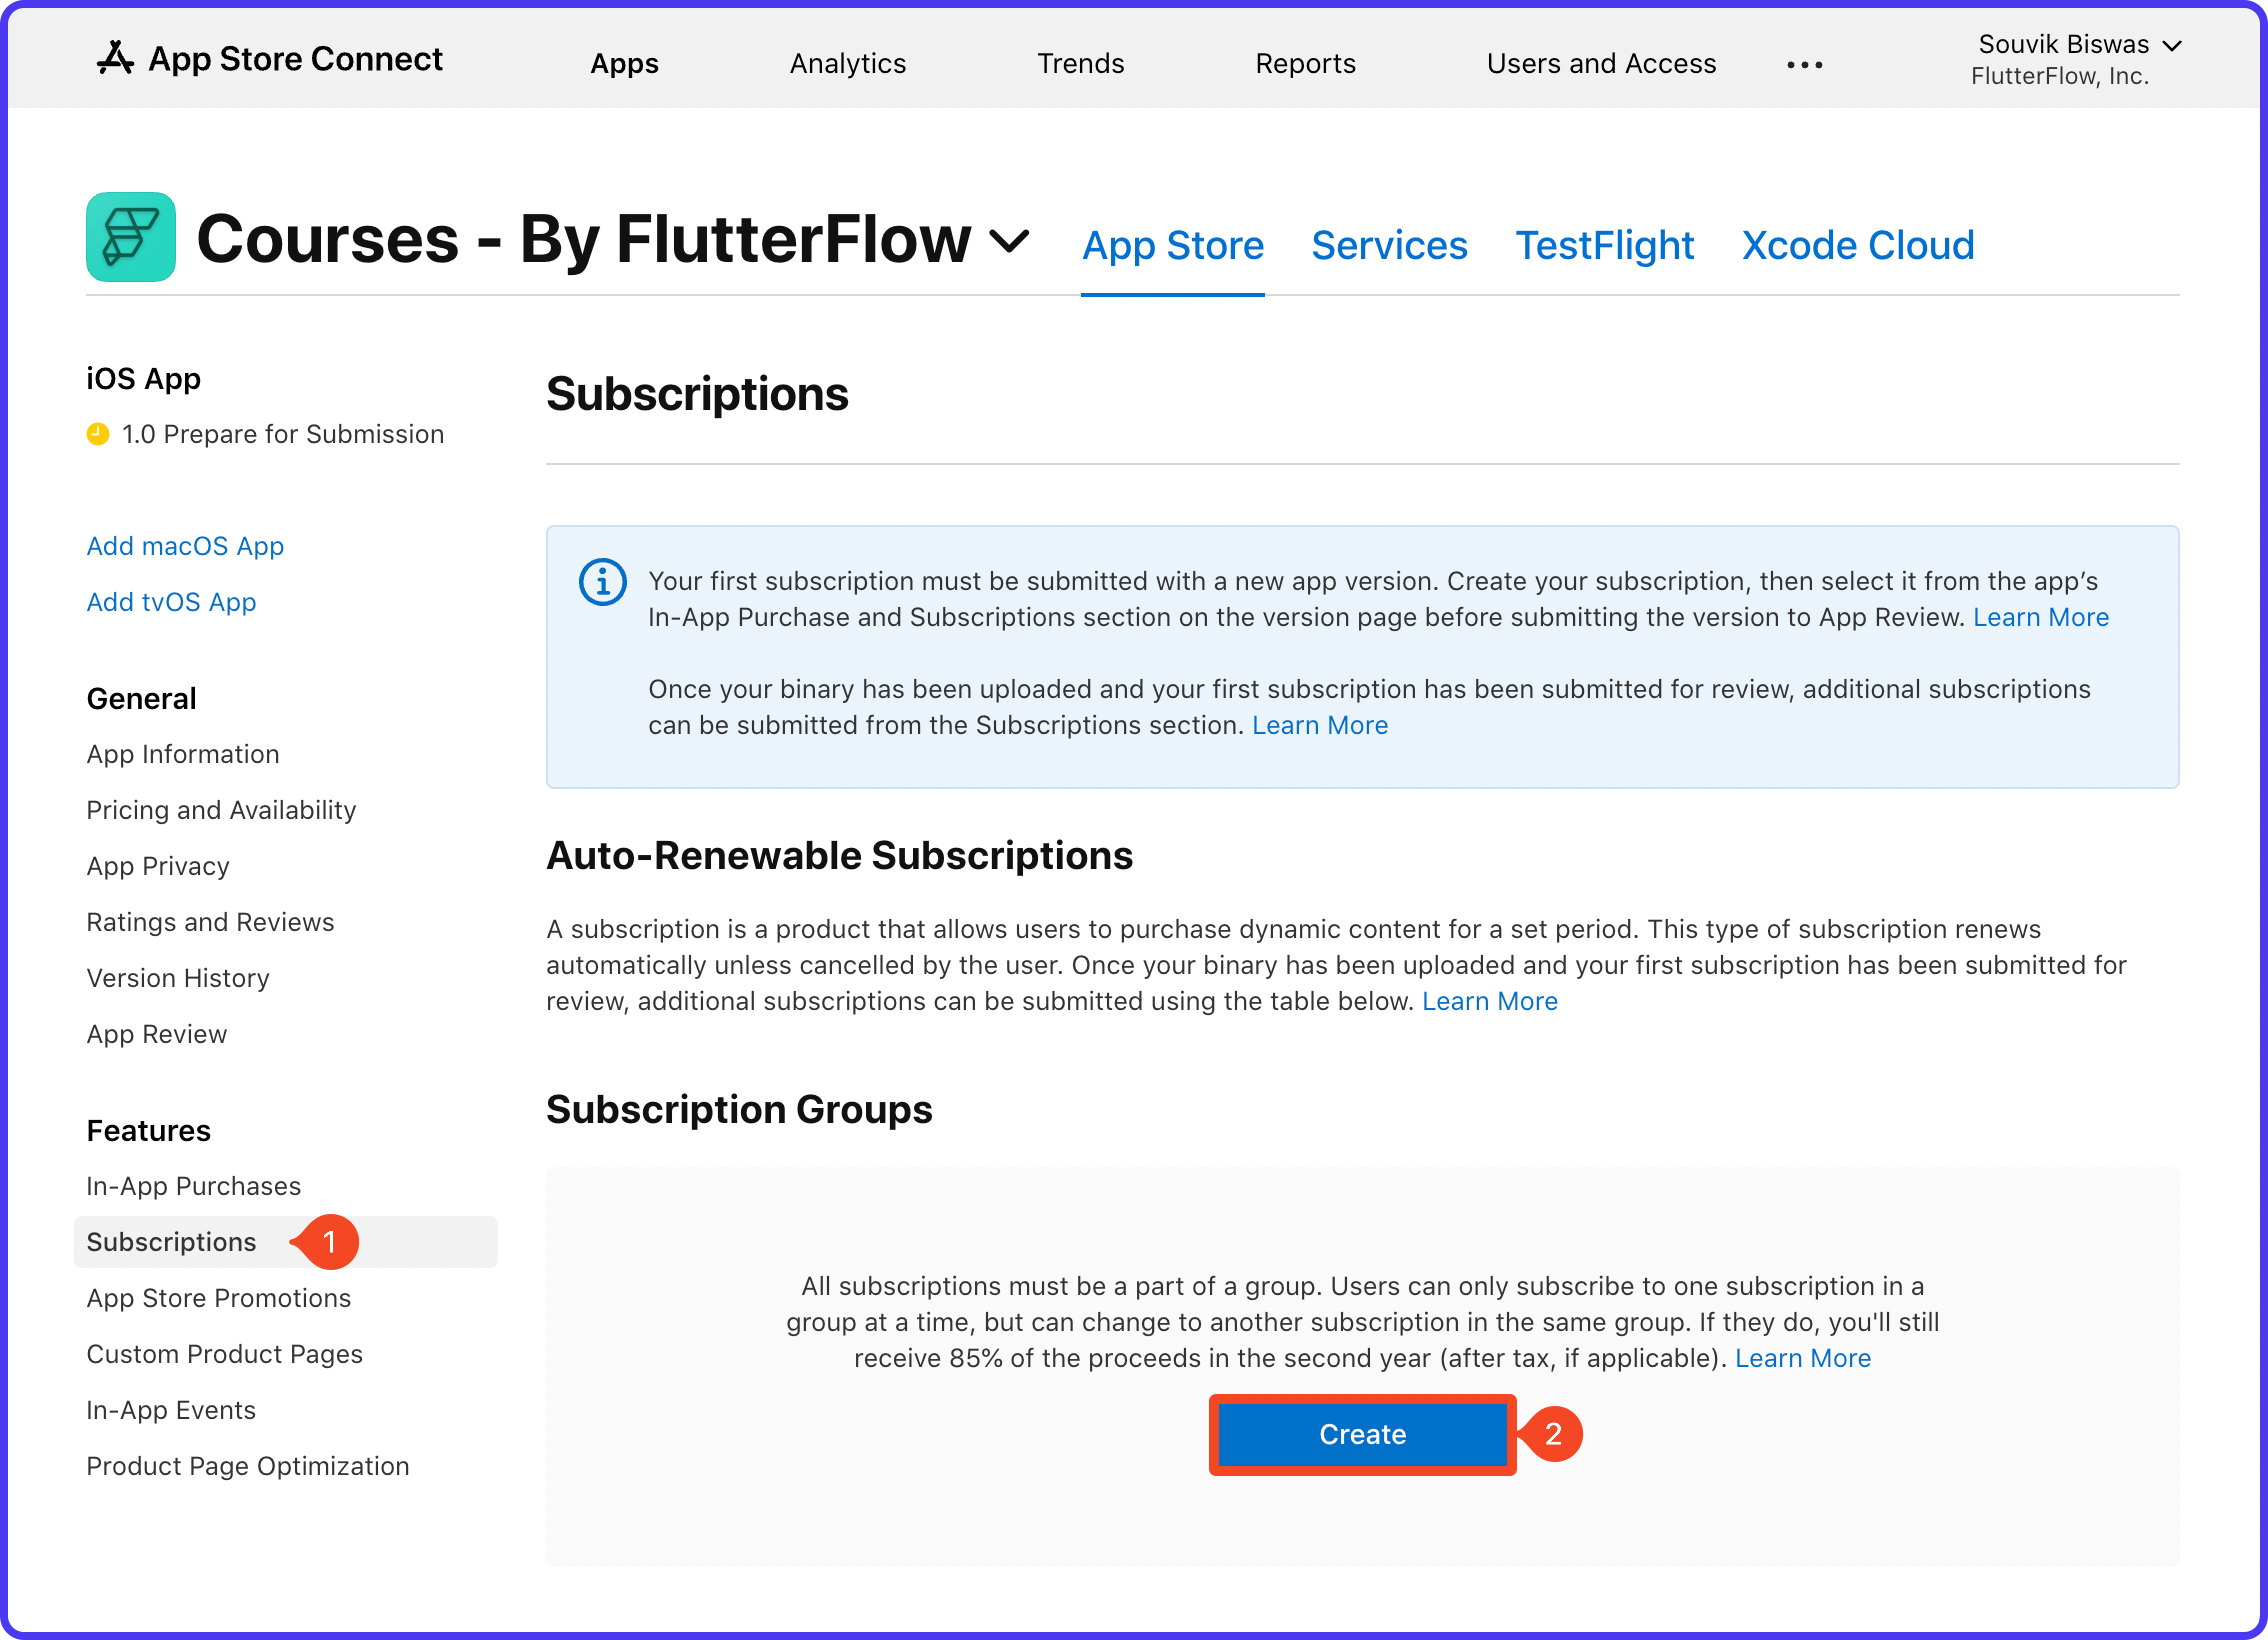
5. Enter a name for the Subscription Group and click Create.

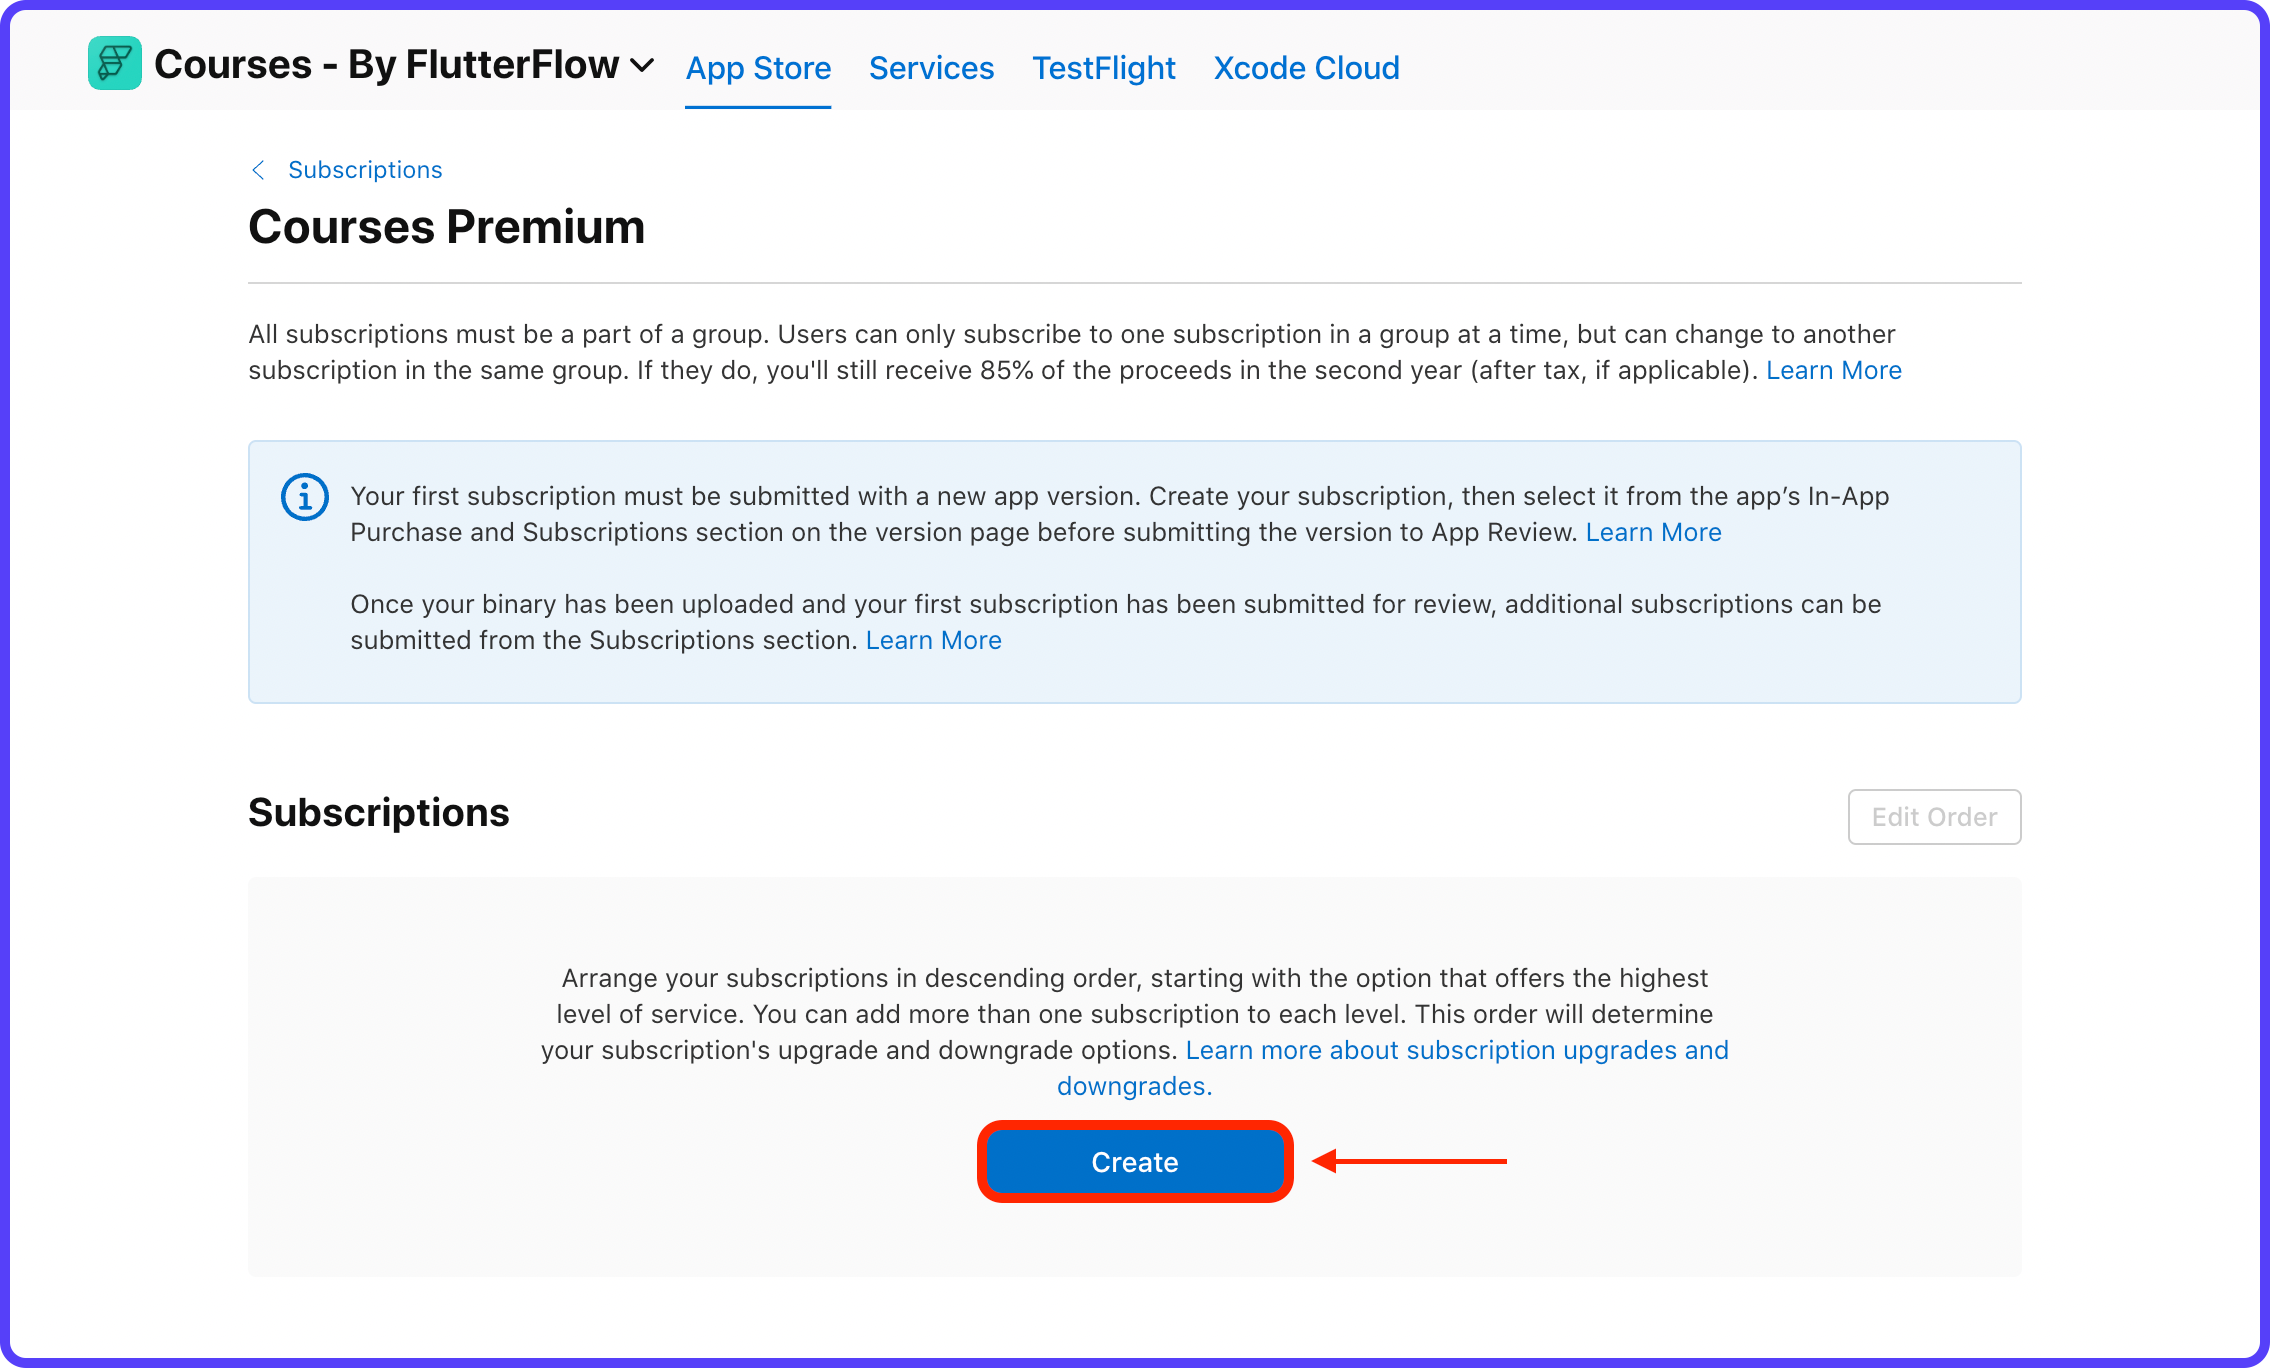
6. This will create and open the Subscription Group. From this page, you will be able to create subscriptions for your app. Click Create under Subscriptions.
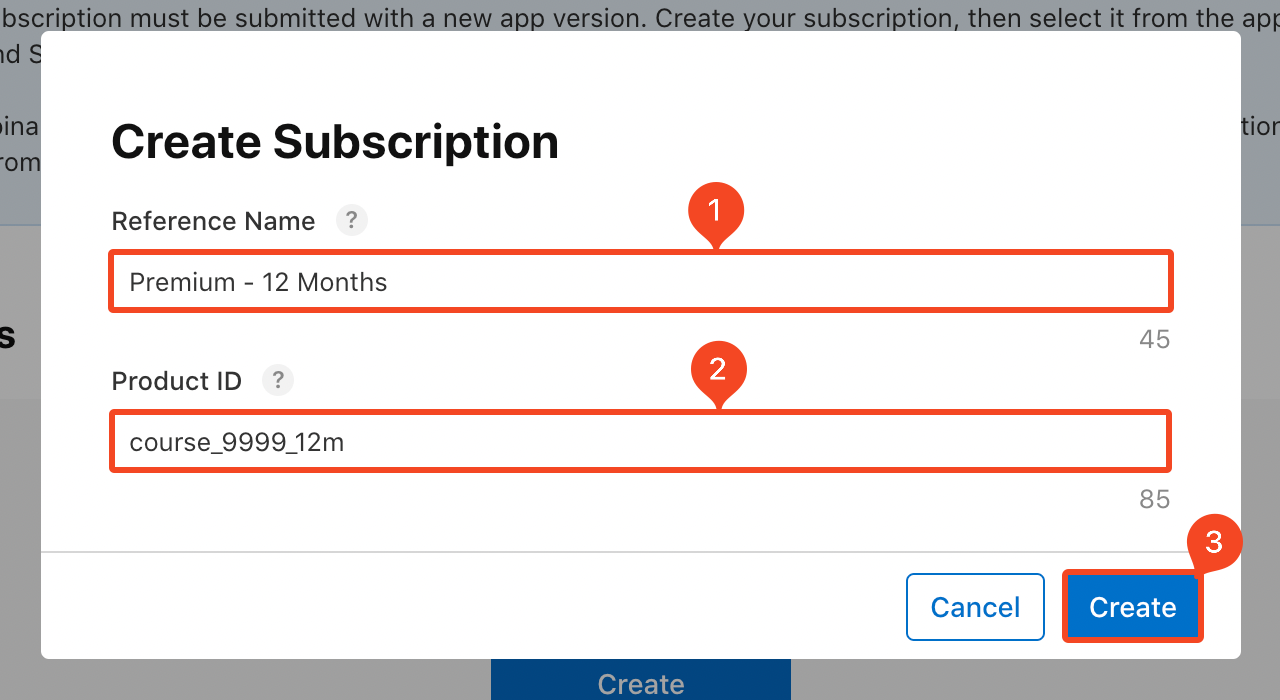
7. Enter a Reference Name and Product ID for the subscription. Use the same format for the Product ID as we had described earlier. Click Create.
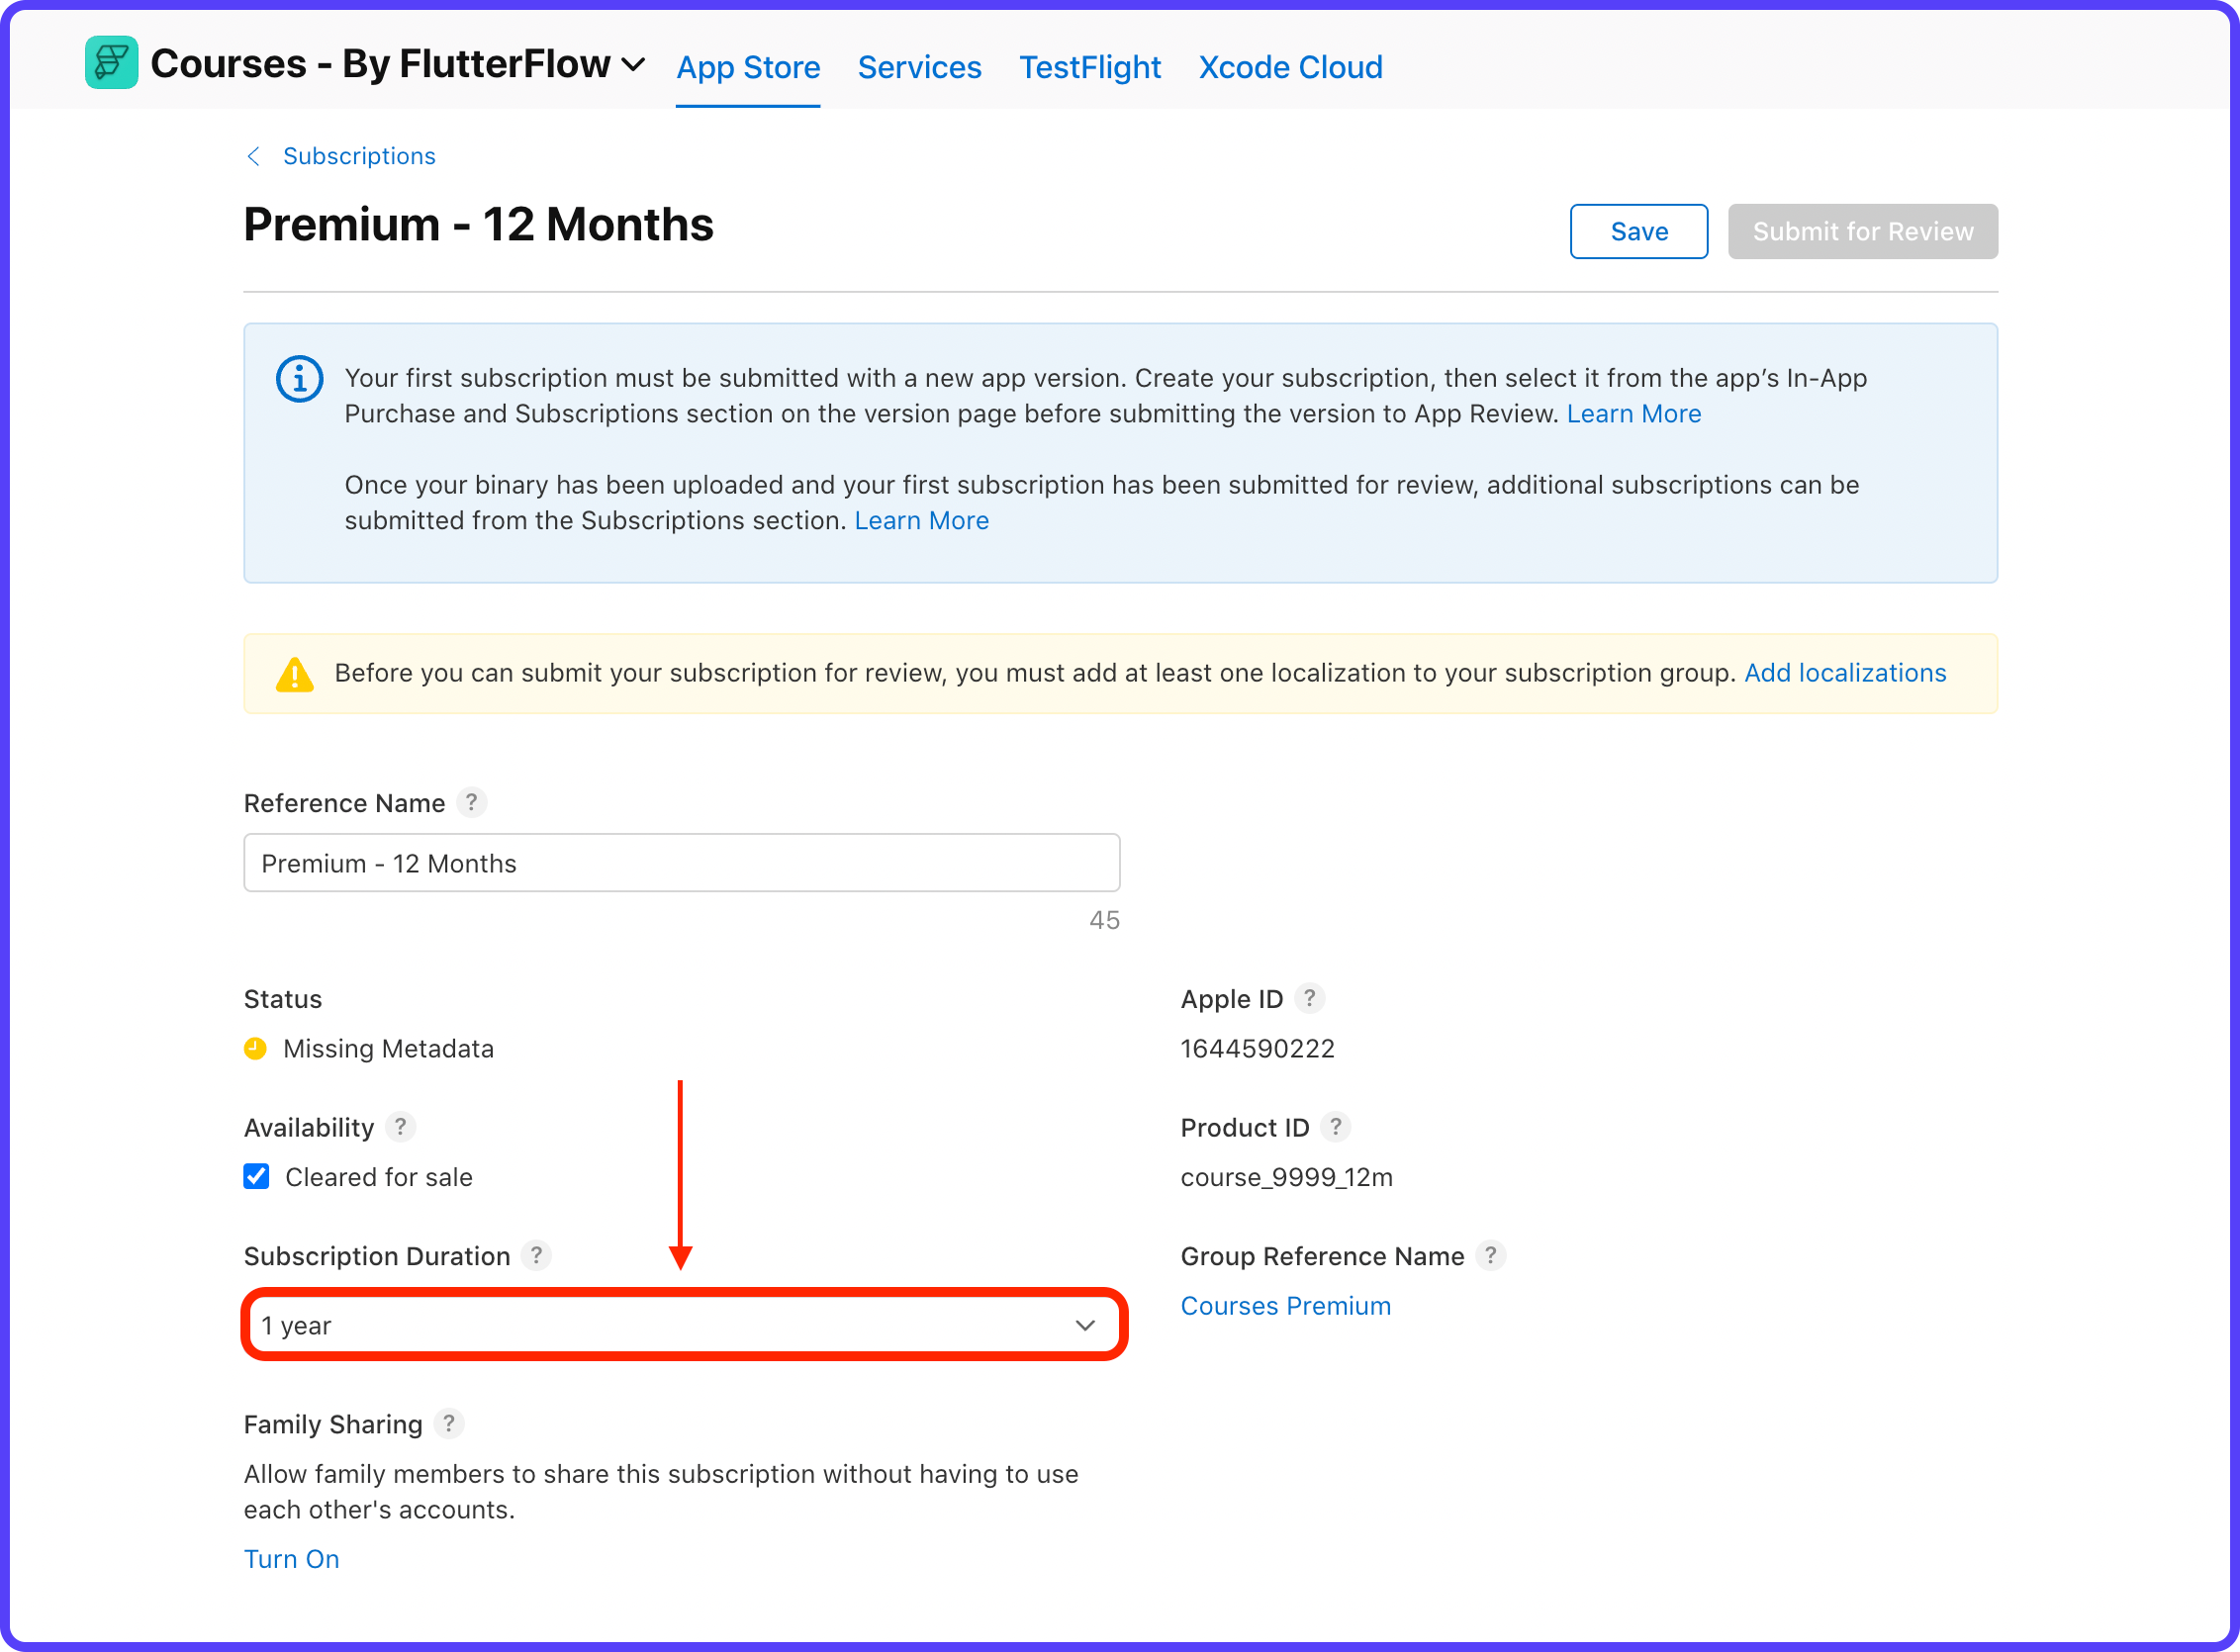
8. This will take you to the subscription details page. Select the Subscription Duration.
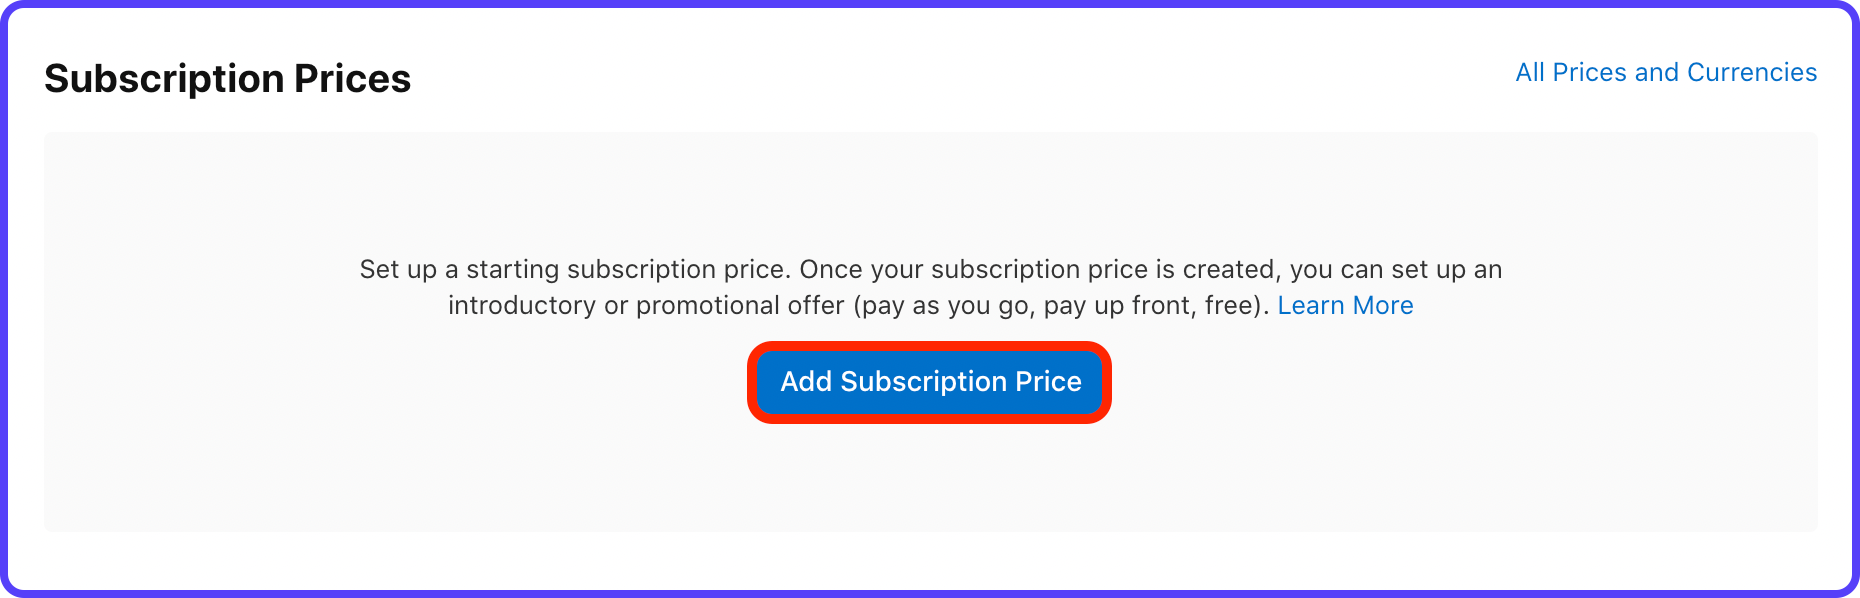
9. Scroll down to the Subscription Prices section and click "Add Subscription Price" button.
10. Enter the subscription price in your preferred currency. Click Next.

11. The next page will show you the automatically calculated prices for other countries and regions. Click Next.
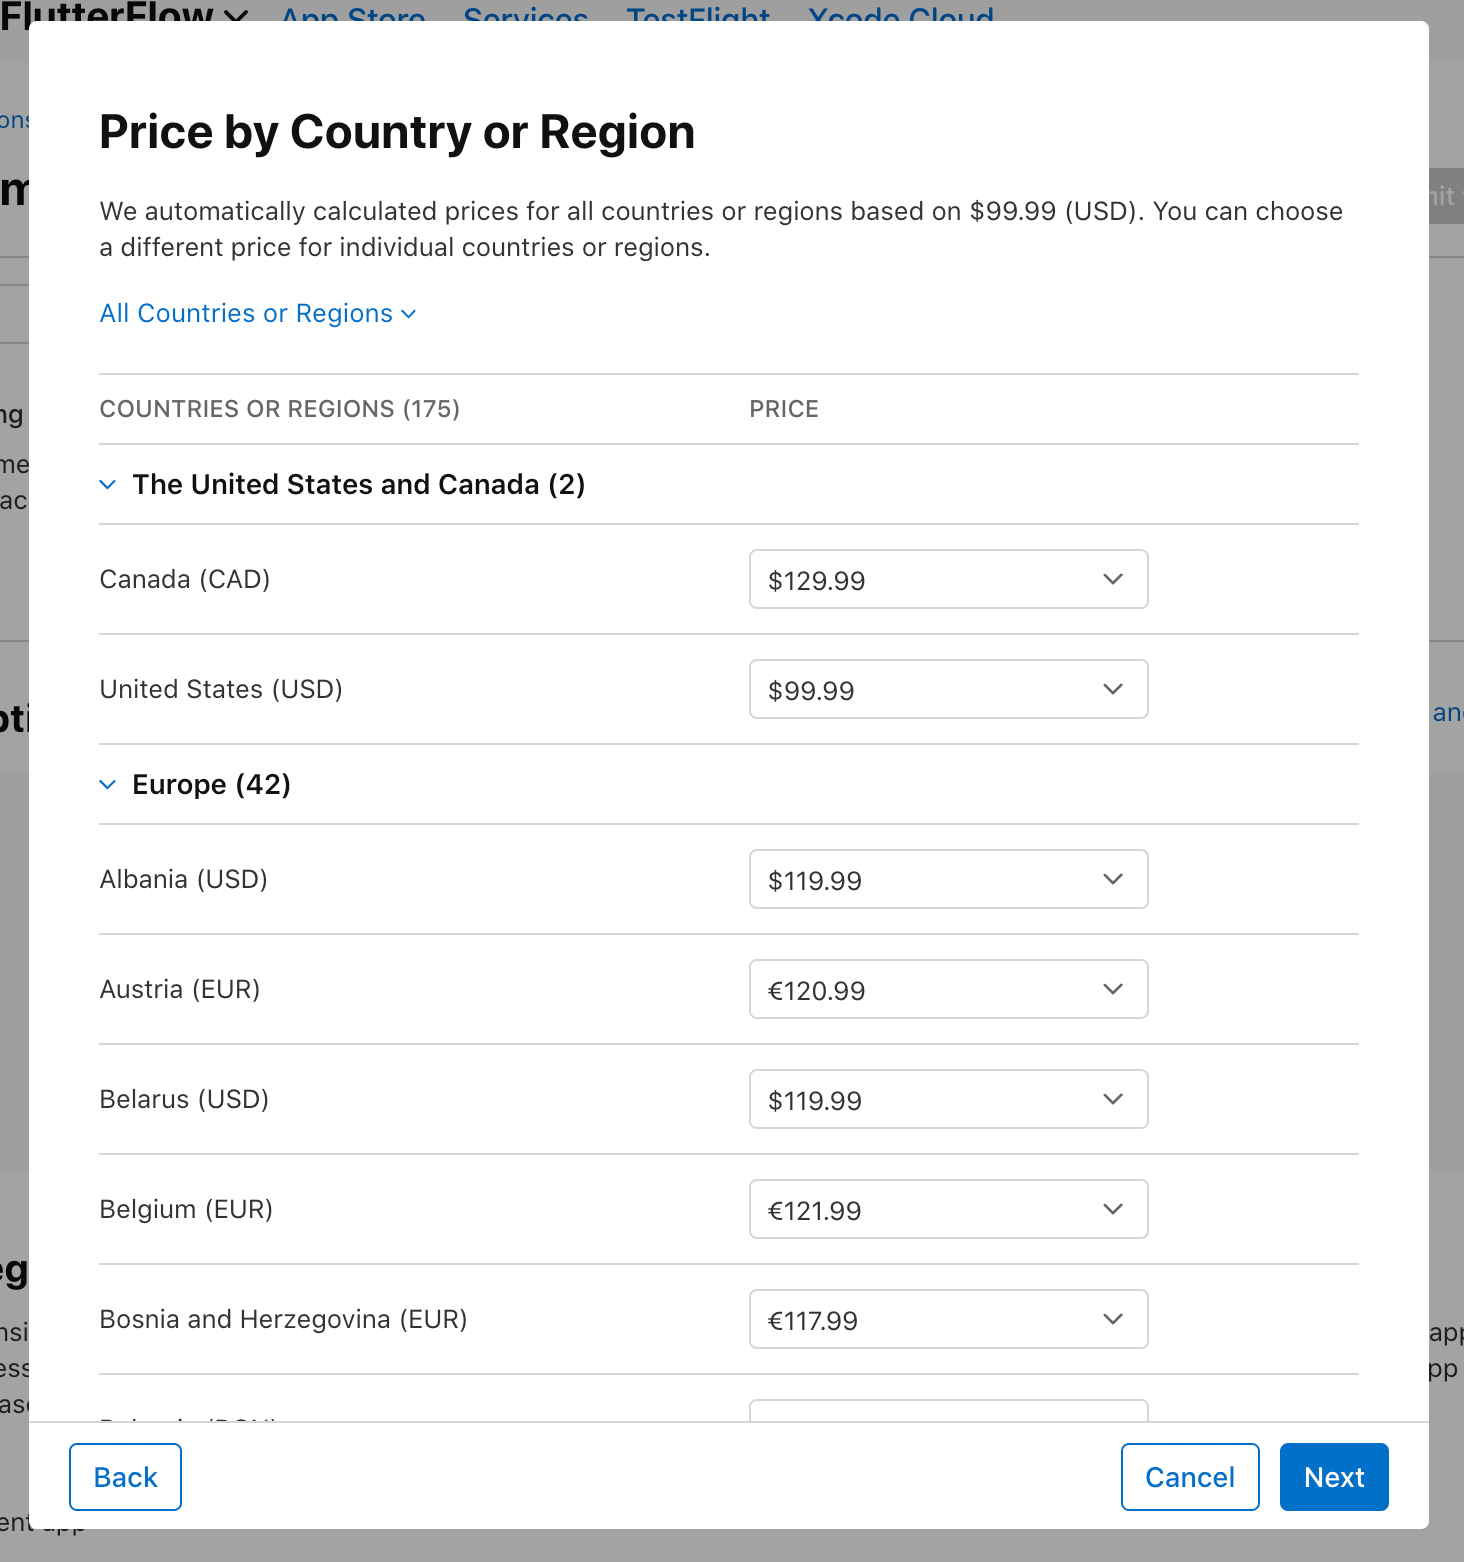
12. Click Confirm on the next page.

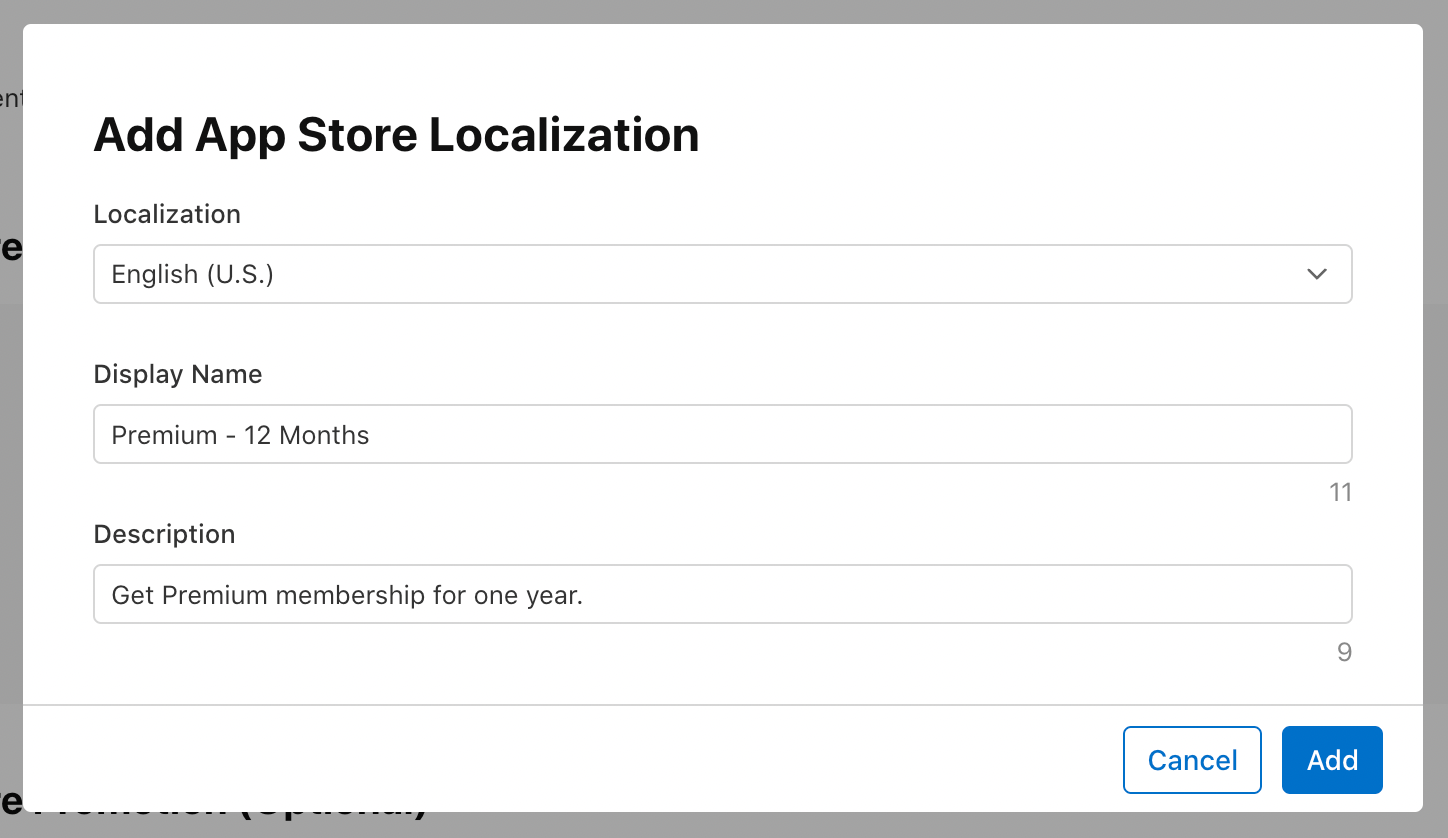
13. Scroll down to the App Store Localization section. Click "Add Localization".

14. Select your preferred language and enter a Display Name and Description. Click Add.
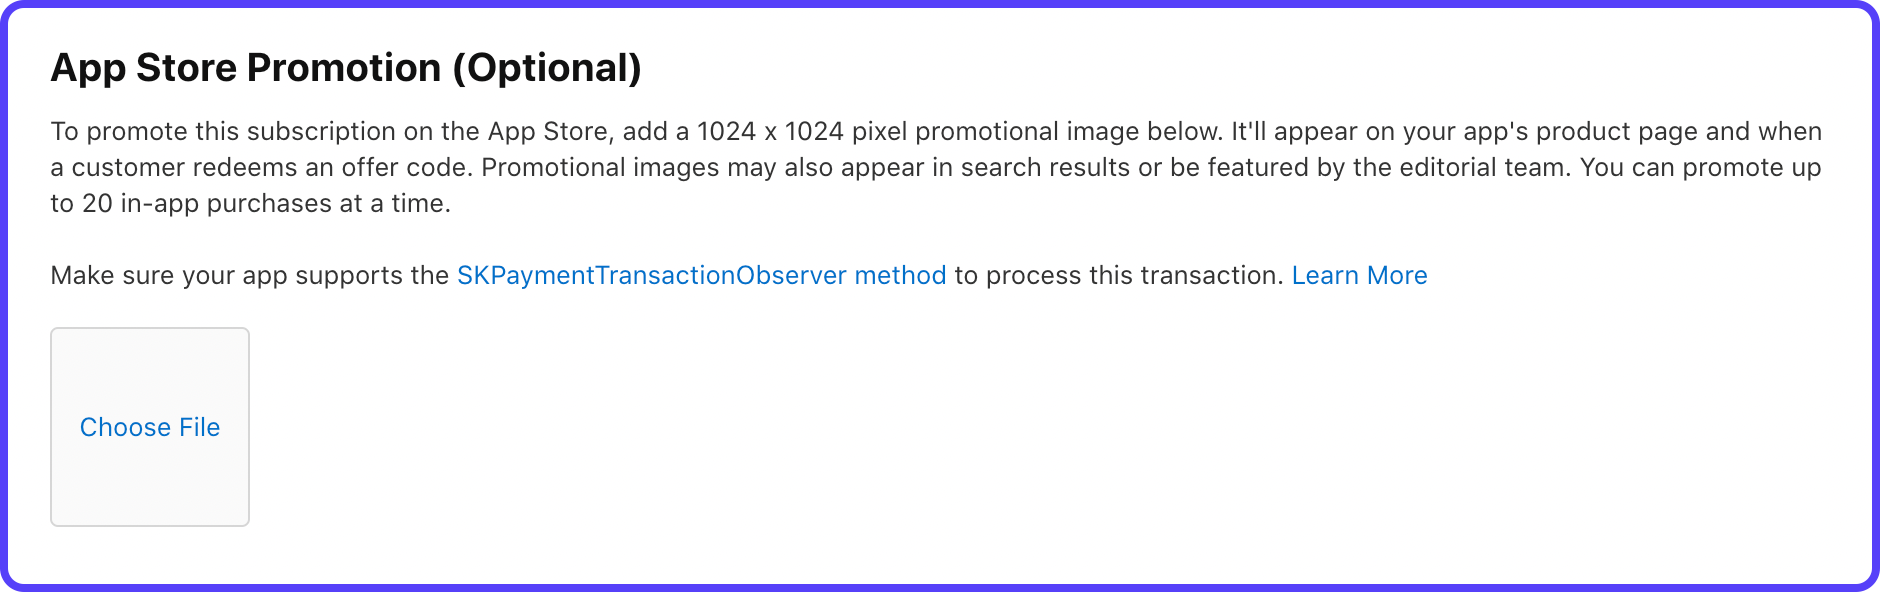
15. You can skip the App Store Promotion for now as it's optional.
16. Under the Review Information section, add a screenshot of the subscription screen of your app (you can also add a blank screenshot, having proper size for now, if you haven't yet created the subscription UI).

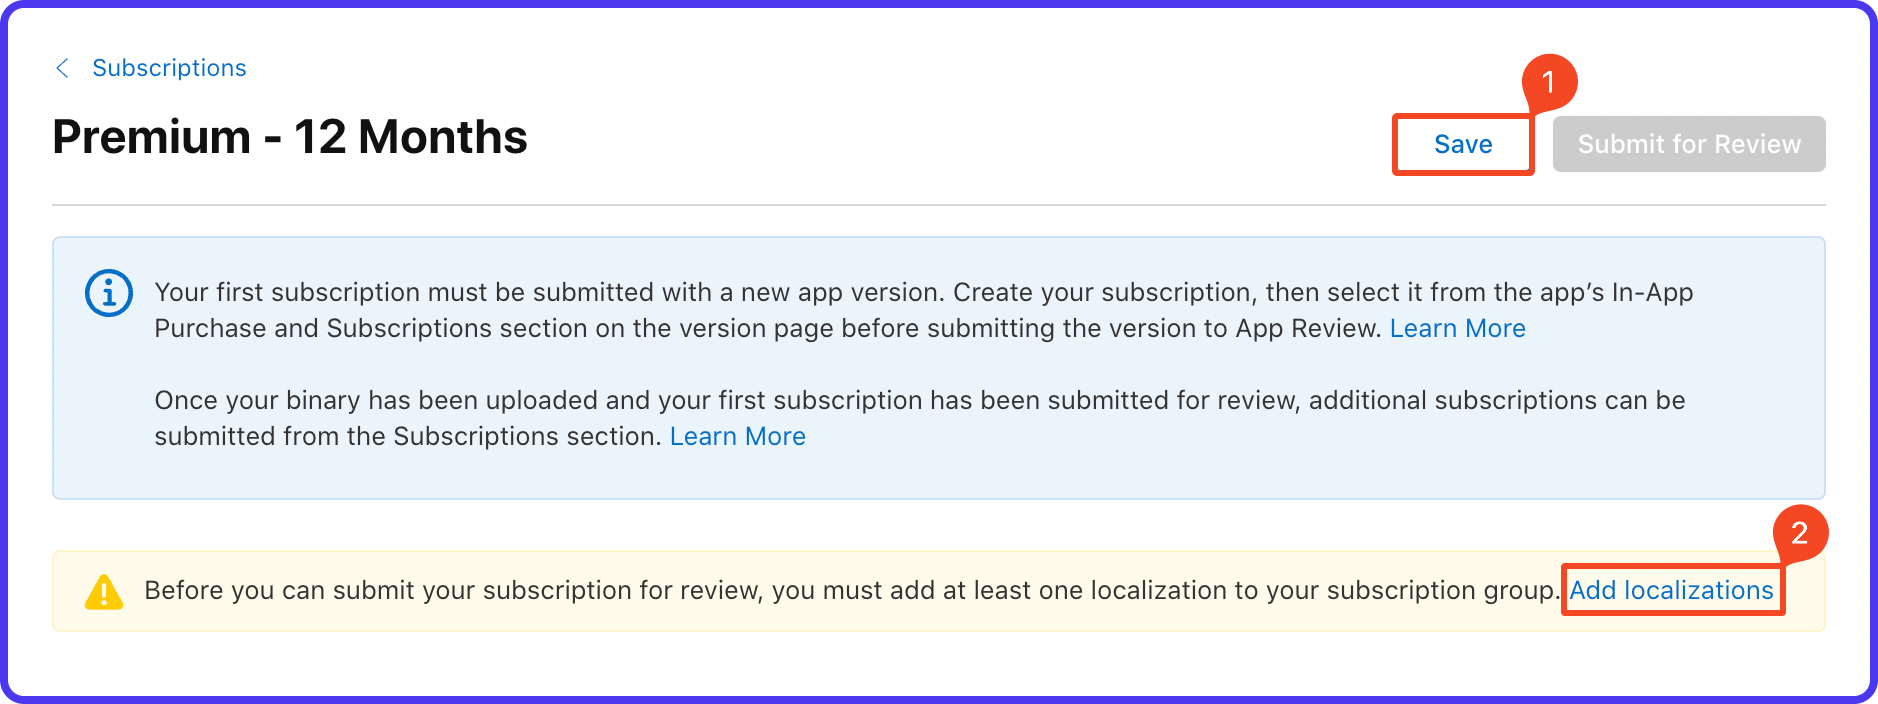
17. Scroll up to the top of the subscription page, and click Save. You will see a warning message if you haven't yet added localization to your subscription group. Click Add localizations (skip if you have already added).
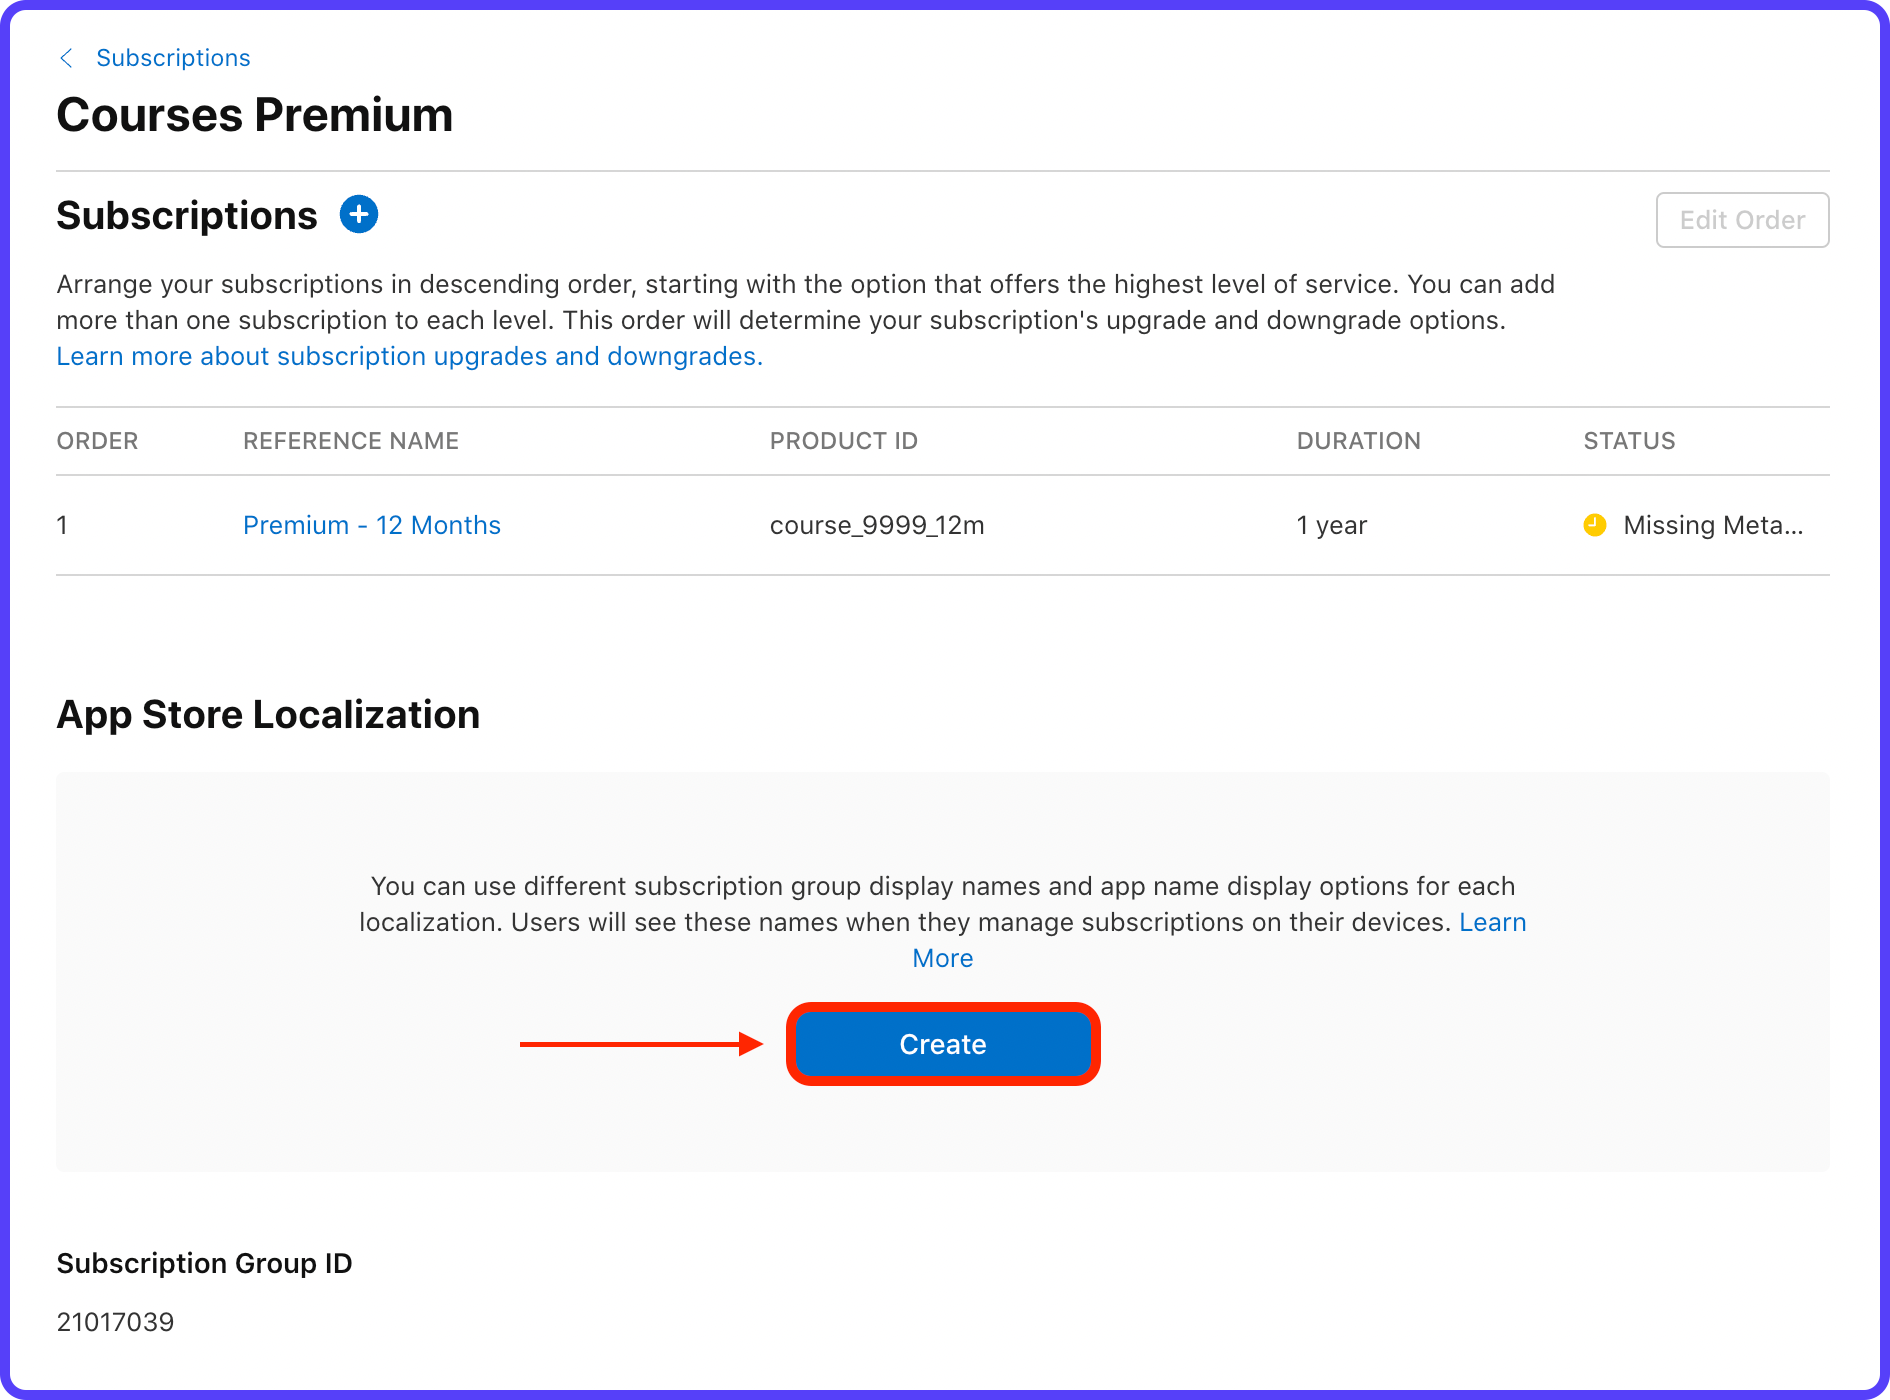
18. This will take you back to the subscription group page. Click Create under App Store Localization.
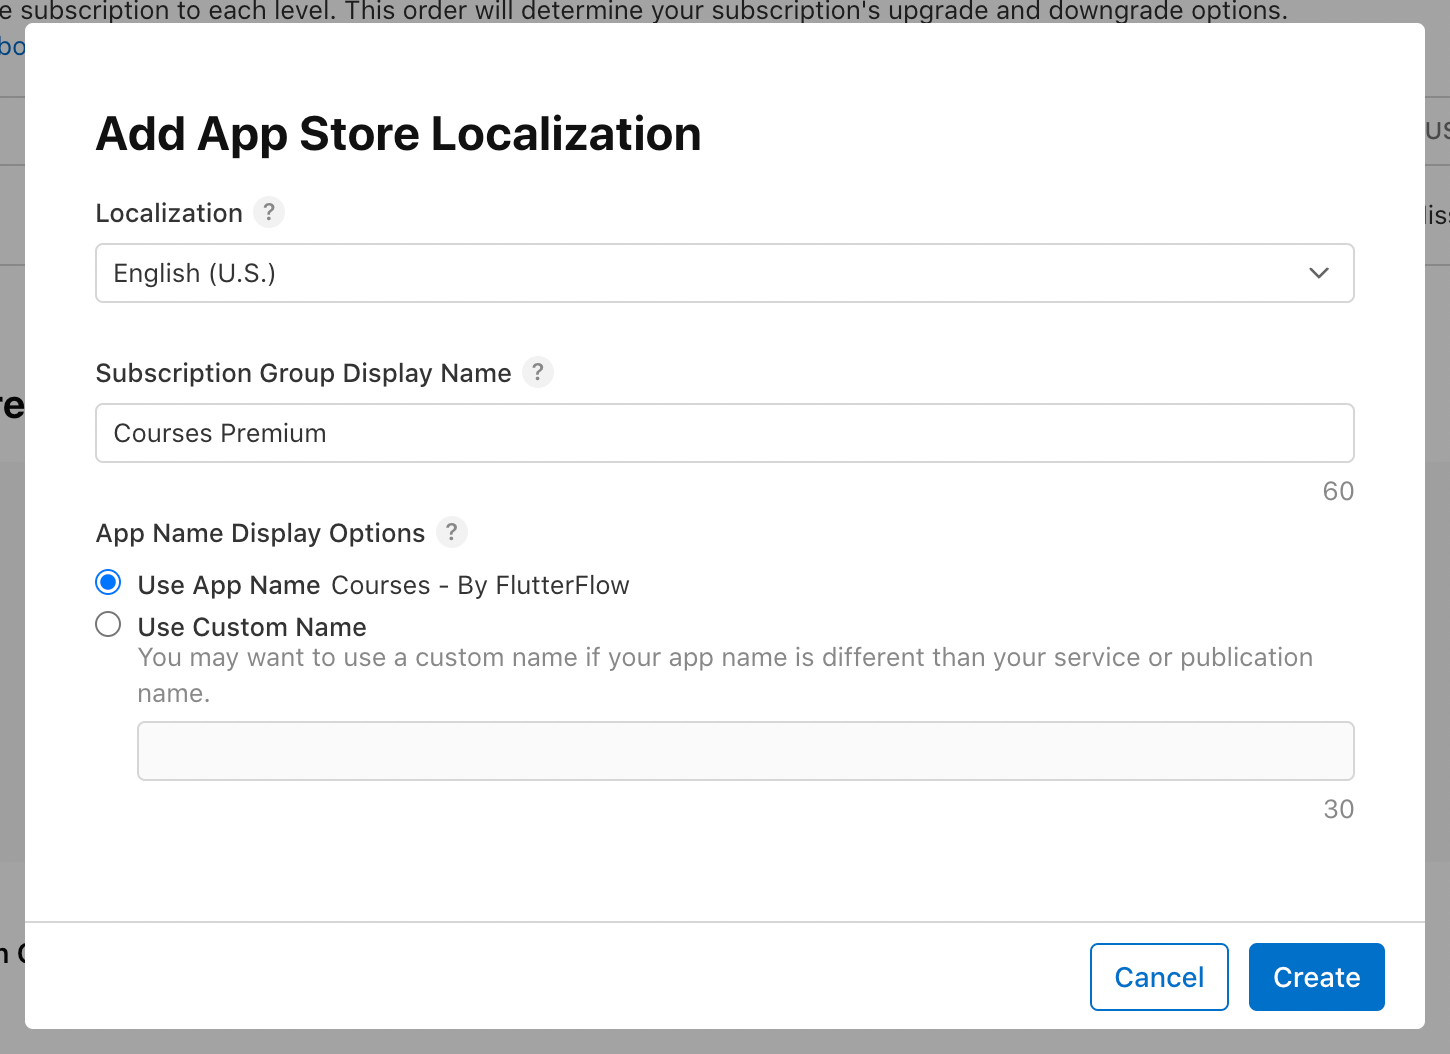
19. Select your preferred language, enter a Subscription Group Display Name, and select App Name. Click Create.
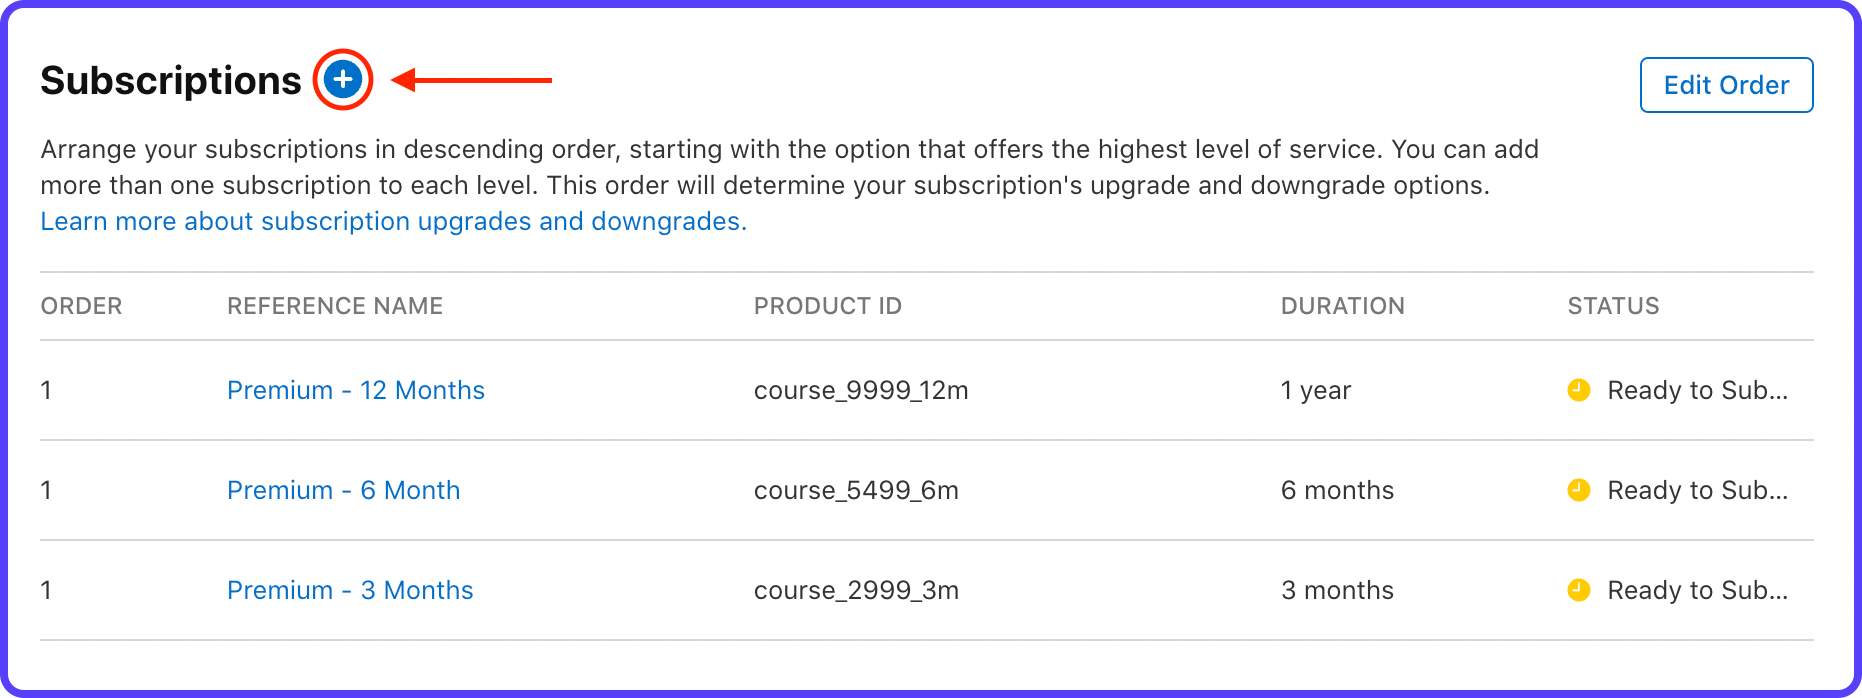
20. This completes the addition of a subscription. You can follow similar steps for adding the other subscription plans as well, use the plus ("+") button next to Subscriptions.
With all the subscription plans defined on Play Console and App Store Connect, we are ready to connect with RevenueCat.
Connect with RevenueCat
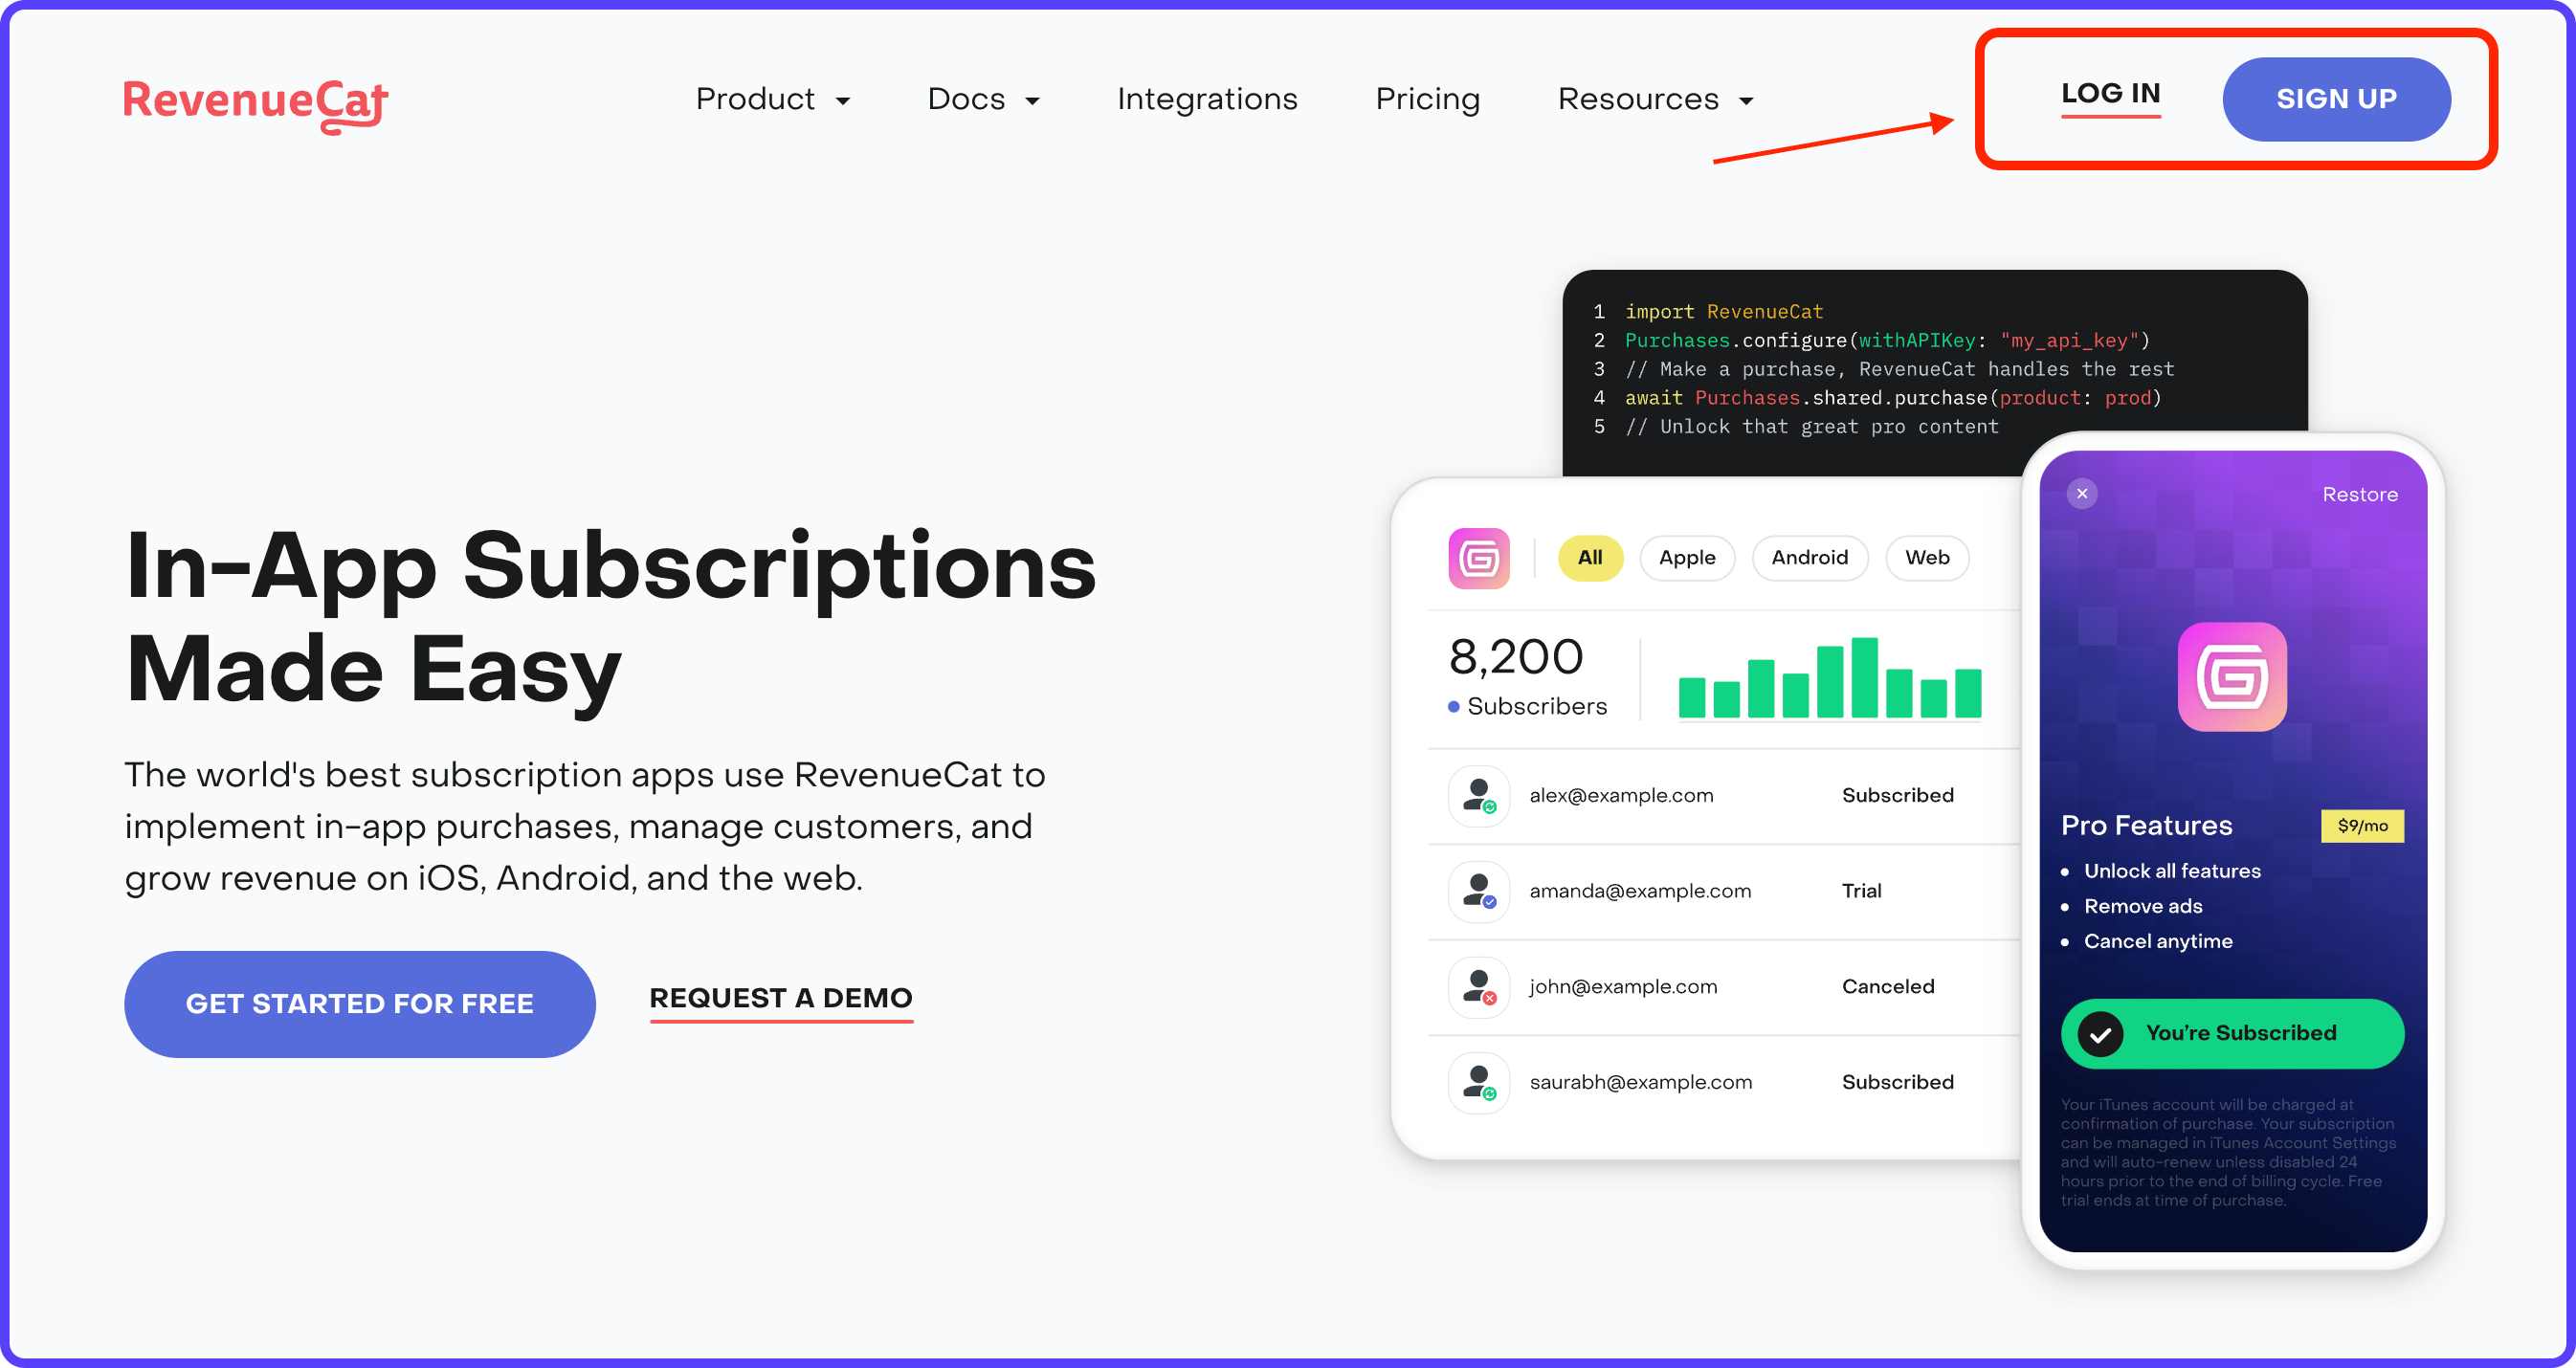
Create an account or log in to RevenueCat from here to get started.
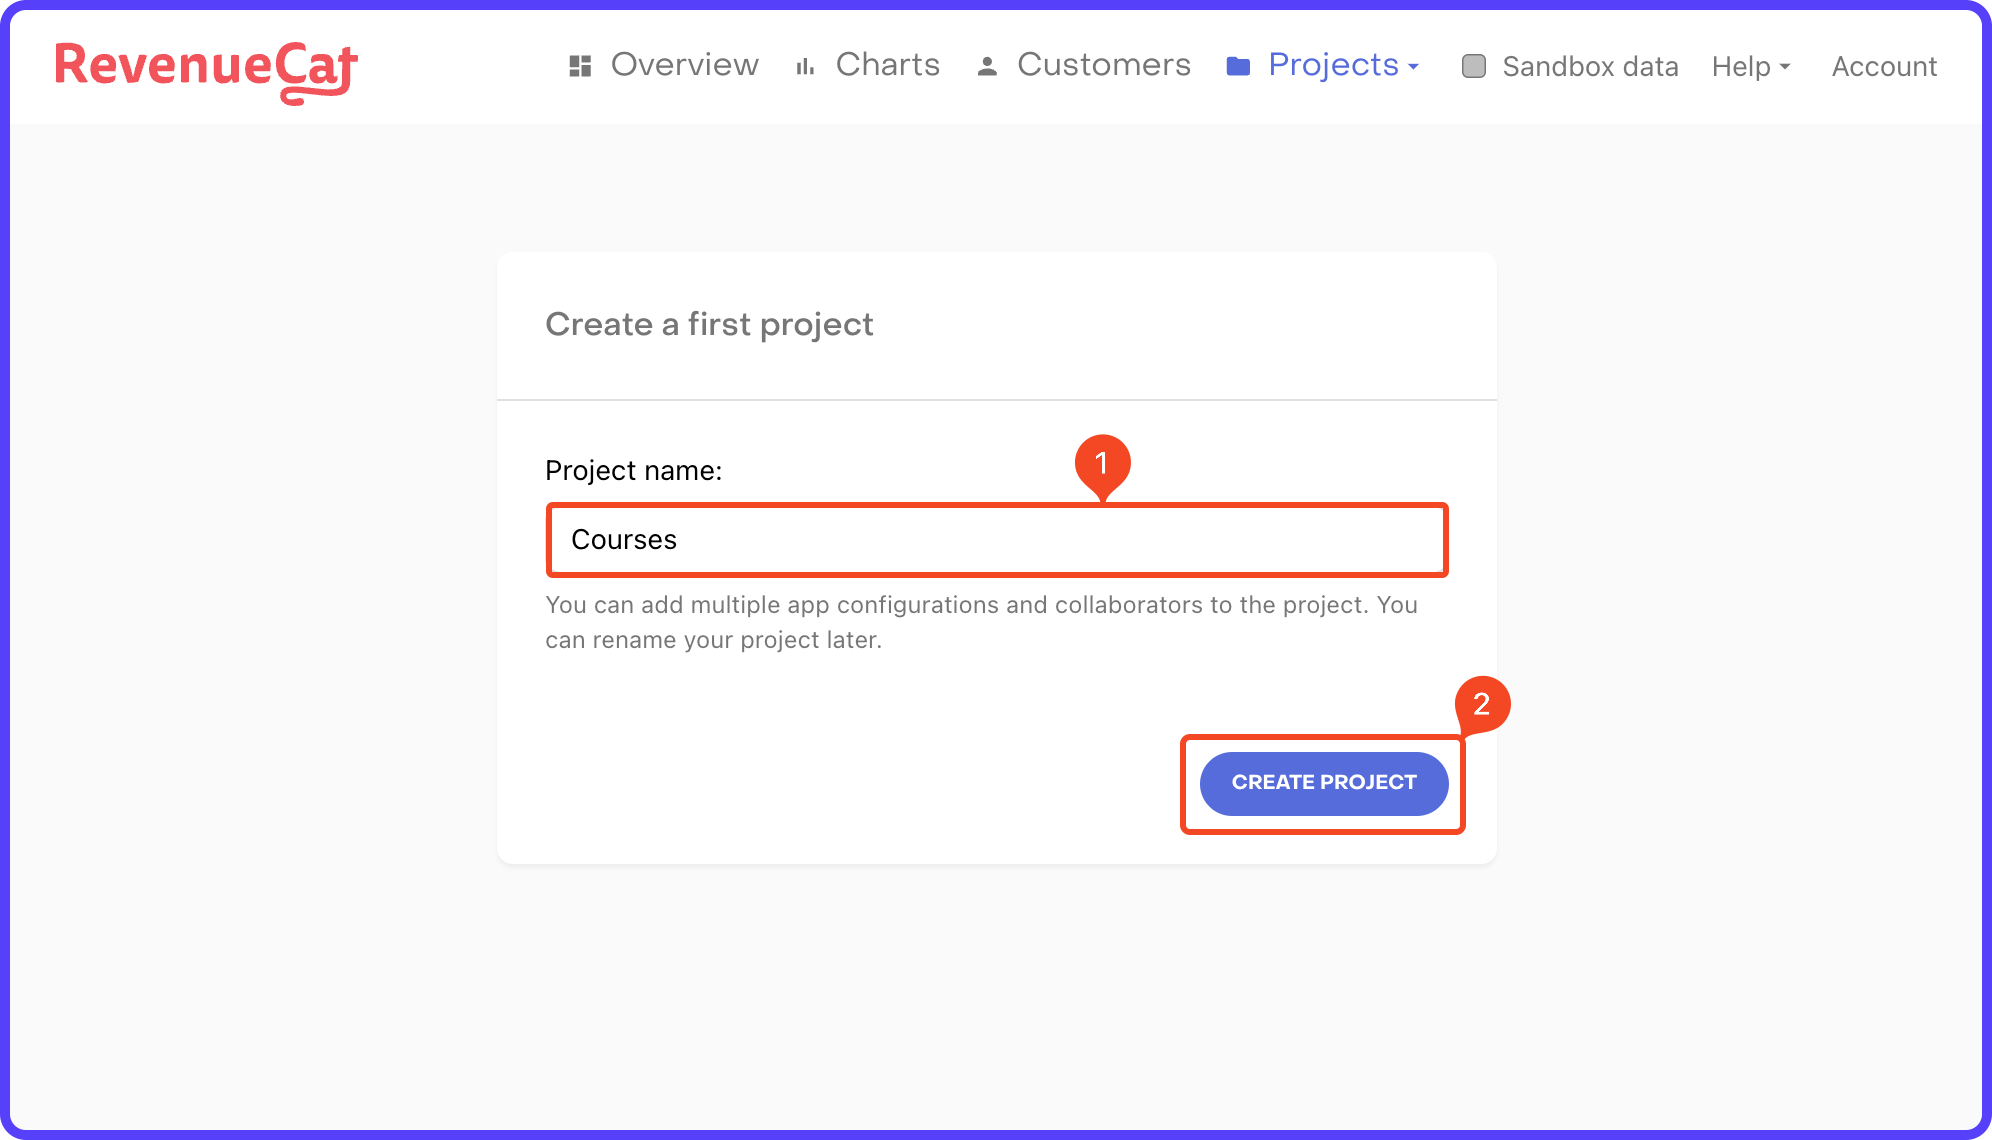
If you have created a new account, you will be automatically prompted to create your first project. Enter a Project name and click "CREATE PROJECT" button.
Next, you need to add your Android and iOS apps to RevenueCat in order to use and manage the subscriptions.
Adding Android app
Let's start by configuring the Android app:
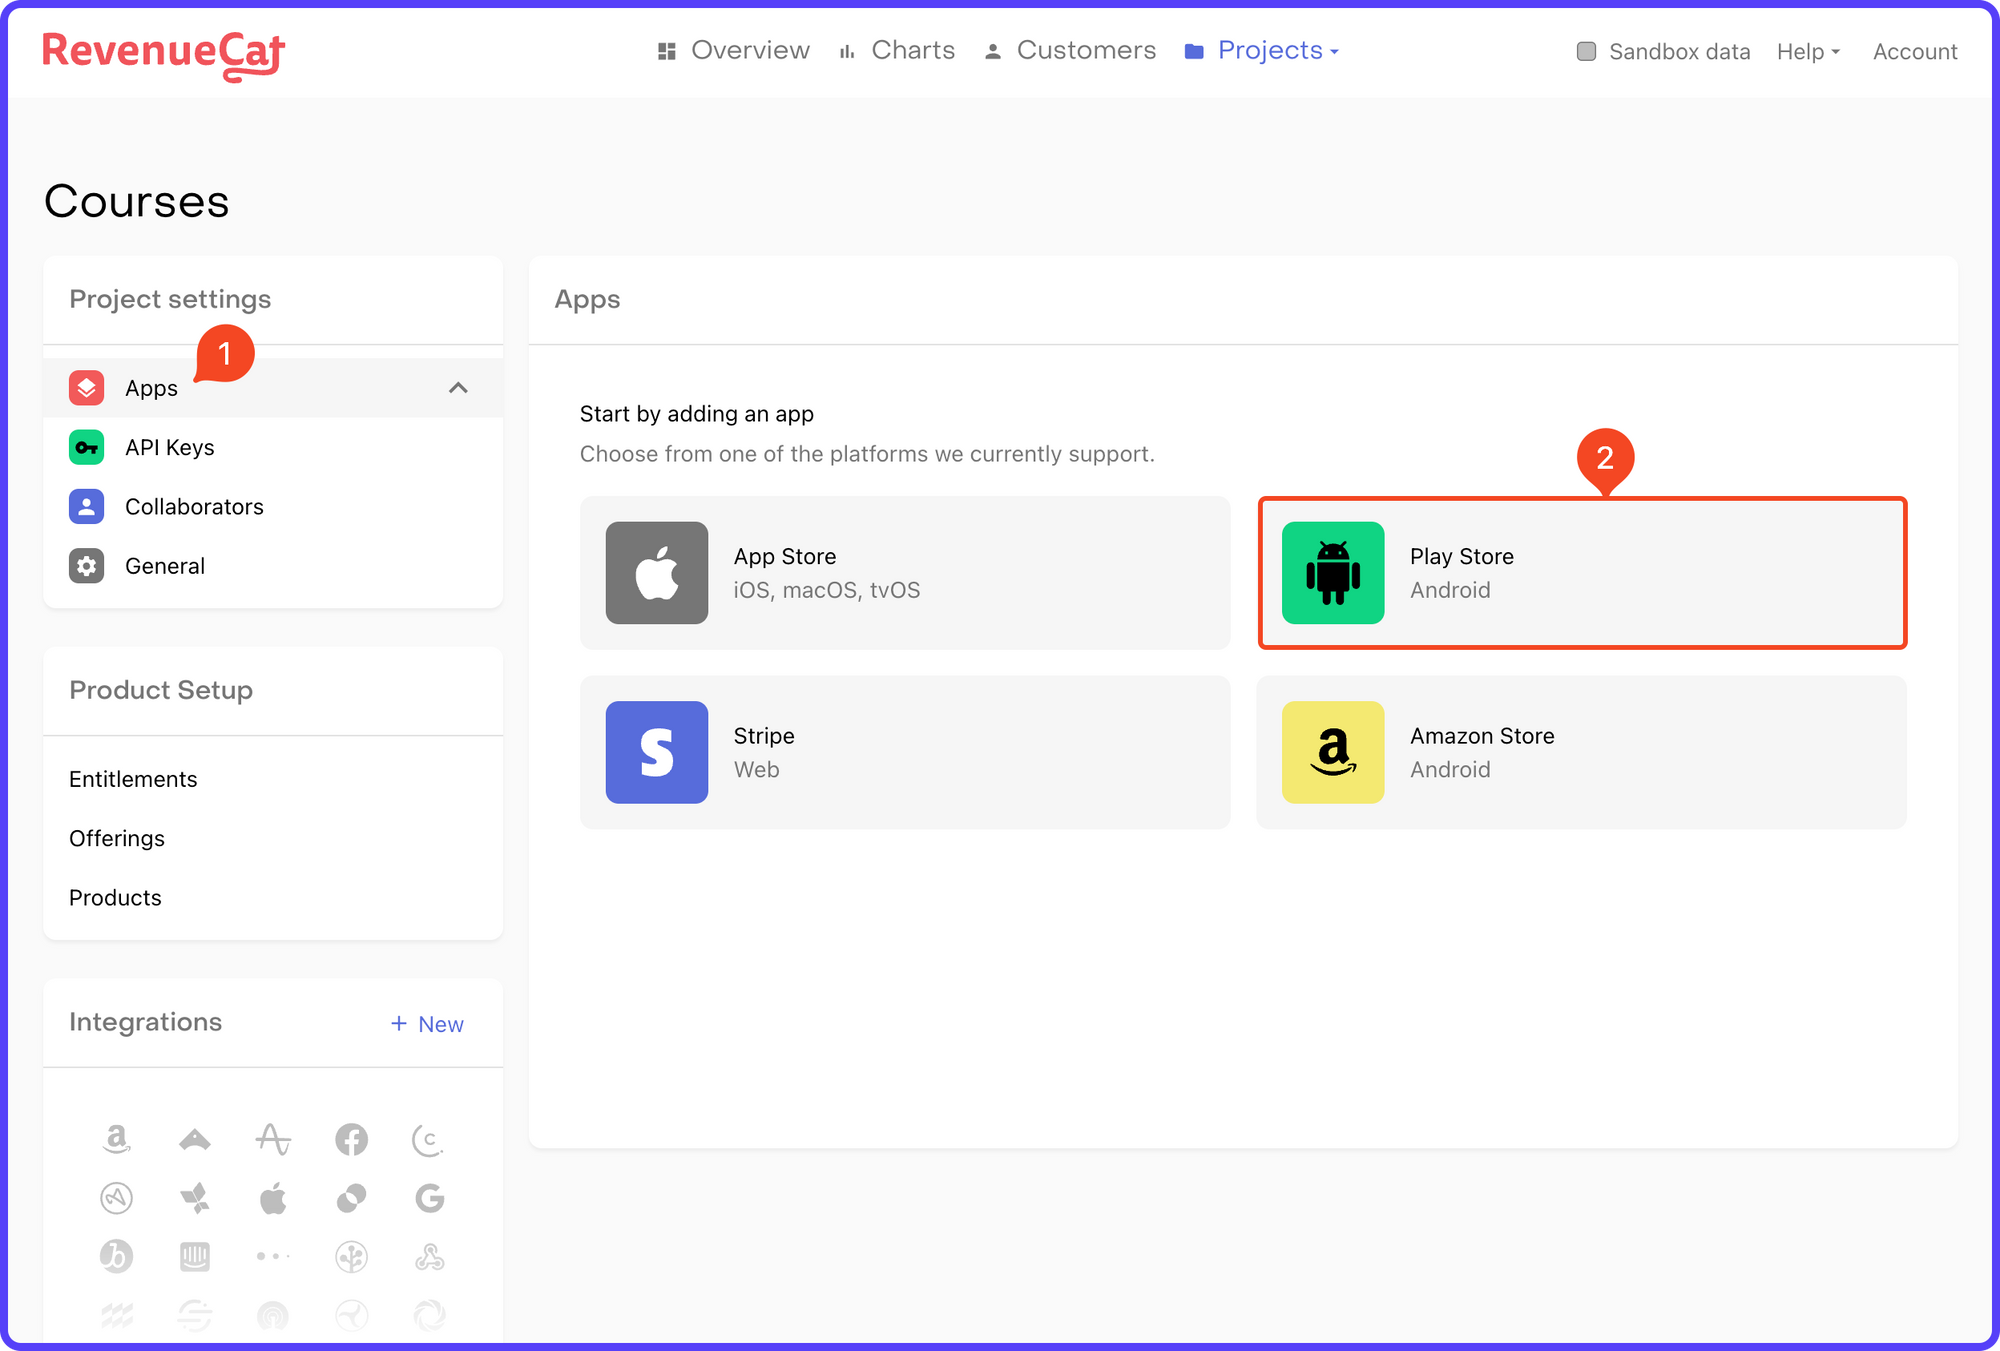
1. Go to Apps under Project settings (from the left menu). Select Play Store.
2. Enter the App name and the package ID.
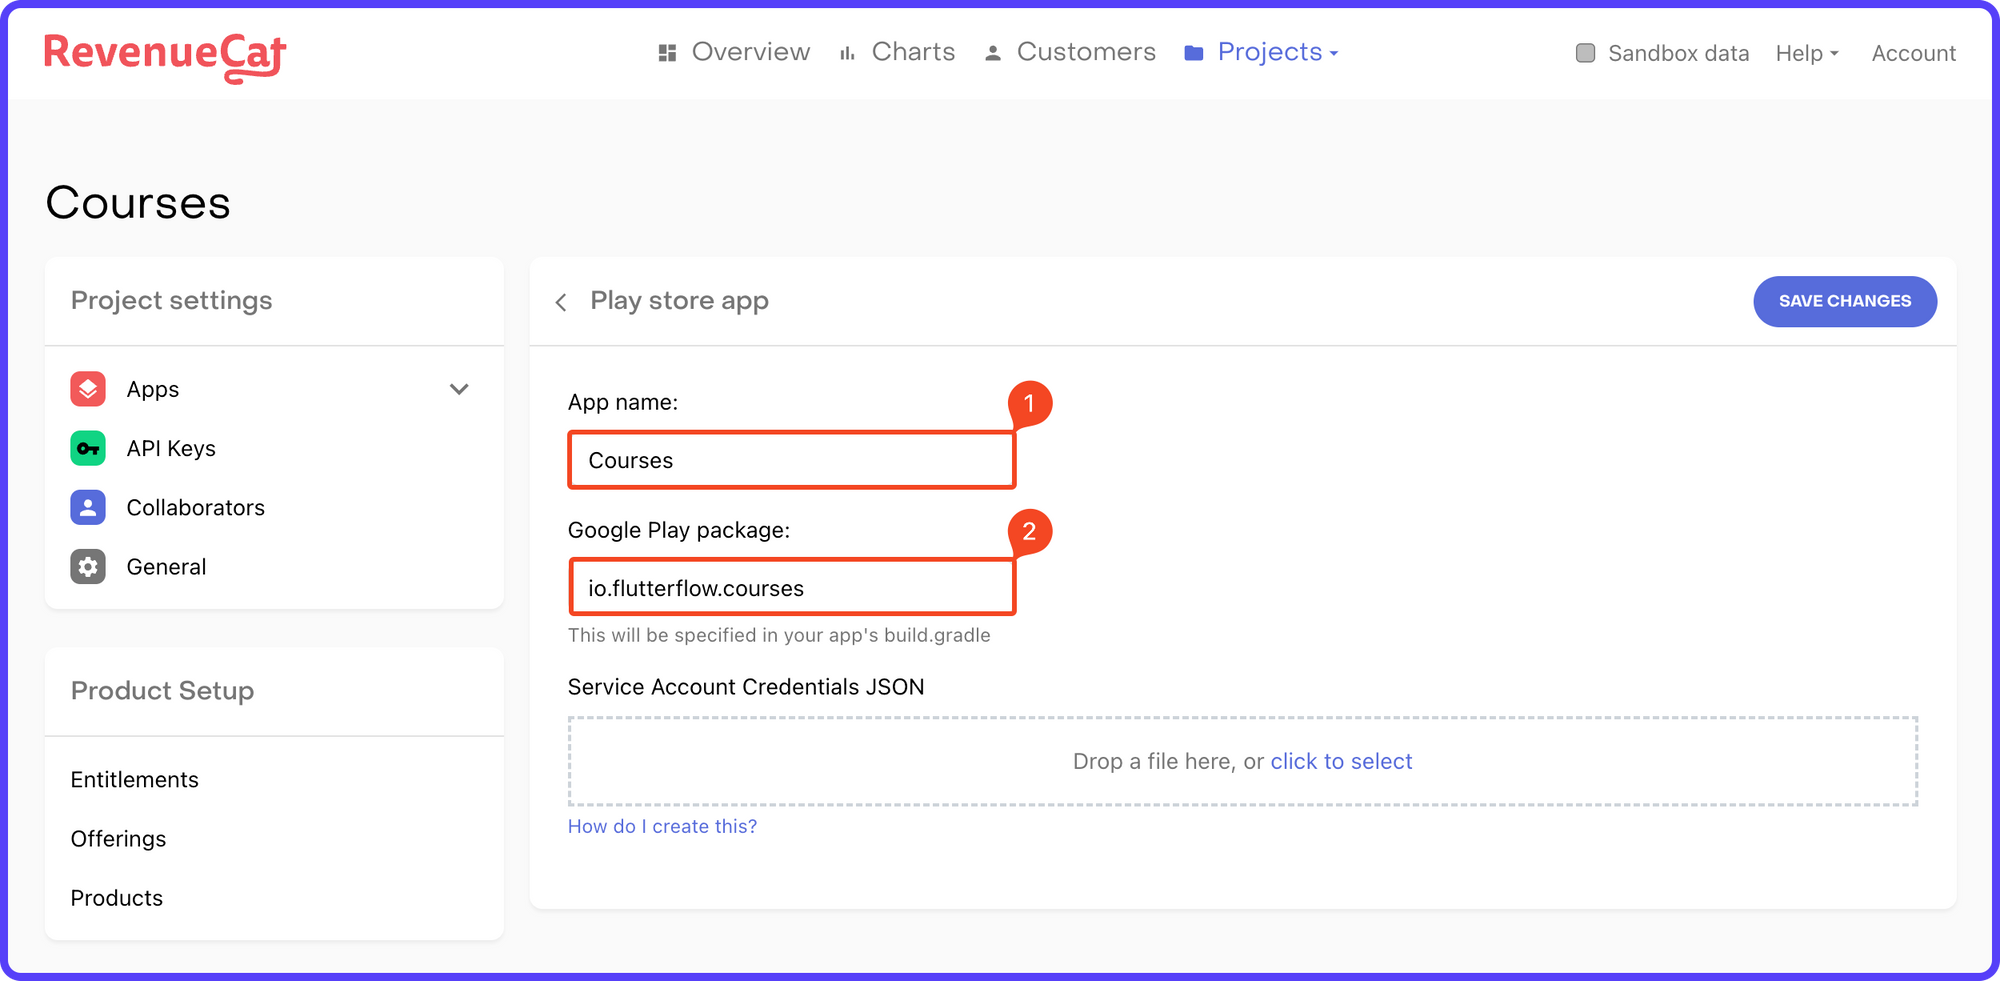
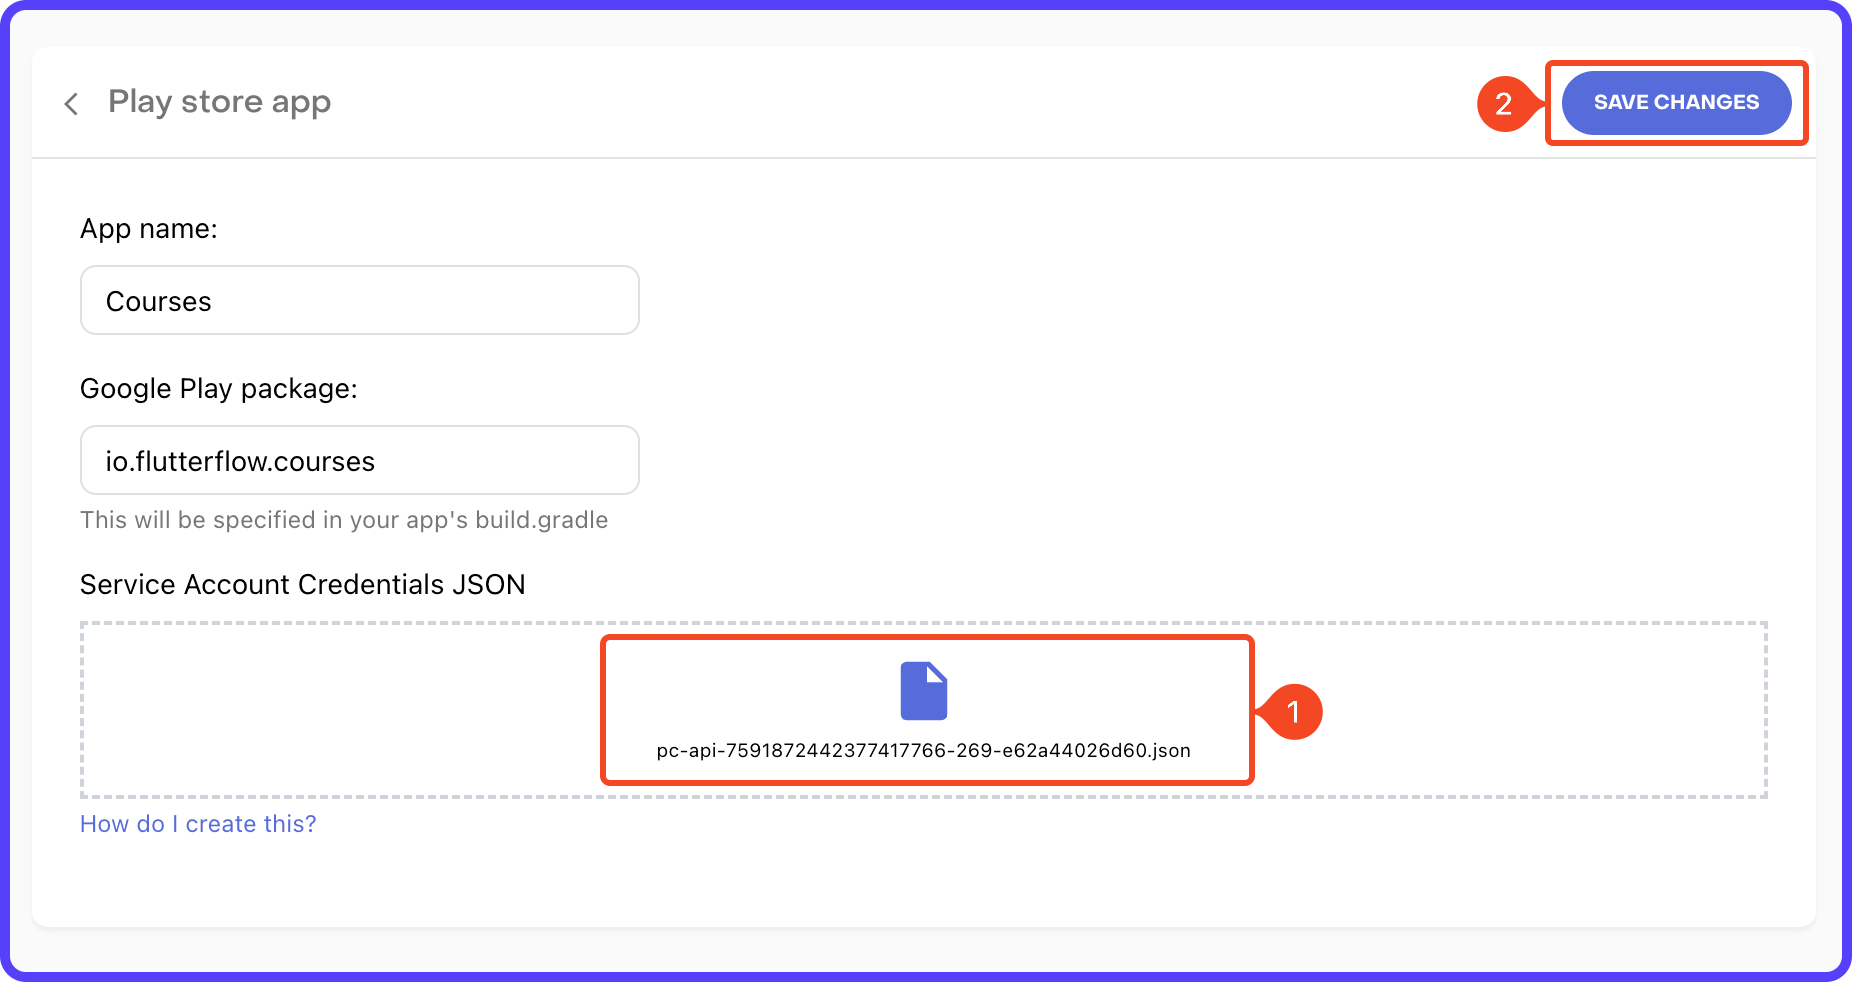
3. You need to create another Service Account for RevenueCat. Follow this guide to generate the credentials in JSON format. Drag and drop the Credentials JSON file. Click "SAVE CHANGES".
This completes the Android app setup on RevenueCat.
Adding iOS app
Follow the steps below to configure the iOS app:
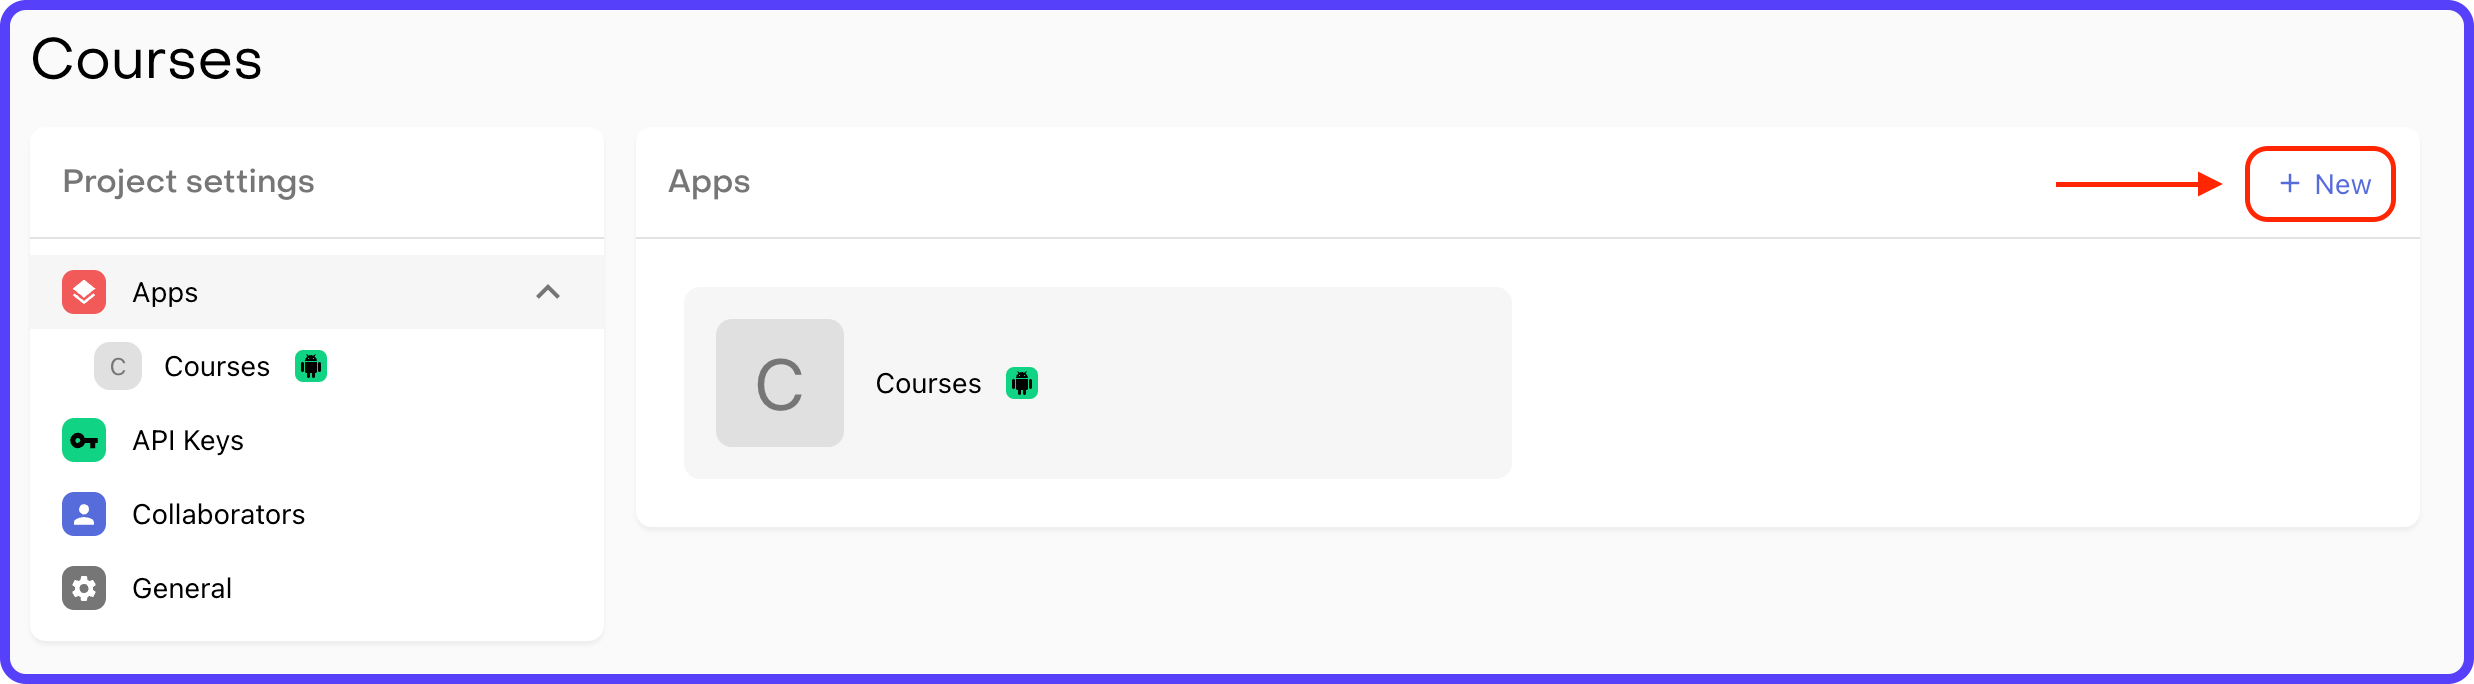
1. Go back to the Apps page and click on "+ New".
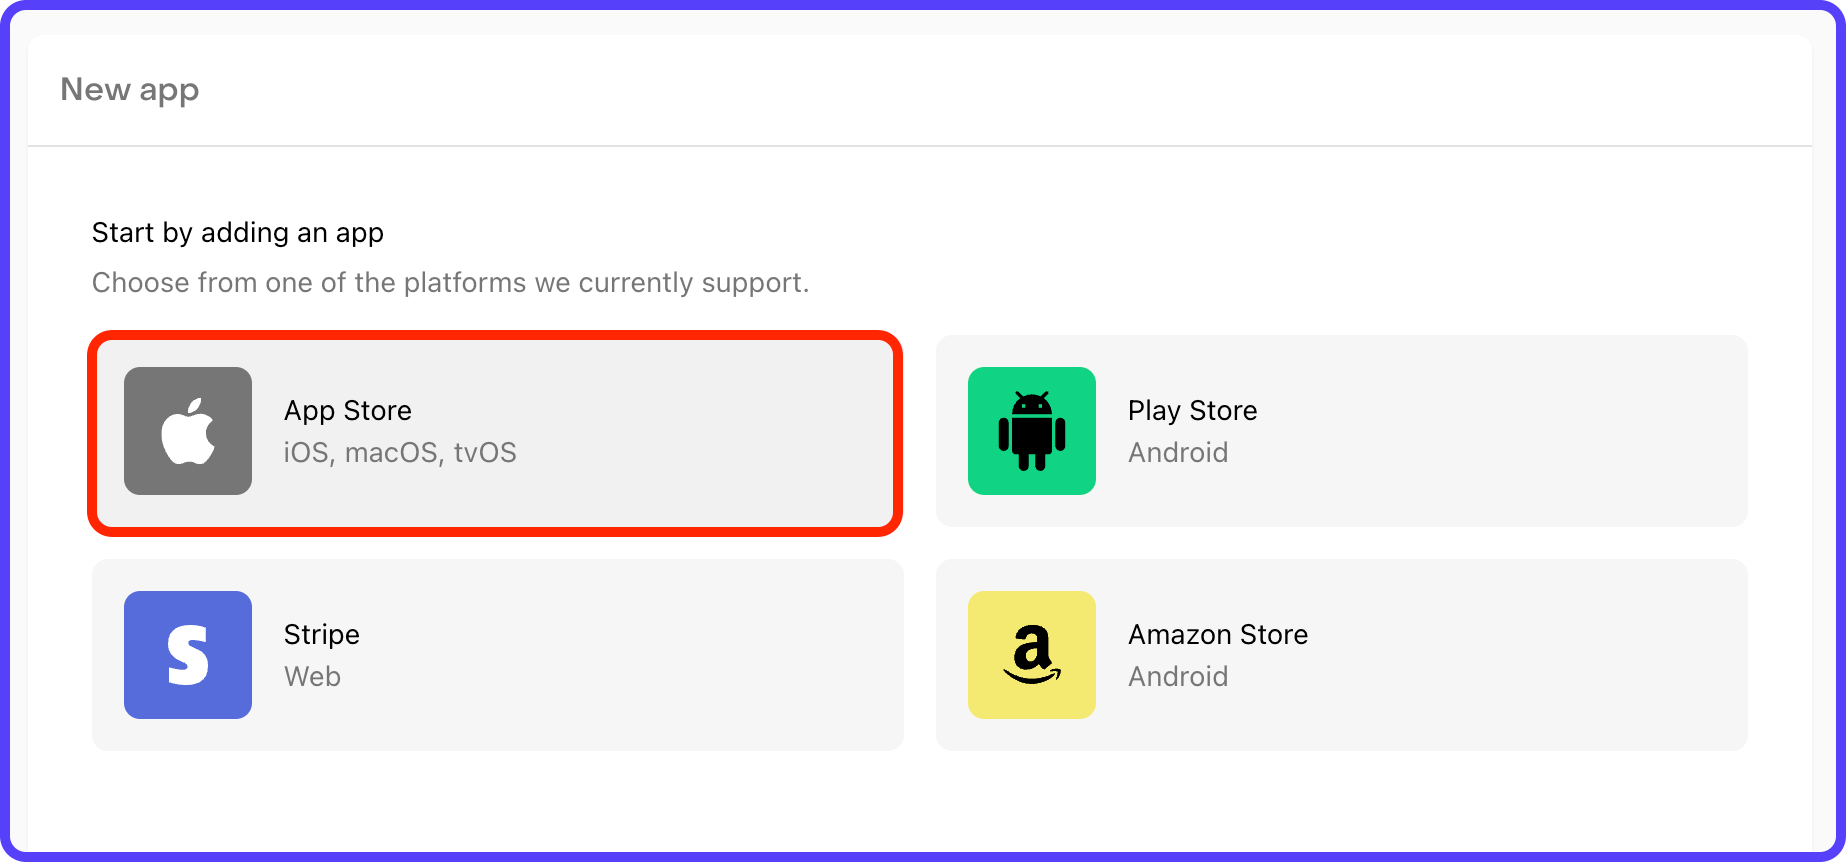
2. Select App Store.
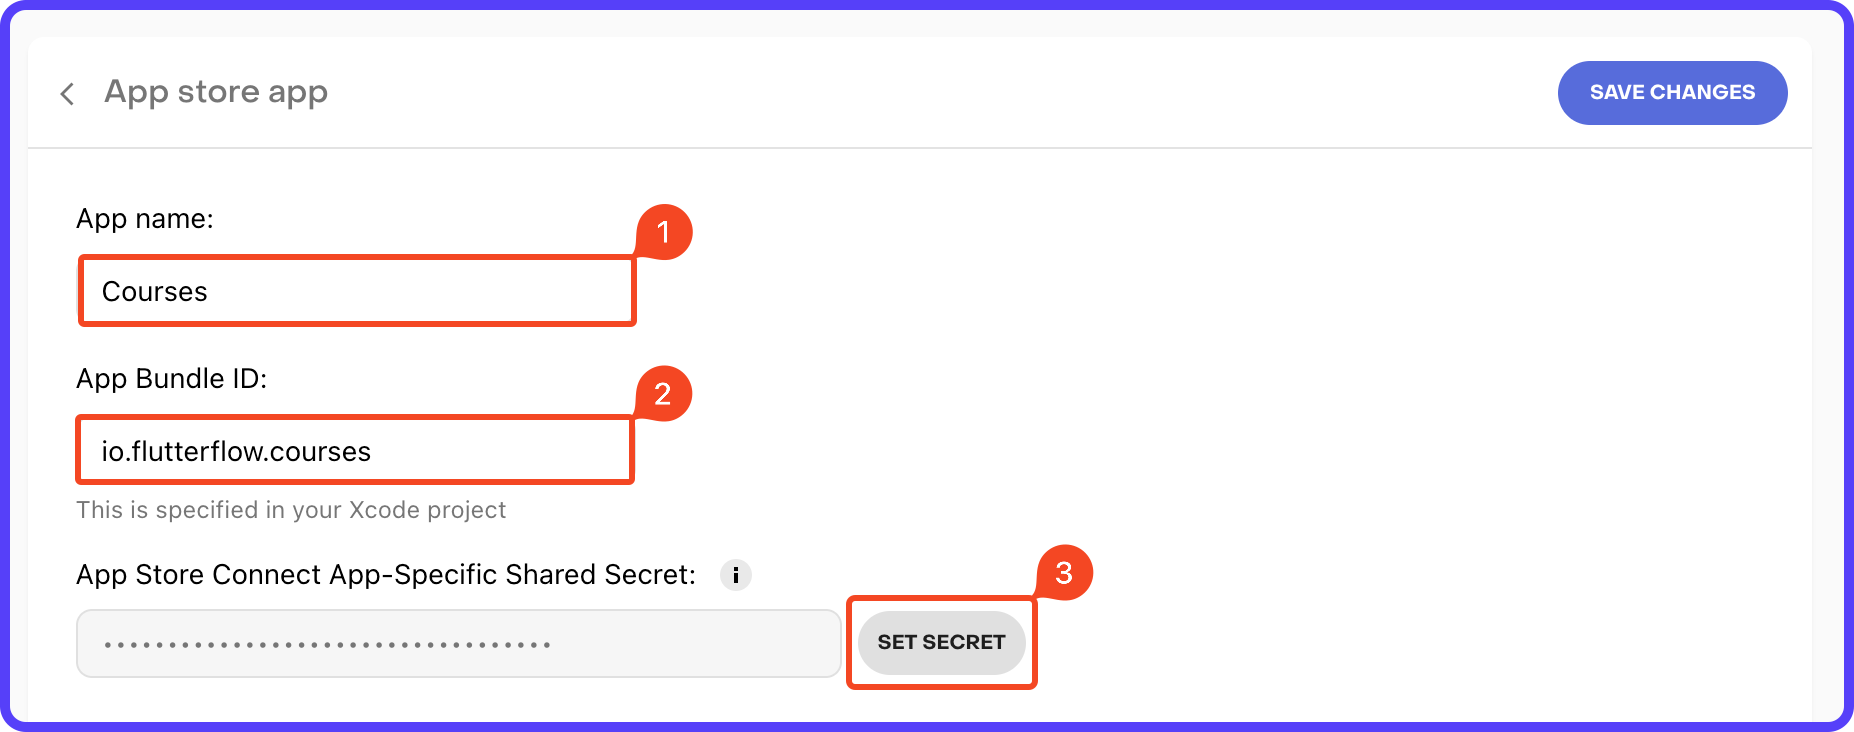
3. Enter an App name, Bundle ID, and App-Specific Shared Secret. To generate an App-Specific Shared Secret, follow the guide here. Once you have the key, click "SET SECRET", enter the value, and click Set. Then click "SAVE CHANGES".
This completes the iOS app setup on RevenueCat.
Define subscriptions on RevenueCat
RevenueCat has a well-organized product configuration that allows you to specify what level of access each product should unlock for your users. There are three levels of product configuration on RevenueCat, we will walk you through the process of adding subscriptions and will also explain how each of these configuration levels work.
You will find these configuration levels on the left menu of the RevenueCat dashboard under the section Product Setup:
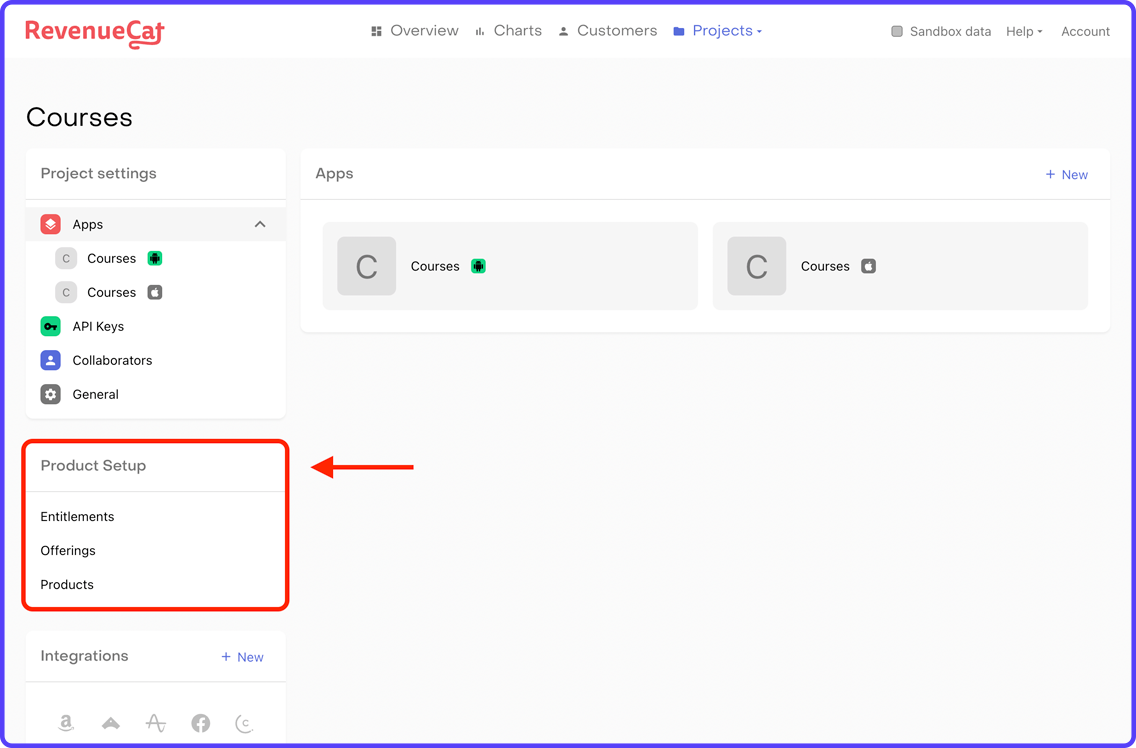
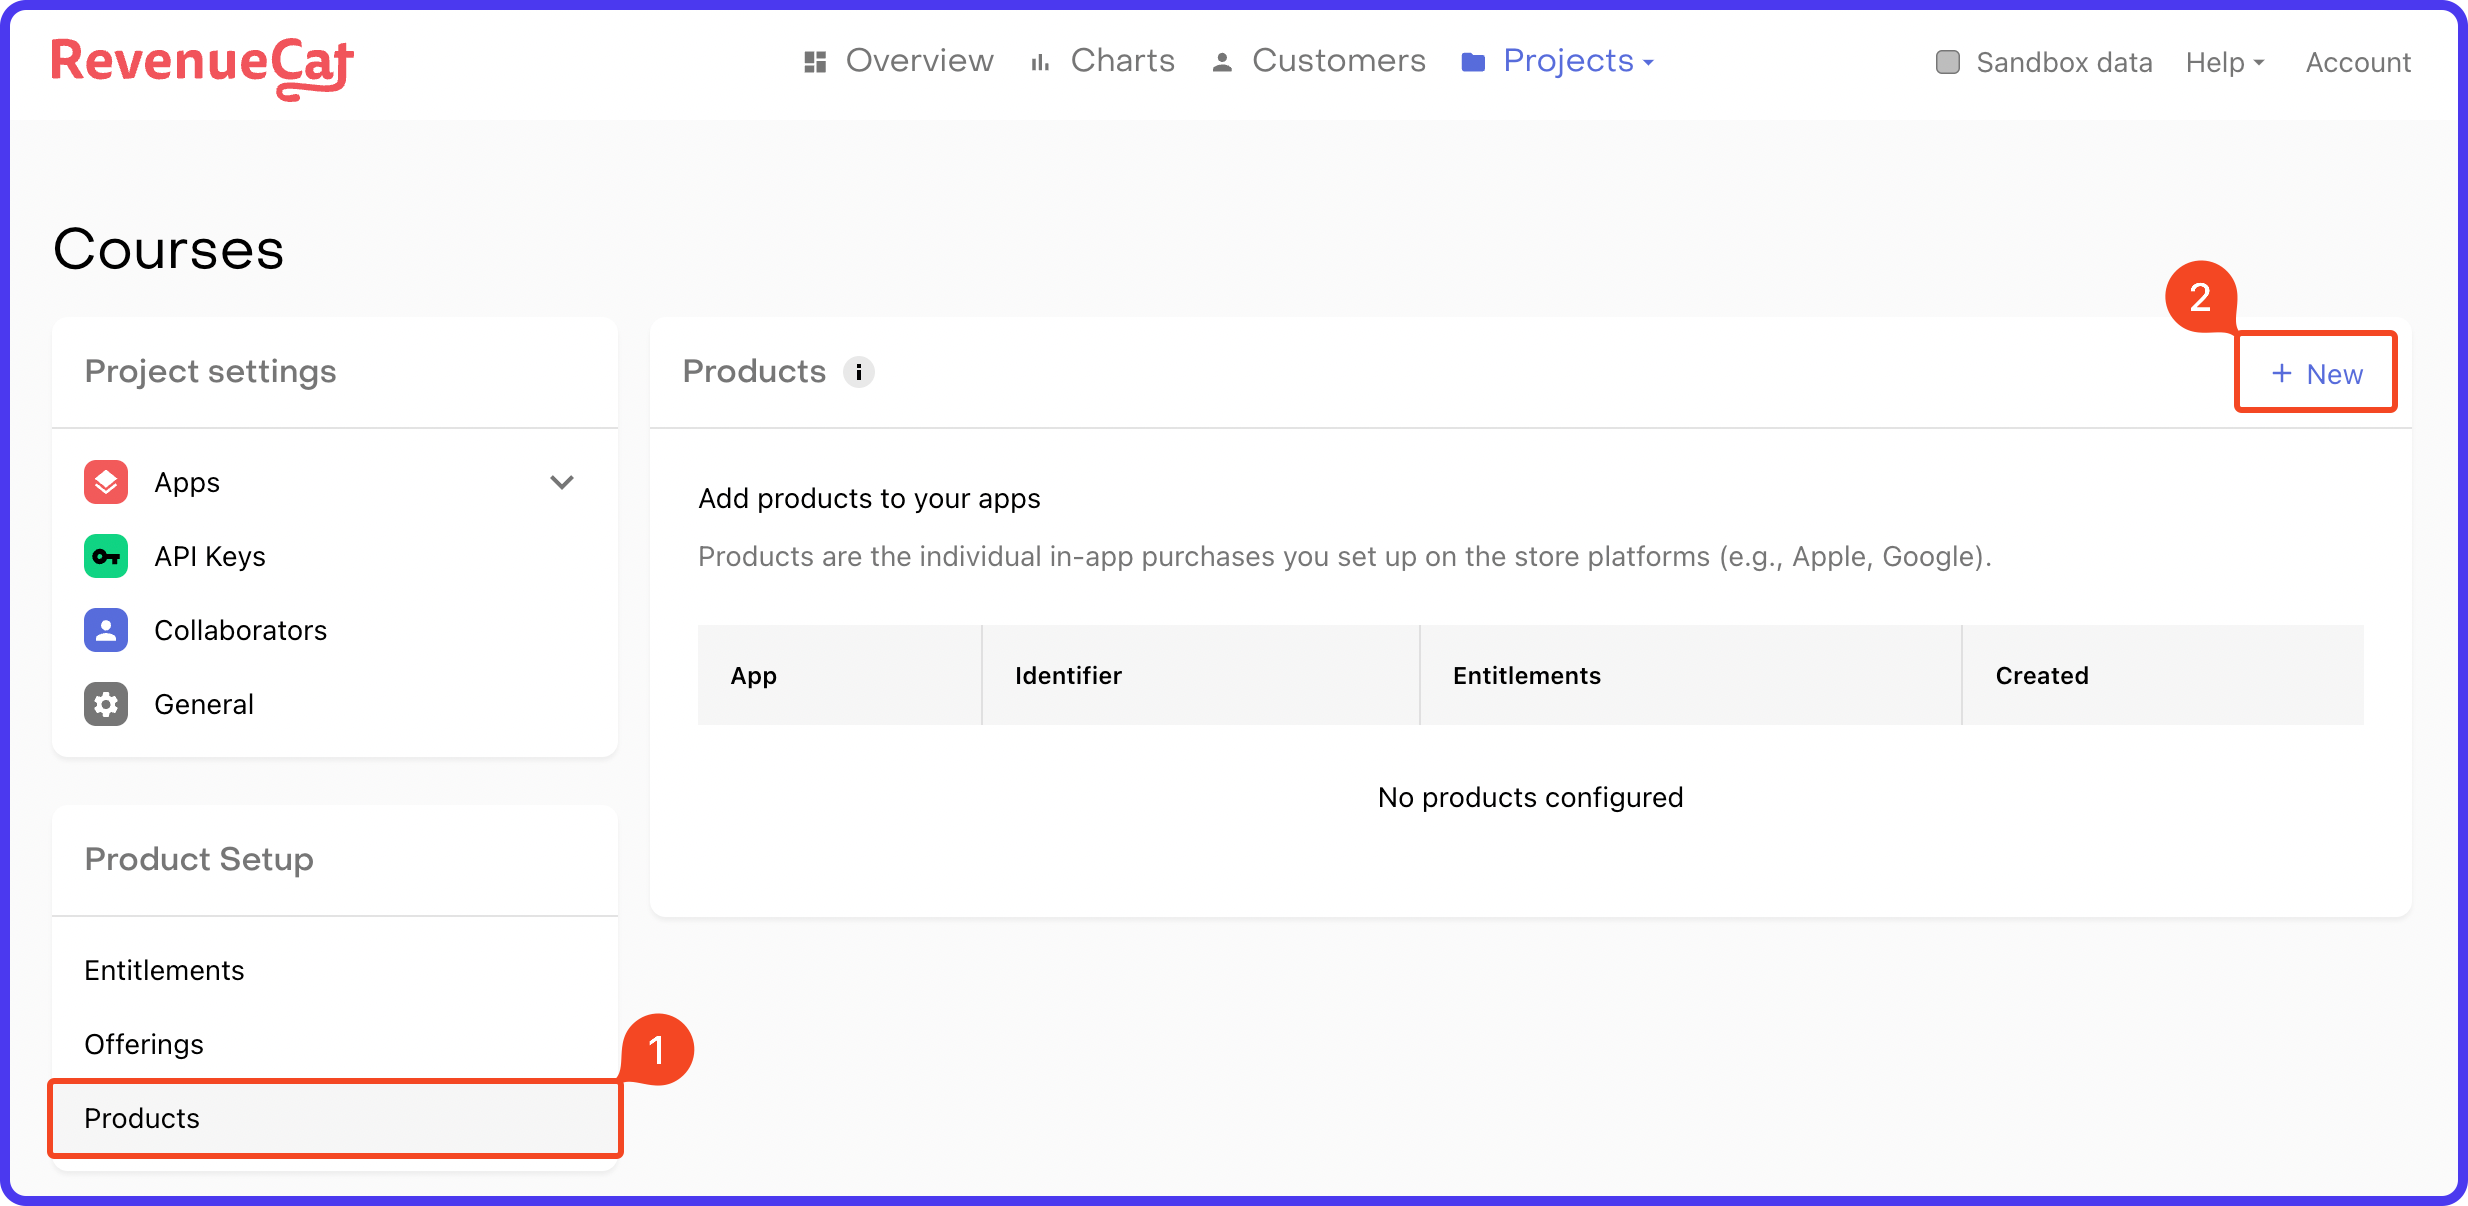
Products
In this configuration, you need to add all the subscriptions for both your Android and iOS app that the user can purchase. This is like a 1-to-1 mapping of the products in RevenueCat that you have already added to the stores (Google Play Store and Apple App Store).
To add products, follow these steps:
1. Select Products under the Product Setup section. Click "+ New".
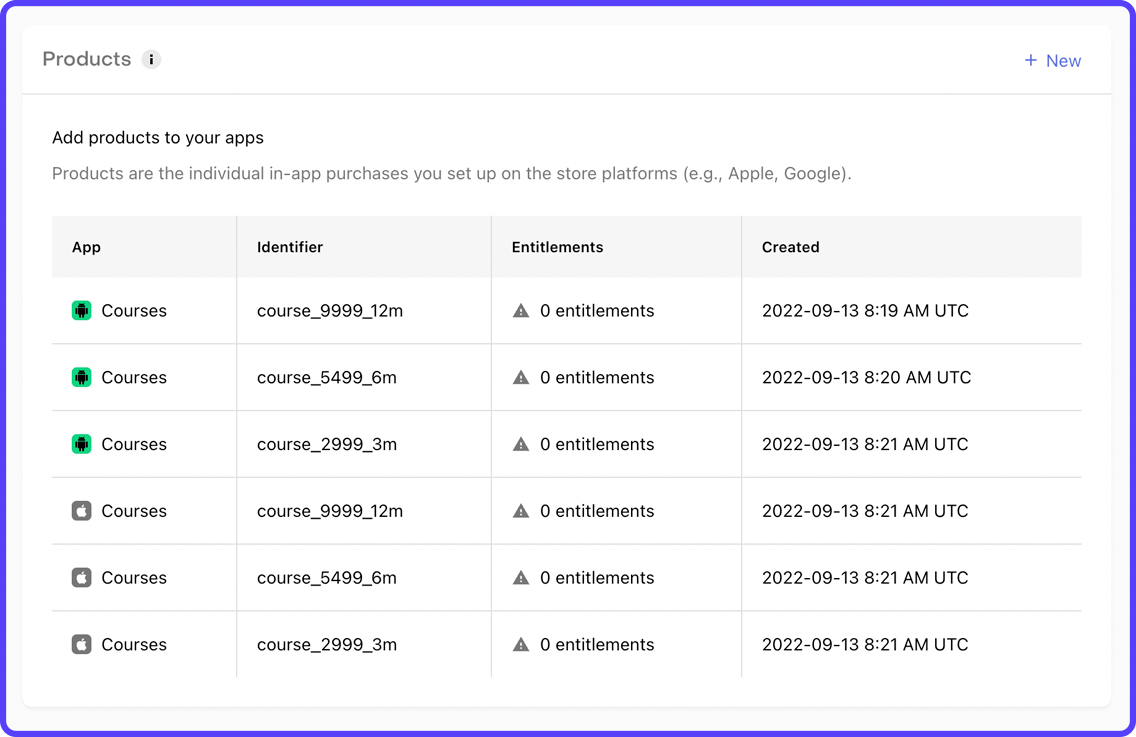
2. You need to enter the product Identifier and the App. Make sure you use exactly the same product ID you used for the Android/iOS subscription. Click ADD.
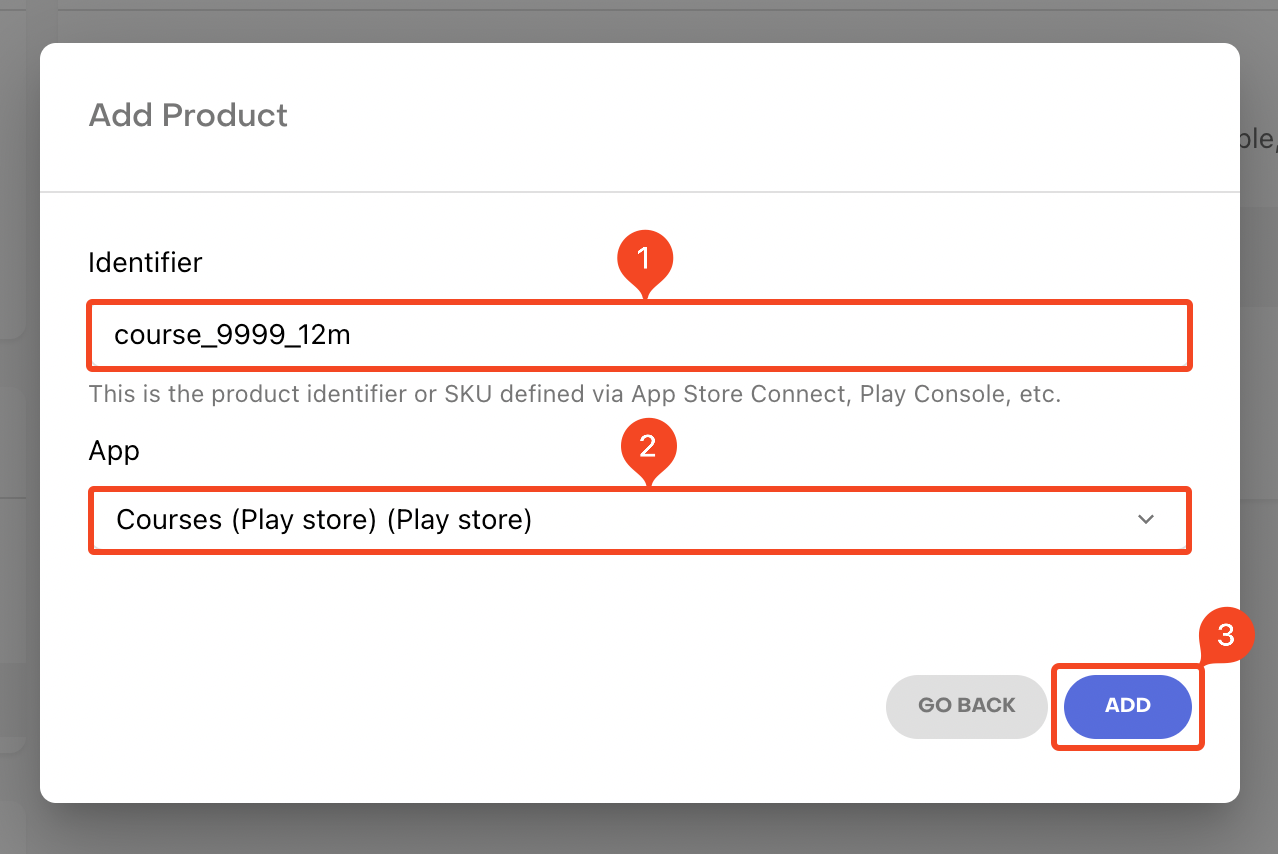
3. Similarly, add the other subscriptions as well (for both Android and iOS).
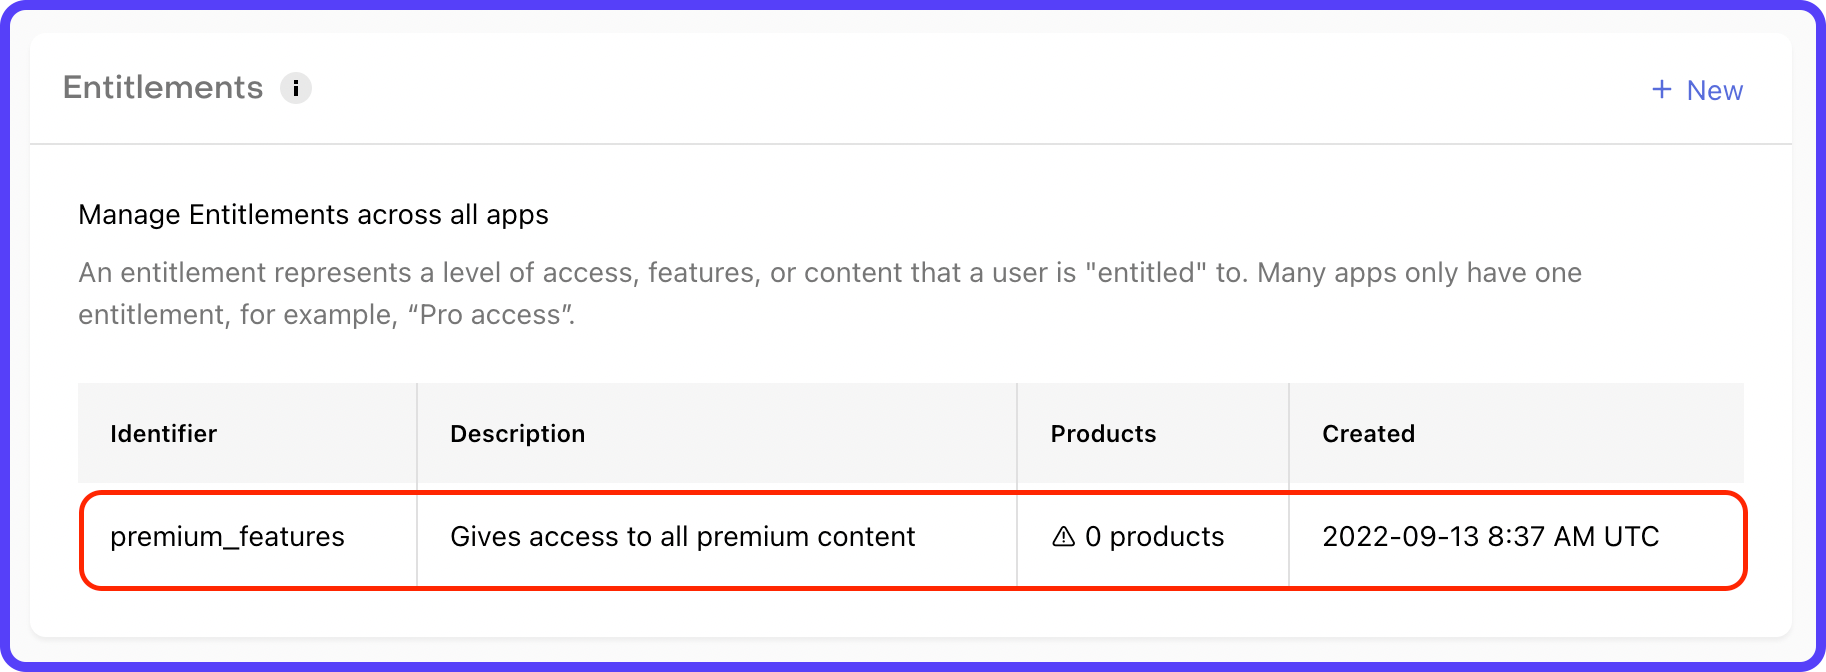
Entitlements
An entitlement helps in easily identifying whether the user has access to the content based on their purchase. Most apps only have one entitlement, unlocking all premium features. However, if you have two tiers of content such as Gold and Platinum, you would need 2 entitlements.
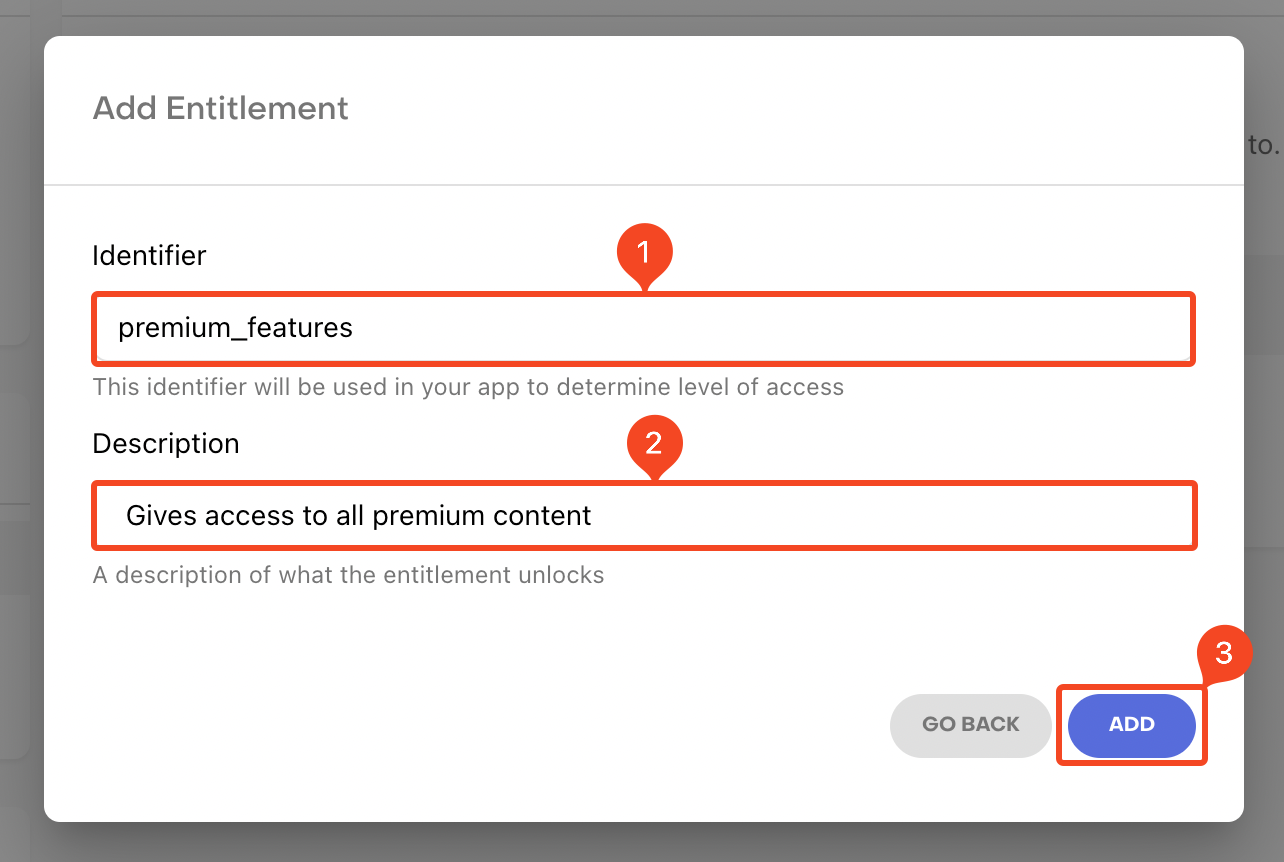
In our app, we just need a single entitlement – premium_features.
Follow these steps to add an entitlement:
1. Select Entitlements under the Product Setup section. Click "+ New".

2. Enter an Identifier and Description for the entitlement. Click ADD.
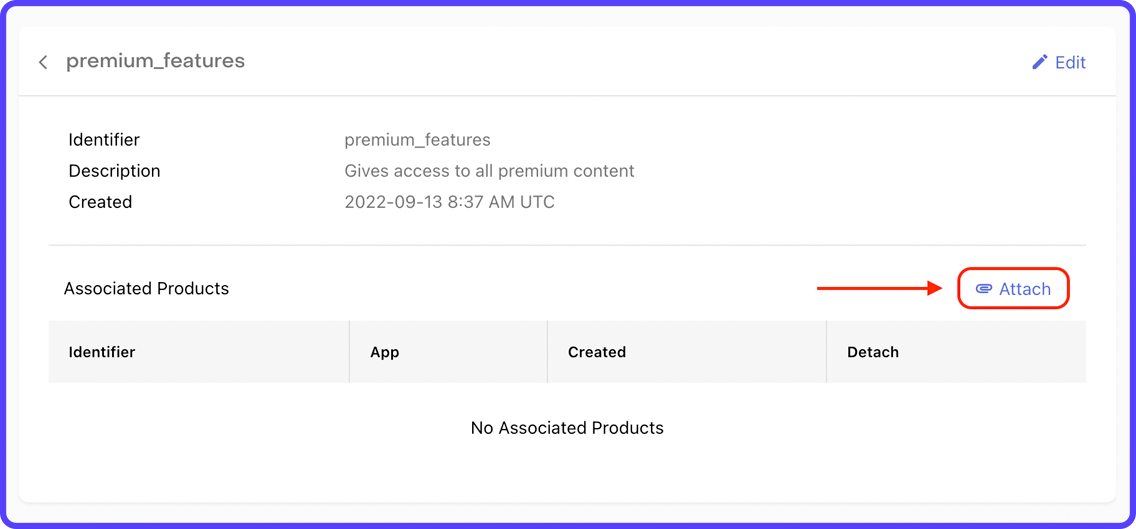
3. Next, you need to attach the products to this entitlement. Click on the entitlement that you just created.
3. Click on Attach.
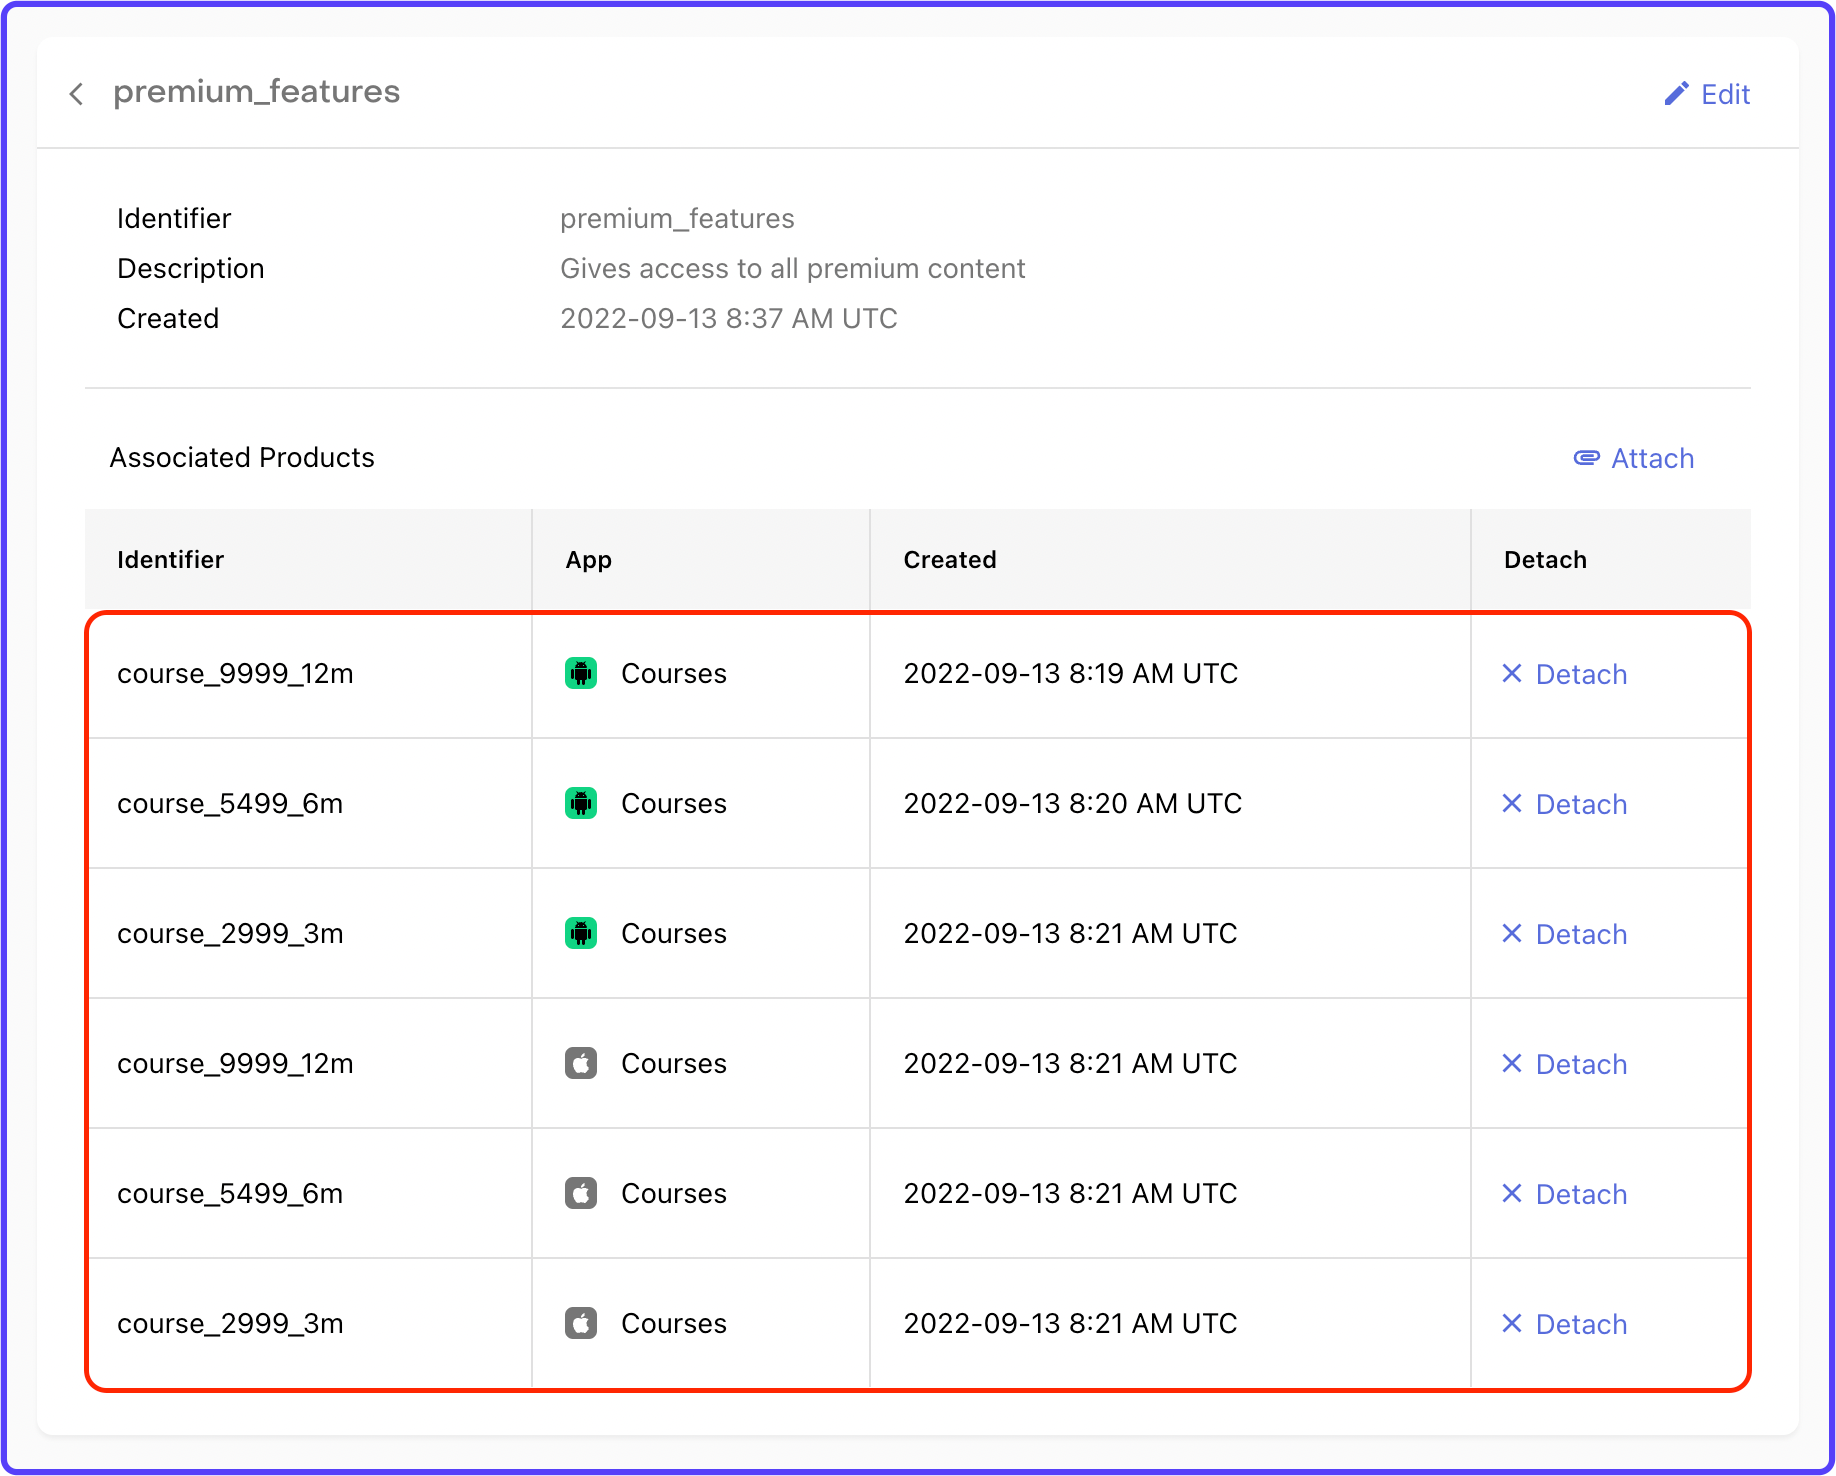
4. Select a Product from the dropdown and click ADD.
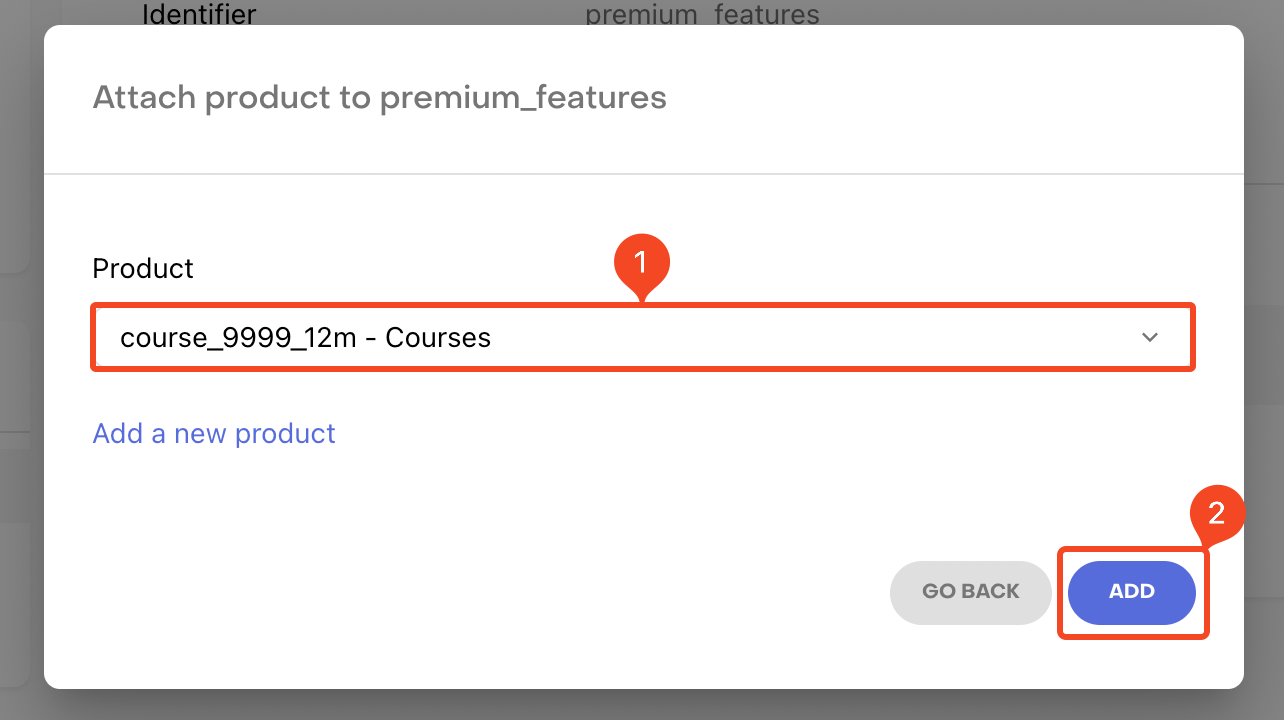
5. Similarly, attach all the other products to this entitlement.
Offerings
This configuration describes the product offerings to be shown on the paywall. Each offering must have one or more associated Packages (group of equivalent products across different platforms).
As our app will be available for both Android and iOS users, each of the offerings will consist of two packages.
Follow the steps below to add offerings:
1. Select Offerings under the Product Setup section. Click "+ New".
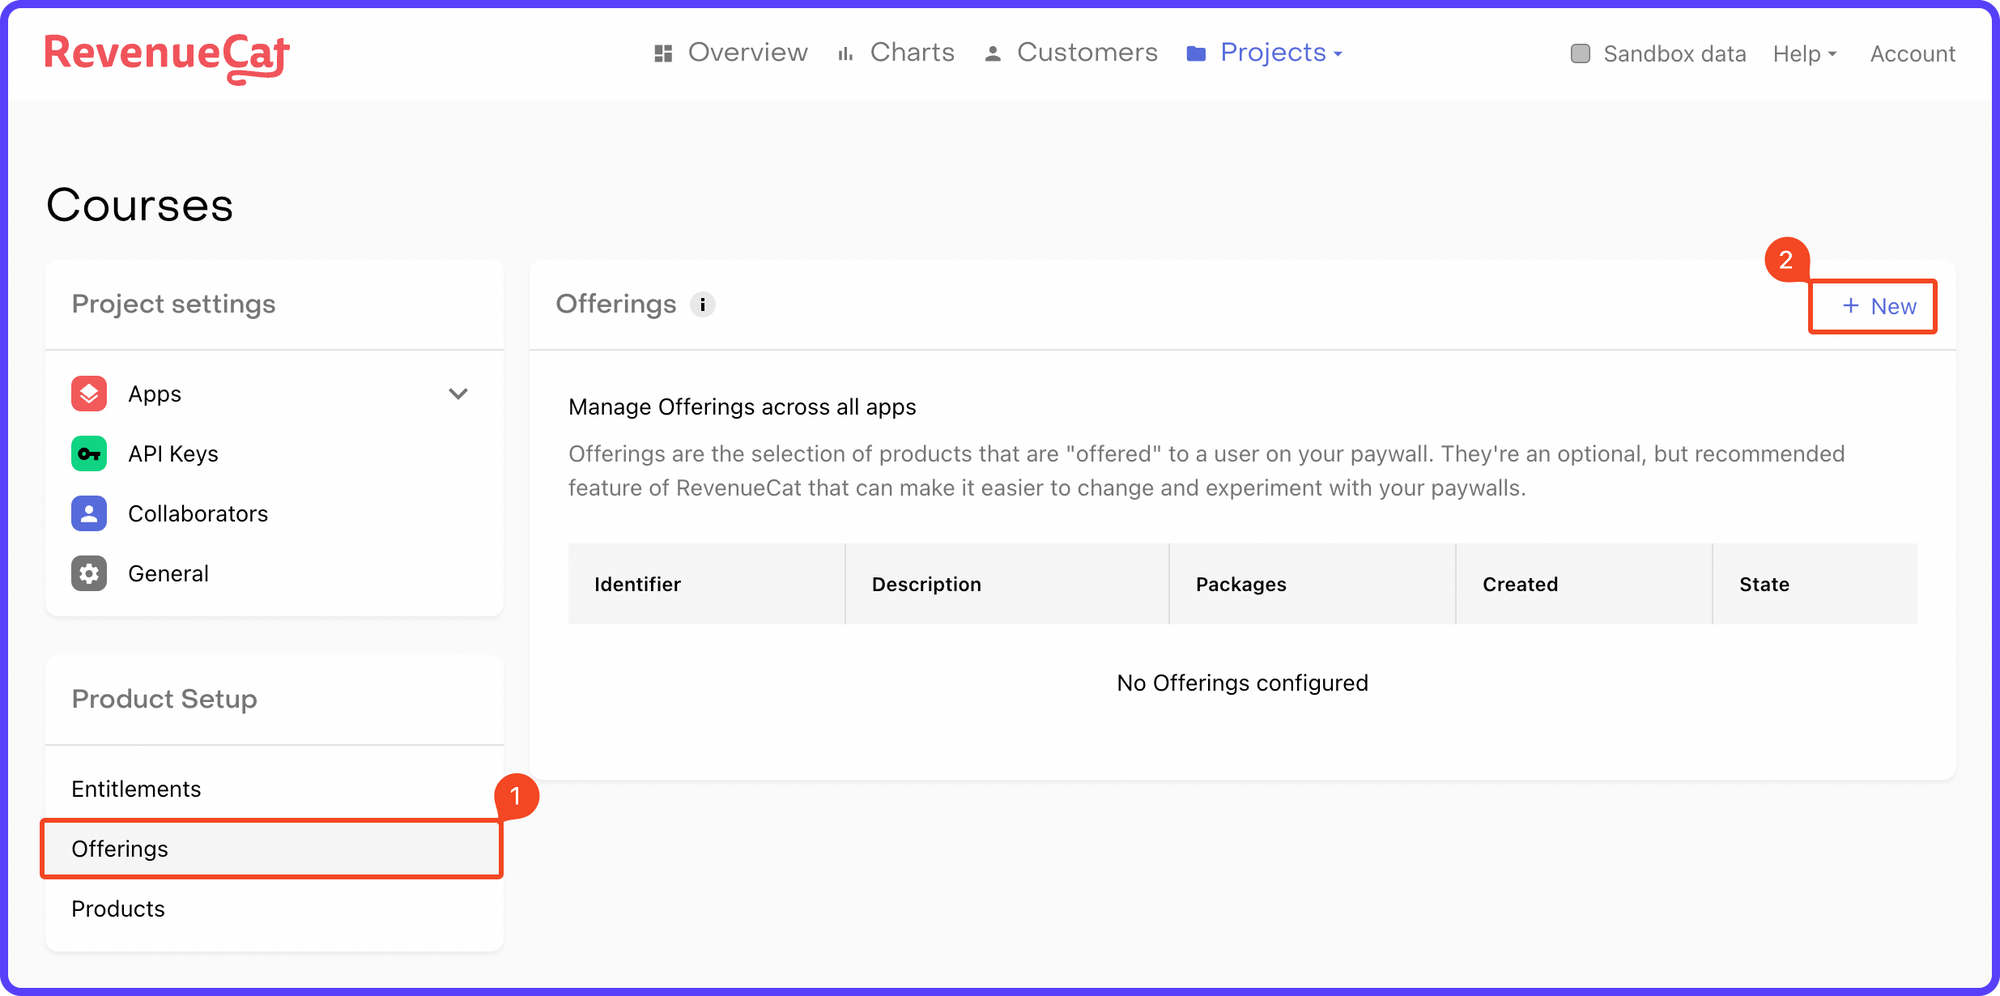
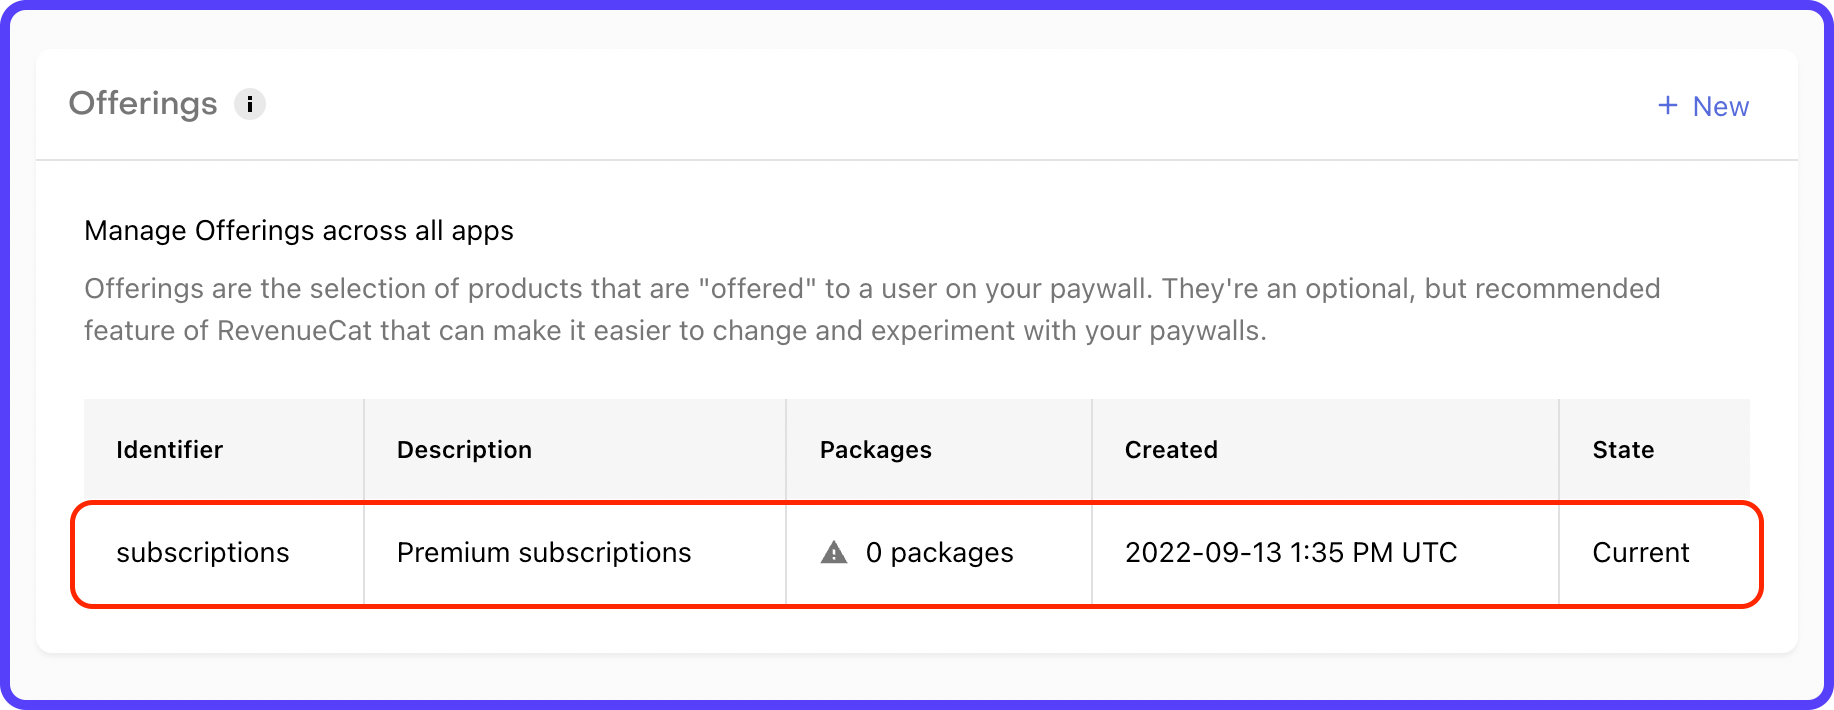
2. Enter an Identifier and Description for the offering. Click ADD.

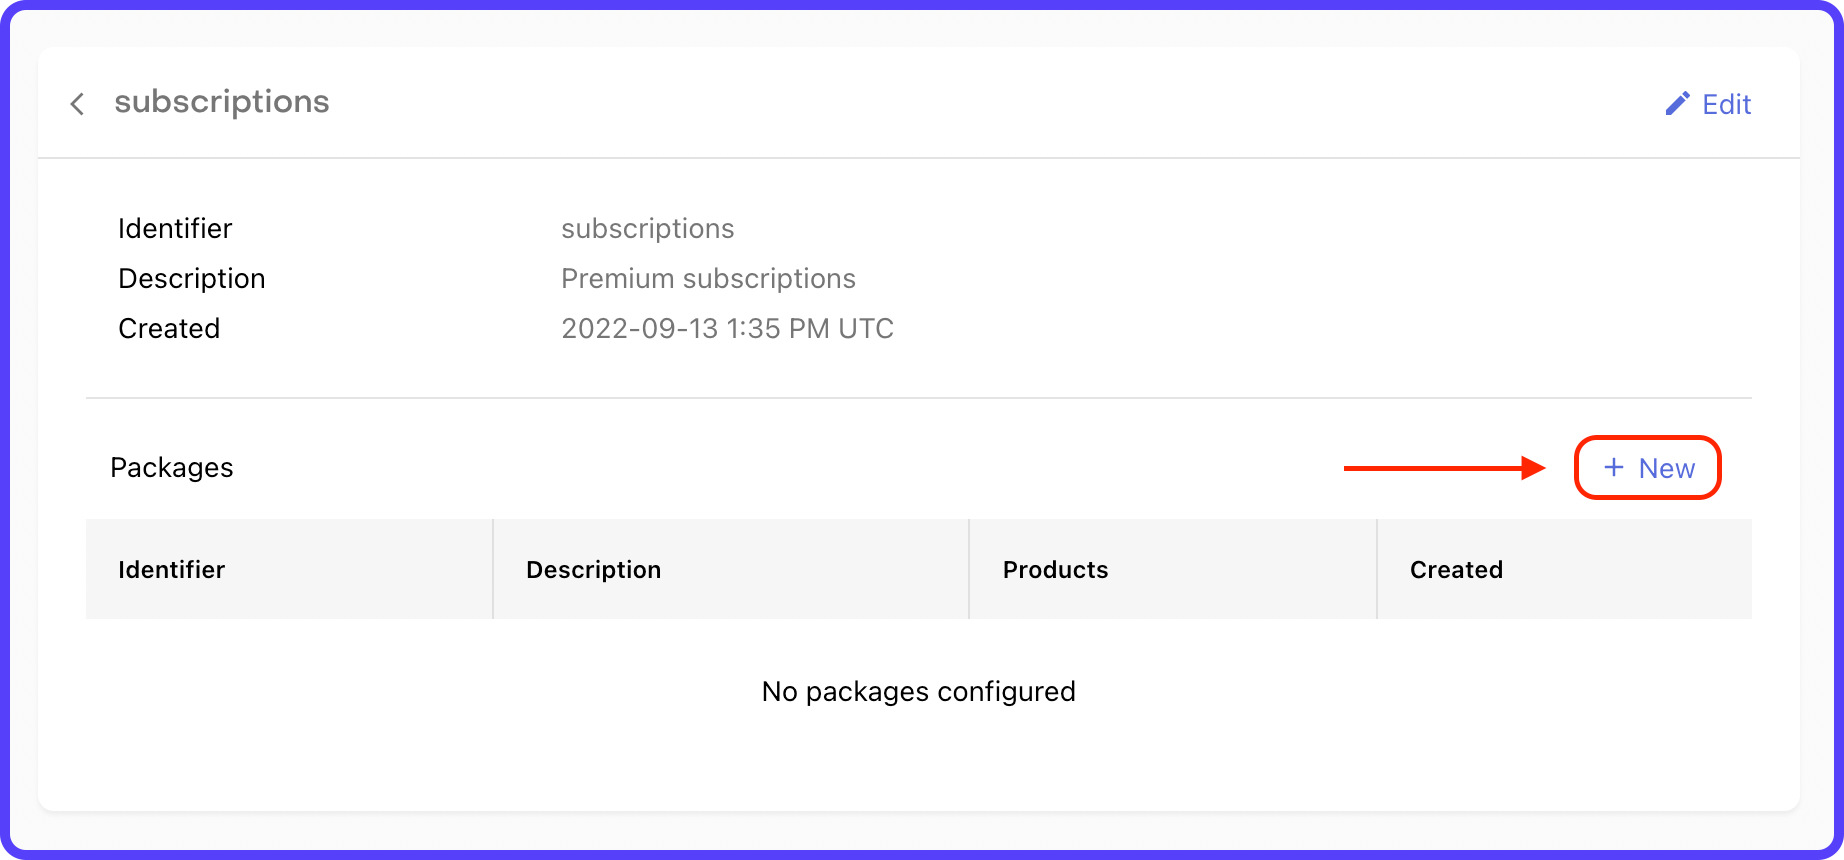
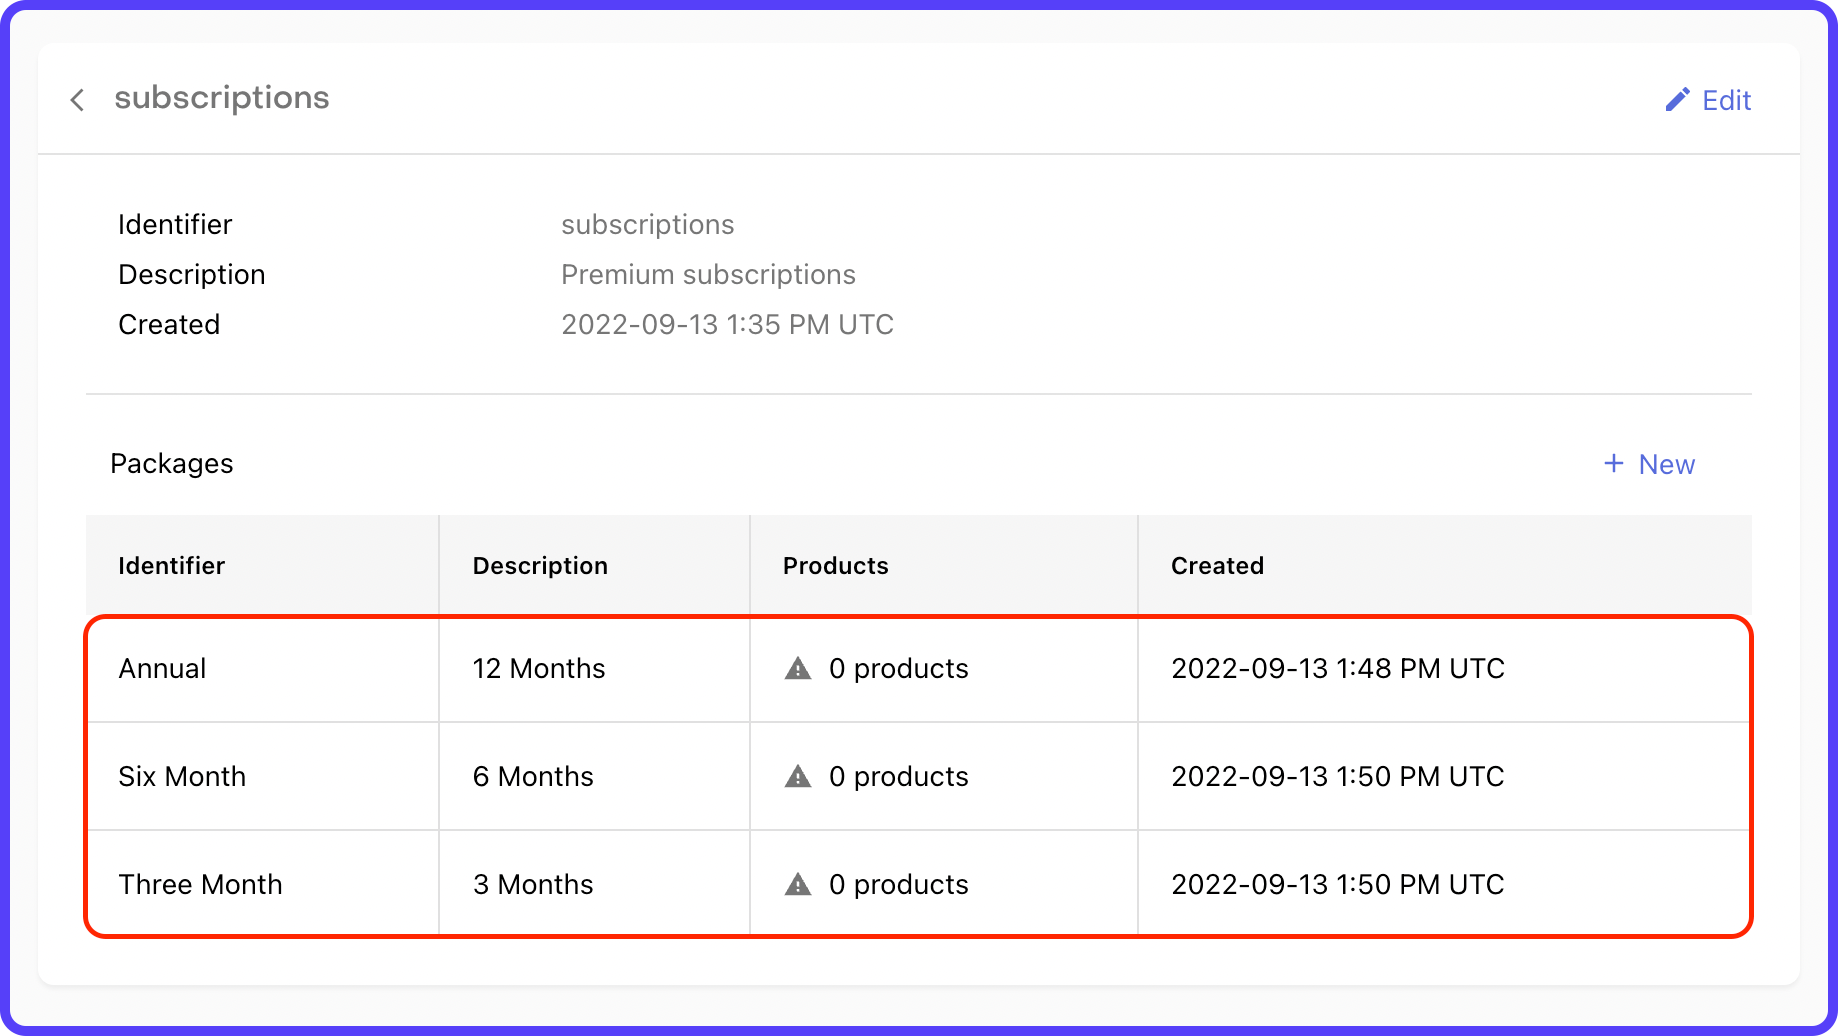
3. Click to open the offering that you just created.
4. Click on "+ New" beside the Packages.
5. Enter an Identifier for the package from the dropdown and add a Description. Click ADD.
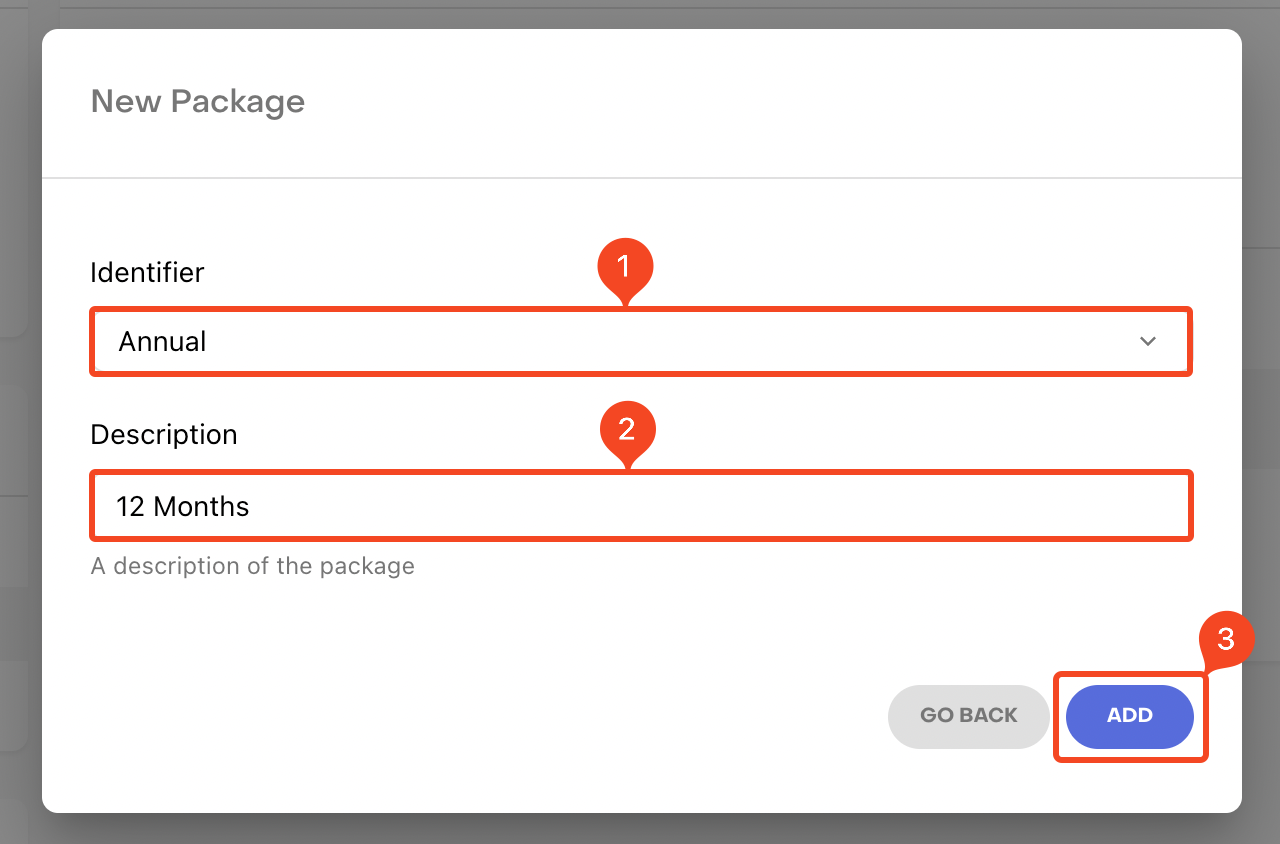
6. Similarly, add the other packages as well.
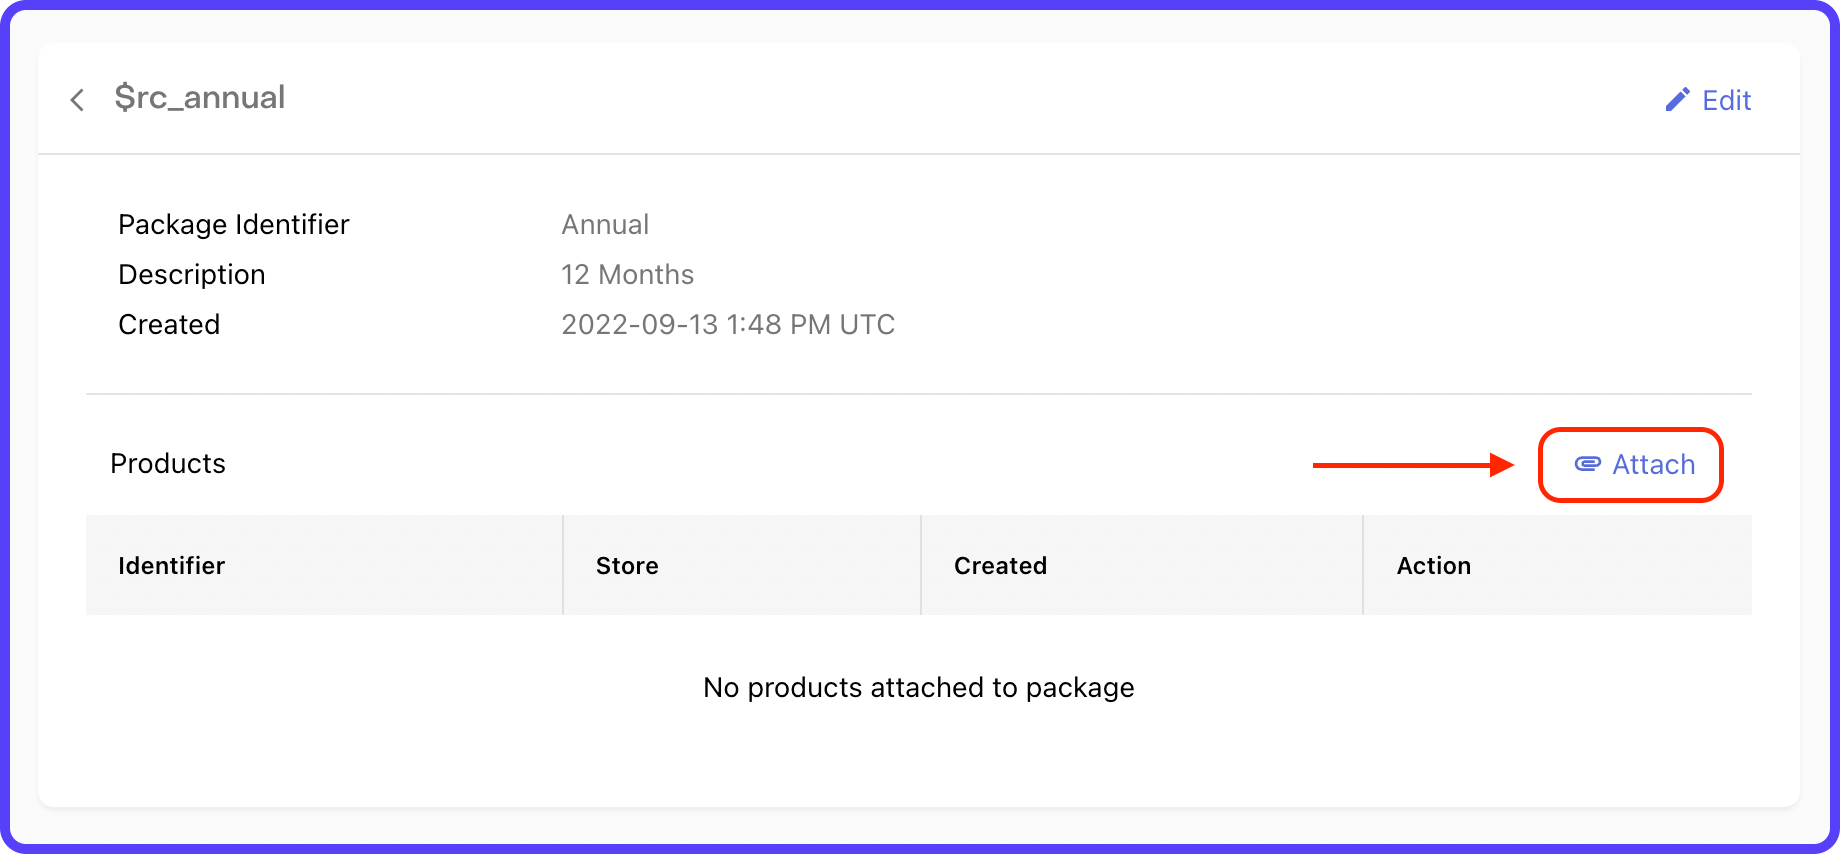
7. Click to open a package. Then click Attach.
8. Select the respective Play Store and App Store products from the dropdown. Click Attach.
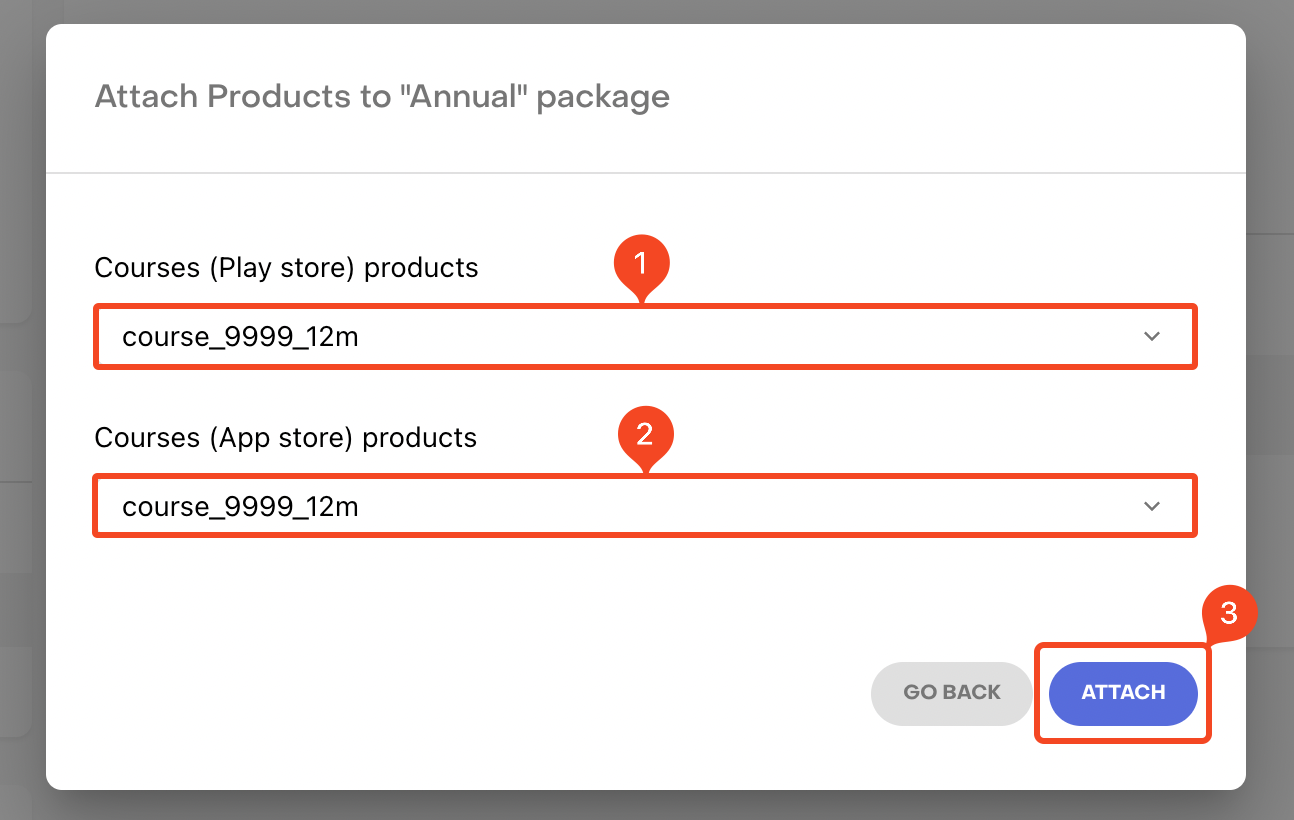
9. Similarly, attach the correct products to the other two packages as well.
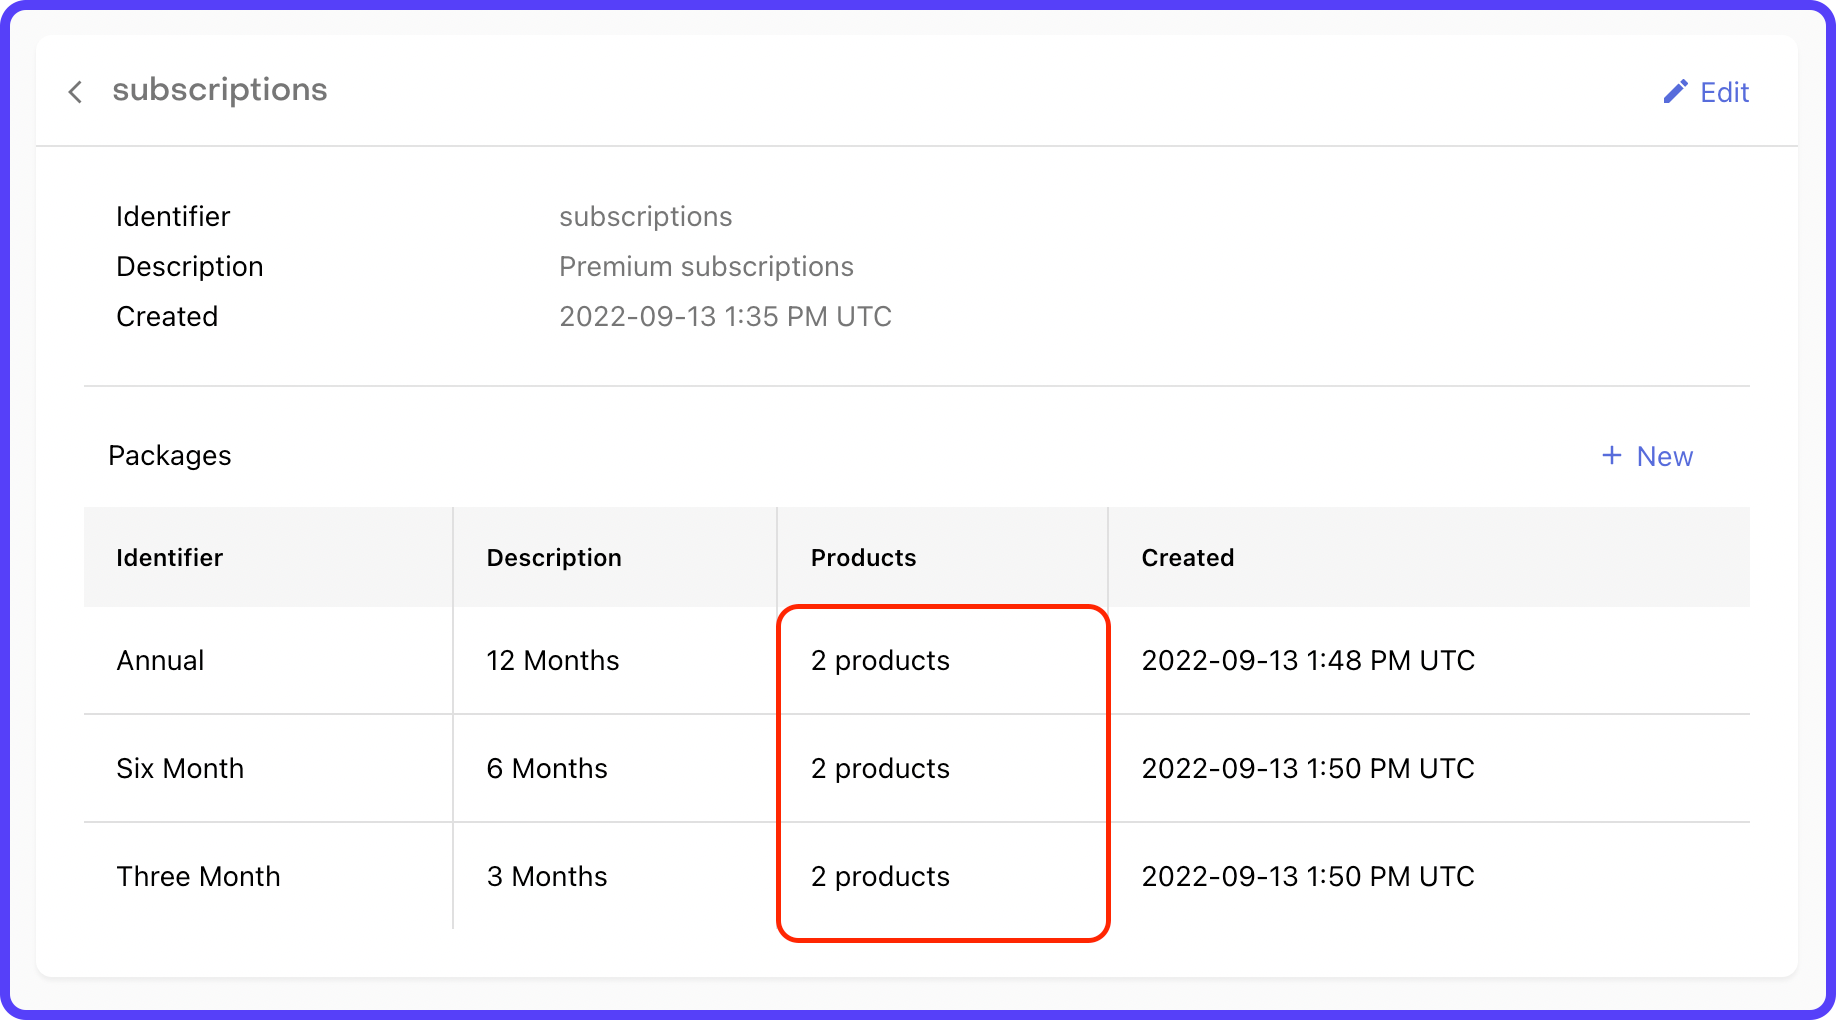
This completes the three levels of configuration on the RevenueCat.
Enable RevenueCat in FlutterFlow
To use RevenueCat in your app, you must configure it inside FlutterFlow. If you have followed the Play Store subscription setup, you should already have RevenueCat integration enabled. But you still need to update the configuration to use the proper keys.
Follow the steps below:
1. From your FlutterFlow project, go to the Settings and Integrations page.
2. Under In App Purchases & Subscriptions section, select RevenueCat. Enable RevenueCat using the toggle.
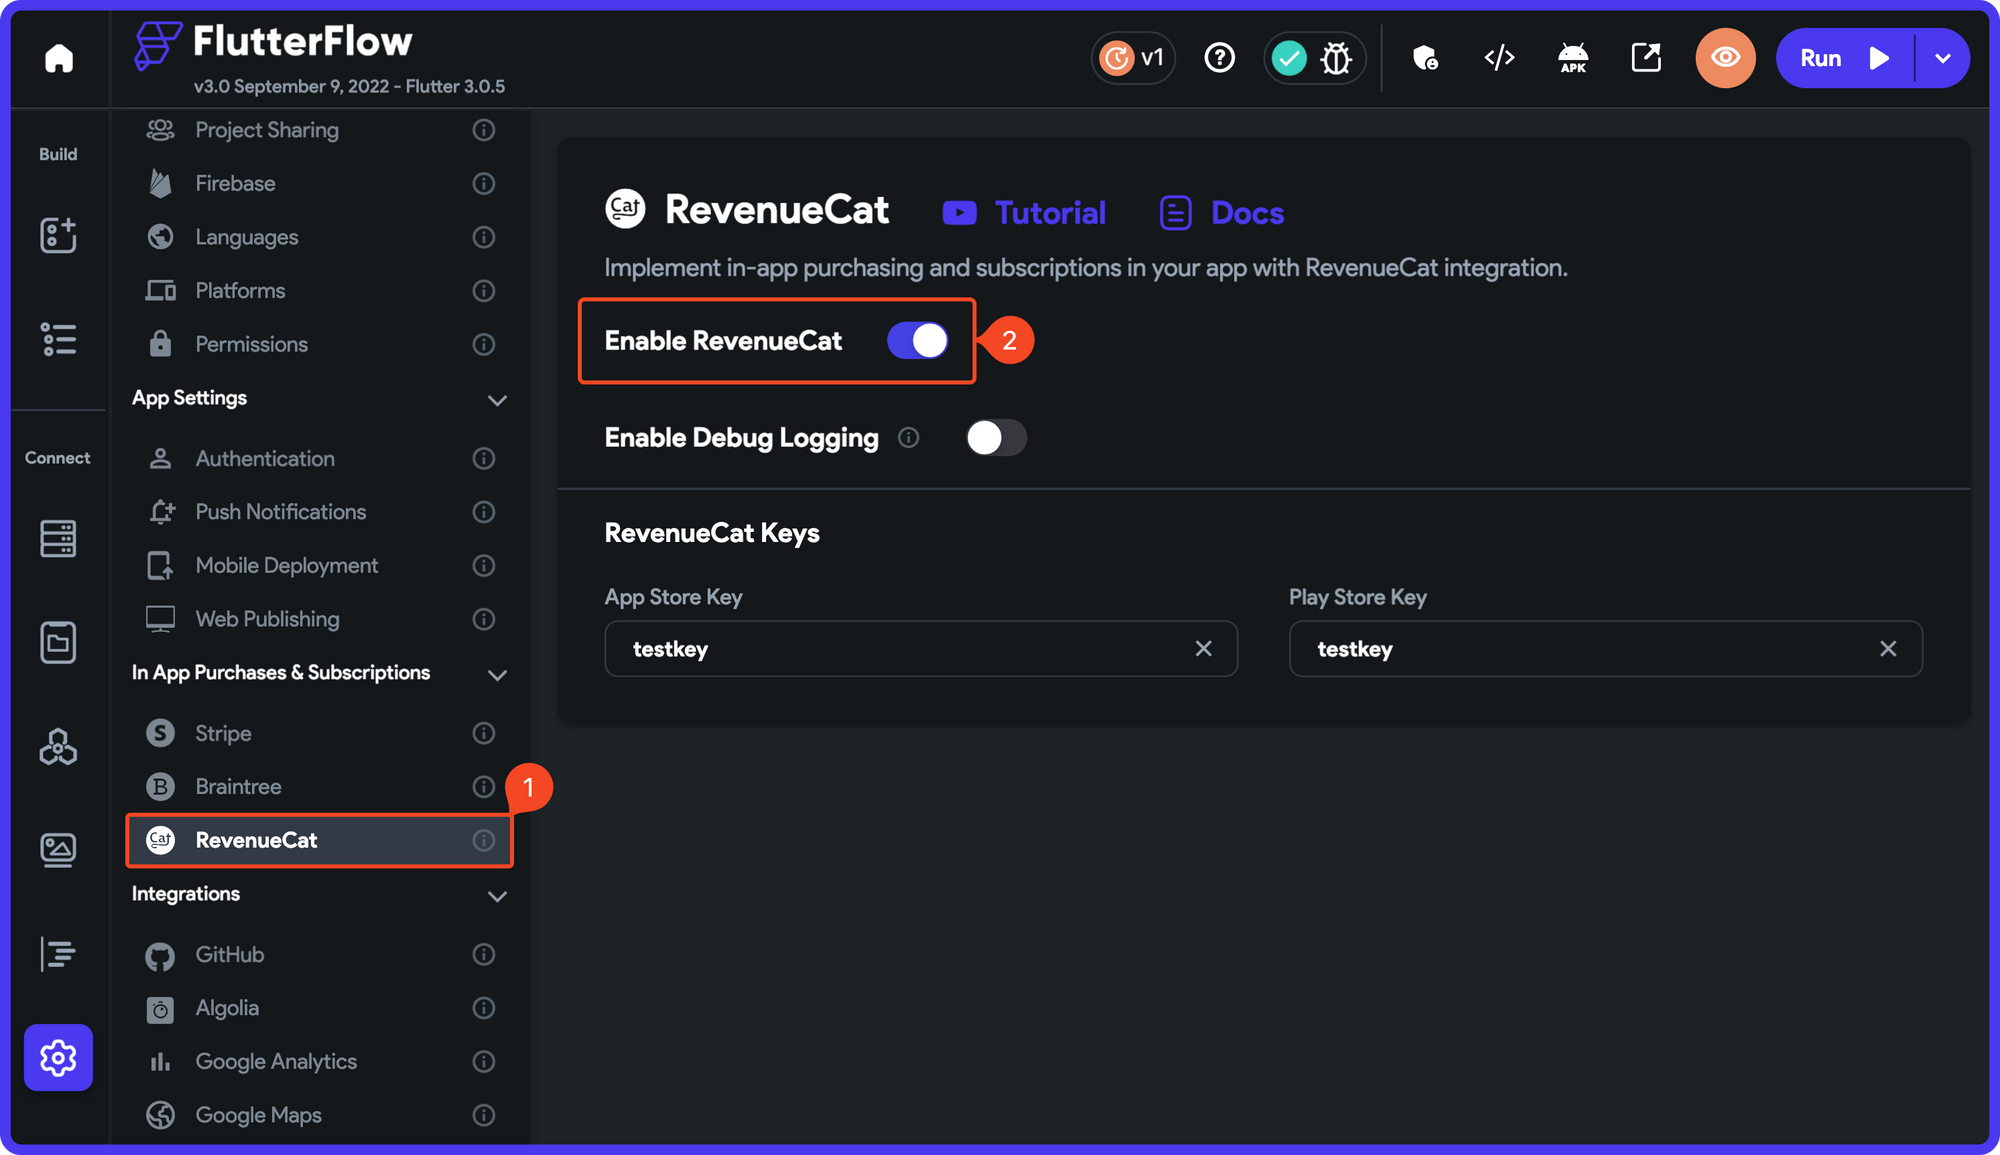
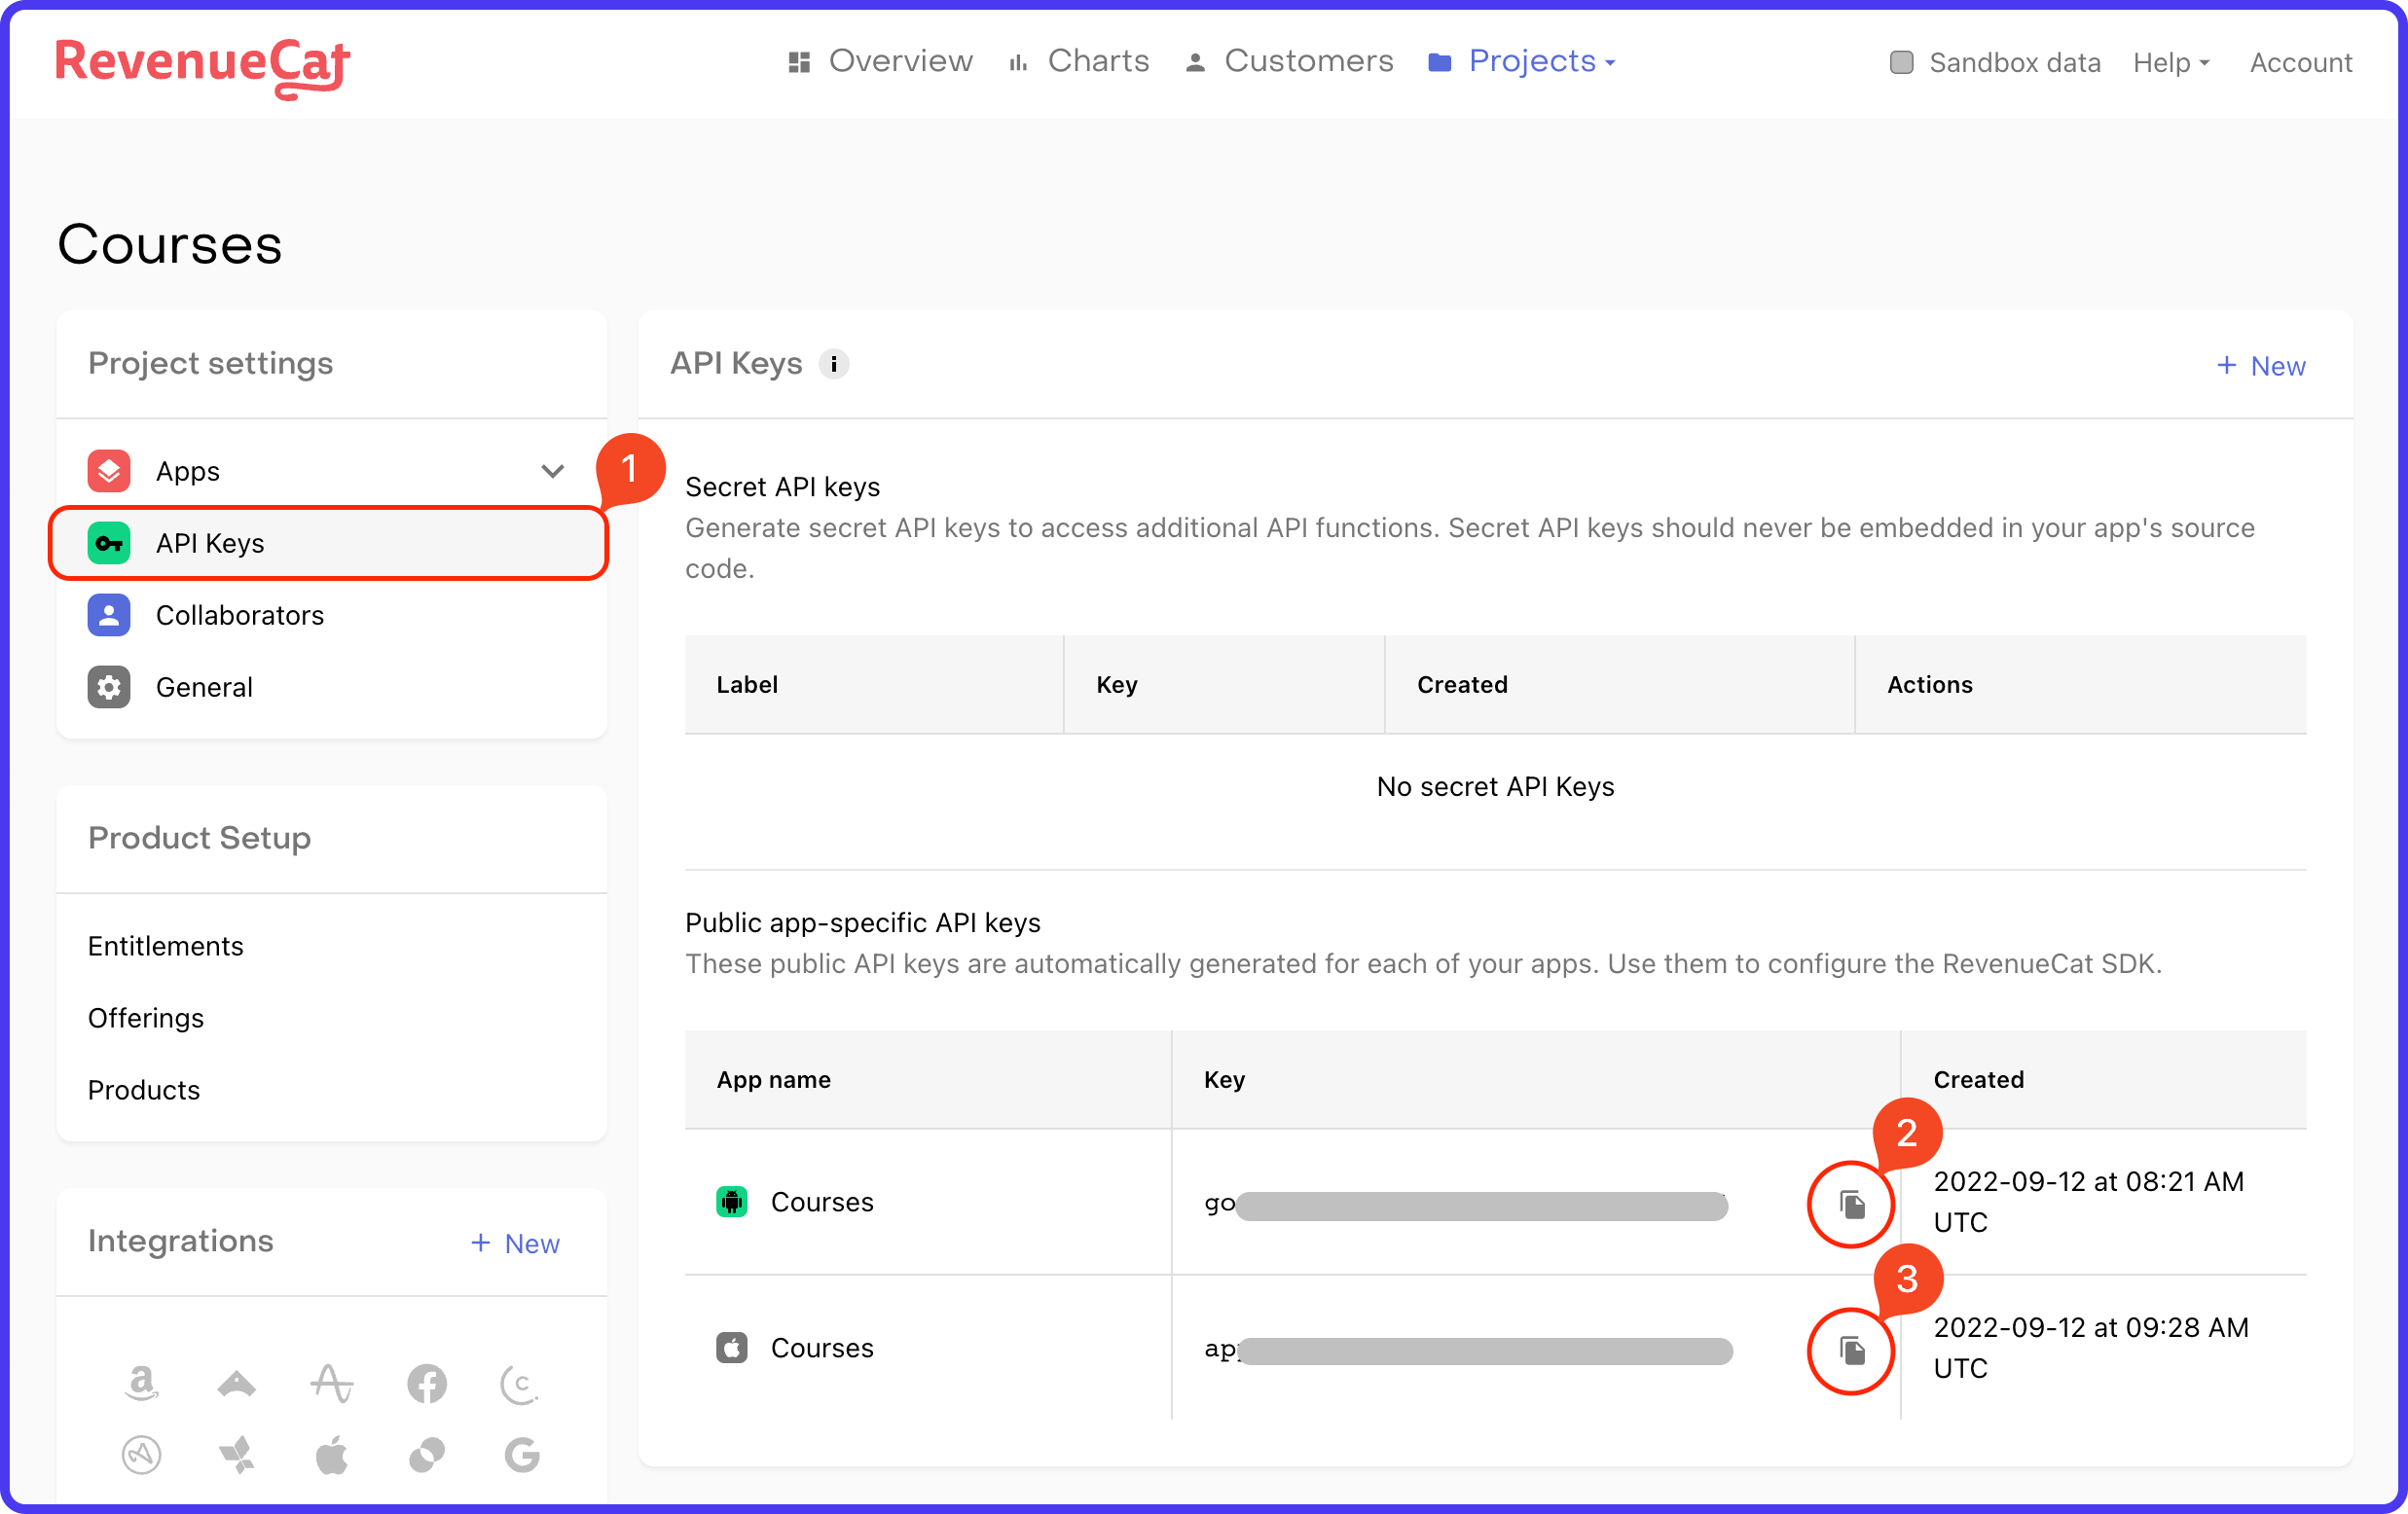
3. Next, you need to add the App Store Key and Play Store Key to FlutterFlow. You can get these keys by going to the RevenueCat dashboard > API Keys > Public app-specific API keys. Copy and paste these keys into the respective fields of FlutterFlow.
Showing paywall
With the integration of RevenueCat and FlutterFlow done, we are now ready to use RevenueCat in the app to show the paywall (i.e., the Subscription Page, if the user hasn't subscribed to any of the Premium plans yet) along with the plan details that we have defined on RevenueCat.
We need to check if the user is subscribed to any of the Premium Plans as soon as the "Enroll Course" button is tapped on the Overview Page.
Follow the steps below:
- Select the "Enroll Course" button on the
OverviewPage. - From the Properties Panel, select the Actions tab. Click "+ Add Action".
- Select the Action as RevenueCat > Paywall.
- Enter the Entitlement ID as Specific Value >
<entitlement_identifier>. You will get this ID from the RevenueCat dashboard > Entitlements. - Open the Action Flow Editor. Click on "+" below the RevenueCat Action, select Add Conditional. It should automatically set the condition as "User Has RevenueCat Entitlement".
- Under the TRUE branch of the condition (user already has a valid subscription), set an action to navigate to the Course Page.
- Under the FALSE branch of the condition (user doesn't have a subscription yet), set an action to navigate to the Subscription Page.
Navigate to the Subscription Page, here we need to show all the packages (i.e., the subscription plans available under the current entitlement).
To display the packages from RevenueCat, follow these steps:
- Select the Column wrapping the SubscriptionPlan Container.
- From the Properties Panel, select the Generate Dynamic Children tab.
- Enter the Variable Name as
subscriptionPackages. - Set the Variable from RevenueCat > Current Offering > Packages. Click Confirm. Again click Confirm under the Generate Dynamic Children properties, and click Ok in the dialog box that appears.
- To show the values from data returned by RevenueCat. Select a Text widget and click Set from Variable under the Properties Panel.
- For subscription title, select the Source as subscriptionPackages Item > RevenueCat > Title. Click Confirm.
- For subscription price, select the Source as subscriptionPackages Item > RevenueCat > Price String. Click Confirm.
Purchasing subscription
You will need to add an Action on the subscription item to trigger the purchase of a plan. Follow the steps below:
- Select the SubscriptionPlan (Container) widget.
- From the Properties Panel, select the Actions tab. Click "+ Add Action".
- Select the Action as RevenueCat > Purchase.
- Select the Package ID as From Variable > subscriptionPackages Item > RevenueCat > Package Identifier. Click Confirm.
- Enter the Action Output Variable Name as
isPurchaseSuccessful. - Open the Action Flow Editor.
- Click on "+" below the RevenueCat Action, and select "Add Conditional".
- Set the condition from Action Outputs > isPurchaseSuccessful.
- Under the TRUE branch, set an action to navigate to CoursePage. Also, enable the Replace Route toggle.
- Under the FALSE branch, set an action to show a purchase failed message inside a SnackBar.
This completes the purchasing flow for the Courses app. Now, it's time to try out how the entire app works with the RevenueCat integration!
Testing the app
RevenueCat offers a sandbox mode using which you can try out the entire purchasing flow of the app without having to make actual transactions that incur costs. There are a few steps that you might need to complete before you can test the subscription flow of the app.
Android device
To test the purchasing flow on an Android device, follow these steps:
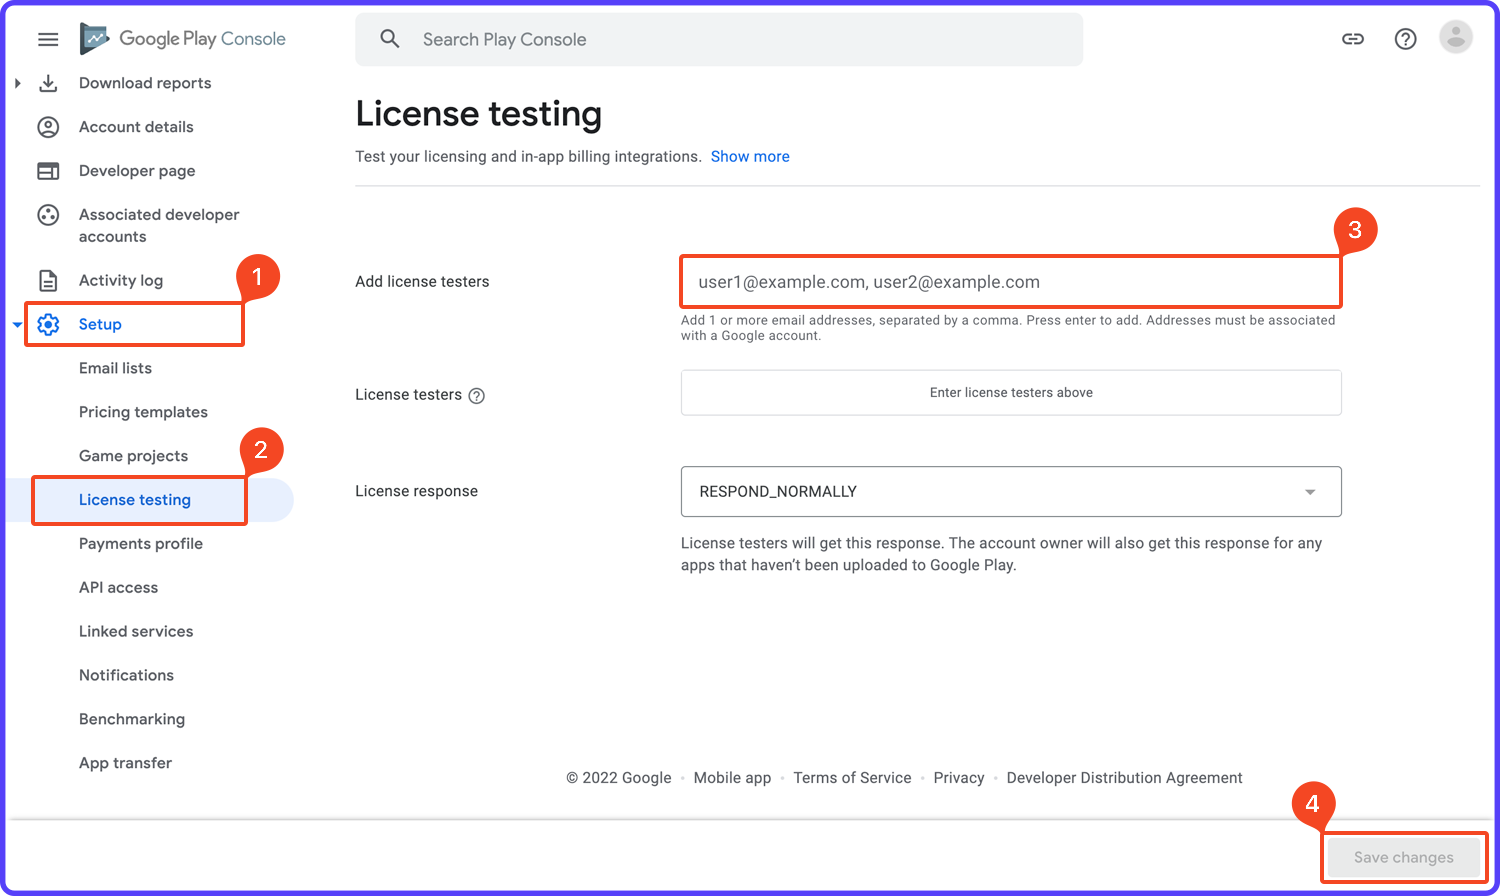
- Go to the Google Play Console.
- Expand the Setup section.
- Select License testing.
- In the Add license testers field, add an email address associated with a Google account and with which you are currently logged in on your Android device. Press Enter to add the email address.
- Click Save changes.
After completing this configuration, you will be able to test the purchasing flow only from the Android devices logged in using a Google account whose email address is added as a licensed tester (in the previous step).
Now, you can either download the app from FlutterFlow and run it locally on your Android device, or deploy it from FlutterFlow to an Internal or Closed track on Play Store and download it on the device from Play Store to try out.
If you want testers to try out the deployed version, you need to share the joining link present on the Play Store testing page:
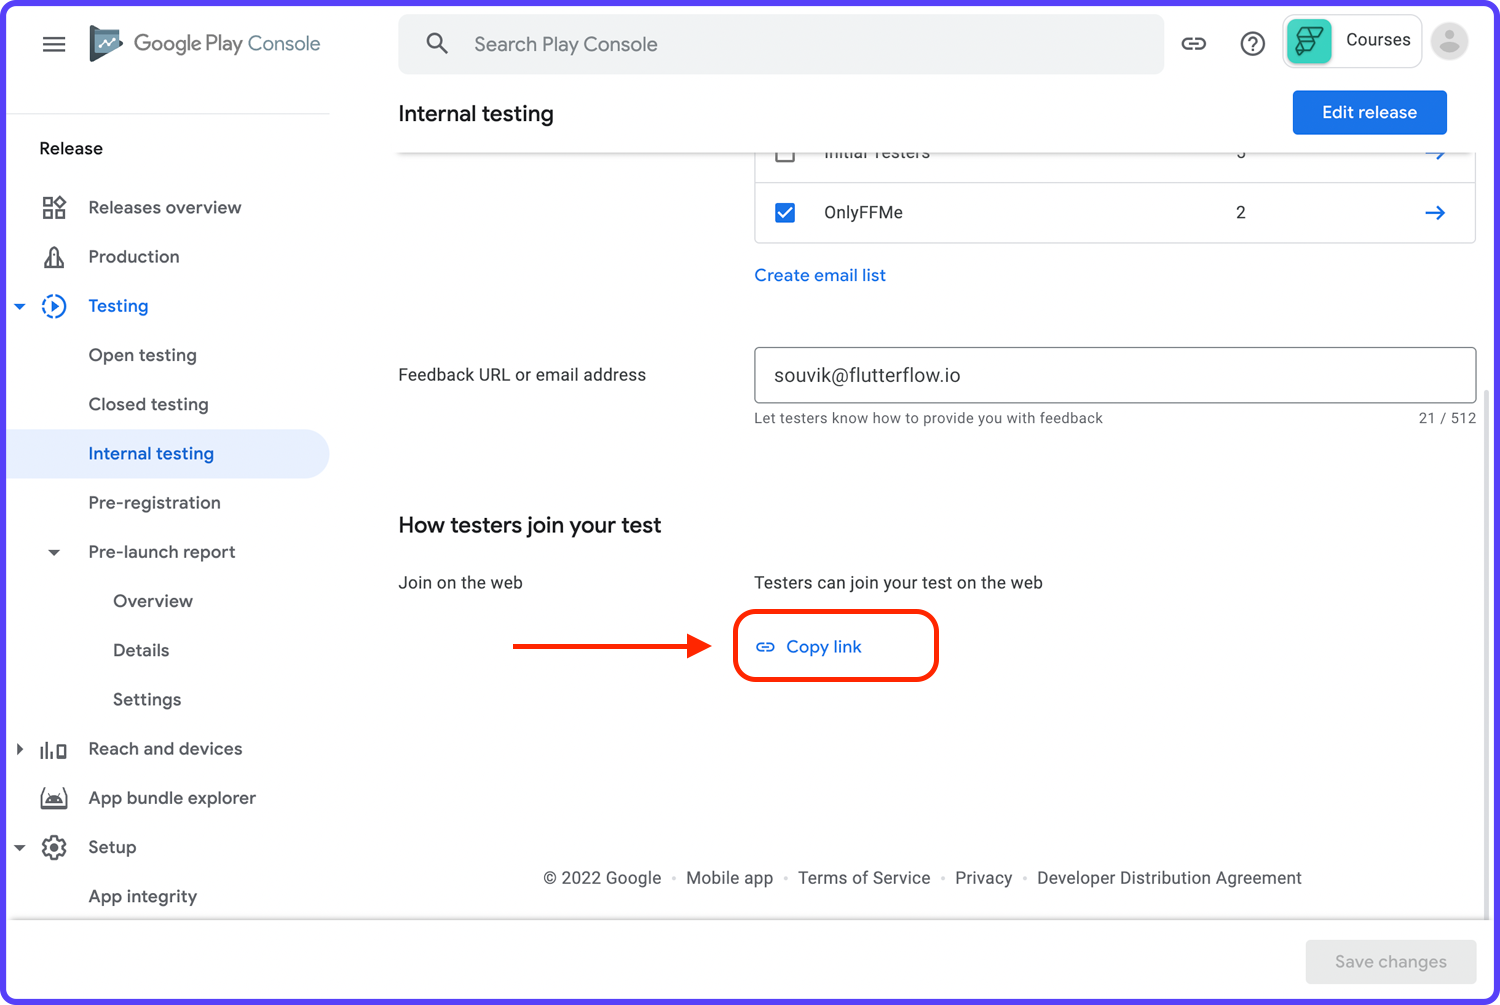
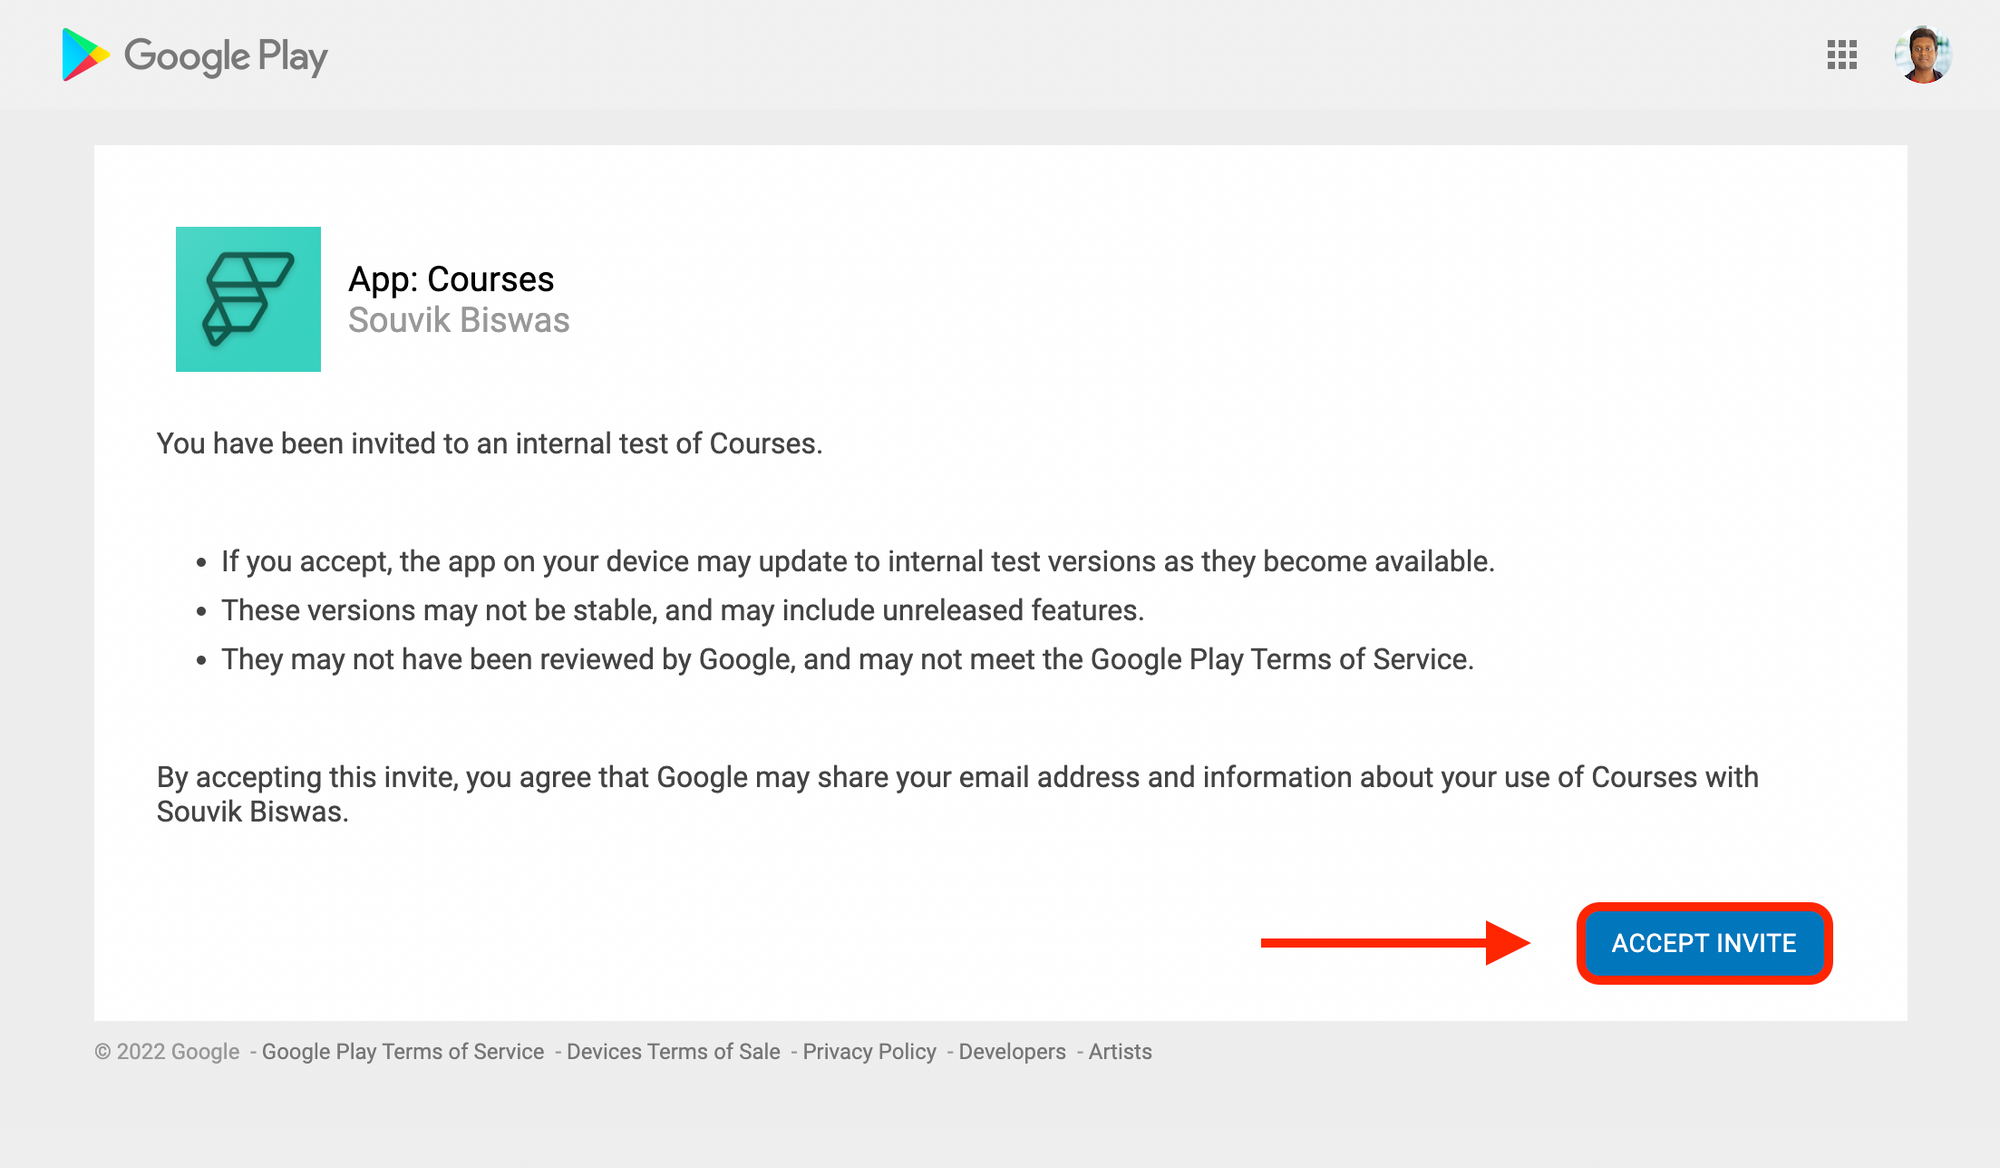
Each of the testers needs to open this link and accept the invitation in order to download the app from Play Store and try:
iOS device
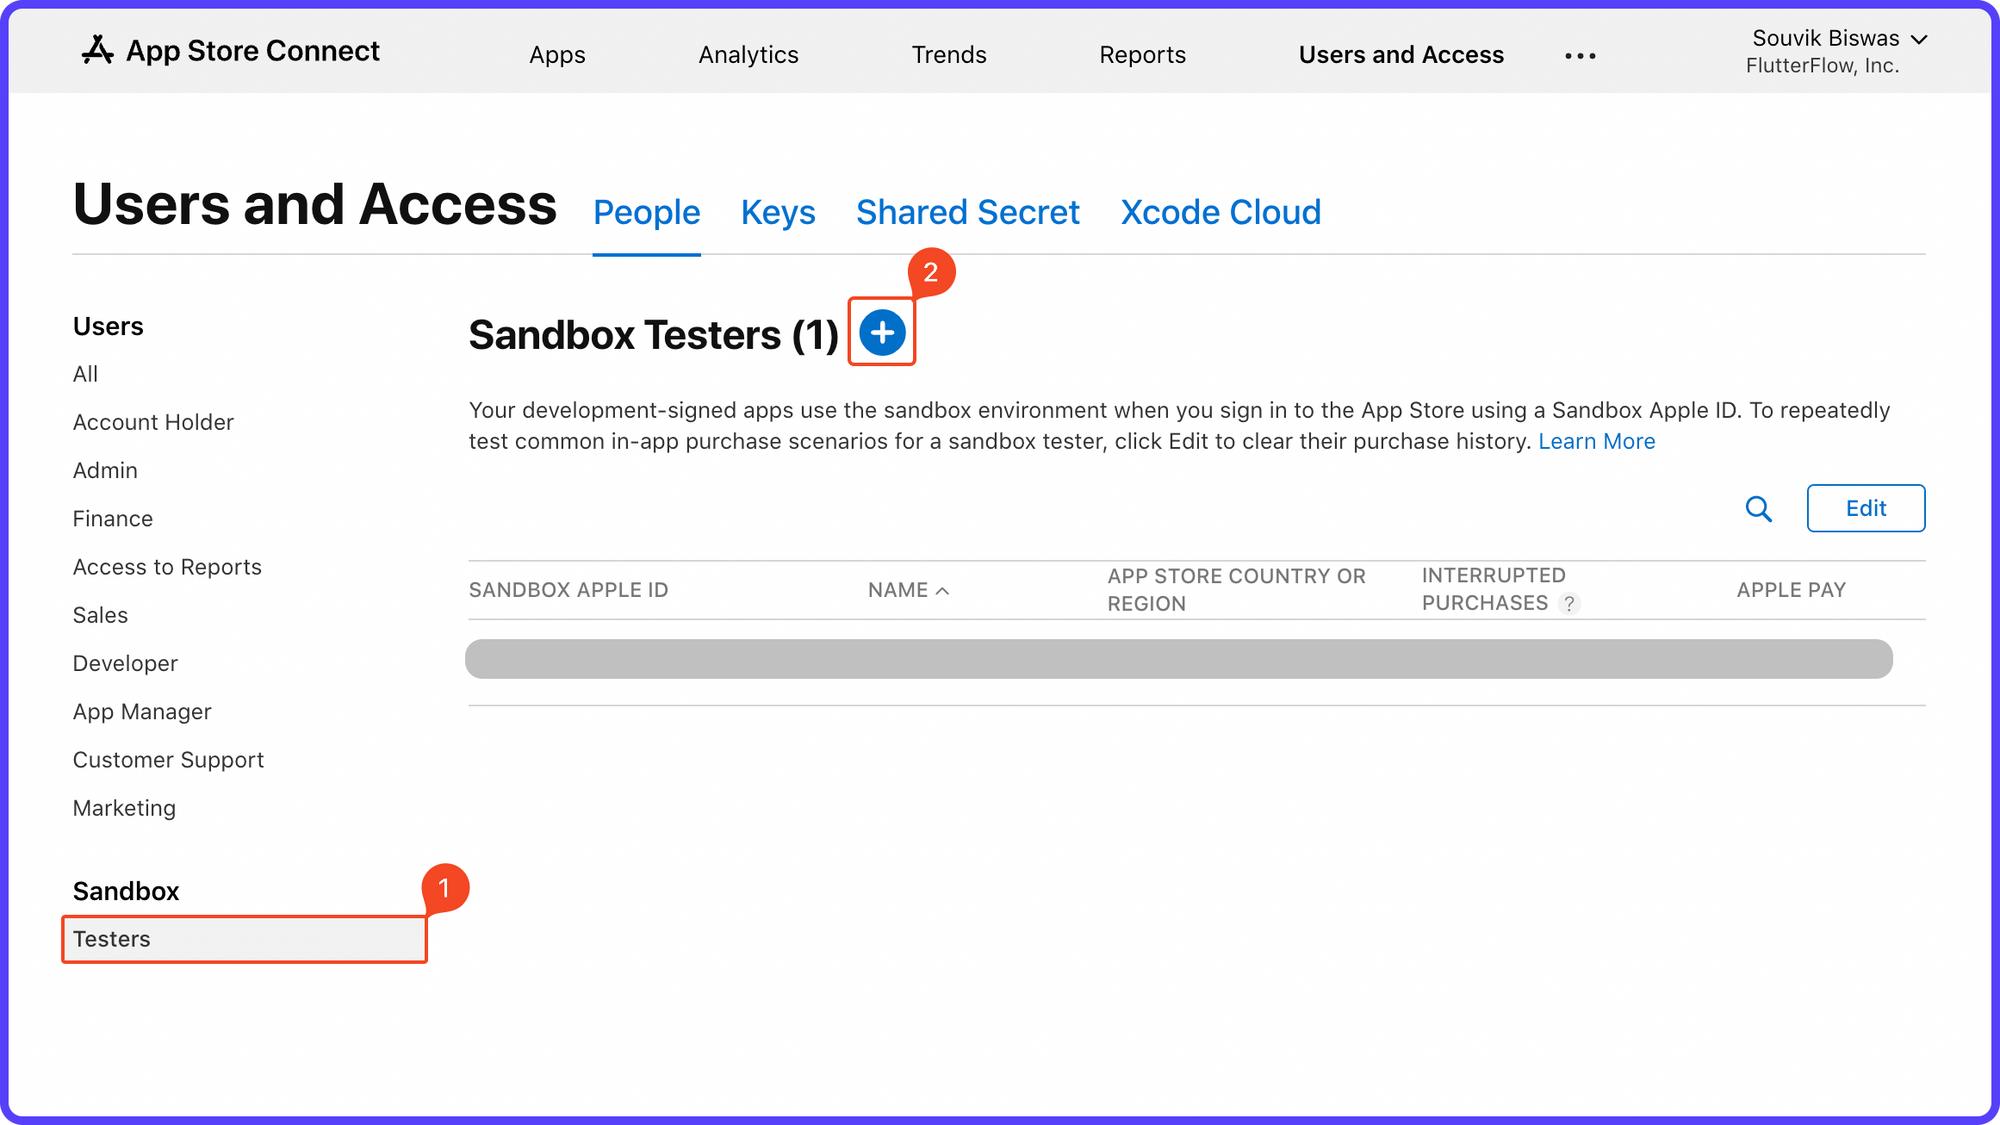
To test the purchasing flow on an Android device, follow these steps:
- Go to App Store Connect.
- Select Users and Access.
- Select Sandbox Testers from the left menu.
- Click on the "+" button to add a new tester.
- Fill up the form with tester details.
Once this configuration is done, follow the steps here to start testing on a physical iOS device. Only iOS 14 and above supports testing on the Simulator, more info here.
Now, you can either download the app from FlutterFlow and run it locally on your iOS device, or deploy it from FlutterFlow to App Store Connect and distribute to the testers using TestFlight.
Finally, when all the configuration is done and the app is distributed to the testers, you should be able to try out the entire RevenueCat subscription purchasing flow!
Here's the flow in action:
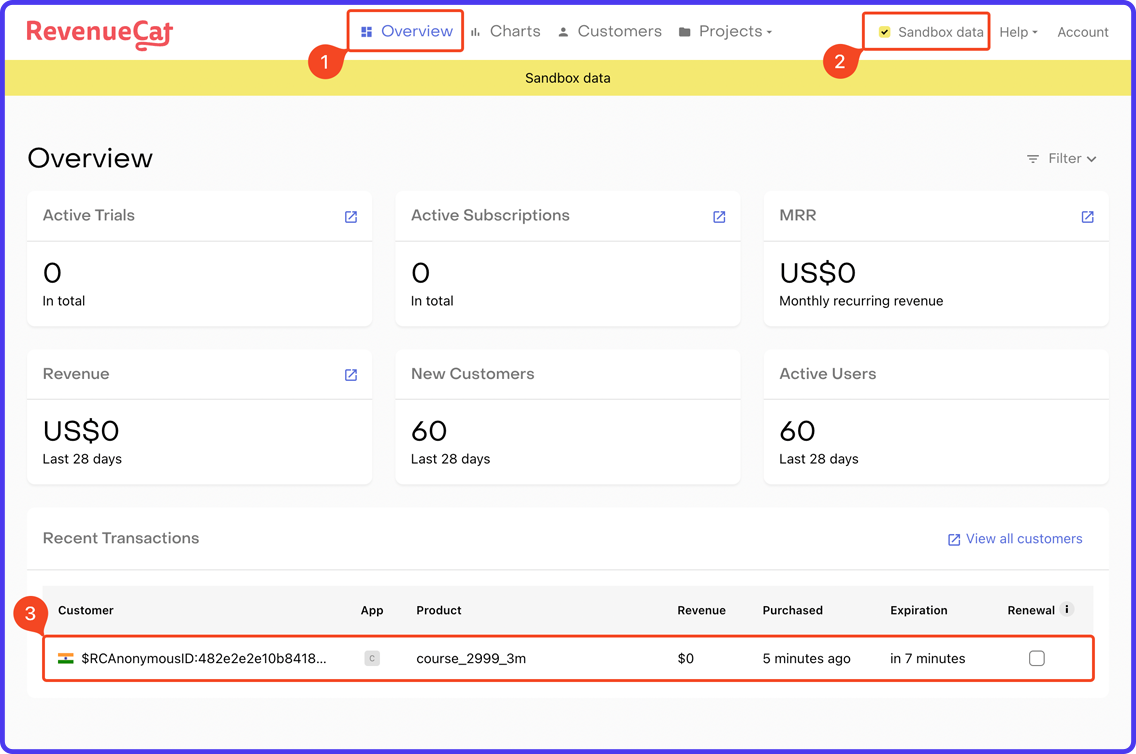
After you perform any test transactions, you should be able to Preview them on the RevenueCat dashboard by:
- Going to the Overview page.
- Enable the Sandbox data.
- The transactions should be listed under the Recent Transactions section. Click on any of the transactions for more detail.
Conclusion
Congratulations! 🎉 You have successfully integrated and tested in-app subscription in your FlutterFlow app with the help of RevenueCat.
When your app is production-ready, make sure you do the following before launching:
- Turn off debug logging by going to
Setting and Integrations > RevenueCatfrom your FlutterFlow project. - Go through the Launch Checklist of RevenueCat.
If you need any help while integrating RevenueCat with FlutterFlow, you can have a look at the links present below.
