
Choice Chips are used in various applications to make it easier for users to select a single/multiple option(s) from a set of available option chips. You can use this widget to change the UI elements to display on the page based upon the selection or filter a list of results.
There's also a Multiselect mode of the ChoiceChips. You can enable this to let users select multiple options at once from the set.
Today, you will learn to use the ChoiceChips widget of FlutterFlow to filter the Firestore query results.
Getting Started
We will demonstrate the Choice Chips filtering by building a simple restaurant menu filter. Users can use this filter to filter out the menu according to their food dish preferences.
The app will have just three pages:
- Login Page: For authentication returning users who have an account.
- Create Account Page: For authenticating new users by creating a user account.
- Menu Page: For displaying the food menu along with the filters (Choice Chips).
Authentication pages (LoginPage and CreateAccountPage) are not relevant to today's topic, so we'll be skipping the details of building these pages. But, you can get an in-depth walkthrough of authentication in FlutterFlow, here.
The app in action will look like this:
Firestore Structure
You should complete the Firebase setup (and also enable authentication) inside your FlutterFlow project before starting with the Firestore Collection structure.
The menu can be stored as a Firestore Collection with the following fields:
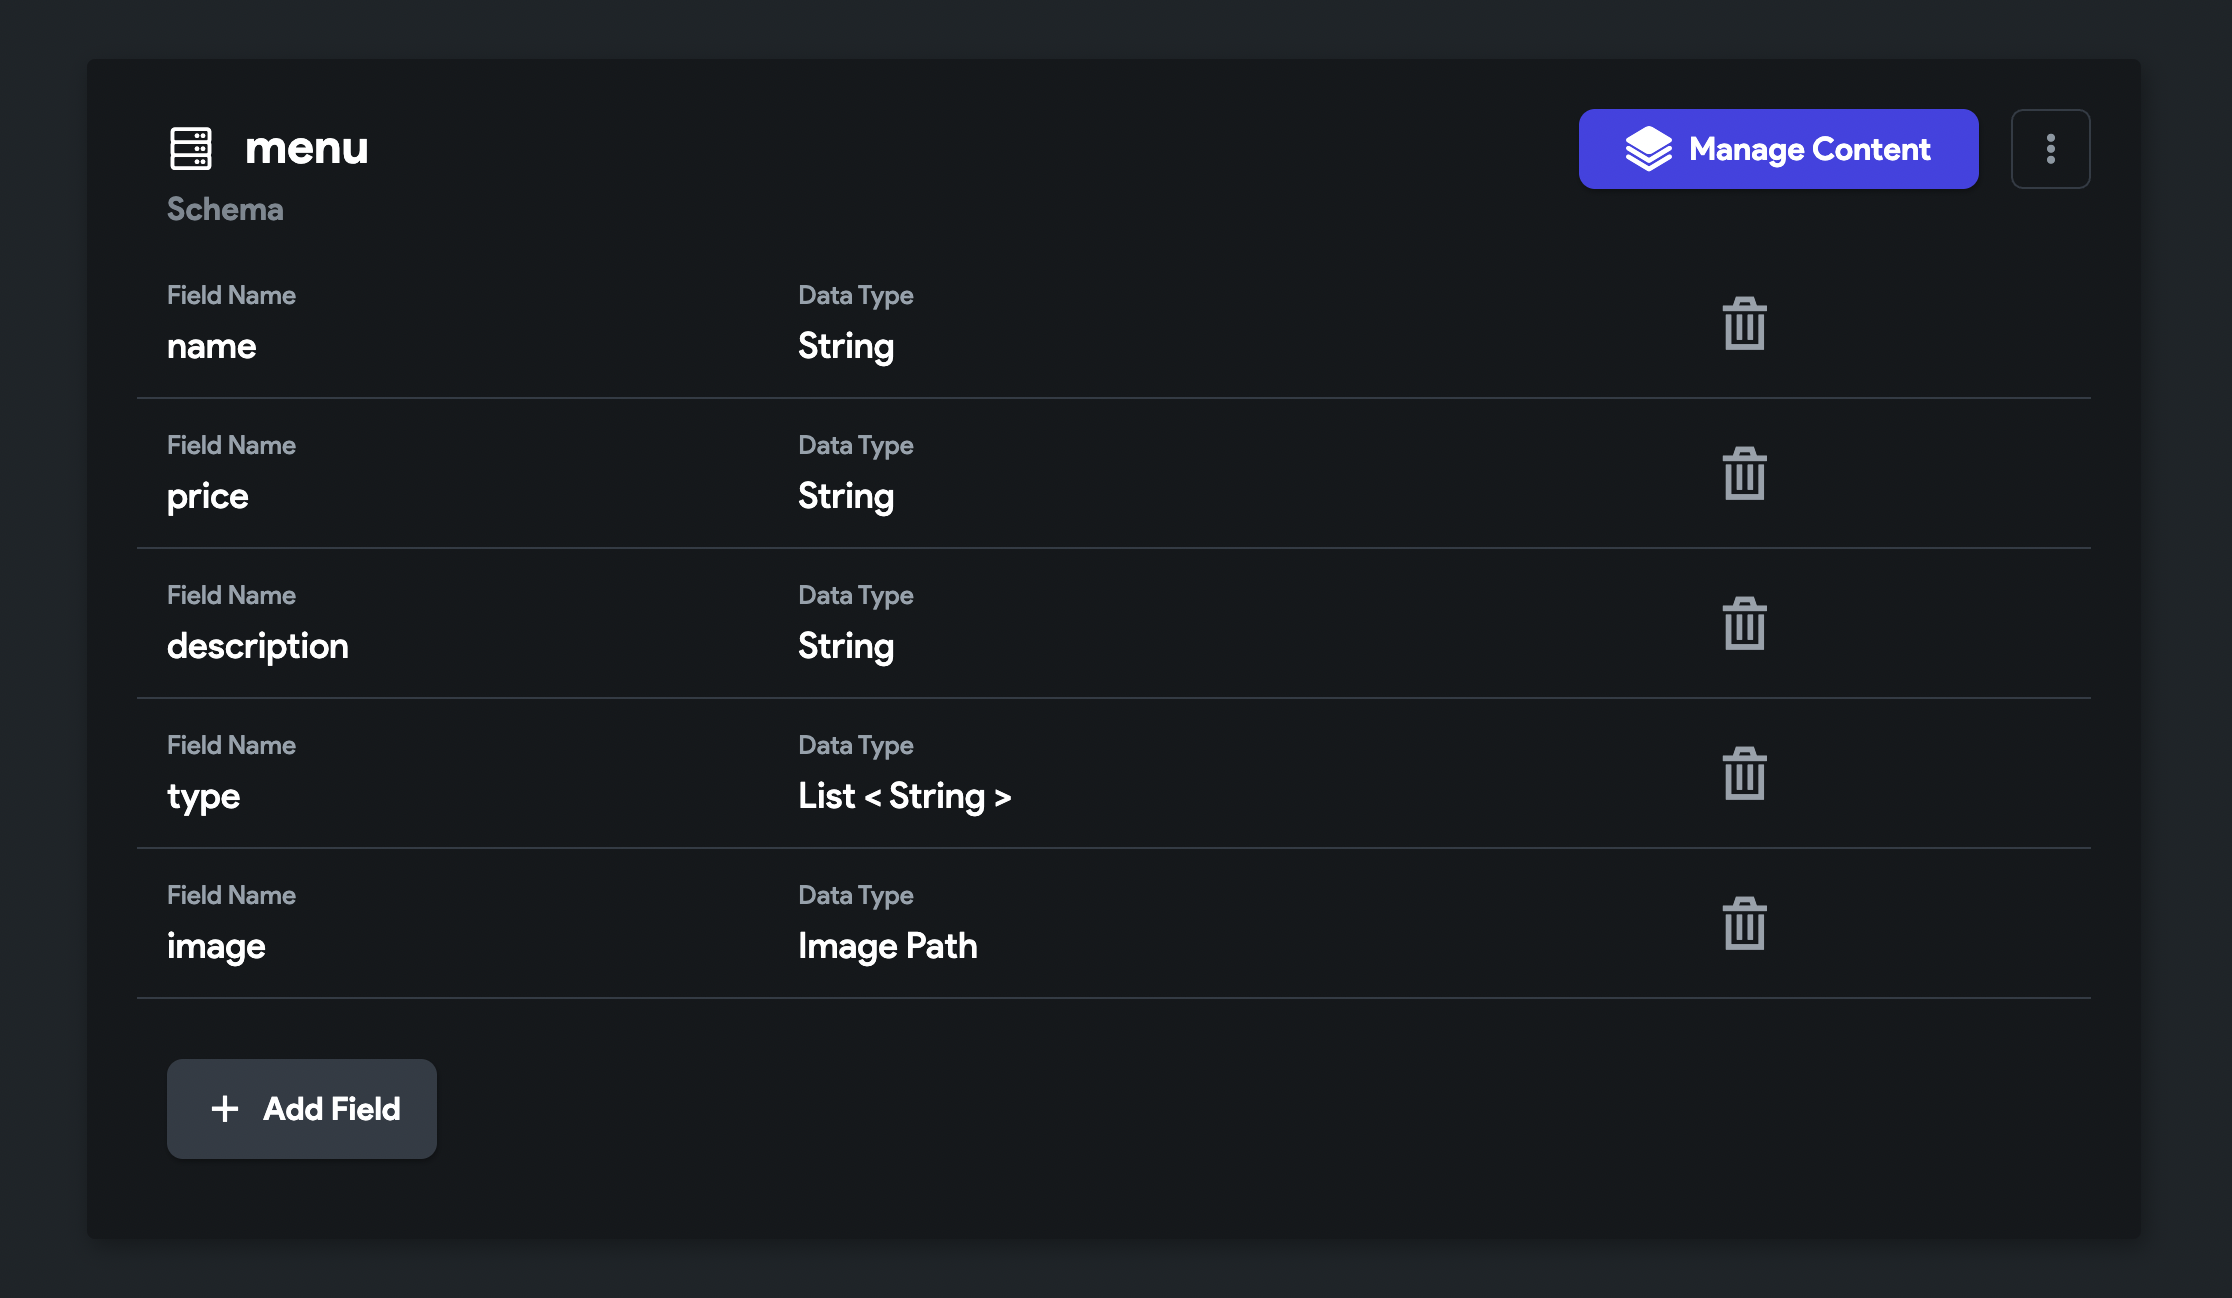
You can create a new Collection with the name "menu" and add the above fields (along with their correct Data Type).
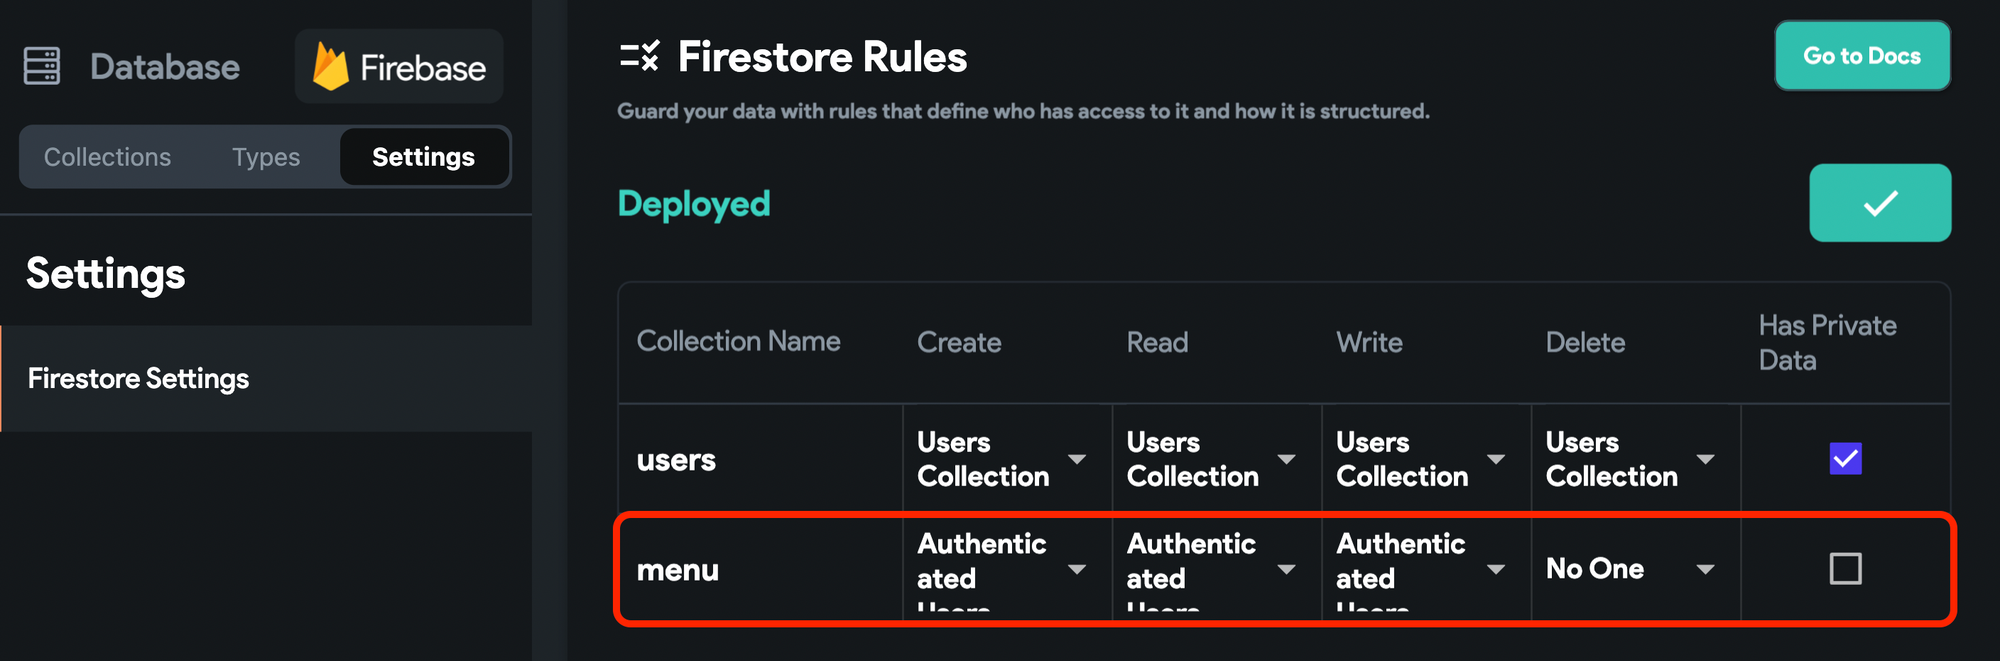
Once you have added all the fields, specify and deploy the Firestore Rules by going to the Firestore Settings tab, as follows:
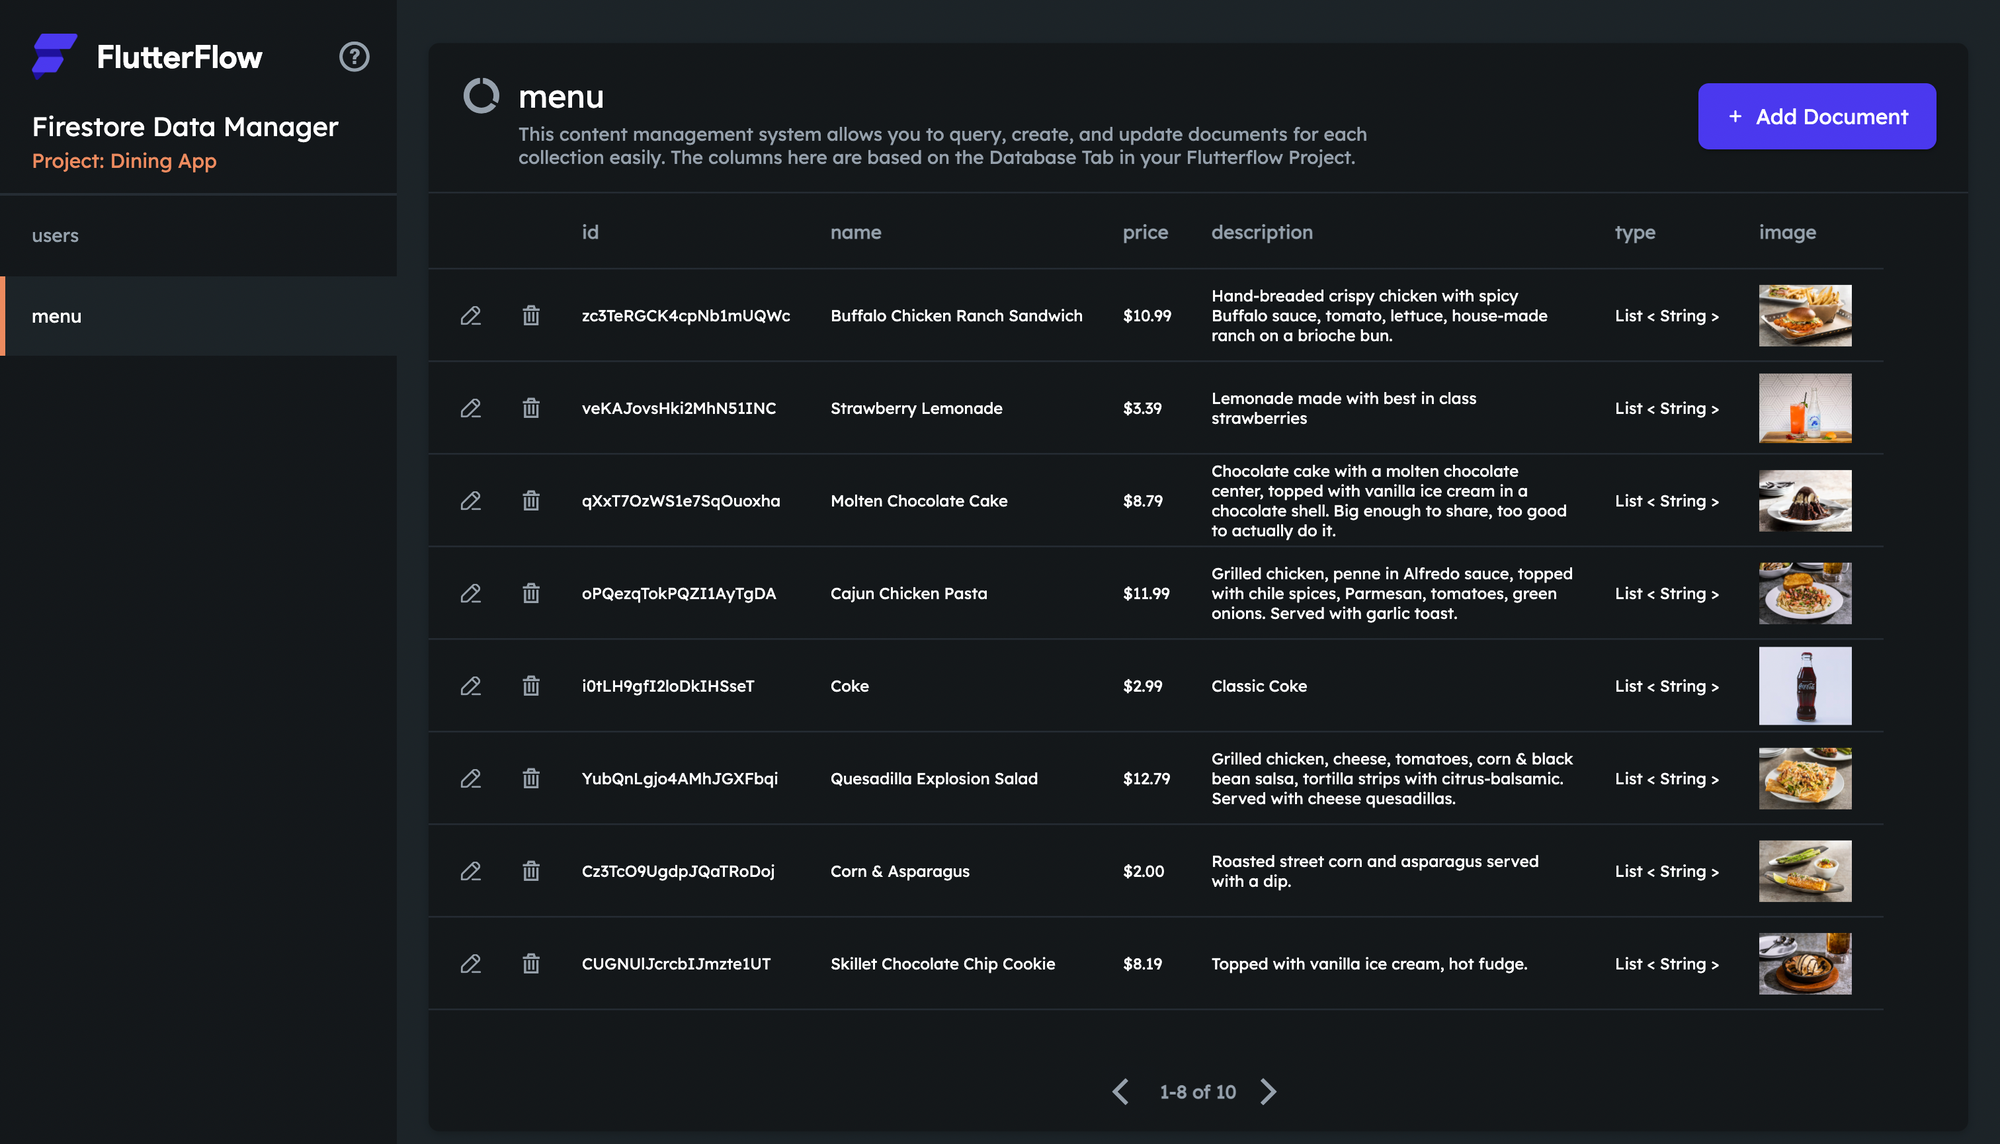
As we are building this as a demo app, let's add some sample data to the Firestore Collection so that we would be able to perform queries and try out filters on them!
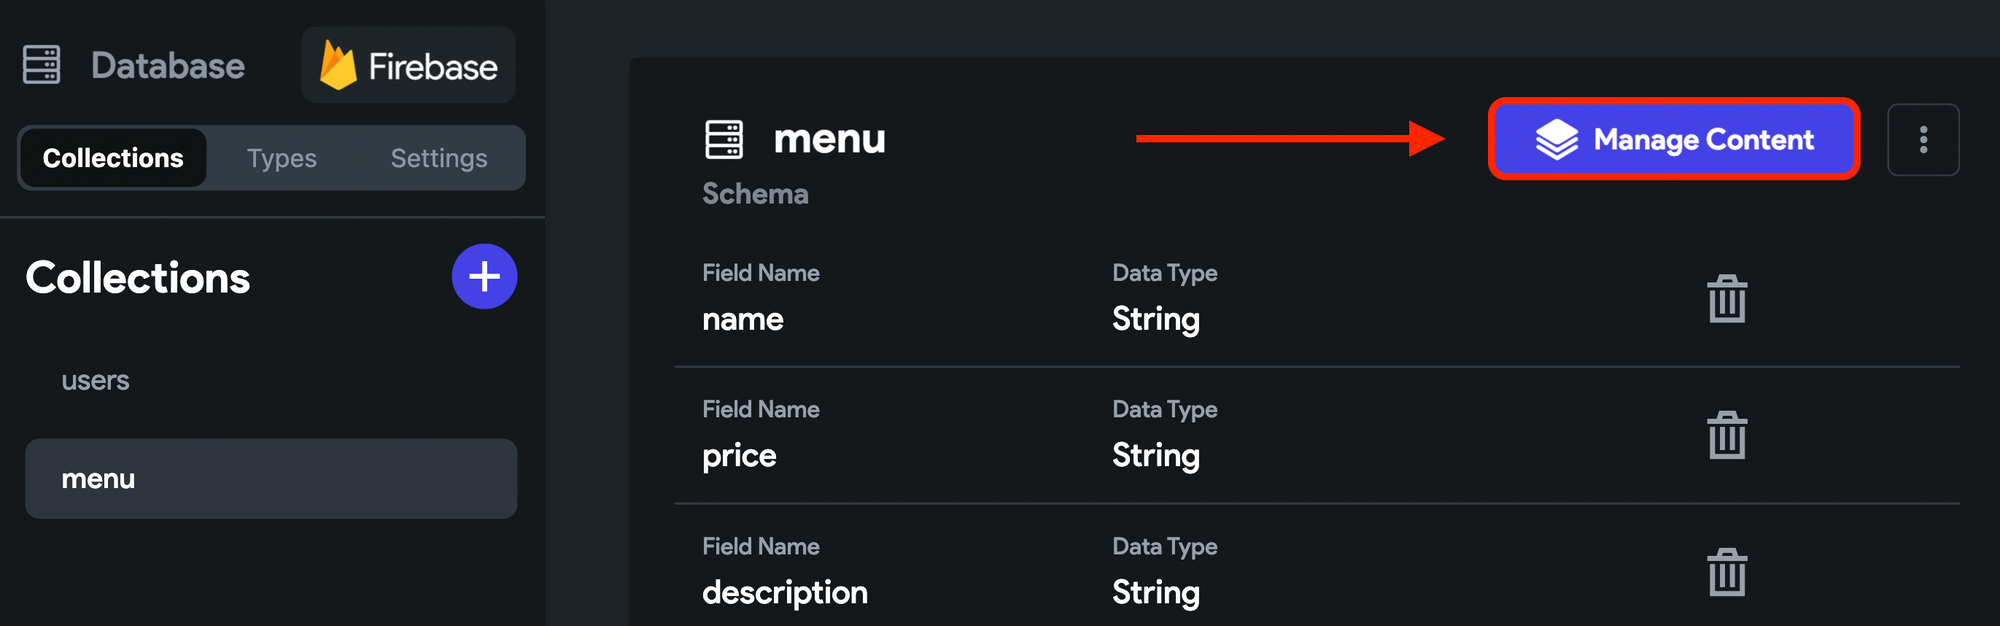
You can go to the Collections page > menu and click on the Manage Content button.
On the Firestore Data Manager page, select the "menu" Collection from the left menu, and click + Add Document button to add a new document to the collection.
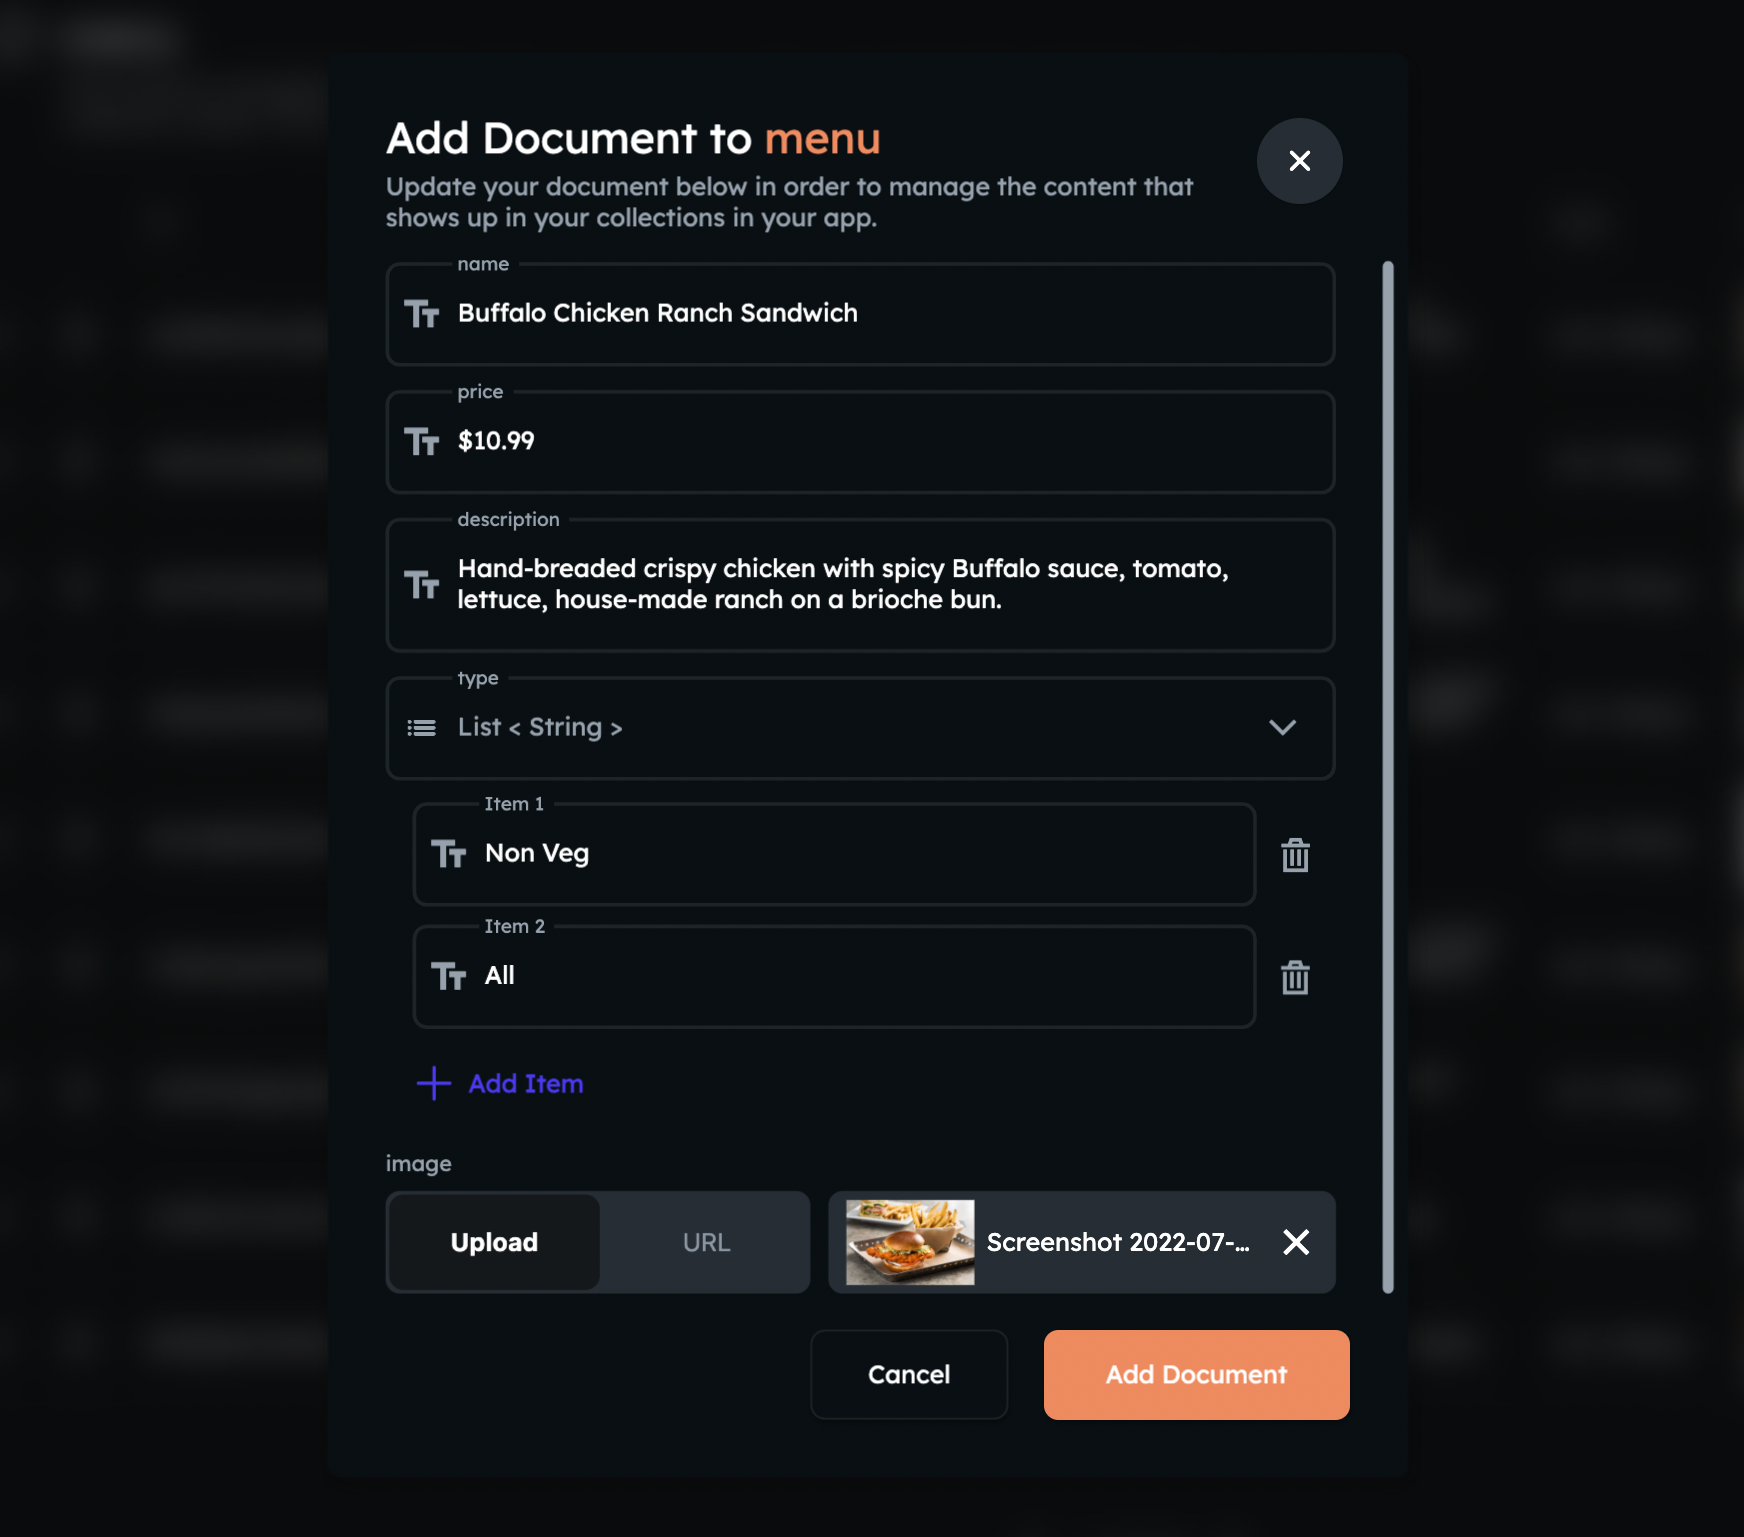
Enter the field values and provide a link/upload a food image. Click Add Document. You can add more documents to the collection in the same way.
We have added the following dishes to the menu 😋:
Now, you are ready to use this Collection to perform queries on it 🔥.
Adding Choice Chips
Let's add the ChoiceChips widget to the MenuPage. Follow the steps below:
- Drag and drop the ChoiceChips widget onto the page.
- Add the options you want to present to the user under the Define Options section.
- Enter the text of the Initial Option that you want to be selected when a user arrives on the MenuPage for the first time.
- Enable the Require Selection toggle.
- Now, you can customize the Selected and Unselected Chip Style to match your app's theme.
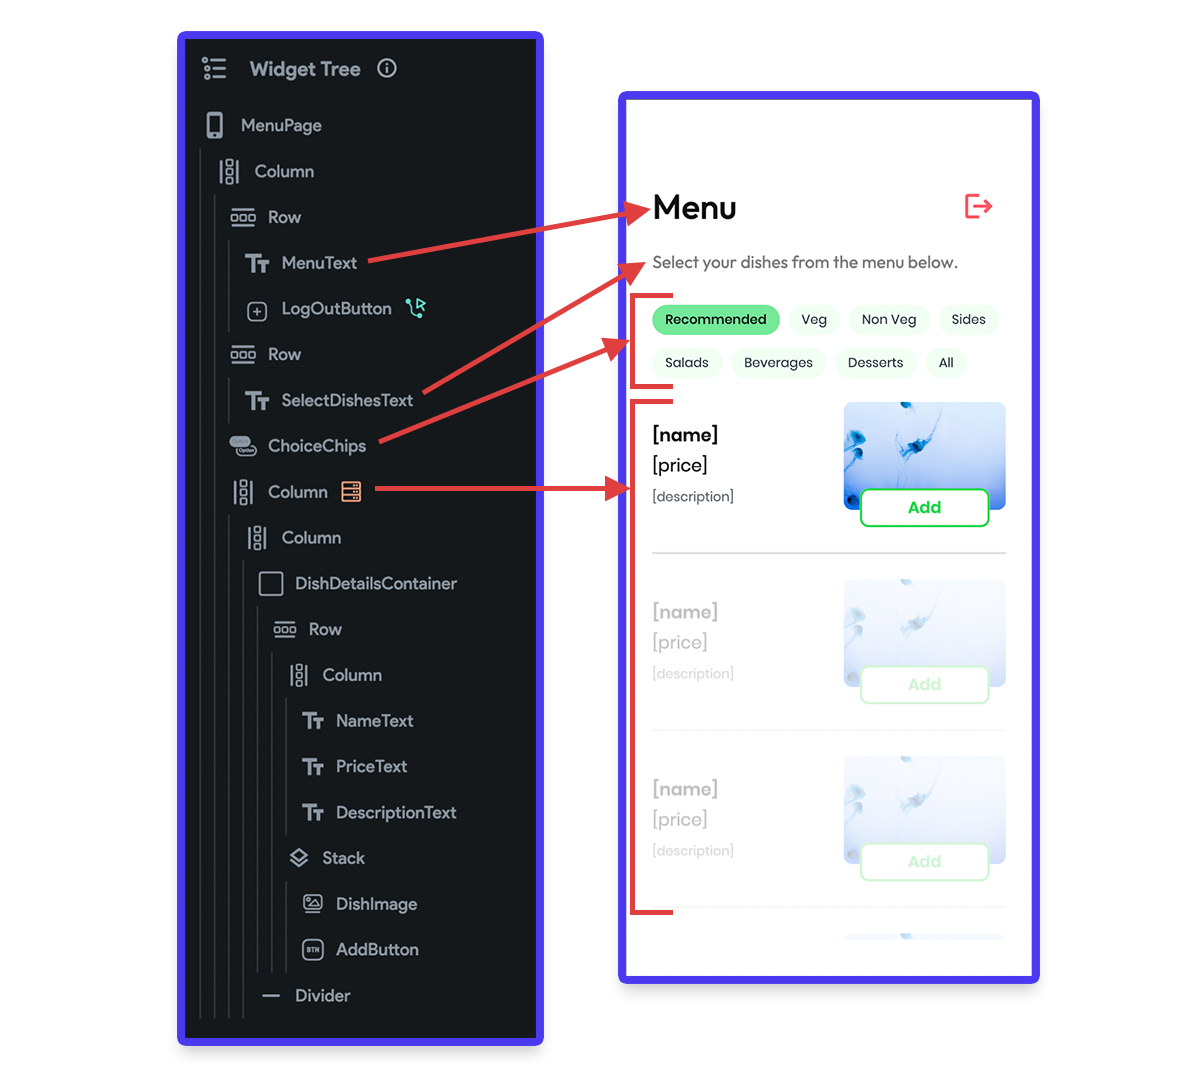
Completing Menu Page
Before adding the Firestore Query, you need to add a Column widget below the Choice Chips. It will contain each of the items inside which the details about a dish would be displayed.
The overall widget tree of the Menu Page will look like this:
Setting up Query with filter
You need to set the query on the Column widget that contains each dish to be displayed. Follow the steps below:
- Select the Column widget.
- From the Properties Panel (right), go to the Backend Query tab.
- Select the Query Type as Query Collection > menu (collection name) > List of Documents.
- To add a query filter, click + Filter button.
- Choose the Collection Field Name as type.
- Select Array Contains as the Relation.
- Select the Value Source as From Variable > WidgetState > ChoiceChips (this is the currently selected option text).
- Click Confirm. Inside the dialog, click Confirm again (this will generate the children dynamically from the query result).
Now, you can use the menu Document fields inside the widgets. Set the name, price, description, and image from the retrieved document.
Conclusion
Congratulations 🎉, you have successfully implemented a choice chip filter for Firestore queries! One another famous app category where you can take advantage of the choice chips filter is E-commerce apps.
You can get the clonable version of this project here.
Try out the sample app in Run mode!
References
Check out the following pages for more information regarding the concepts used in this blog post:
