
An essential part of certain apps such as ride-hailing (for example, Uber) and food/grocery/medicine delivery is having an integrated real-time tracking of the cab or delivery partner on the map. This makes it intuitive for the user to track the current status of their service while they are waiting for their cab or food order to arrive at the desired location.
Talking about maps, Google Maps is one of the pioneers in worldwide mapping technology. In this article, you will learn to leverage the advantages of Google Maps and build a live tracking experience with the help of Firebase.
Background knowledge
FlutterFlow already has a widget called GoogleMap that allows you to interact with the map by zooming and panning, point out nearby locations (restaurants, gas stations, etc.) using markers, show traffic on the map, and also allows you to preview the map in various types (terrain, hybrid, satellite) and styles (standard, night, retro).
But as of now, the GoogleMap widget does not allow you to draw a route on the map and update it in real-time according to the changes in location data.
Fear not, here comes one of the major advantages of using a low code platform - you can write your custom code and just add it to the FlutterFlow project.
Today, you will learn to build RouteViewStatic and RouteViewLive custom widgets along with helper custom action to update the current location to Firestore.
Getting started
Before getting started with the actual implementation, let's have an overview of the apps.
We would use an example of building a ride-hailing service to demonstrate how you can:
- Draw routes on the Google Maps
- Update the driver location in realtime
- Preview the real-time location updates on the maps
For building this service, you would need two apps:
- Rider App: Using this app, users can choose their destination and book a cab. Once a driver accepts the booking, real-time updates of the driver's location will be previewed.
- Driver App: Using this app, drivers can see the list of currently available bookings and will be able to accept a booking. After accepting the booking, the cab driver would be able to see the user's location and navigate to the pickup spot.
In this article, we'll only focus on the Rider App. The driver version of the app will be covered in a separate article.
App overview
This blog focuses on integrating a live tracking experience with the rider side of the app. Let's have a quick walkthrough of the different screens you will need for this app.
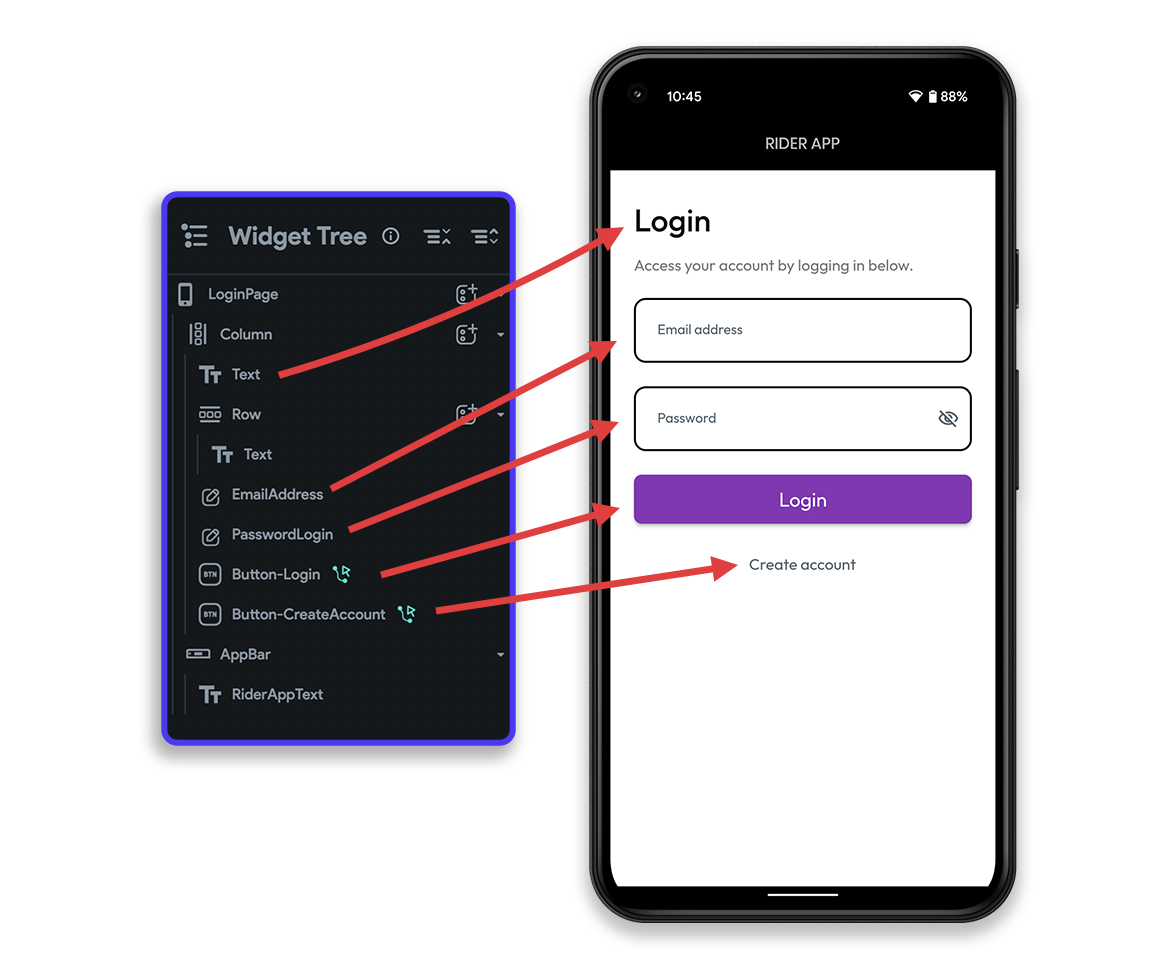
Login Page
This page is used for logging in the existing users to the rider app.
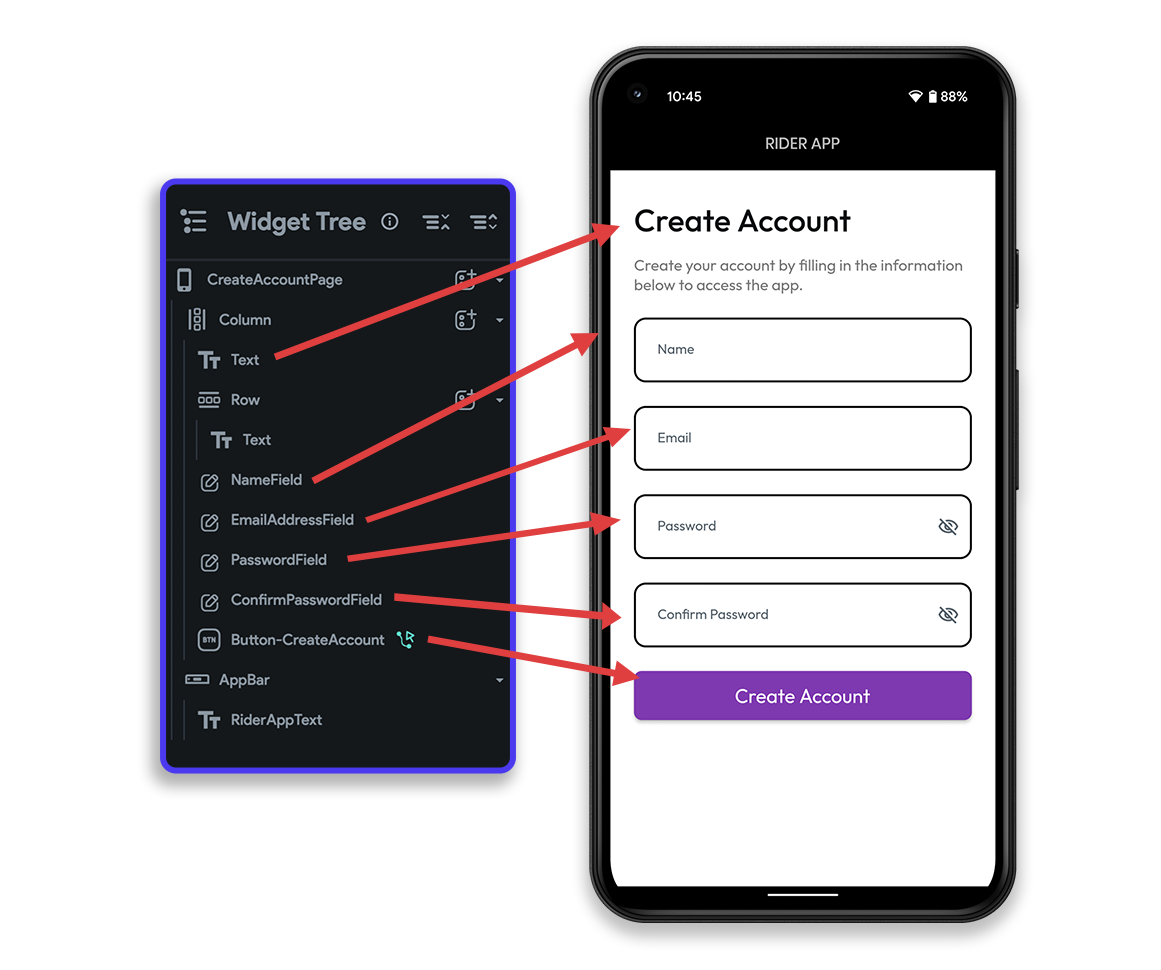
Create Account Page
This page is used for creating an account for a new user inside the rider app.
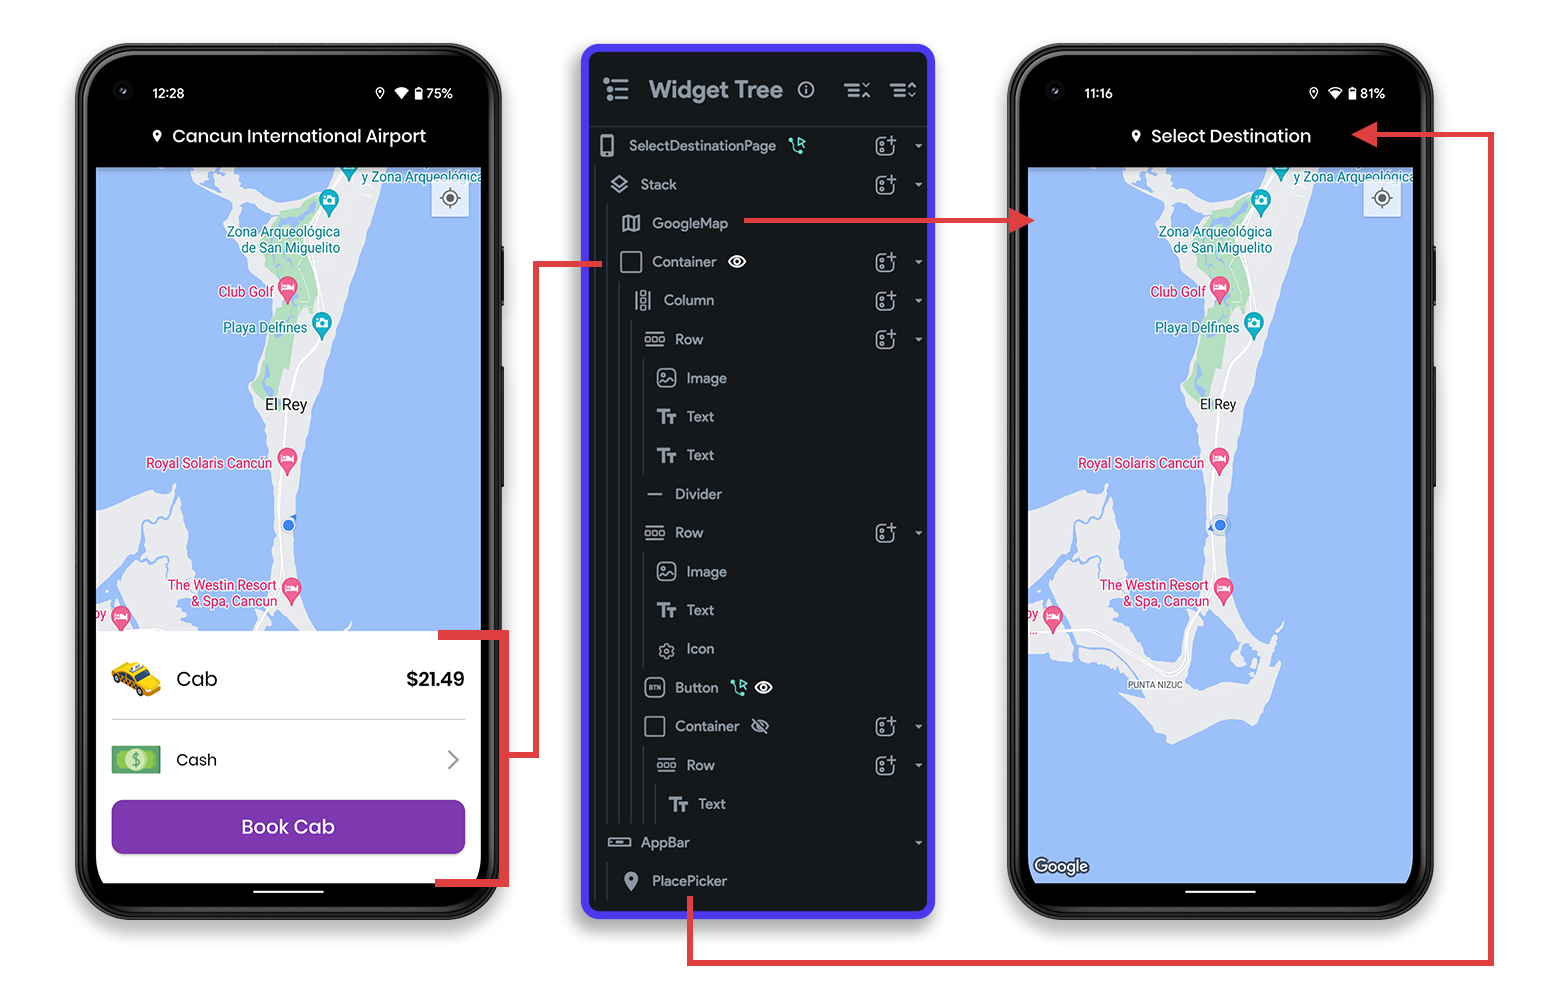
Select Destination Page
Users can choose their destination using the PlacePicker widget from this page and continue booking a cab.
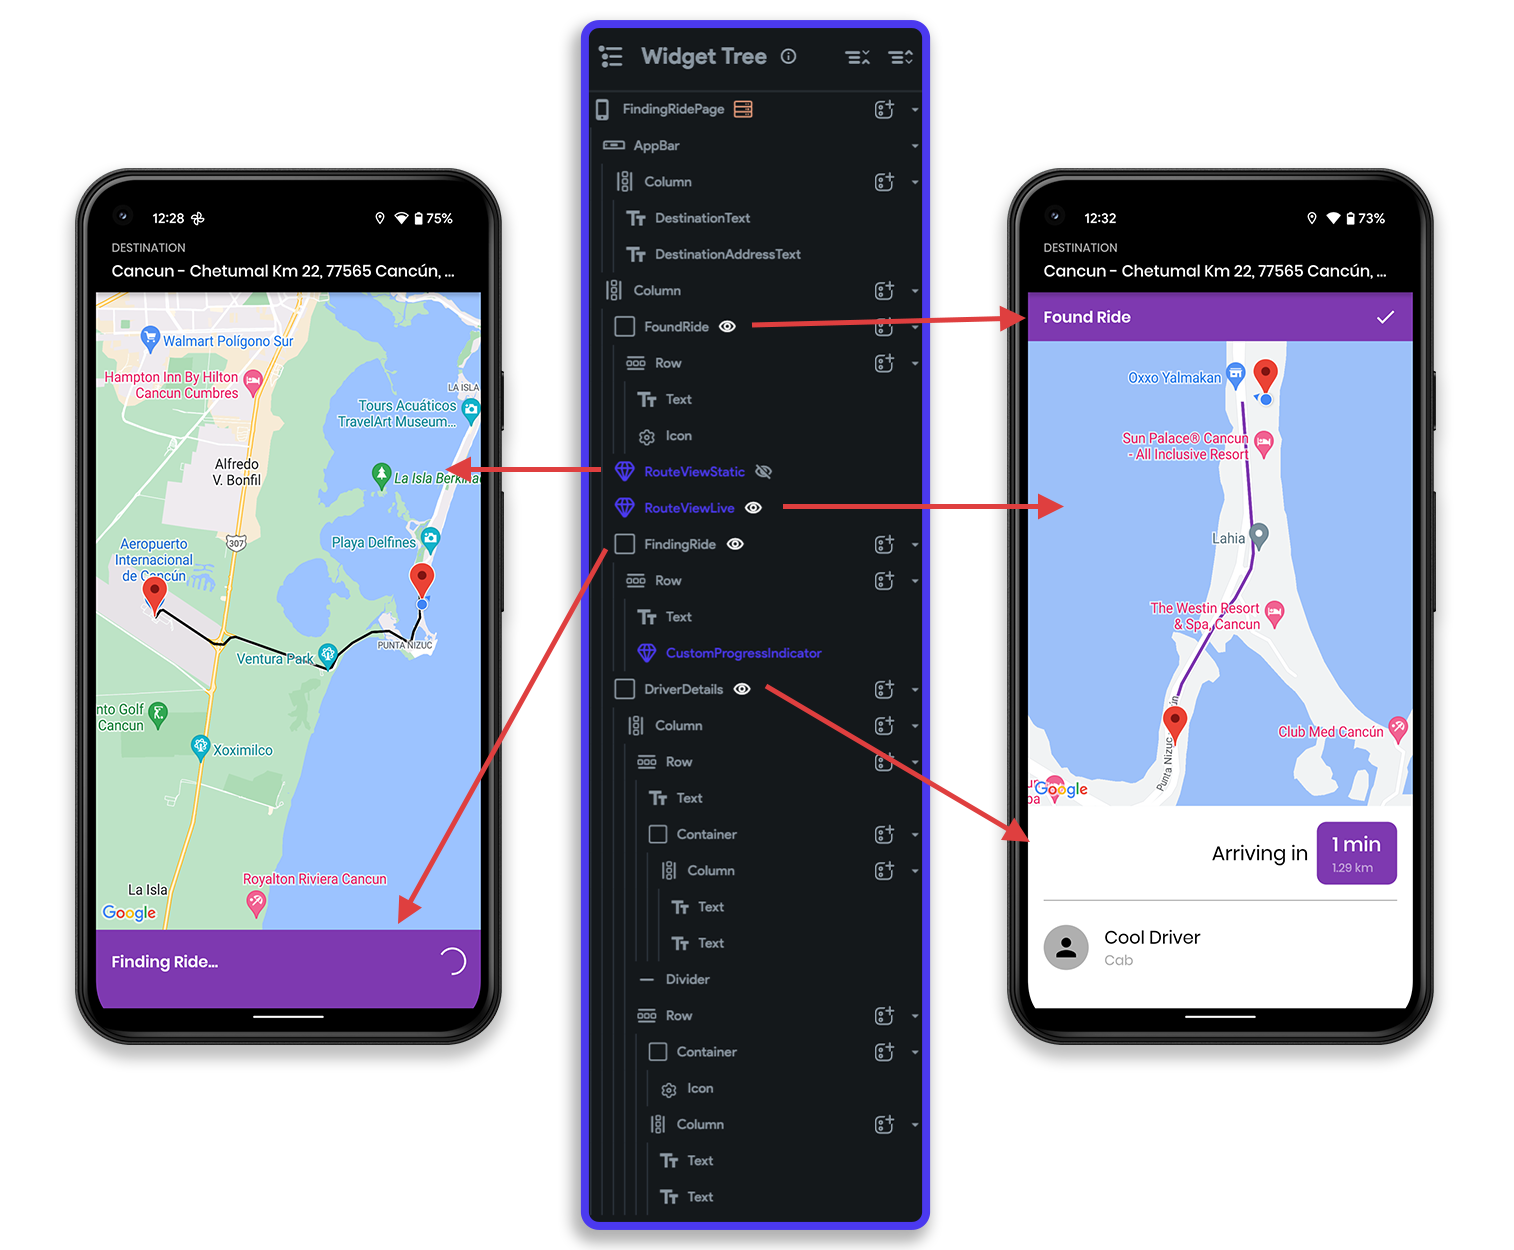
Finding Ride Page
Once a user taps on the Book Cab button, they will be navigated to this page. This page will display "Finding Ride" along with a route between the start location and the destination until a driver confirms. As soon as a driver confirms the trip, the page will update to show a route between the user's and driver's location and will also update the location in real-time.
Firestore structure
To provide the backend infrastructure required for managing rides and tracking live location, we'll use a Firestore database. Firebase comes integrated with FlutterFlow, making it even simpler to set up and manage the database from within the FlutterFlow platform.
Let's add a new collection to our database for storing the ride information, including the required locations like start, destination, and driver's current position (once the booking is accepted).
Follow the steps below:
- Navigate to the Firestore page from the left menu.
- Click the plus ( + ) button beside the Collections.
- Enter the collection name as "ride" and click Create.
- Add the following fields to the collection:
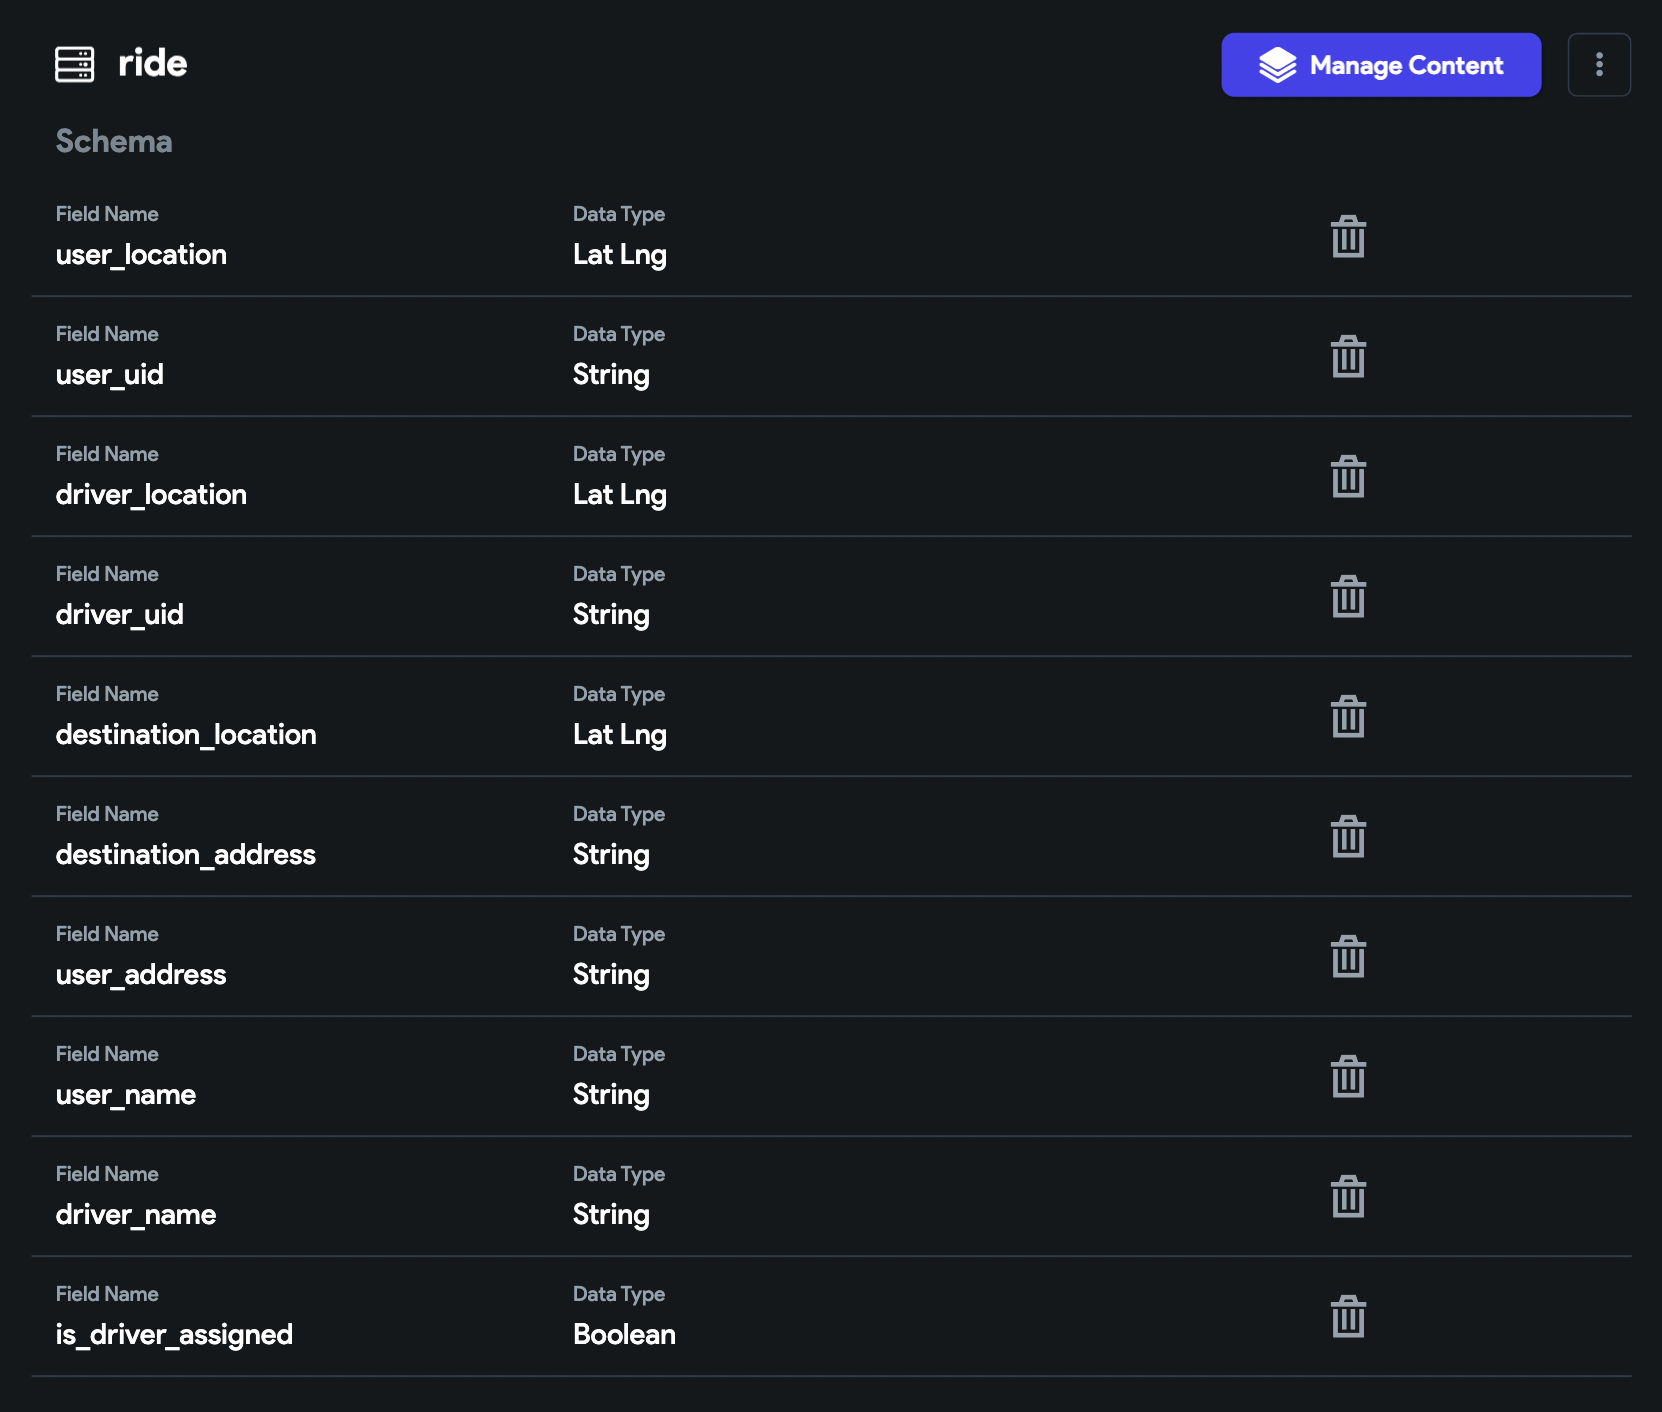
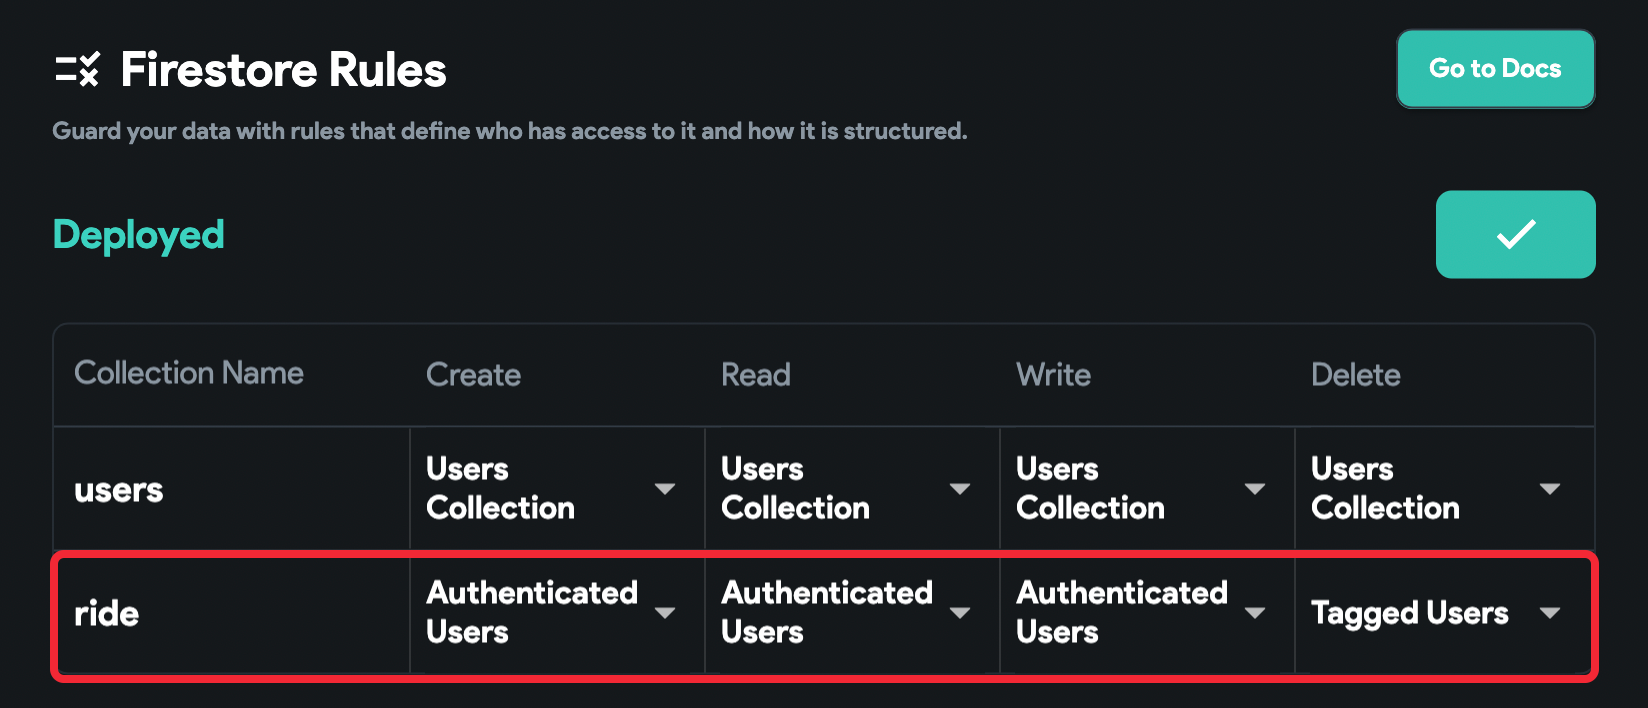
Finally, go to the Firestore Settings, update the security rules for the ride collection under Firestore Rules, and click Deploy.
You are ready to store ride information on the database! 🎉
Configuring Google Maps
You need to configure Google Maps inside FlutterFlow before using the widget to display maps in your app.
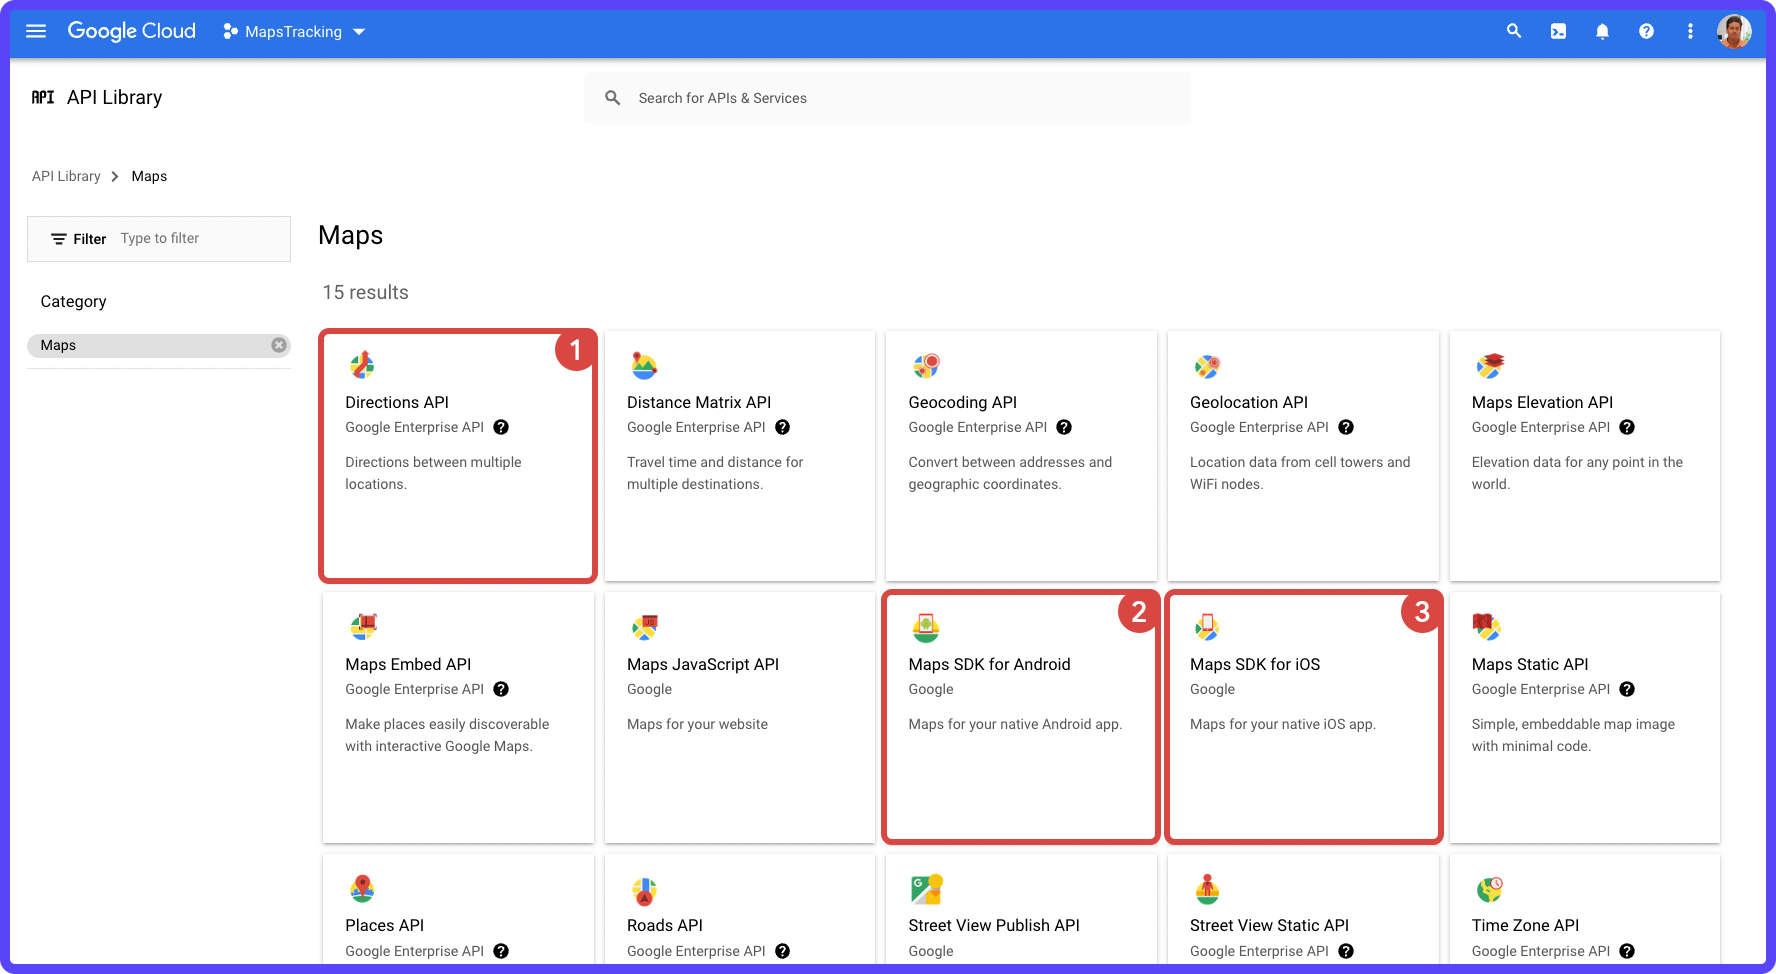
Enable the required Maps APIs by following these steps:
- Go to the Google Developers Console page.
- Select the correct Firebase project from the dropdown present on the top.
- Click Library from the left menu.
- Select the Maps category from the left menu.
- Enable Maps SDK for Android, Maps SDK for iOS, Maps JavaScript API (required for testing maps in Run-mode of FlutterFlow), and Directions API (for drawing the routes on the map).
Add the required credentials to FlutterFlow for using the GoogleMap widget:
- Go to the Google Developers Console page.
- Select the correct Firebase project from the dropdown present on the top.
- Click Credentials from the left menu.
- Under API Keys, click SHOW KEY beside Android key (auto created by Firebase), and copy the key.
- Now, go to your FlutterFlow project. Navigate to the Settings and Integrations > Google Maps (under Integrations). Paste the key under Android API Key field.
- Similarly, copy the iOS key (auto created by Firebase) and Browser key (auto created by Firebase) from the Google Developers console and paste them into the iOS API Key and Web API Key fields in FlutterFlow respectively.
Selecting Destination
The first step in the ride booking process is to get the user's destination. Let's build the SelectDestinationPage for taking the user's destination as an input. This page will also contain a GoogleMap widget to preview the user's current location and a button to book a cab with the selected destination.
Adding PlacePicker widget
The PlacePicker widget helps you to search for places. You can start typing the name of the place, and it displays a list of matching places from which you can choose your preferred place (or, in this case, destination).
Drag and drop the PlacePicker widget onto the AppBar to the page. Customize the widget to match the theme of your app.
Displaying current location on the map
To display the user's current location on the map, you can use the GoogleMap widget included with the FlutterFlow's widget library.
- Drag and drop the GoogleMap widget onto the canvas.
- Choose the Initial Location as Set from Variable > Global Properties > Current Device Location.
- Customize the rest of the properties as per your preference.
Using conditional visibility
You can display the ride information, such as type of car, price estimate, preferred payment mode, and also a button to book the cab, on top of the map using the Stack widget. But ideally, you will only want this information to be displayed once the user has selected the destination - you can achieve this by setting a Conditional Visibility condition.
- Select the widget (such as, Container) on which you want to apply the Conditional Visibility.
- From the Properties Panel, enable the toggle beside Conditional Visibility.
- Click on Unset, select Condition from the list.
- Select the First Value as Widget State > placePickerValue > Get Place Field > Address. Click Confirm.
- Choose the condition as Is Set and Not Empty.
- Click Confirm.
Now, the ride details will only be visible to the user once the destination is set using the PlacePicker widget.
Storing a new ride document
After the user has selected the destination and other information, once the Book Cab button is tapped, you would need to store these data inside the Firestore database.
Let's set an action to store the ride information to Firestore and another one to navigate to the next page (FindingRidePage):
- Select the Book Cab button.
- From the Properties Panel, go to Actions tab.
- Click + Add Action.
- Under Database, select Create Document.
- Choose the Collection as ride.
- Now, use + Add Field button to define the values of the following fields:
| # | Field | Value |
|---|---|---|
| 1 | is_driver_assigned | Specific Value > False |
| 2 | user_location | Global Properties > Current Device Location |
| 3 | user_uid | From Variable > Authenticated User > User ID |
| 4 | destination_location | Widget State > placePickerValue > Get Place Field > LatLng |
| 5 | destination_address | Widget State > placePickerValue > Get Place Field > Address |
| 6 | user_name | From Variable > Authenticated User > Display Name |
- Enter the Action Output Variable Name as "rideDetails".
- Scroll up and open the Action Flow Editor.
- Click on the "+" button and select Add Action.
- Select the Action as Navigate To > FindingRidePage.
- Pass the rideDetails > Reference to the page (define a parameter on the FindingRidePage as rideDetailsReference having DocumentReference type).
Querying for ride details
We have already passed a reference of the ride collection to the FindingRidePage. In order to retrieve the ride details, you have to define a query on this page.
- Don't select any widget. If you have any widget selected, just click outside the canvas.
- From the Properties Panel, go to the Backend Query tab.
- Select the Query Type as Document from Reference.
- Choose the Collection as ride.
- Click UNSET, and choose the source as rideDetailsReference (the parameter defined on this page).
- Click Confirm.
Finding Ride Page UI
This page will contain the two main Custom Widgets, one for just drawing route and another one with the added capability of updating the route in realtime:
- RouteViewStatic: This widget will help draw a static route between point A and point B, but won't update it if the locations change. It will show the route between the user's location and destination while the app waits for a driver to accept the booking.
- RouteViewLive: Similar to the above widget, but with the ability to update the route as the positions change. It will show the route between the user's location and the cab while the car approaches to pick up the user (it will display the position update in real-time).
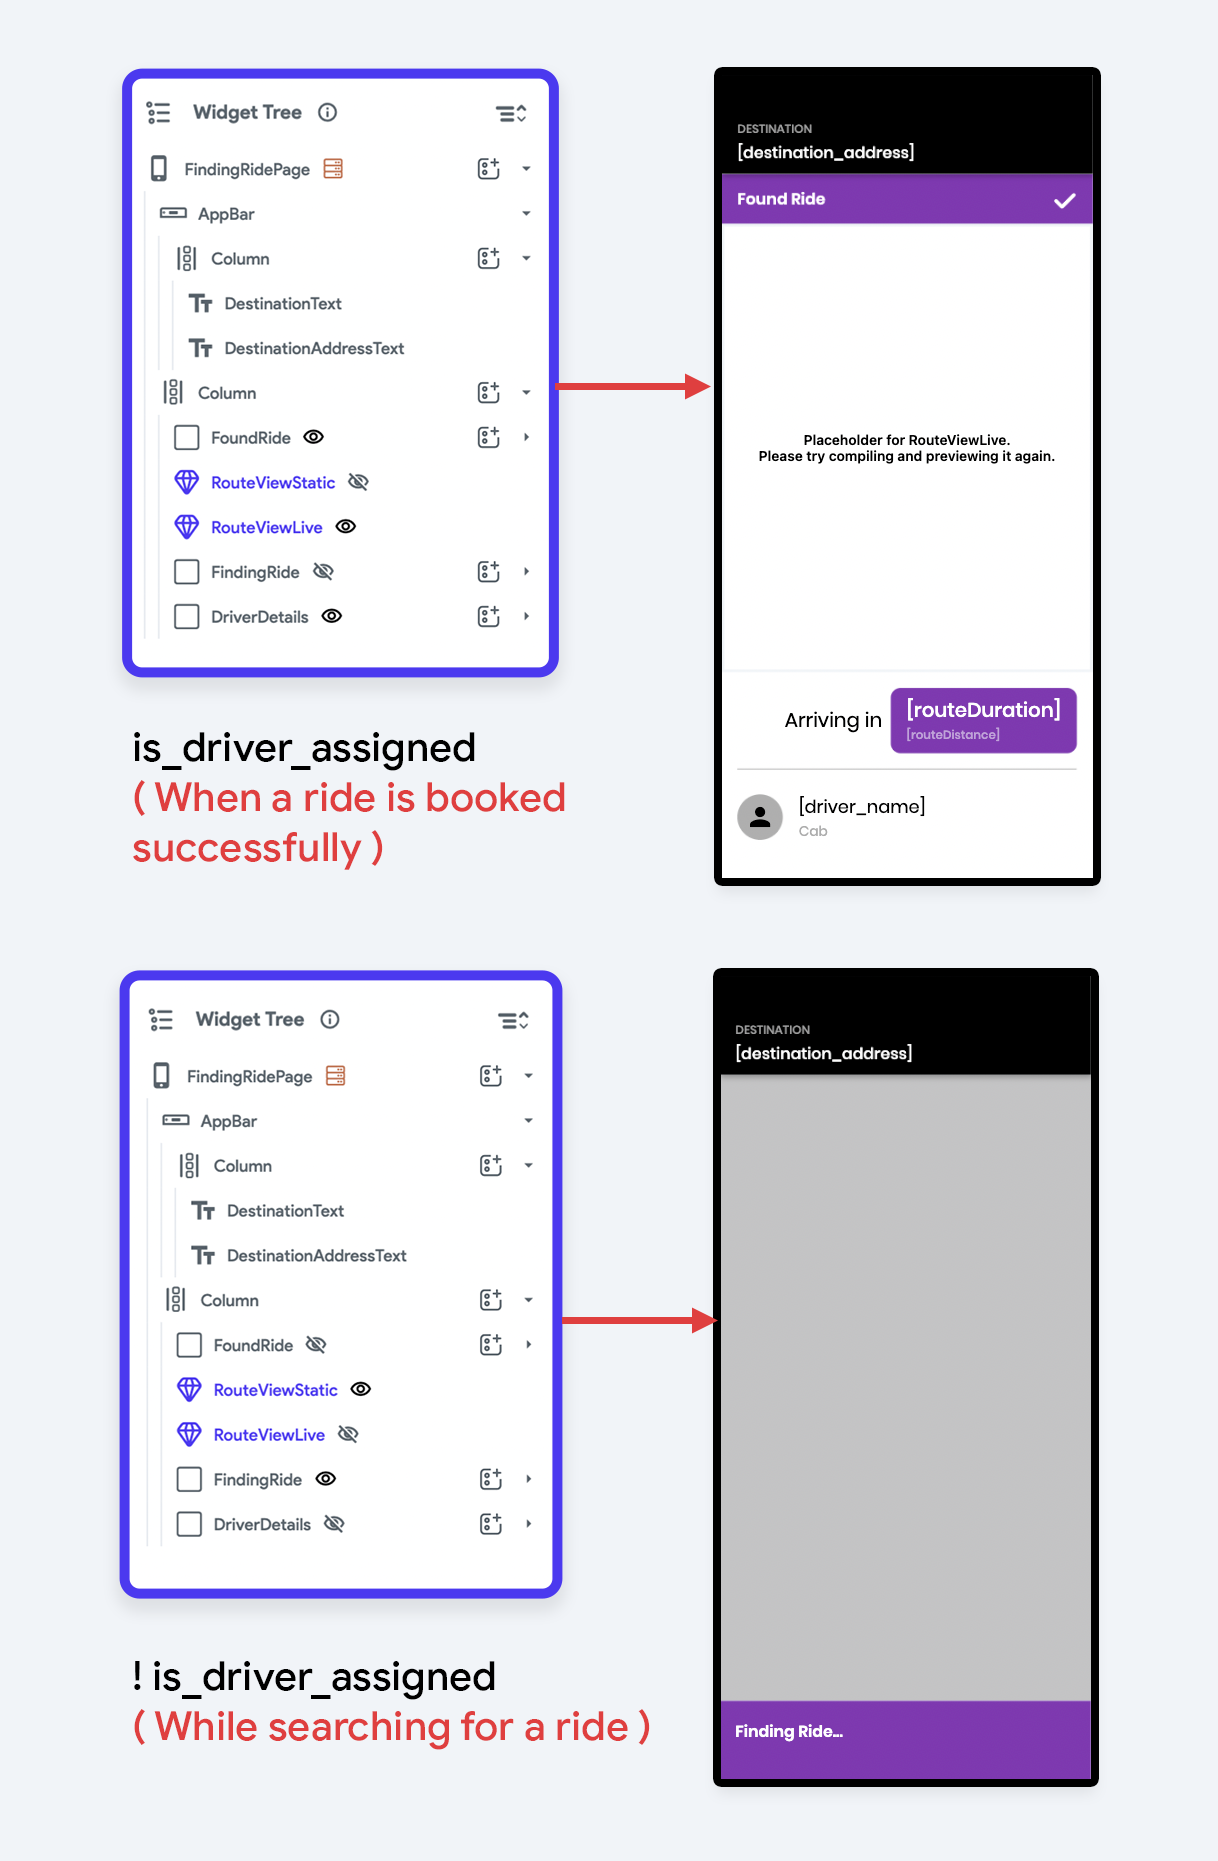
Before diving deep into these custom widgets, let's have a look at the overall widget structure of this page. The primary widgets of this page are as follows:
- AppBar with the destination address text
- FoundRide widget for indicating that a cab driver has accepted the booking
- RouteViewStatic
- RouteViewLive
- FindingRide widget for indicating that it's searching for a cab
- DriverDetails widget for displaying some basic information about the driver
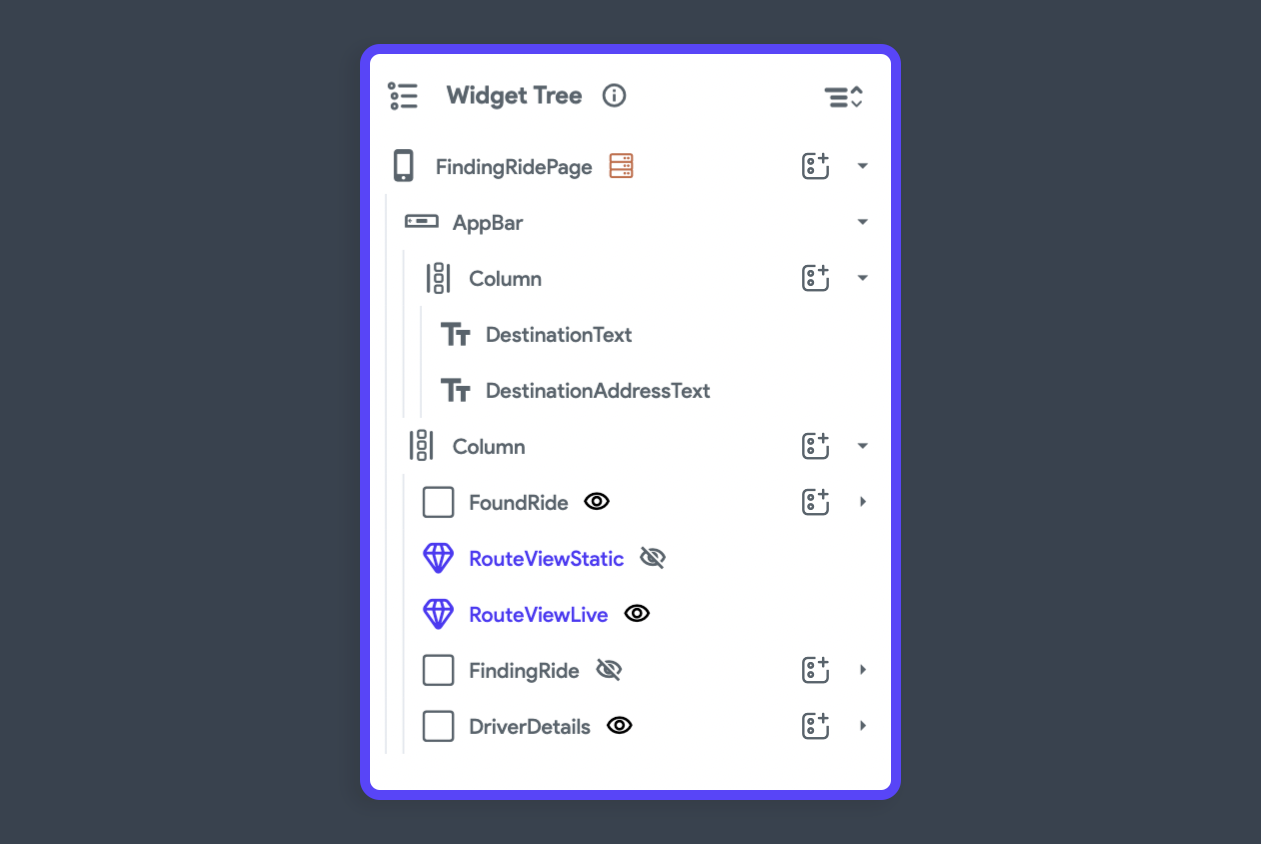
Notice that all of the widgets present inside the Column have a Conditional Visibility condition assigned to them. This is because we only want certain widgets to be displayed when it's searching for a cab and others when a cab booking is successful.
Here's a better look at how the conditional visibility is assigned to the widgets:
Previewing static route
Let's start by having a look at the properties that you can take as parameters while building the RouteViewStatic custom widget:
| # | Parameter | Type | Nullable |
|---|---|---|---|
| 1 | width, height | Dimensions | True |
| 2 | startCoordinate | LatLng | False |
| 3 | endCoordinate | LatLng | False |
| 4 | startAddress | String | True |
| 5 | destinationAddress | String | True |
| 6 | iOSGoogleMapsApiKey | String | False |
| 7 | androidGoogleMapsApiKey | String | False |
| 8 | webGoogleMapsApiKey | String | False |
The boilerplate code (along with the import statements):
import 'dart:math' show cos, sqrt, asin;
import 'package:http/http.dart' as http;
import 'package:flutter/foundation.dart';
import 'package:flutter_polyline_points/flutter_polyline_points.dart';
import 'package:google_maps_flutter/google_maps_flutter.dart' hide LatLng;
import 'package:google_maps_flutter/google_maps_flutter.dart' as latlng;

class RouteViewStatic extends StatefulWidget {
  const RouteViewStatic({
    Key? key,
    this.width,
    this.height,
    this.lineColor = Colors.black,
    this.startAddress,
    this.destinationAddress,
    required this.startCoordinate,
    required this.endCoordinate,
    required this.iOSGoogleMapsApiKey,
    required this.androidGoogleMapsApiKey,
    required this.webGoogleMapsApiKey,
  }) : super(key: key);

  final double? height;
  final double? width;
  final Color lineColor;
  final String? startAddress;
  final String? destinationAddress;
  final LatLng startCoordinate;
  final LatLng endCoordinate;
  final String iOSGoogleMapsApiKey;
  final String androidGoogleMapsApiKey;
  final String webGoogleMapsApiKey;

  @override
  _RouteViewStaticState createState() => _RouteViewStaticState();
}

class _RouteViewStaticState extends State<RouteViewStatic> {
  // TODO: Add variables here
  // TODO: Add the methods here

  @override
  Widget build(BuildContext context) {
    return Container();
  }
}
We have passed the API keys for iOS, Android, and Web to this widget because we would need them while evaluating the polyline points between the start and destination location and also for calculating an estimate of the duration.
Define the following variables inside the _RouteViewStaticState class, you'll need these to store certain values:
class _RouteViewStaticState extends State<RouteViewStatic> {
  late final CameraPosition _initialLocation;
  GoogleMapController? mapController;

  String? _placeDistance;
  Set<Marker> markers = {};

  PolylinePoints? polylinePoints;
  Map<PolylineId, Polyline> polylines = {};
  List<latlng.LatLng> polylineCoordinates = [];

  // TODO: Add the methods here

  @override
  Widget build(BuildContext context) {
    return Container();
  }
}
Also, define the initState() method to specify the _initialLocation:
class _RouteViewStaticState extends State<RouteViewStatic> {
  // ...
  // TODO: Add the methods here

  @override
  void initState() {
    final startCoordinate = latlng.LatLng(
      widget.startCoordinate.latitude,
      widget.startCoordinate.longitude,
    );
    _initialLocation = CameraPosition(
      target: startCoordinate,
      zoom: 14,
    );

    super.initState();
  }

  @override
  Widget build(BuildContext context) {
    return Container();
  }
}
Now, you have to define the following methods inside this class:
- googleMapsApiKey (getter method): For getting the correct API key based on the platform the app is running on.
- coordinateDistance: To calculate the distance between each of the polyline points (coordinates).
- createPolylines: To create Polyline objects by taking two coordinates as inputs.
- calculateDistance: To calculate the distance between the start and the end coordinates.
googleMapsApiKey method
This is a getter method that returns the correct API key based on the device platform as a String:
  String get googleMapsApiKey {
    if (kIsWeb) {
      return widget.webGoogleMapsApiKey;
    }
    switch (defaultTargetPlatform) {
      case TargetPlatform.macOS:
      case TargetPlatform.windows:
        return '';
      case TargetPlatform.iOS:
        return widget.iOSGoogleMapsApiKey;
      case TargetPlatform.android:
        return widget.androidGoogleMapsApiKey;
      default:
        return widget.webGoogleMapsApiKey;
    }
  }
coordinateDistance method
This method uses the Haversine formula to calculate the distance between two points that are defined by each of their latitude and longitude:
  double _coordinateDistance(lat1, lon1, lat2, lon2) {
    var p = 0.017453292519943295;
    var c = cos;
    var a = 0.5 -
        c((lat2 - lat1) * p) / 2 +
        c(lat1 * p) * c(lat2 * p) * (1 - c((lon2 - lon1) * p)) / 2;
    return 12742 * asin(sqrt(a));
  }
createPolylines method
This method takes the coordinates of two points and calculates the polylines between those points as per the travel mode specified. The coordinates of each of the polylines points, along with their color and width are specified here.
  _createPolylines(
    double startLatitude,
    double startLongitude,
    double destinationLatitude,
    double destinationLongitude,
  ) async {
    polylinePoints = PolylinePoints();
    PolylineResult result = await polylinePoints!.getRouteBetweenCoordinates(
      googleMapsApiKey, // Google Maps API Key
      PointLatLng(startLatitude, startLongitude),
      PointLatLng(destinationLatitude, destinationLongitude),
      travelMode: TravelMode.driving,
    );

    debugPrint('MAP::STATUS: ${result.status}');
    debugPrint('MAP::POLYLINES: ${result.points.length}');

    if (result.points.isNotEmpty) {
      result.points.forEach((PointLatLng point) {
        polylineCoordinates.add(latlng.LatLng(point.latitude, point.longitude));
      });
    }

    PolylineId id = PolylineId('poly');
    Polyline polyline = Polyline(
      polylineId: id,
      color: widget.lineColor,
      points: polylineCoordinates,
      width: 3,
    );
    polylines[id] = polyline;
  }
calculateDistance method
This method helps to calculate the distance between the start and destination coordinates. It also uses the above two methods to calculate the distance between each pair of points and generate the polylines.
  Future<bool> _calculateDistance() async {
    setState(() {
      if (markers.isNotEmpty) markers.clear();
      if (polylines.isNotEmpty) polylines.clear();
      if (polylineCoordinates.isNotEmpty) polylineCoordinates.clear();
      _placeDistance = null;
    });

    try {
      // Use the retrieved coordinates of the current position,
      // instead of the address if the start position is user's
      // current position, as it results in better accuracy.
      double startLatitude = widget.startCoordinate.latitude;
      double startLongitude = widget.startCoordinate.longitude;

      double destinationLatitude = widget.endCoordinate.latitude;
      double destinationLongitude = widget.endCoordinate.longitude;

      String startCoordinatesString = '($startLatitude, $startLongitude)';
      String destinationCoordinatesString =
          '($destinationLatitude, $destinationLongitude)';

      // Start Location Marker
      Marker startMarker = Marker(
        markerId: MarkerId(startCoordinatesString),
        position: latlng.LatLng(startLatitude, startLongitude),
        infoWindow: InfoWindow(
          title: 'Start $startCoordinatesString',
          snippet: widget.startAddress ?? '',
        ),
        icon: BitmapDescriptor.defaultMarker,
      );

      // Destination Location Marker
      Marker destinationMarker = Marker(
        markerId: MarkerId(destinationCoordinatesString),
        position: latlng.LatLng(destinationLatitude, destinationLongitude),
        infoWindow: InfoWindow(
          title: 'Destination $destinationCoordinatesString',
          snippet: widget.destinationAddress ?? '',
        ),
        icon: BitmapDescriptor.defaultMarker,
      );

      // Adding the markers to the list
      markers.add(startMarker);
      markers.add(destinationMarker);

      debugPrint('MAP::START COORDINATES: ($startLatitude, $startLongitude)');
      debugPrint(
          'MAP::DESTINATION COORDINATES: ($destinationLatitude, $destinationLongitude)');

      // Calculating to check that the position relative
      // to the frame, and pan & zoom the camera accordingly.
      double miny = (startLatitude <= destinationLatitude)
          ? startLatitude
          : destinationLatitude;
      double minx = (startLongitude <= destinationLongitude)
          ? startLongitude
          : destinationLongitude;
      double maxy = (startLatitude <= destinationLatitude)
          ? destinationLatitude
          : startLatitude;
      double maxx = (startLongitude <= destinationLongitude)
          ? destinationLongitude
          : startLongitude;

      double southWestLatitude = miny;
      double southWestLongitude = minx;

      double northEastLatitude = maxy;
      double northEastLongitude = maxx;

      // Accommodate the two locations within the
      // camera view of the map
      mapController?.animateCamera(
        CameraUpdate.newLatLngBounds(
          LatLngBounds(
            northeast: latlng.LatLng(northEastLatitude, northEastLongitude),
            southwest: latlng.LatLng(southWestLatitude, southWestLongitude),
          ),
          60.0,
        ),
      );

      await _createPolylines(startLatitude, startLongitude, destinationLatitude,
          destinationLongitude);

      double totalDistance = 0.0;

      // Calculating the total distance by adding the distance
      // between small segments
      for (int i = 0; i < polylineCoordinates.length - 1; i++) {
        totalDistance += _coordinateDistance(
          polylineCoordinates[i].latitude,
          polylineCoordinates[i].longitude,
          polylineCoordinates[i + 1].latitude,
          polylineCoordinates[i + 1].longitude,
        );
      }

      _placeDistance = totalDistance.toStringAsFixed(2);
      debugPrint('MAP::DISTANCE: $_placeDistance km');
      FFAppState().routeDistance = '$_placeDistance km';

      var url = Uri.parse(
        'https://maps.googleapis.com/maps/api/distancematrix/json?destinations=$destinationLatitude,$destinationLongitude&origins=$startLatitude,$startLongitude&key=$googleMapsApiKey',
      );
      var response = await http.get(url);

      if (response.statusCode == 200) {
        final jsonResponse = jsonDecode(response.body) as Map<String, dynamic>;

        final String durationText =
            jsonResponse['rows'][0]['elements'][0]['duration']['text'];
        debugPrint('MAP::$durationText');
        FFAppState().routeDuration = '$durationText';
      } else {
        debugPrint('ERROR in distance matrix API');
      }

      setState(() {});

      return true;
    } catch (e) {
      debugPrint(e.toString());
    }
    return false;
  }
You will notice that FFAppState() is used to store the route distance and the duration. FFAppState() helps to access the local state variables defined inside FlutterFlow.
Now that we have all the required methods defined, update the build method to add the GoogleMap widget like this:
class _RouteViewStaticState extends State<RouteViewStatic> {
  // ...

  @override
  Widget build(BuildContext context) {
    return SizedBox(
      height: widget.height,
      width: widget.width,
      child: GoogleMap(
        markers: Set<Marker>.from(markers),
        initialCameraPosition: _initialLocation,
        myLocationEnabled: true,
        myLocationButtonEnabled: false,
        mapType: MapType.normal,
        zoomGesturesEnabled: true,
        zoomControlsEnabled: false,
        polylines: Set<Polyline>.of(polylines.values),
        onMapCreated: (GoogleMapController controller) {
          mapController = controller;
          _calculateDistance();
        },
      ),
    );
  }
}
The entire code of this custom widget can be downloaded here:
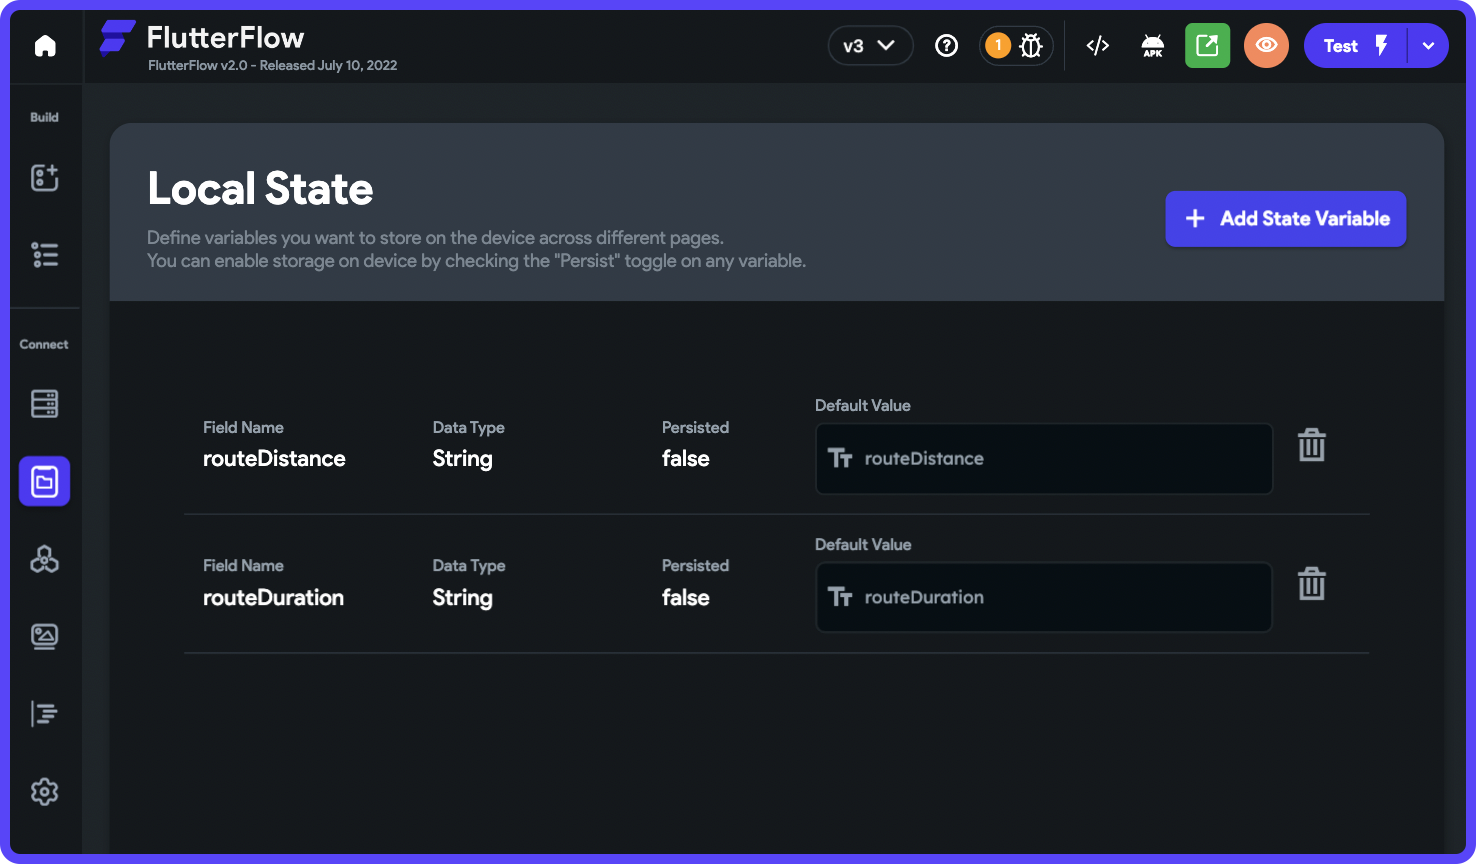
Defining Local State variables
Before adding the custom widget code to FlutterFlow, define the following Local State variables:
| # | Field Name | Data Type | List | Persisted |
|---|---|---|---|---|
| 1 | routeDistance | String | false | false |
| 2 | routeDuration | String | false | false |
To define Local State variables, use the left menu to navigate to the Local State page and click on the + Add State Variable button to add a new variable.
Adding RouteViewStatic widget
It's time to add the RouteViewStatic custom widget to FlutterFlow.
Follow the steps below:
- From the left menu, navigate to the Custom Functions page.
- Go to the Custom Widgets tab.
- Click + Create button.
- Enter the Widget Name as RouteViewStatic.
- Click + Add Parameter to define the Parameters with the types as described here.
- Click + Add Dependency, and specify
flutter_polyline_points: ^1.0.0. - Now, either you can paste the entire custom code or use the Upload Code button to upload a file.
- Check the Exclude from compilation checkbox.
- Click Save.
You can use this custom widget by dragging and dropping it into the canvas from the UI Builder > Components tab, or by going to the Widget Tree and using Add Widget button > Components tab.
- Make the RouteViewStatic widget Expanded, and set its width and height to infinite.
- Specify the values of the properties:
- Line Color: choose any color
- Start Coordinate: Set from Variable > ride Document > user_location
- End Coordinate: Set from Variable > ride Document > destination_location
- Start Address: Set from Variable > ride Document > user_address
- Destination Address: Set from Variable > ride Document > destination_address
- API Keys of respective platforms
Also, don't forget to set the Conditional Visibility to show the widget only when the app is searching for a cab (i.e., when the value of is_driver_assigned is false).
Realtime route preview
The RouteViewLive custom widget will be pretty similar to the RouteViewStatic widget. Still, we need to make some changes to some of the methods for adapting it to the real-time location updates. Also, we will pass an additional parameter to this widget, i.e., the Document Reference of the ride collection (this will help to update the route on the map as the driver's location coordinates change on Firestore).
The basic structure of the RouteViewLive widget will be as follows:
import 'dart:math' show cos, sqrt, asin;
import 'package:http/http.dart' as http;
import 'package:tuple/tuple.dart';
import 'package:flutter/foundation.dart';
import 'package:flutter_polyline_points/flutter_polyline_points.dart';
import 'package:google_maps_flutter/google_maps_flutter.dart' hide LatLng;
import 'package:google_maps_flutter/google_maps_flutter.dart' as latlng;

class RouteViewLive extends StatefulWidget {
  const RouteViewLive({
    Key? key,
    this.width,
    this.height,
    this.lineColor = Colors.black,
    this.startAddress,
    this.destinationAddress,
    required this.startCoordinate,
    required this.endCoordinate,
    required this.iOSGoogleMapsApiKey,
    required this.androidGoogleMapsApiKey,
    required this.webGoogleMapsApiKey,
    required this.rideDetailsReference,
  }) : super(key: key);

  final double? height;
  final double? width;
  final Color lineColor;
  final String? startAddress;
  final String? destinationAddress;
  final LatLng startCoordinate;
  final LatLng endCoordinate;
  final String iOSGoogleMapsApiKey;
  final String androidGoogleMapsApiKey;
  final String webGoogleMapsApiKey;
  final DocumentReference rideDetailsReference;

  @override
  _RouteViewLiveState createState() => _RouteViewLiveState();
}

class _RouteViewLiveState extends State<RouteViewLive> {
  late final CameraPosition _initialLocation;
  GoogleMapController? mapController;
  Set<Marker> markers = {};
  Map<PolylineId, Polyline> initialPolylines = {};

  // Same as earlier
  String get googleMapsApiKey {
    if (kIsWeb) {
      return widget.webGoogleMapsApiKey;
    }
    switch (defaultTargetPlatform) {
      case TargetPlatform.macOS:
      case TargetPlatform.windows:
        return '';
      case TargetPlatform.iOS:
        return widget.iOSGoogleMapsApiKey;
      case TargetPlatform.android:
        return widget.androidGoogleMapsApiKey;
      default:
        return widget.webGoogleMapsApiKey;
    }
  }

  // Formula for calculating distance between two coordinates
  // Same as earlier
  double _coordinateDistance(lat1, lon1, lat2, lon2) {
    var p = 0.017453292519943295;
    var c = cos;
    var a = 0.5 -
        c((lat2 - lat1) * p) / 2 +
        c(lat1 * p) * c(lat2 * p) * (1 - c((lon2 - lon1) * p)) / 2;
    return 12742 * asin(sqrt(a));
  }

  // TODO: Add updated _calculateDistance and _createPolylines method
  // TODO: Add a new method to initialize the polylines

  // Same as earlier
  @override
  void initState() {
    final startCoordinate = latlng.LatLng(
      widget.startCoordinate.latitude,
      widget.startCoordinate.longitude,
    );
    _initialLocation = CameraPosition(
      target: startCoordinate,
      zoom: 14,
    );

    super.initState();
  }

  @override
  Widget build(BuildContext context) {
    return Container();
  }
}
The above code also includes the methods that will be unchanged in this widget. Two methods that will require changes are _createPolylines and _calculateDistance methods.
createPolylines method (updated)
Previously, this method wasn't returning any value as we had a single value and it was stored globally within the widget. But now, as the polylines have to change each time the location updates, so we would need to return the value. The data type of the return value will be Tuple2 (using tuple package).
  Future<Tuple2<Map<PolylineId, Polyline>, List<latlng.LatLng>>>
      _createPolylines(
    double startLatitude,
    double startLongitude,
    double destinationLatitude,
    double destinationLongitude,
  ) async {
    PolylinePoints polylinePoints = PolylinePoints();
    PolylineResult result = await polylinePoints.getRouteBetweenCoordinates(
      googleMapsApiKey, // Google Maps API Key
      PointLatLng(startLatitude, startLongitude),
      PointLatLng(destinationLatitude, destinationLongitude),
      travelMode: TravelMode.driving,
    );

    List<latlng.LatLng> polylineCoordinates = [];

    if (result.points.isNotEmpty) {
      result.points.forEach((PointLatLng point) {
        polylineCoordinates.add(latlng.LatLng(point.latitude, point.longitude));
      });
    }

    PolylineId id = PolylineId('poly');
    Polyline polyline = Polyline(
      polylineId: id,
      color: widget.lineColor,
      points: polylineCoordinates,
      width: 3,
    );
    // polylines[id] = polyline;

    return Tuple2({id: polyline}, polylineCoordinates);
  }
calculateDistance method (updated)
Previously, this method was returning a boolean value. But now, we have to return a value having Map<PolylineId, Polyline> as the data type.
The updated method will be like this:
  Future<Map<PolylineId, Polyline>?> _calculateDistance({
    required double startLatitude,
    required double startLongitude,
    required double destinationLatitude,
    required double destinationLongitude,
  }) async {
    if (markers.isNotEmpty) markers.clear();

    try {
      // Use the retrieved coordinates of the current position,
      // instead of the address if the start position is user's
      // current position, as it results in better accuracy.
      String startCoordinatesString = '($startLatitude, $startLongitude)';
      String destinationCoordinatesString =
          '($destinationLatitude, $destinationLongitude)';

      // Start Location Marker
      Marker startMarker = Marker(
        markerId: MarkerId(startCoordinatesString),
        position: latlng.LatLng(startLatitude, startLongitude),
        infoWindow: InfoWindow(
          title: 'Start $startCoordinatesString',
          snippet: widget.startAddress ?? '',
        ),
        icon: BitmapDescriptor.defaultMarker,
      );

      // Destination Location Marker
      Marker destinationMarker = Marker(
        markerId: MarkerId(destinationCoordinatesString),
        position: latlng.LatLng(destinationLatitude, destinationLongitude),
        infoWindow: InfoWindow(
          title: 'Destination $destinationCoordinatesString',
          snippet: widget.destinationAddress ?? '',
        ),
        icon: BitmapDescriptor.defaultMarker,
        // icon: await BitmapDescriptor.fromAssetImage(
        //   ImageConfiguration(size: Size(20, 20)),
        //   'assets/images/cab-top-view.png',
        // ),
      );

      // Adding the markers to the list
      markers.add(startMarker);
      markers.add(destinationMarker);

      debugPrint(
        'MAP::START COORDINATES: ($startLatitude, $startLongitude)',
      );
      debugPrint(
        'MAP::DESTINATION COORDINATES: ($destinationLatitude, $destinationLongitude)',
      );

      // Calculating to check that the position relative
      // to the frame, and pan & zoom the camera accordingly.
      double miny = (startLatitude <= destinationLatitude)
          ? startLatitude
          : destinationLatitude;
      double minx = (startLongitude <= destinationLongitude)
          ? startLongitude
          : destinationLongitude;
      double maxy = (startLatitude <= destinationLatitude)
          ? destinationLatitude
          : startLatitude;
      double maxx = (startLongitude <= destinationLongitude)
          ? destinationLongitude
          : startLongitude;

      double southWestLatitude = miny;
      double southWestLongitude = minx;

      double northEastLatitude = maxy;
      double northEastLongitude = maxx;

      // Accommodate the two locations within the
      // camera view of the map
      mapController?.animateCamera(
        CameraUpdate.newLatLngBounds(
          LatLngBounds(
            northeast: latlng.LatLng(northEastLatitude, northEastLongitude),
            southwest: latlng.LatLng(southWestLatitude, southWestLongitude),
          ),
          60.0,
        ),
      );

      final result = await _createPolylines(
        startLatitude,
        startLongitude,
        destinationLatitude,
        destinationLongitude,
      );

      final polylines = result.item1;
      final polylineCoordinates = result.item2;

      double totalDistance = 0.0;

      // Calculating the total distance by adding the distance
      // between small segments
      for (int i = 0; i < polylineCoordinates.length - 1; i++) {
        totalDistance += _coordinateDistance(
          polylineCoordinates[i].latitude,
          polylineCoordinates[i].longitude,
          polylineCoordinates[i + 1].latitude,
          polylineCoordinates[i + 1].longitude,
        );
      }

      final placeDistance = totalDistance.toStringAsFixed(2);
      debugPrint('MAP::DISTANCE: $placeDistance km');
      FFAppState().routeDistance = '$placeDistance km';

      var url = Uri.parse(
        'https://maps.googleapis.com/maps/api/distancematrix/json?destinations=$destinationLatitude,$destinationLongitude&origins=$startLatitude,$startLongitude&key=$googleMapsApiKey',
      );
      var response = await http.get(url);

      if (response.statusCode == 200) {
        final jsonResponse = jsonDecode(response.body) as Map<String, dynamic>;

        final String durationText =
            jsonResponse['rows'][0]['elements'][0]['duration']['text'];
        debugPrint('MAP::$durationText');
        FFAppState().routeDuration = '$durationText';
      } else {
        debugPrint('ERROR in distance matrix API');
      }

      return polylines;
    } catch (e) {
      debugPrint(e.toString());
    }
    return null;
  }
initPolylines method
This is the new method that we need to add. It will get called only initially when the location updates haven't started.
The method will be like this:
  initPolylines() async {
    double startLatitude = widget.startCoordinate.latitude;
    double startLongitude = widget.startCoordinate.longitude;

    double destinationLatitude = widget.endCoordinate.latitude;
    double destinationLongitude = widget.endCoordinate.longitude;
    final initPolylines = await _calculateDistance(
      startLatitude: startLatitude,
      startLongitude: startLongitude,
      destinationLatitude: destinationLatitude,
      destinationLongitude: destinationLongitude,
    );
    if (initPolylines != null) {
      WidgetsBinding.instance.addPostFrameCallback(
          (_) => setState(() => initialPolylines = initPolylines));
    }
  }
Finally, you need to update the build method of the widget. The GoogleMap widget will now be wrapped inside a StreamBuilder that will refresh the widget with new values as soon as the driver location coordinates update on the Firestore database.
The updated build method:
class _RouteViewLiveState extends State<RouteViewLive> {
  // ...

  @override
  Widget build(BuildContext context) {
    return StreamBuilder<RideRecord>(
      stream: RideRecord.getDocument(widget.rideDetailsReference),
      builder: (context, snapshot) {
        if (!snapshot.hasData) {
          return Container(
            height: widget.height,
            width: widget.width,
            child: GoogleMap(
              markers: Set<Marker>.from(markers),
              initialCameraPosition: _initialLocation,
              myLocationEnabled: true,
              myLocationButtonEnabled: false,
              mapType: MapType.normal,
              zoomGesturesEnabled: true,
              zoomControlsEnabled: false,
              polylines: Set<Polyline>.of(initialPolylines.values),
              onMapCreated: (GoogleMapController controller) {
                mapController = controller;
                initPolylines();
              },
            ),
          );
        }

        final rideRecord = snapshot.data;
        debugPrint('MAP::UPDATED');

        return Container(
          height: widget.height,
          width: widget.width,
          child: FutureBuilder<Map<PolylineId, Polyline>?>(
              future: _calculateDistance(
                startLatitude: rideRecord!.driverLocation!.latitude,
                startLongitude: rideRecord.driverLocation!.longitude,
                destinationLatitude: rideRecord.userLocation!.latitude,
                destinationLongitude: rideRecord.userLocation!.longitude,
              ),
              builder: (context, snapshot) {
                if (!snapshot.hasData) {
                  return GoogleMap(
                    markers: Set<Marker>.from(markers),
                    initialCameraPosition: CameraPosition(
                      target: latlng.LatLng(
                        rideRecord.destinationLocation!.latitude,
                        rideRecord.destinationLocation!.longitude,
                      ),
                    ),
                    myLocationEnabled: true,
                    myLocationButtonEnabled: false,
                    mapType: MapType.normal,
                    zoomGesturesEnabled: true,
                    zoomControlsEnabled: false,
                    polylines: Set<Polyline>.of(initialPolylines.values),
                    onMapCreated: (GoogleMapController controller) {
                      mapController = controller;
                    },
                  );
                }

                return GoogleMap(
                  markers: Set<Marker>.from(markers),
                  initialCameraPosition: CameraPosition(
                    target: latlng.LatLng(
                      rideRecord.destinationLocation!.latitude,
                      rideRecord.destinationLocation!.longitude,
                    ),
                  ),
                  myLocationEnabled: true,
                  myLocationButtonEnabled: false,
                  mapType: MapType.normal,
                  zoomGesturesEnabled: true,
                  zoomControlsEnabled: false,
                  polylines: Set<Polyline>.of(snapshot.data!.values),
                  onMapCreated: (GoogleMapController controller) {
                    mapController = controller;
                  },
                );
              }),
        );
      },
    );
  }
}
You can download the entire code of the RouteViewLive custom widget here:
Adding RouteViewLive widget
This widget can be added similarly as you had added the RouteViewStatic widget.
Follow the steps below:
- From the left menu, navigate to the Custom Functions page.
- Go to the Custom Widgets tab.
- Click + Create button.
- Enter the Widget Name as RouteViewLive.
- Click + Add Parameter to define the Parameters with the types as described here.
- Click + Add Dependency, and specify two dependencies,
flutter_polyline_points: ^1.0.0andtuple: ^2.0.0. - Now, either you can paste the entire custom code or use the Upload Code button to upload a file.
- Check the Exclude from compilation checkbox.
- Click Save.
Add this custom widget to the canvas:
- Make the RouteViewLive widget Expanded, and set its width and height to infinite.
- Specify the values of the properties:
- Line Color: choose any color
- Start Coordinate: Set from Variable > ride Document > driver_location
- End Coordinate: Set from Variable > ride Document > user_location
- Start Address: -
- Destination Address: Set from Variable > ride Document > user_address
- API Keys of respective platforms
- rideDetailsReference: Set from Variable > ride Document > Reference
Set the Conditional Visibility to show this widget only when a cab is successfully booked (i.e., when the value of is_driver_assigned is true).
Show duration & distance updates
You can use the local state variables in which we have stored the duration and distance of the route.
Add the Driver Details widget (Container) inside the Column containing the details related to the ride. The values can be assigned to the Text widgets by using Set from Variable > Local State > (variable_name):
Running the app
The Google Maps widget only supports Android and iOS platforms, so you won't be able to try out the app in Run/Test mode. You need to download the app's code from FlutterFlow and run the app locally from your system either on a physical device (recommended) or on an emulator/Simulator.
1. To download the app's source code, click on the Developer Menu button present on the Tool Bar (top menu), and select Download Code.
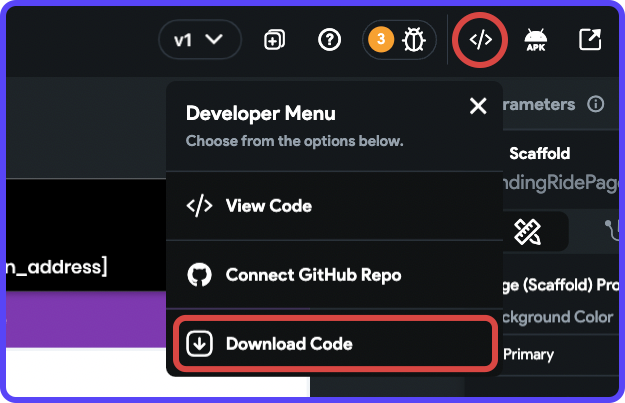
2. Once the project is downloaded, extract the contents from the .zip file.
3. Run the following commands from the project directory:
flutter pub get
flutter packages pub run build_runner build --delete-conflicting-outputs
4. To run the app on a device, connect a physical device or start the emulator/Simulator, and use this command:
flutter runHere's a glimpse of the app in action:
In the following article, we'll cover how the driver version of the app works and build it in FlutterFlow:
 Souvik Biswas
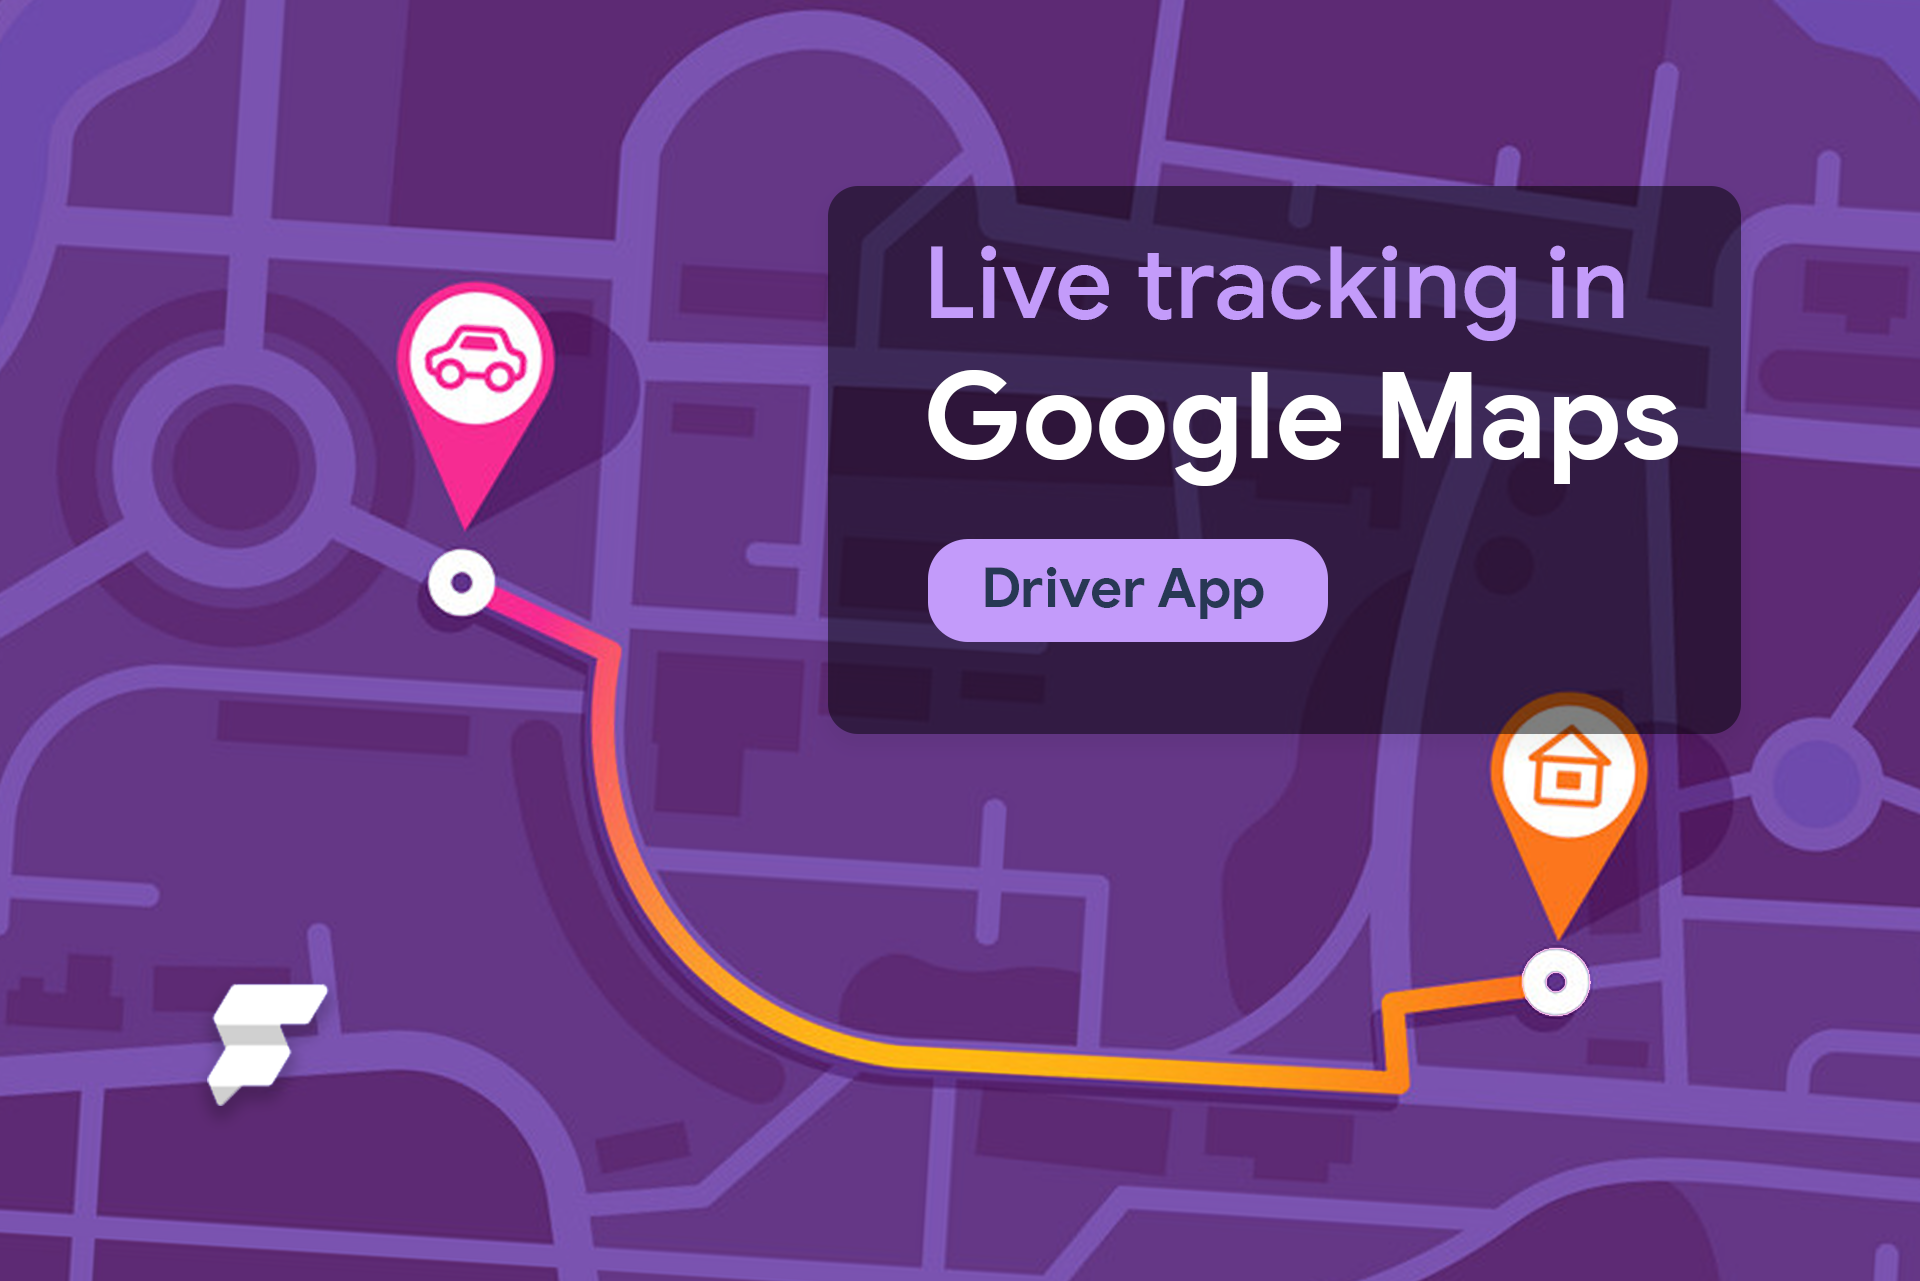
To be continued
Kudos to you if you have made it to the end of this super short article! 😄
Ride tracking is considered one of the most challenging apps to build using any mobile platform as it consists of many moving parts to work synchronously. Some of the functionality we needed wasn't available out of the box in FlutterFlow, but custom code can come to the rescue in such cases.
Thanks for reading! 🫶
Check out the clonable version of this project here.
