
Cloud Firestore is a flexible and scalable NoSQL database to store and sync data across multiple devices in real-time. Another advantage of using this database is its built-in offline support for mobile and web apps. When your mobile device is offline, it stores the data generated by your app locally, and once the device comes back online, the data is synced with the cloud database.
In this article, you will learn to set up and integrate the Firestore database with your FlutterFlow app. Once the Firestore integration is complete, we'll progress with our ToDo app by adding functionality for storing, retrieving, updating, and deleting tasks.
Clone the starter project for this tutorial to follow along: Todo Starter 2.
This is the second part of the ToDo blog series, and if you haven't yet read the first part, we recommended you go through it before continuing with this blog:
 Souvik Biswas
What's a NoSQL database?
Before going further into the Firestore database, let's take a step back and look at the broader picture of databases.
The two most important types of databases are:
- SQL: A relational database system having data items with pre-defined relationships between them that are organized as a set of tables with columns and rows.
- NoSQL: A non-relational database system having flexible data models, scalable horizontally, helps in fast queries and is easy for developers to work with.
In Cloud Firestore, data is stored inside documents in key-value pair format called fields, which are organized into collections.
The following video gives an excellent visual explanation of the differences between a SQL and a NoSQL database, along with a basic idea of the Firestore database structure:
For anyone just starting with Firestore, it's essential to understand the structure followed by this NoSQL database. The following section covers the data model of Firestore in detail.
Firestore data model
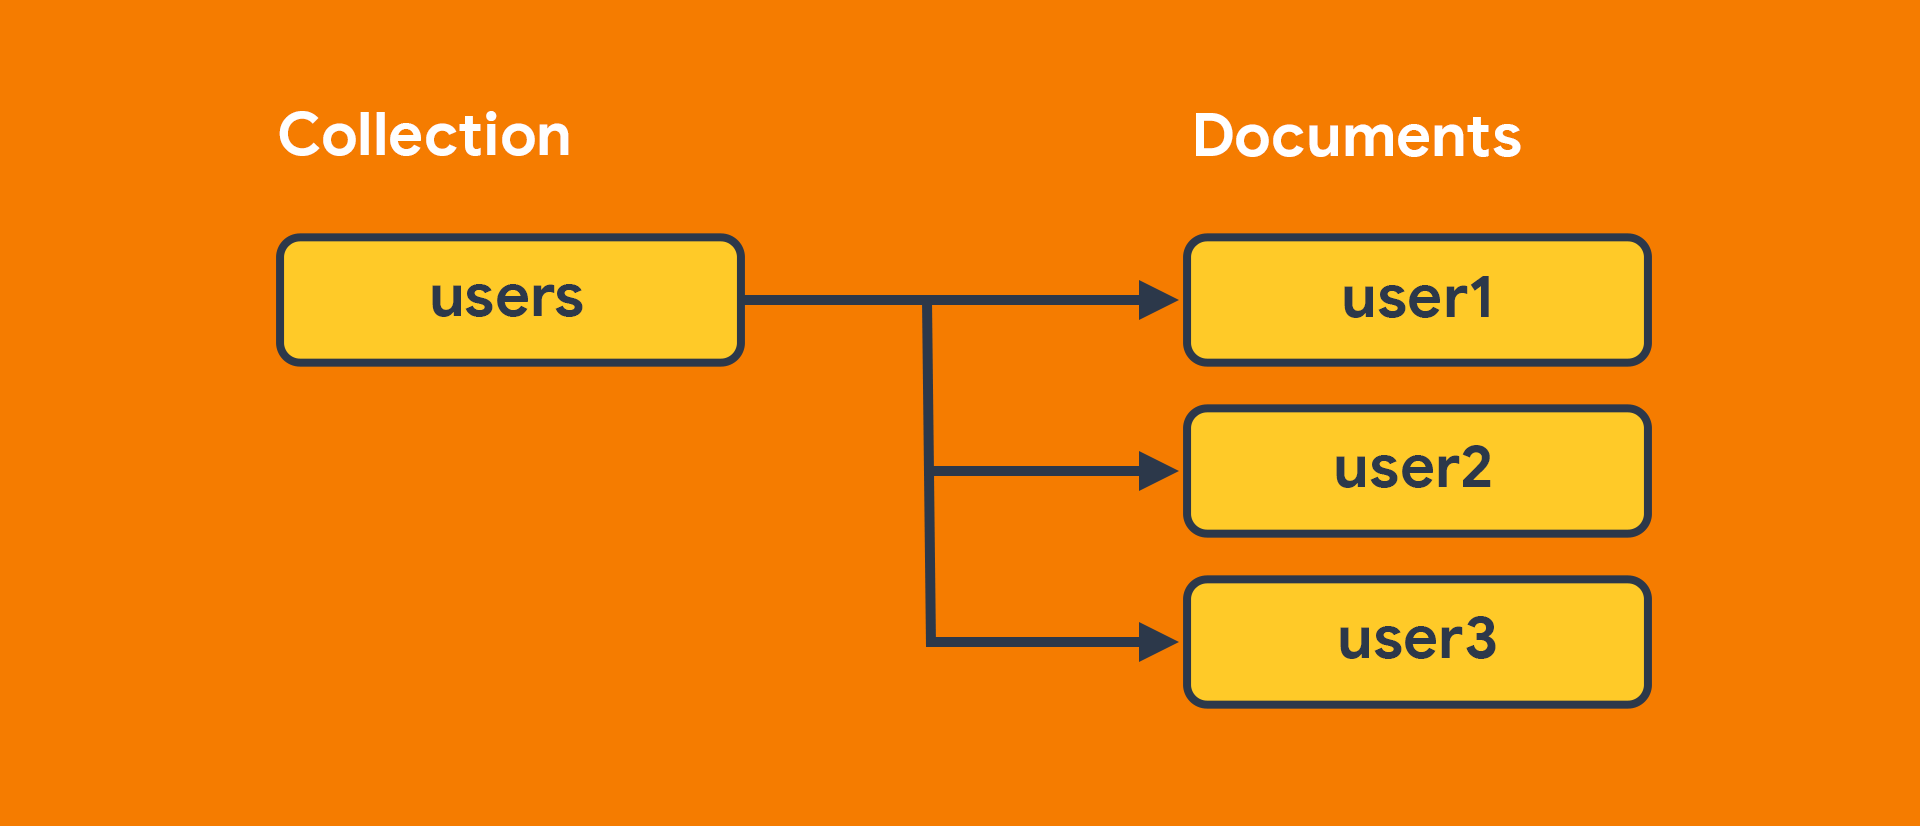
You might have already figured out that Firestore uses collections, documents, and fields for structuring its database.
A Collection can contain one or more documents. For example, a users collection can contain various users, each represented by a document.
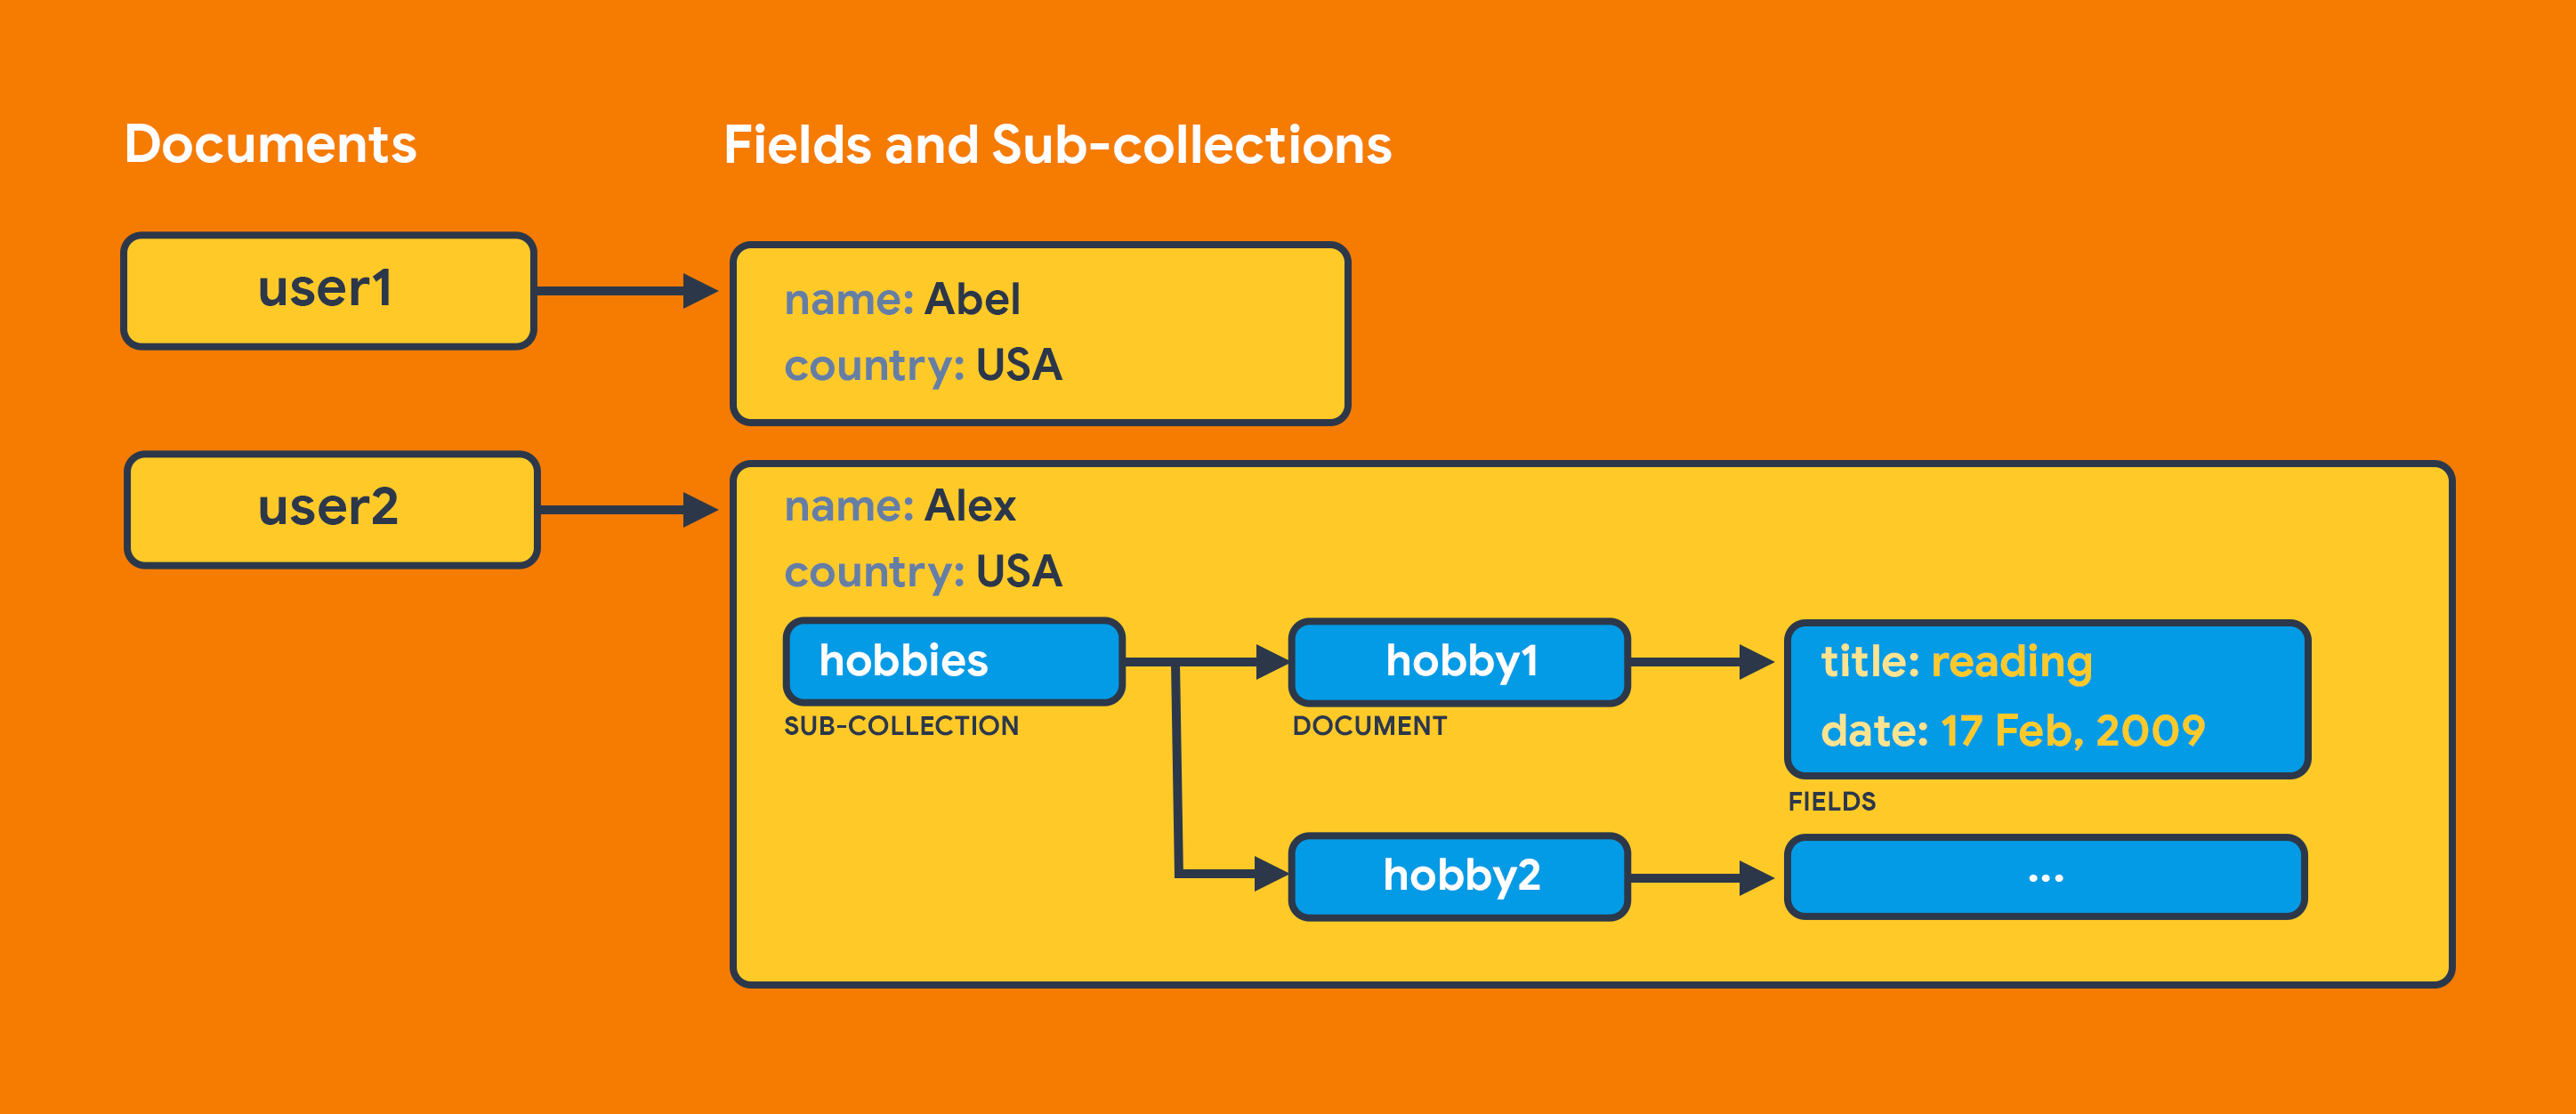
Document can contain fields and sub-collections. For example, a user1 document can contain various user details as fields. Let's say you also want to store hobbies for each user along with the date it's added, then the best way is to create a sub-collection called hobbies and store each of the hobbies as separate documents.
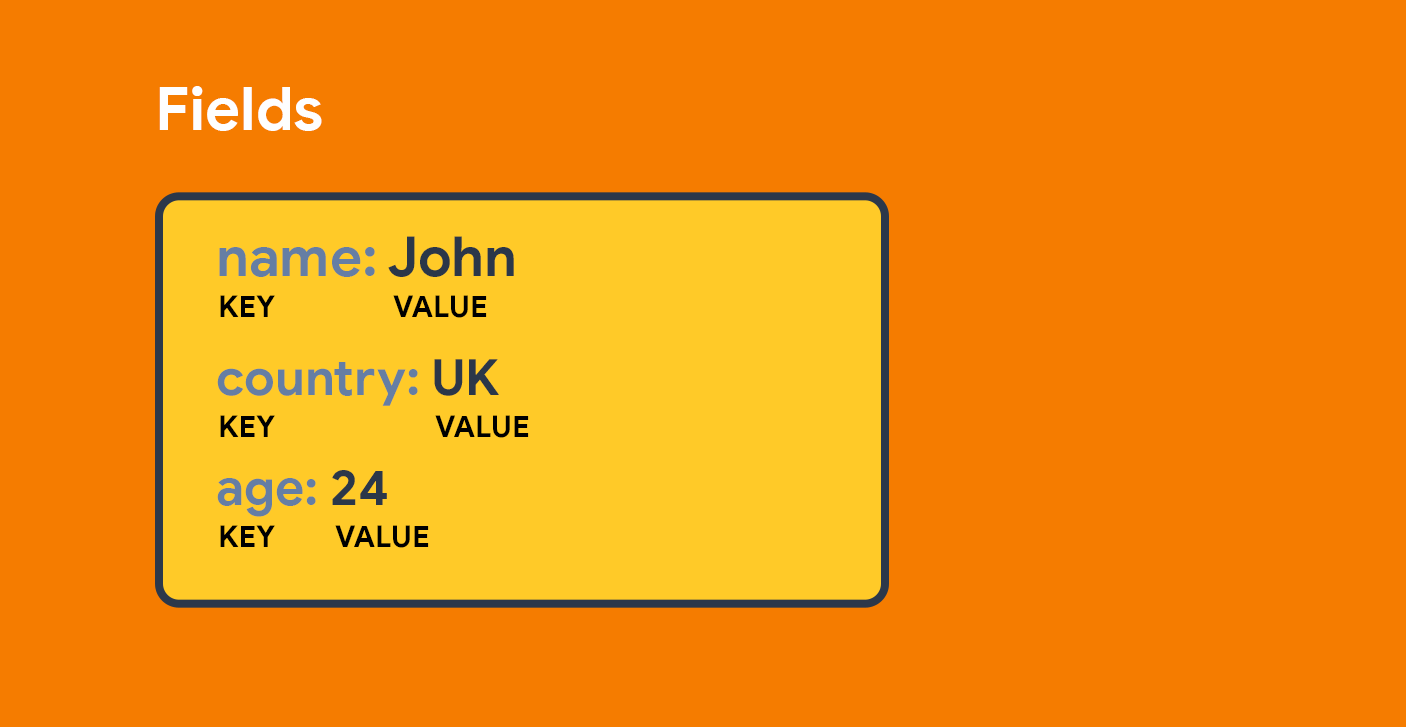
Field is basically a key-value pair where you can set the key as the field name, and the value can have a data type such as string, number, boolean, etc.
Setting up Firestore
With the basics out of the way, you are ready to start setting up Firestore.
Follow the steps below to set up Firestore:
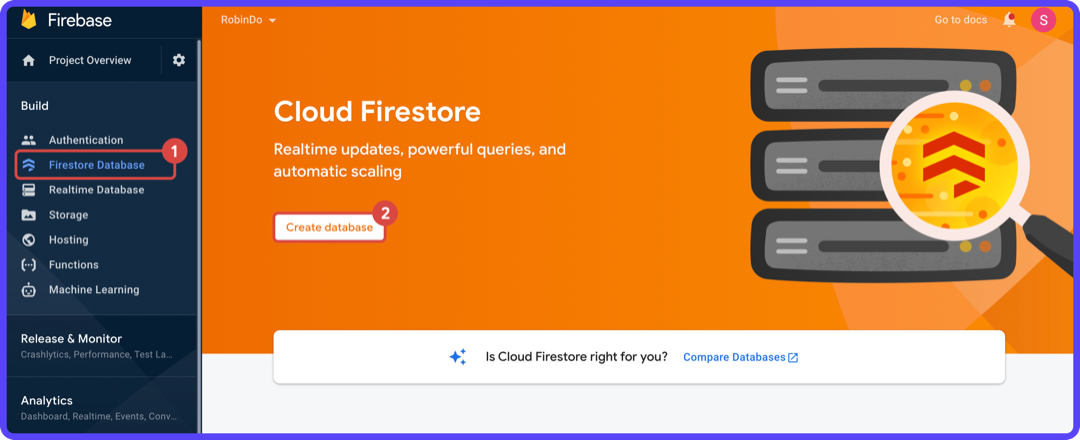
1. Navigate to the Firebase Console.
2. Select Firestore Database from the left menu and click Create database.
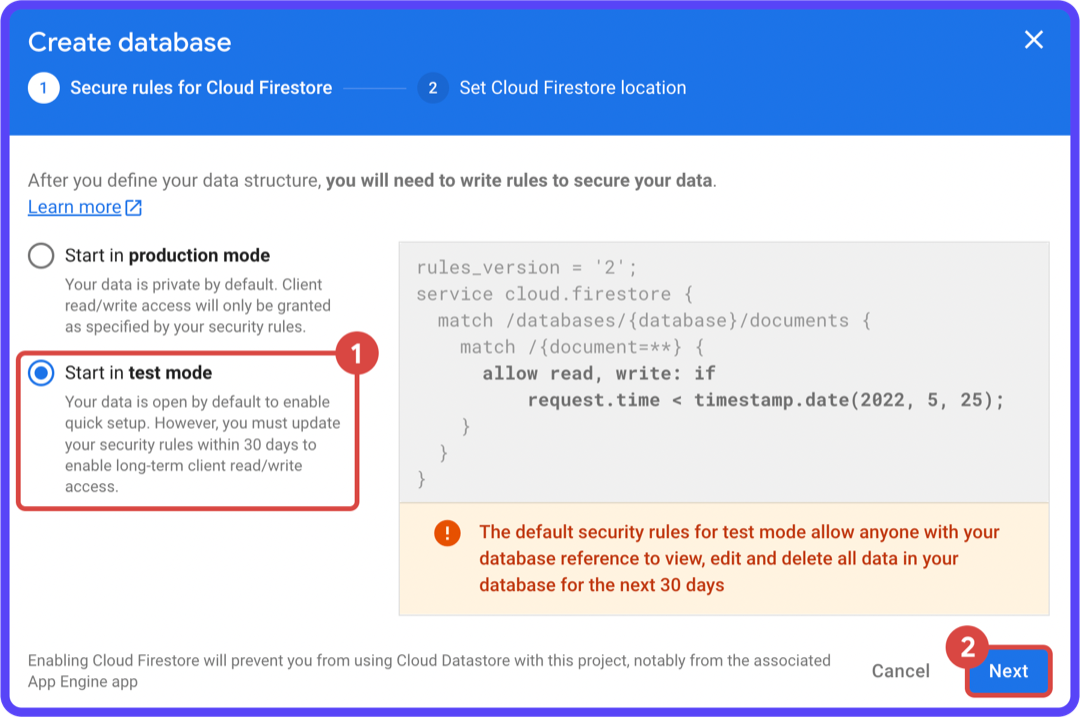
3. In the dialog, choose Start in test mode option and click Next.
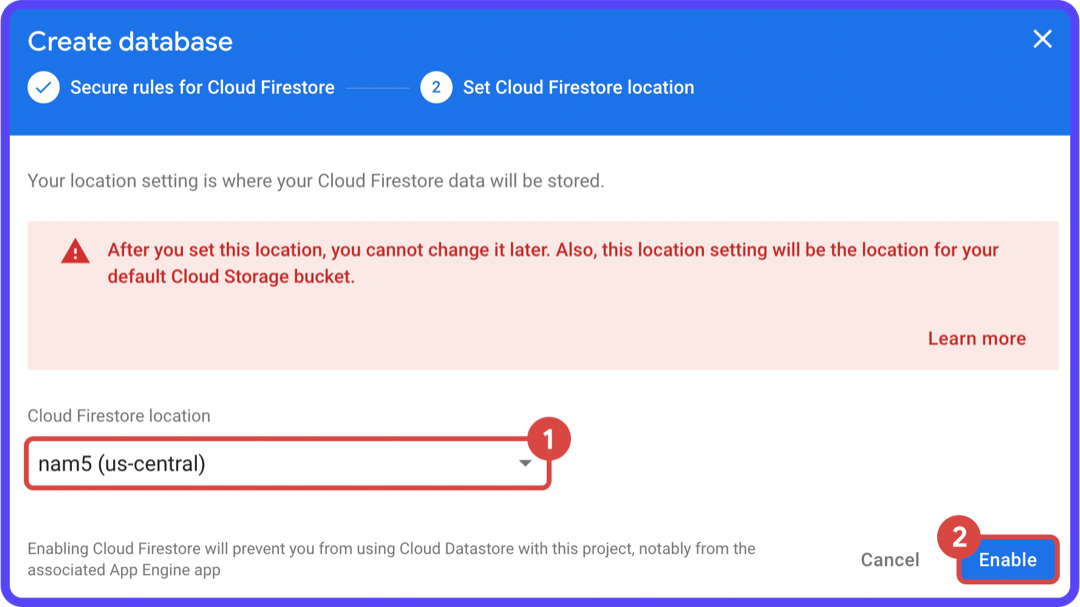
4. Select a location from the dropdown options and click Enable.
Creating Collections
You can directly create and structure your Firestore database from FlutterFlow. For the ToDo app, you would need two collections:
users: For storing general user information.todos: For storing the todos of each user.
Users Collection
Having a users collection is a basic necessity for most apps, so there's a simple way to auto-generate some of the fields you may require.
If you want to follow along, clone the starter project:
- Login to FlutterFlow here. If you don't have an account, you can create one easily from the same page.
- Open the starter project for this tutorial and clone the project.
Follow the steps below to generate the users collection:
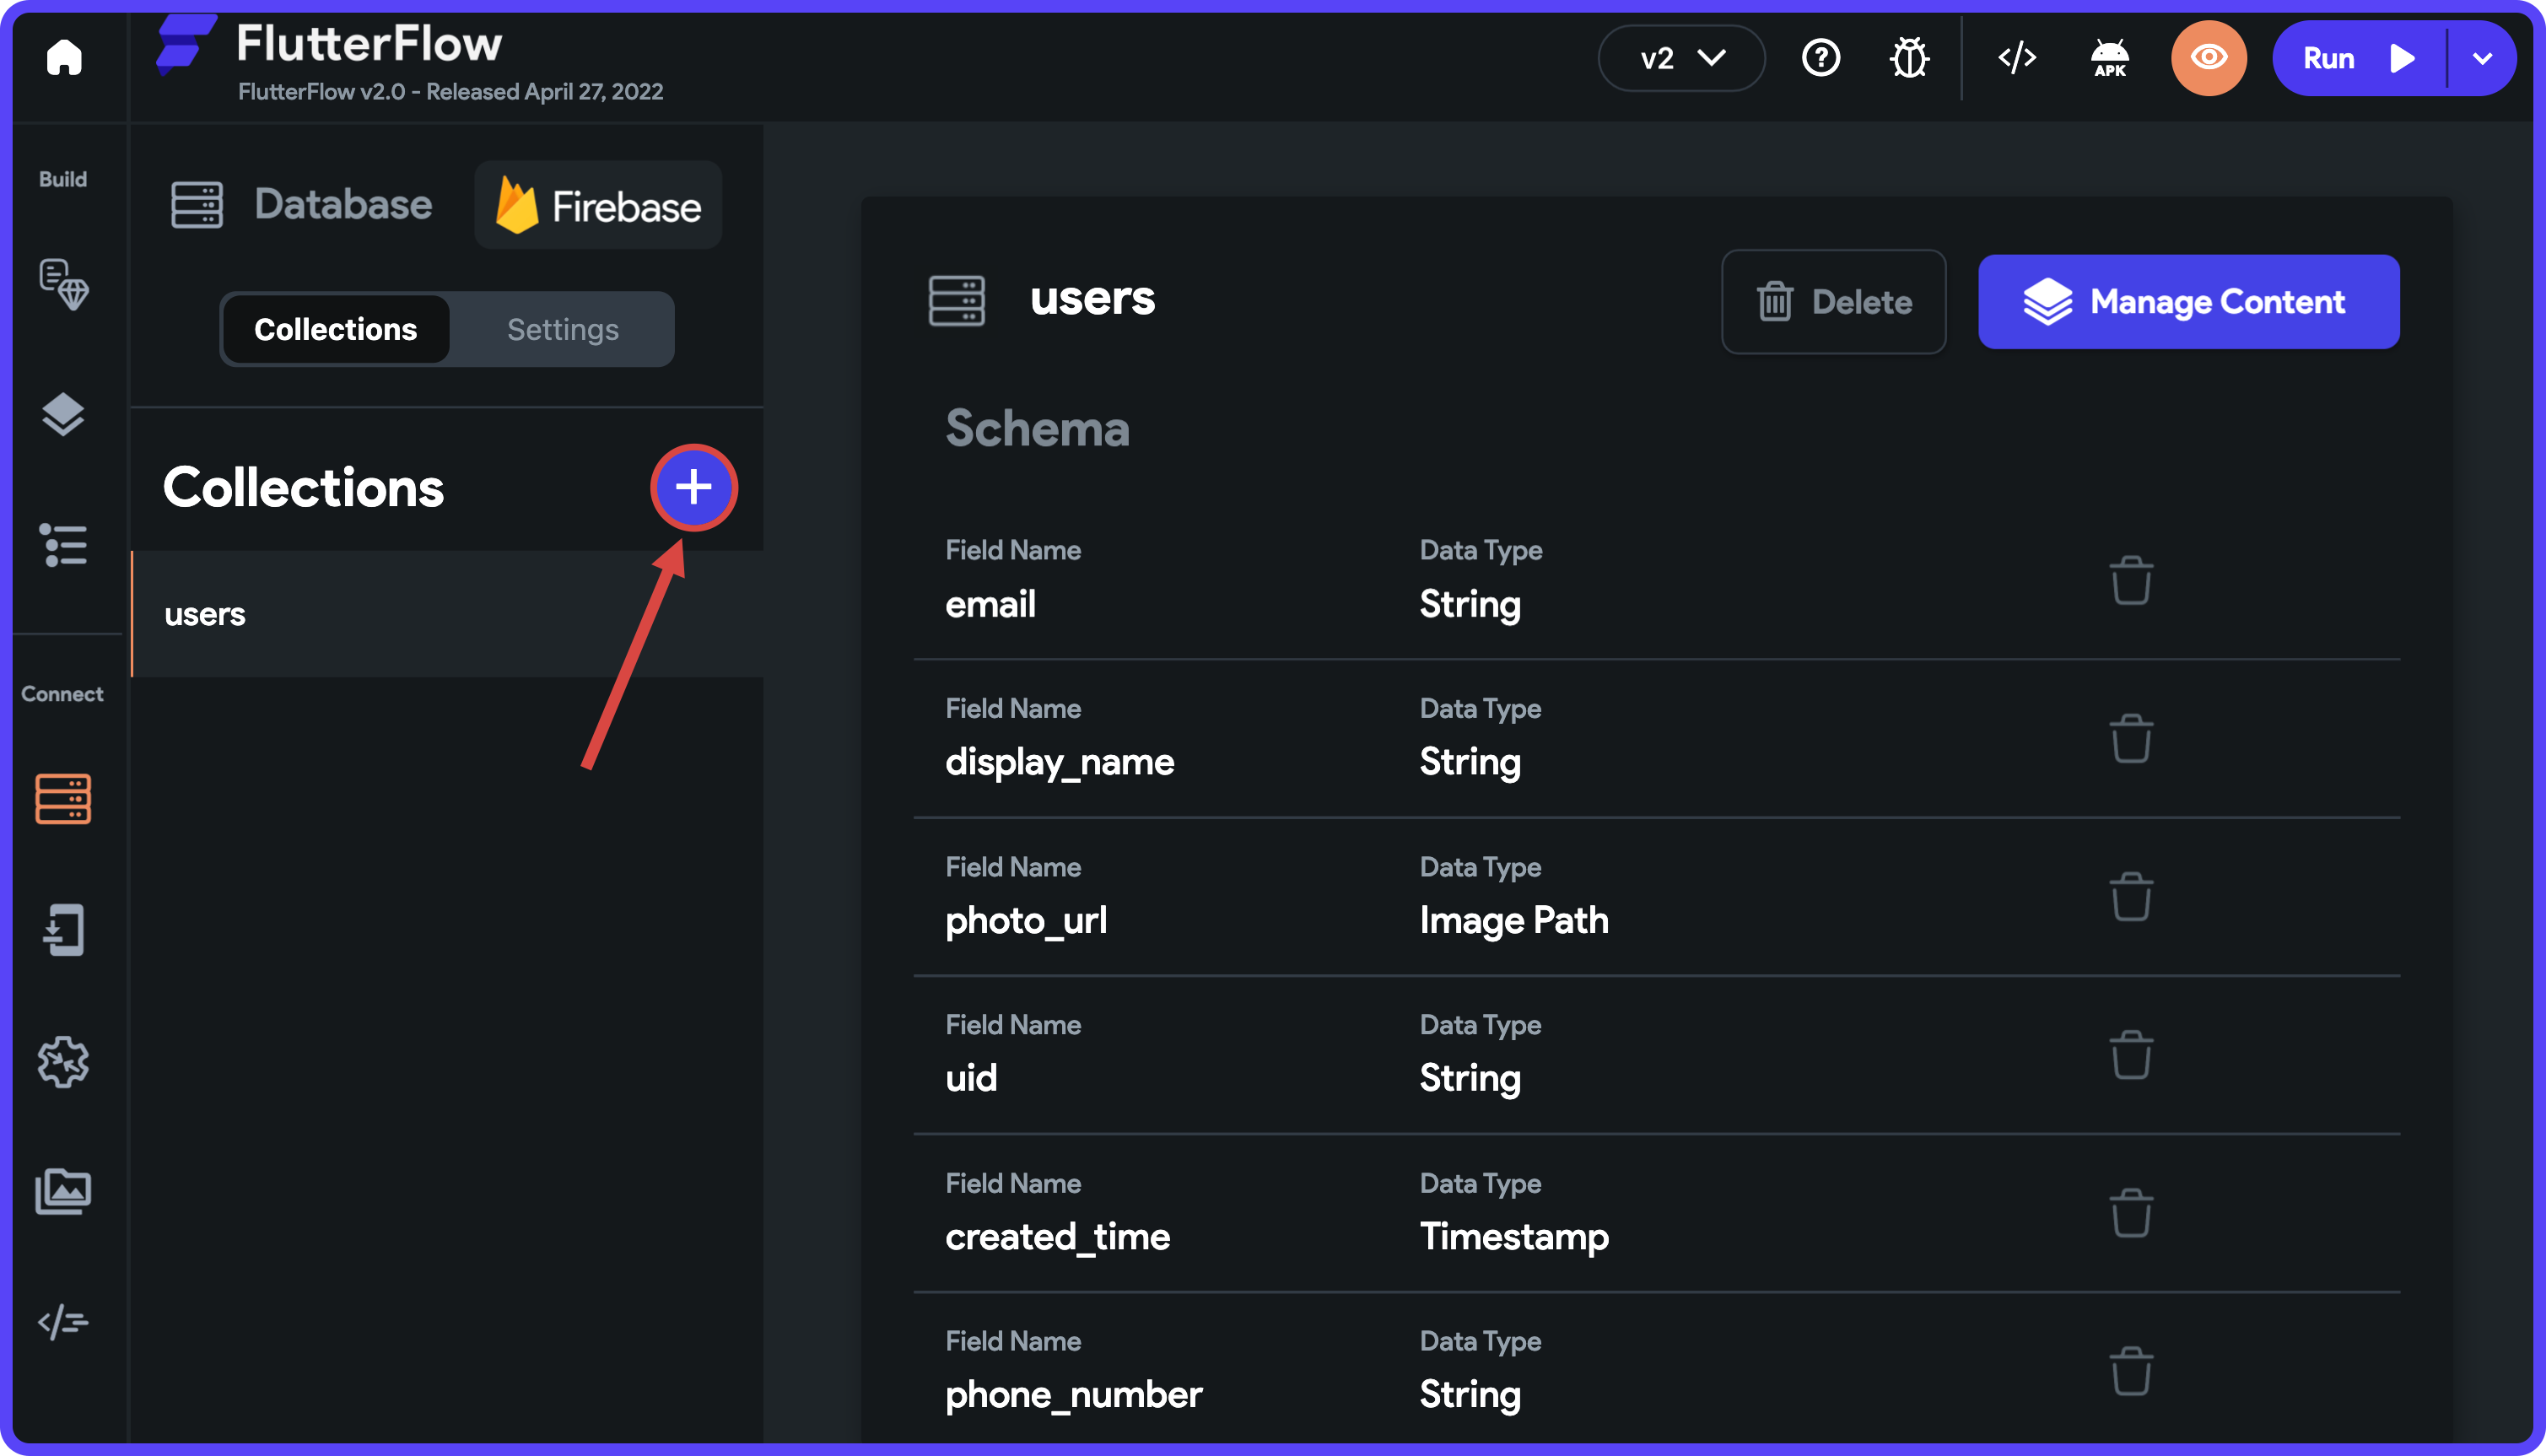
1. Navigate to your FlutterFlow project, select Firestore from the left menu, and click + Create Collection.
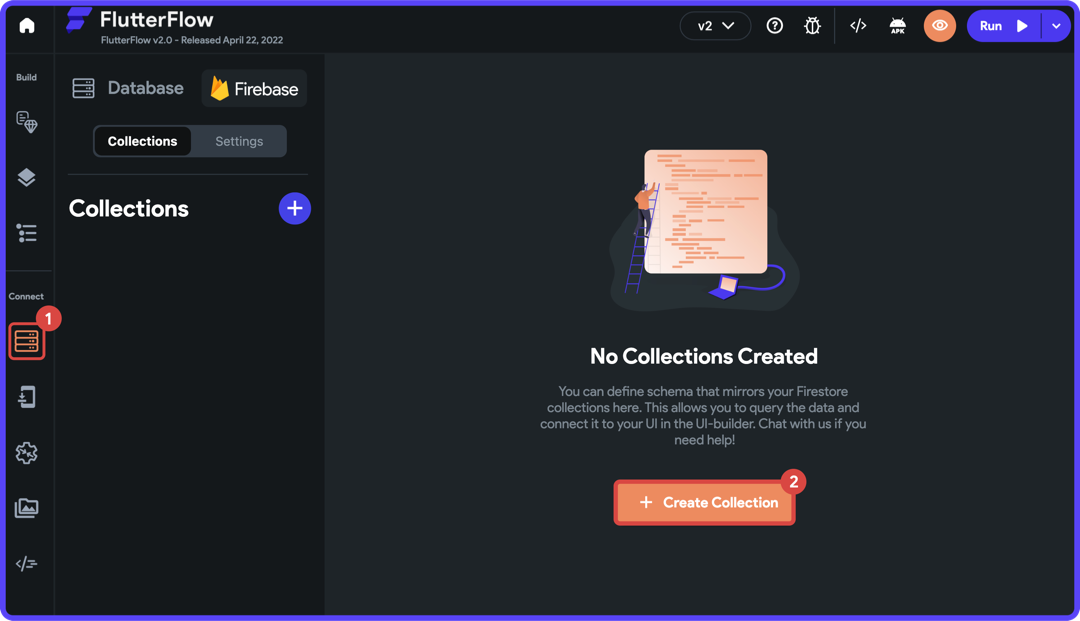
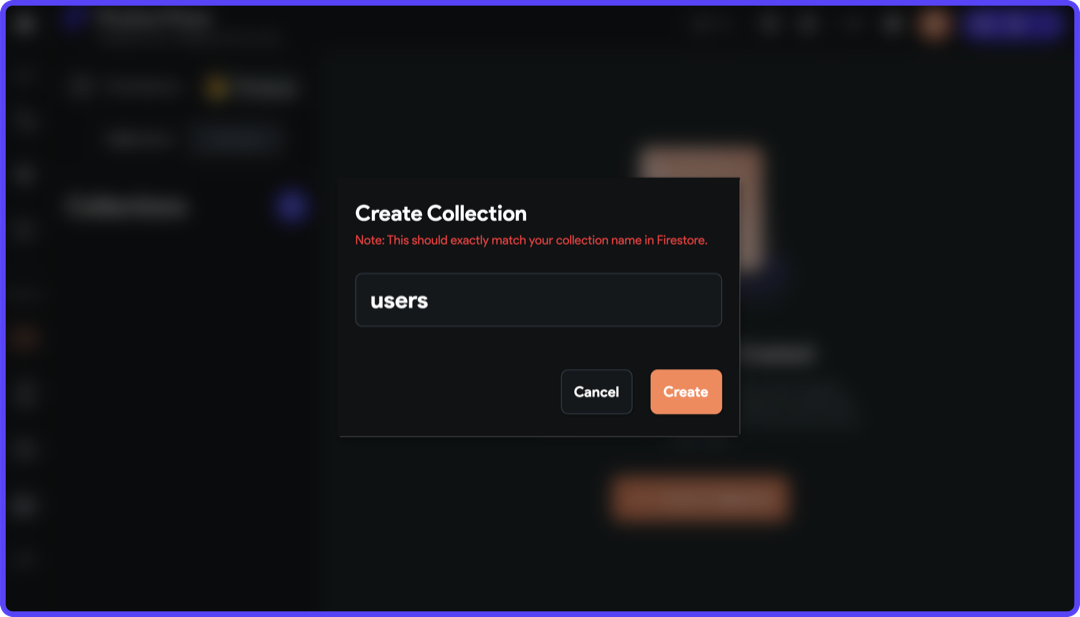
2. In the dialog box, enter the name of the collection as users. Click Create.
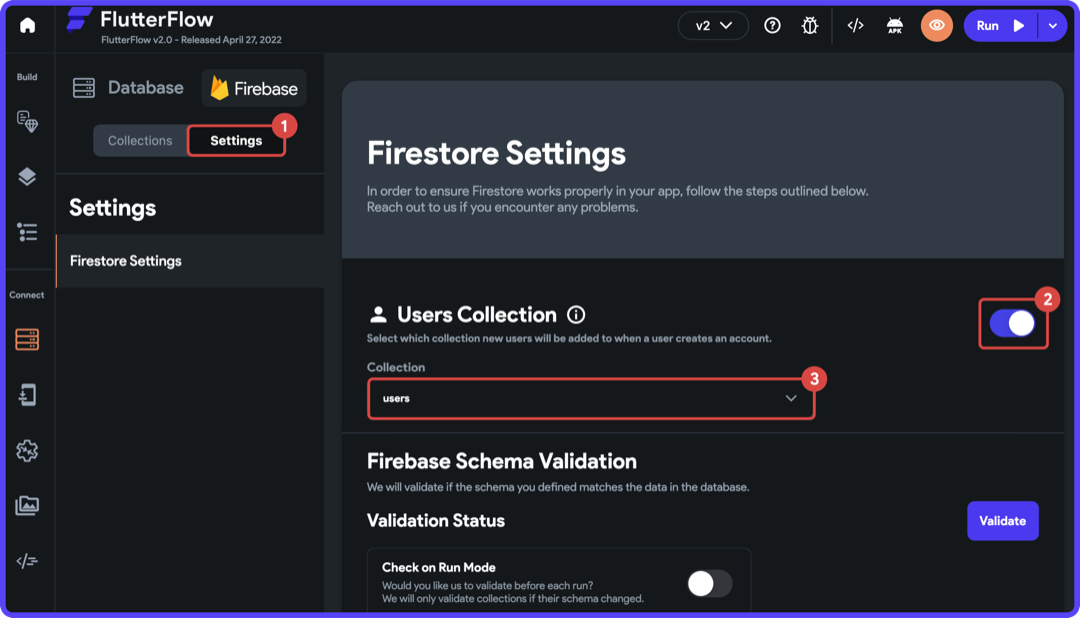
3. Go to the Settings tab, and enable the Users Collection using the toggle. From the Collection dropdown, choose users.
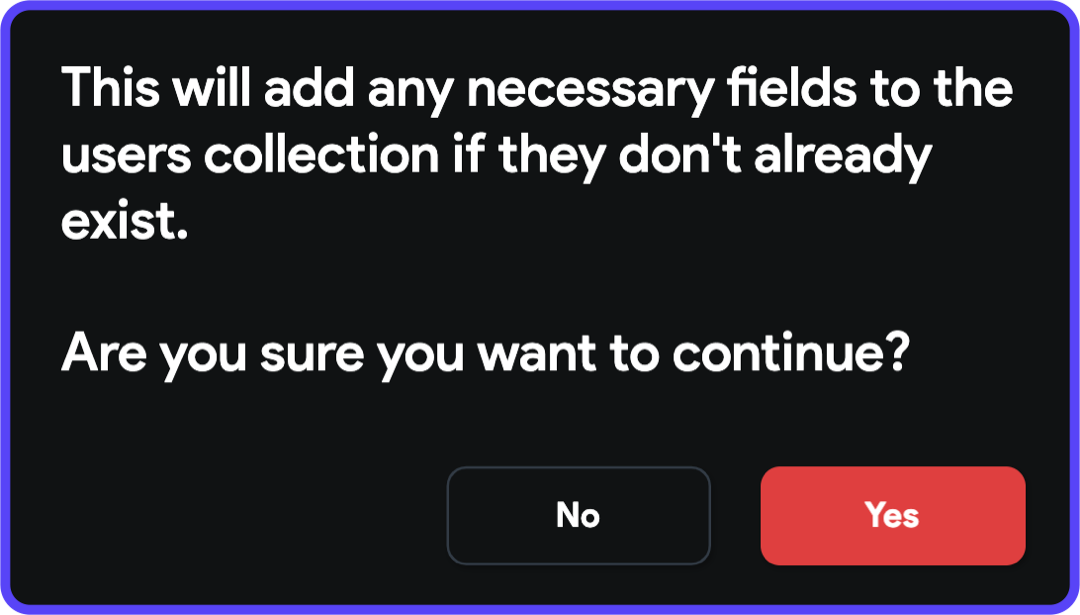
4. A dialog box will pop up for whether you want to add the necessary fields to the users collection, click Yes.
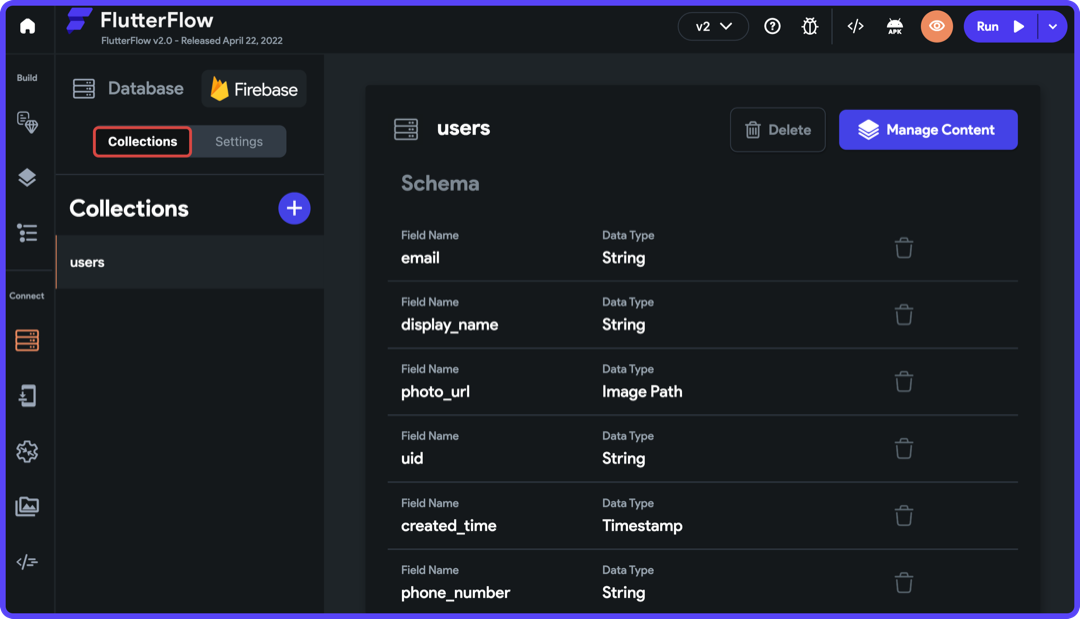
5. If you go back to the Collections tab, you will notice that a few fields have been added to the users collection.
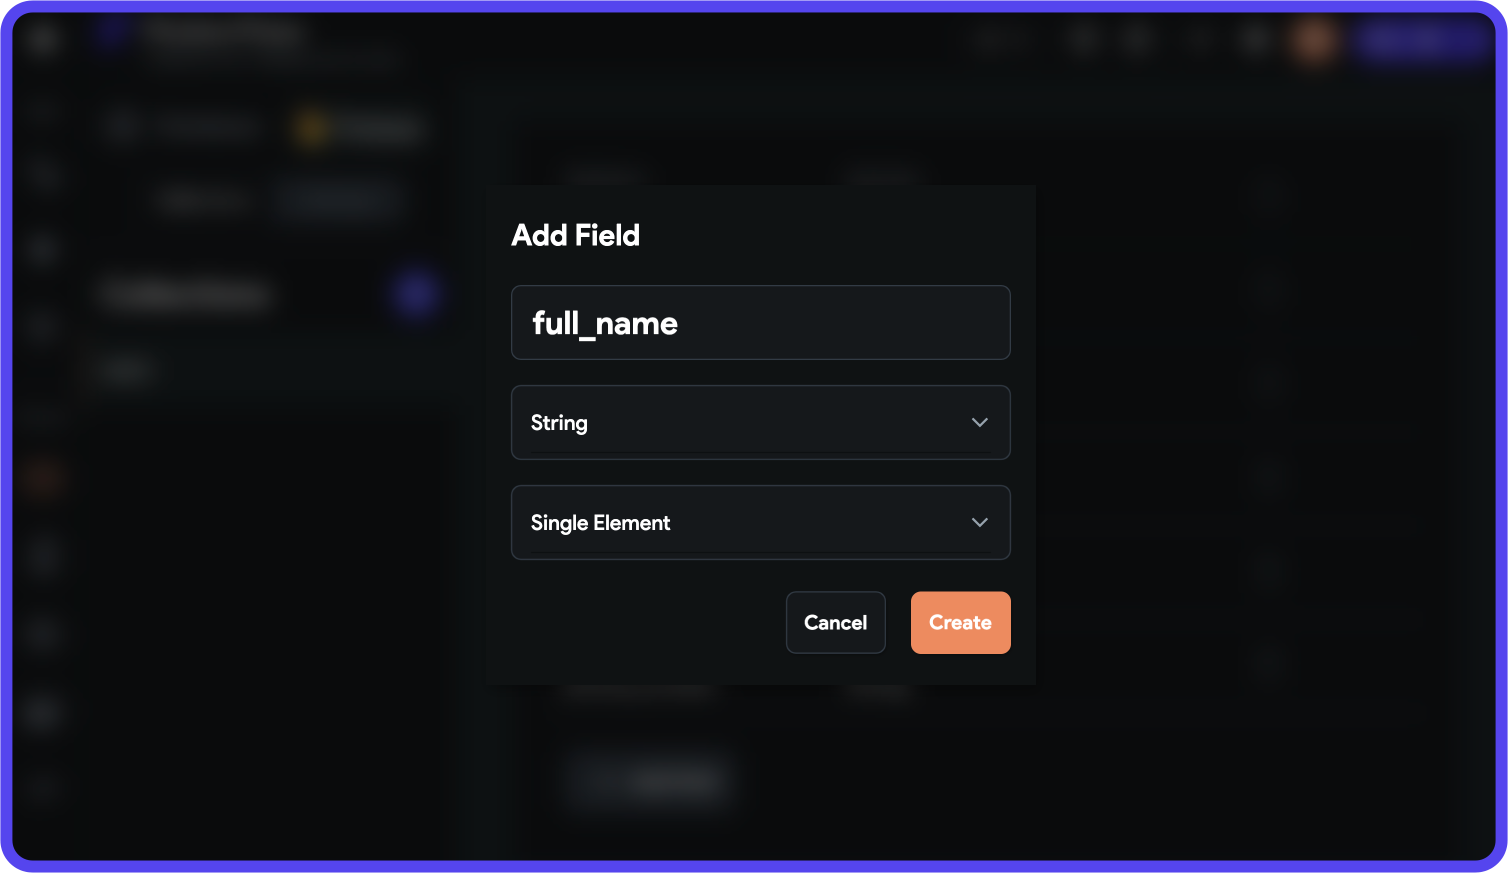
6. To create a new field, click the "+ Add Field" button.
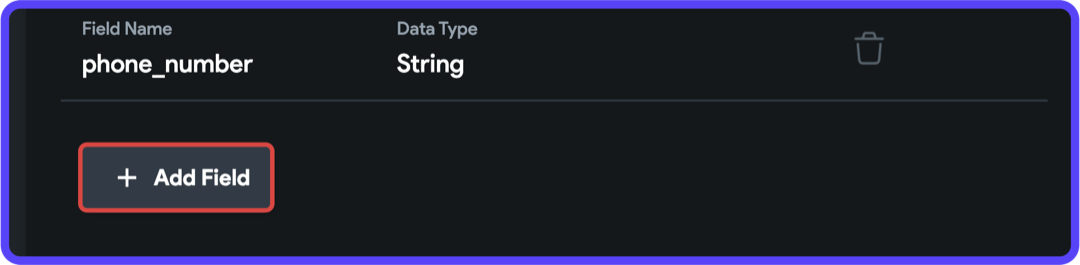
7. Enter the field name, data type, and field type (single element or list). Click Create.
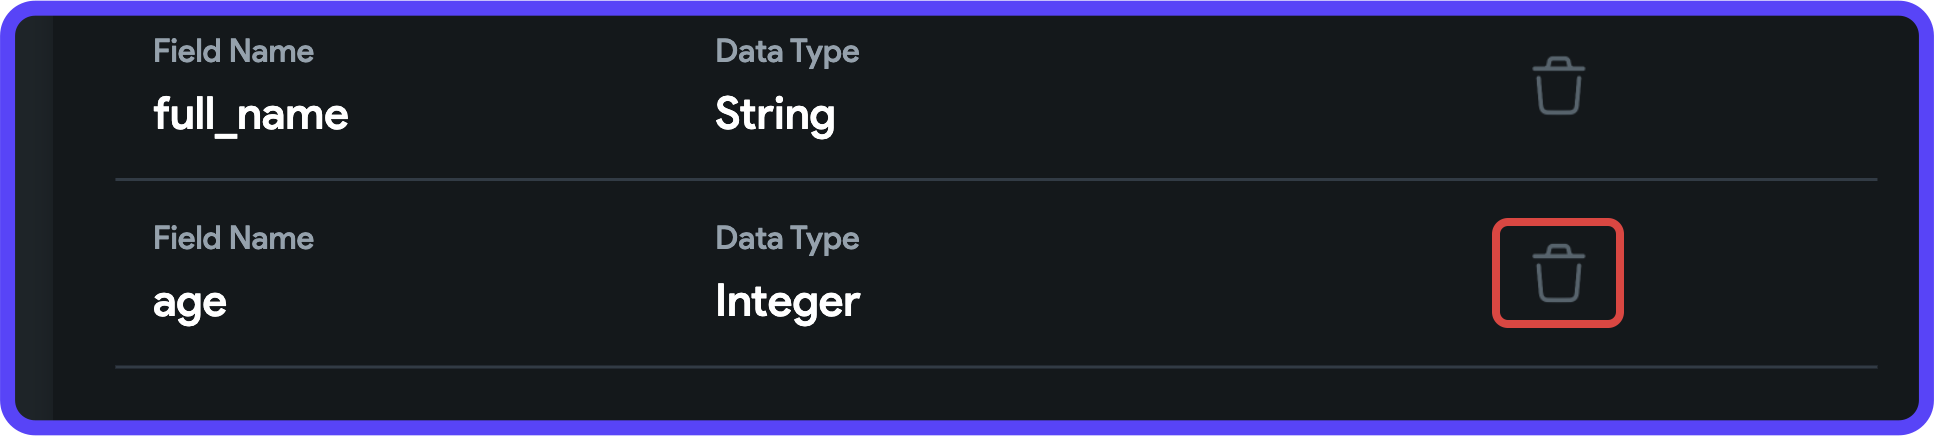
8. You can remove any fields you don't need by clicking on the remove icon beside the field. Click Delete in the dialog box.
Todos Collection
Let's add the todos collection that would be used for storing data related to each of the to-do items that the users can add, edit, or remove.
This collection will consist of the following fields (the data types are written in braces):
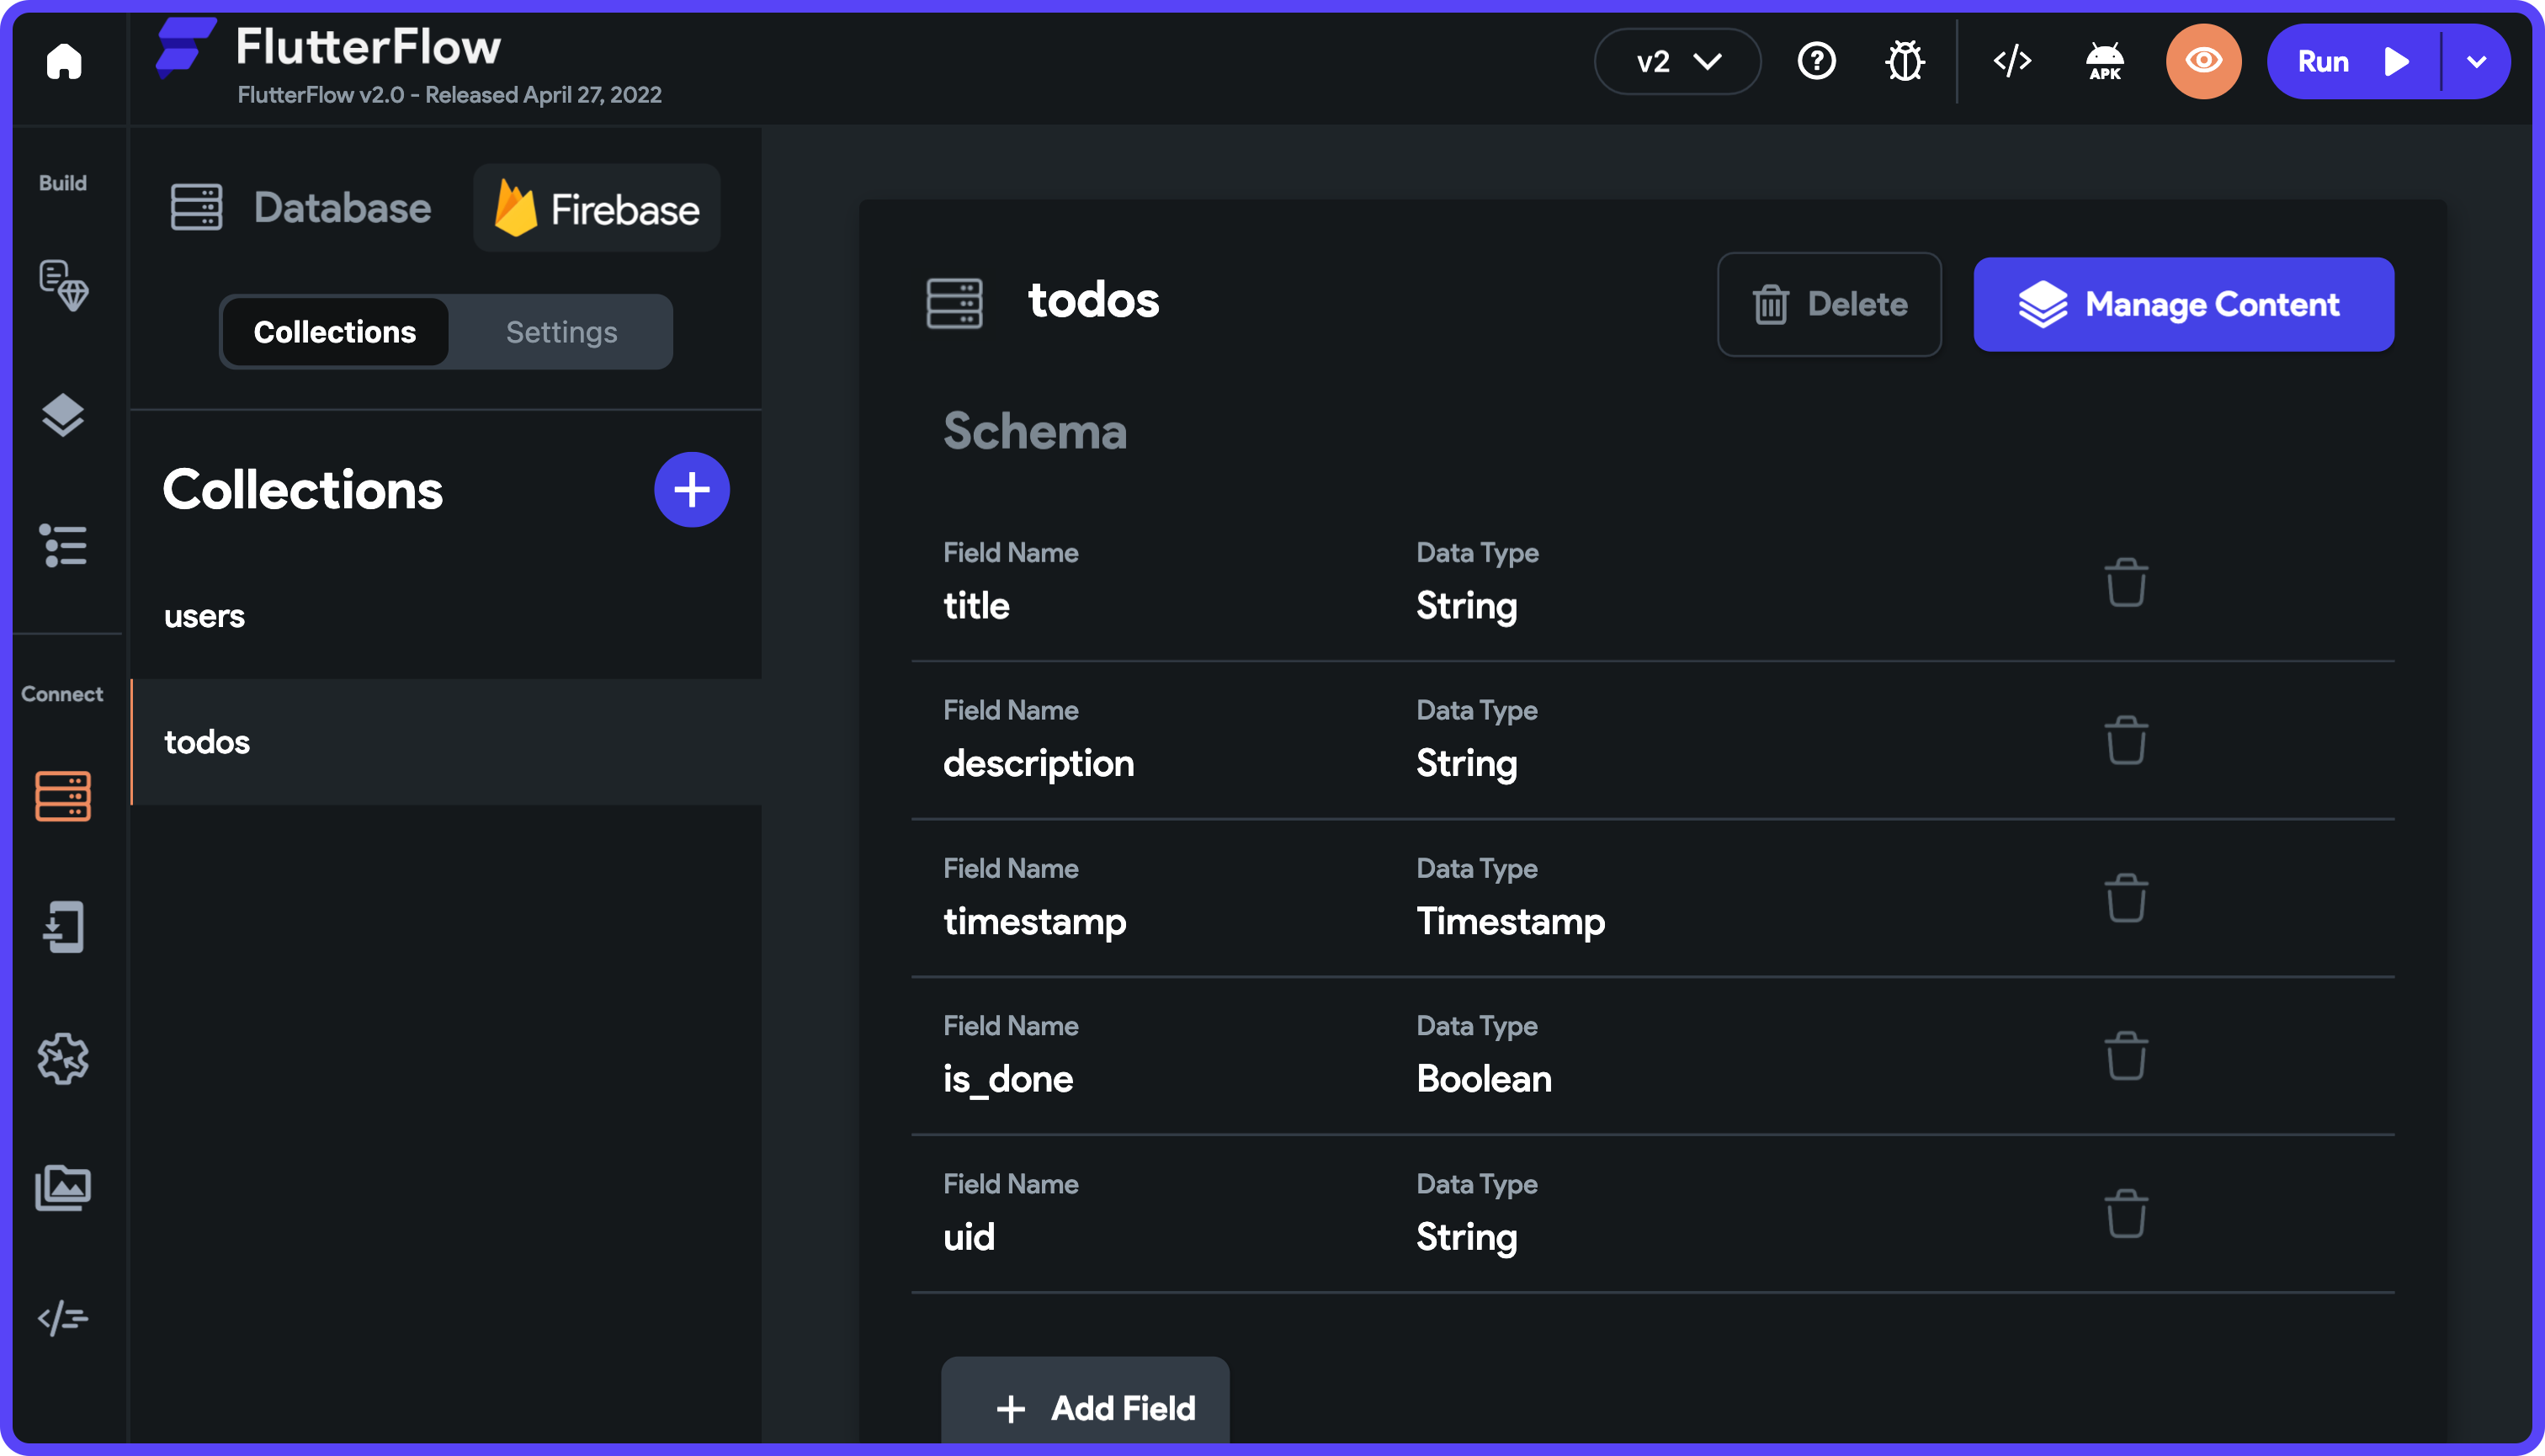
title(String): store the name of to-do taskdescription(String): description of to-do tasktimestamp(Timestamp): creation date of the to-do taskis_done(Boolean): whether the to-do task is completeuid(String): unique identifier of a user
Follow the steps below to create the todos collection:
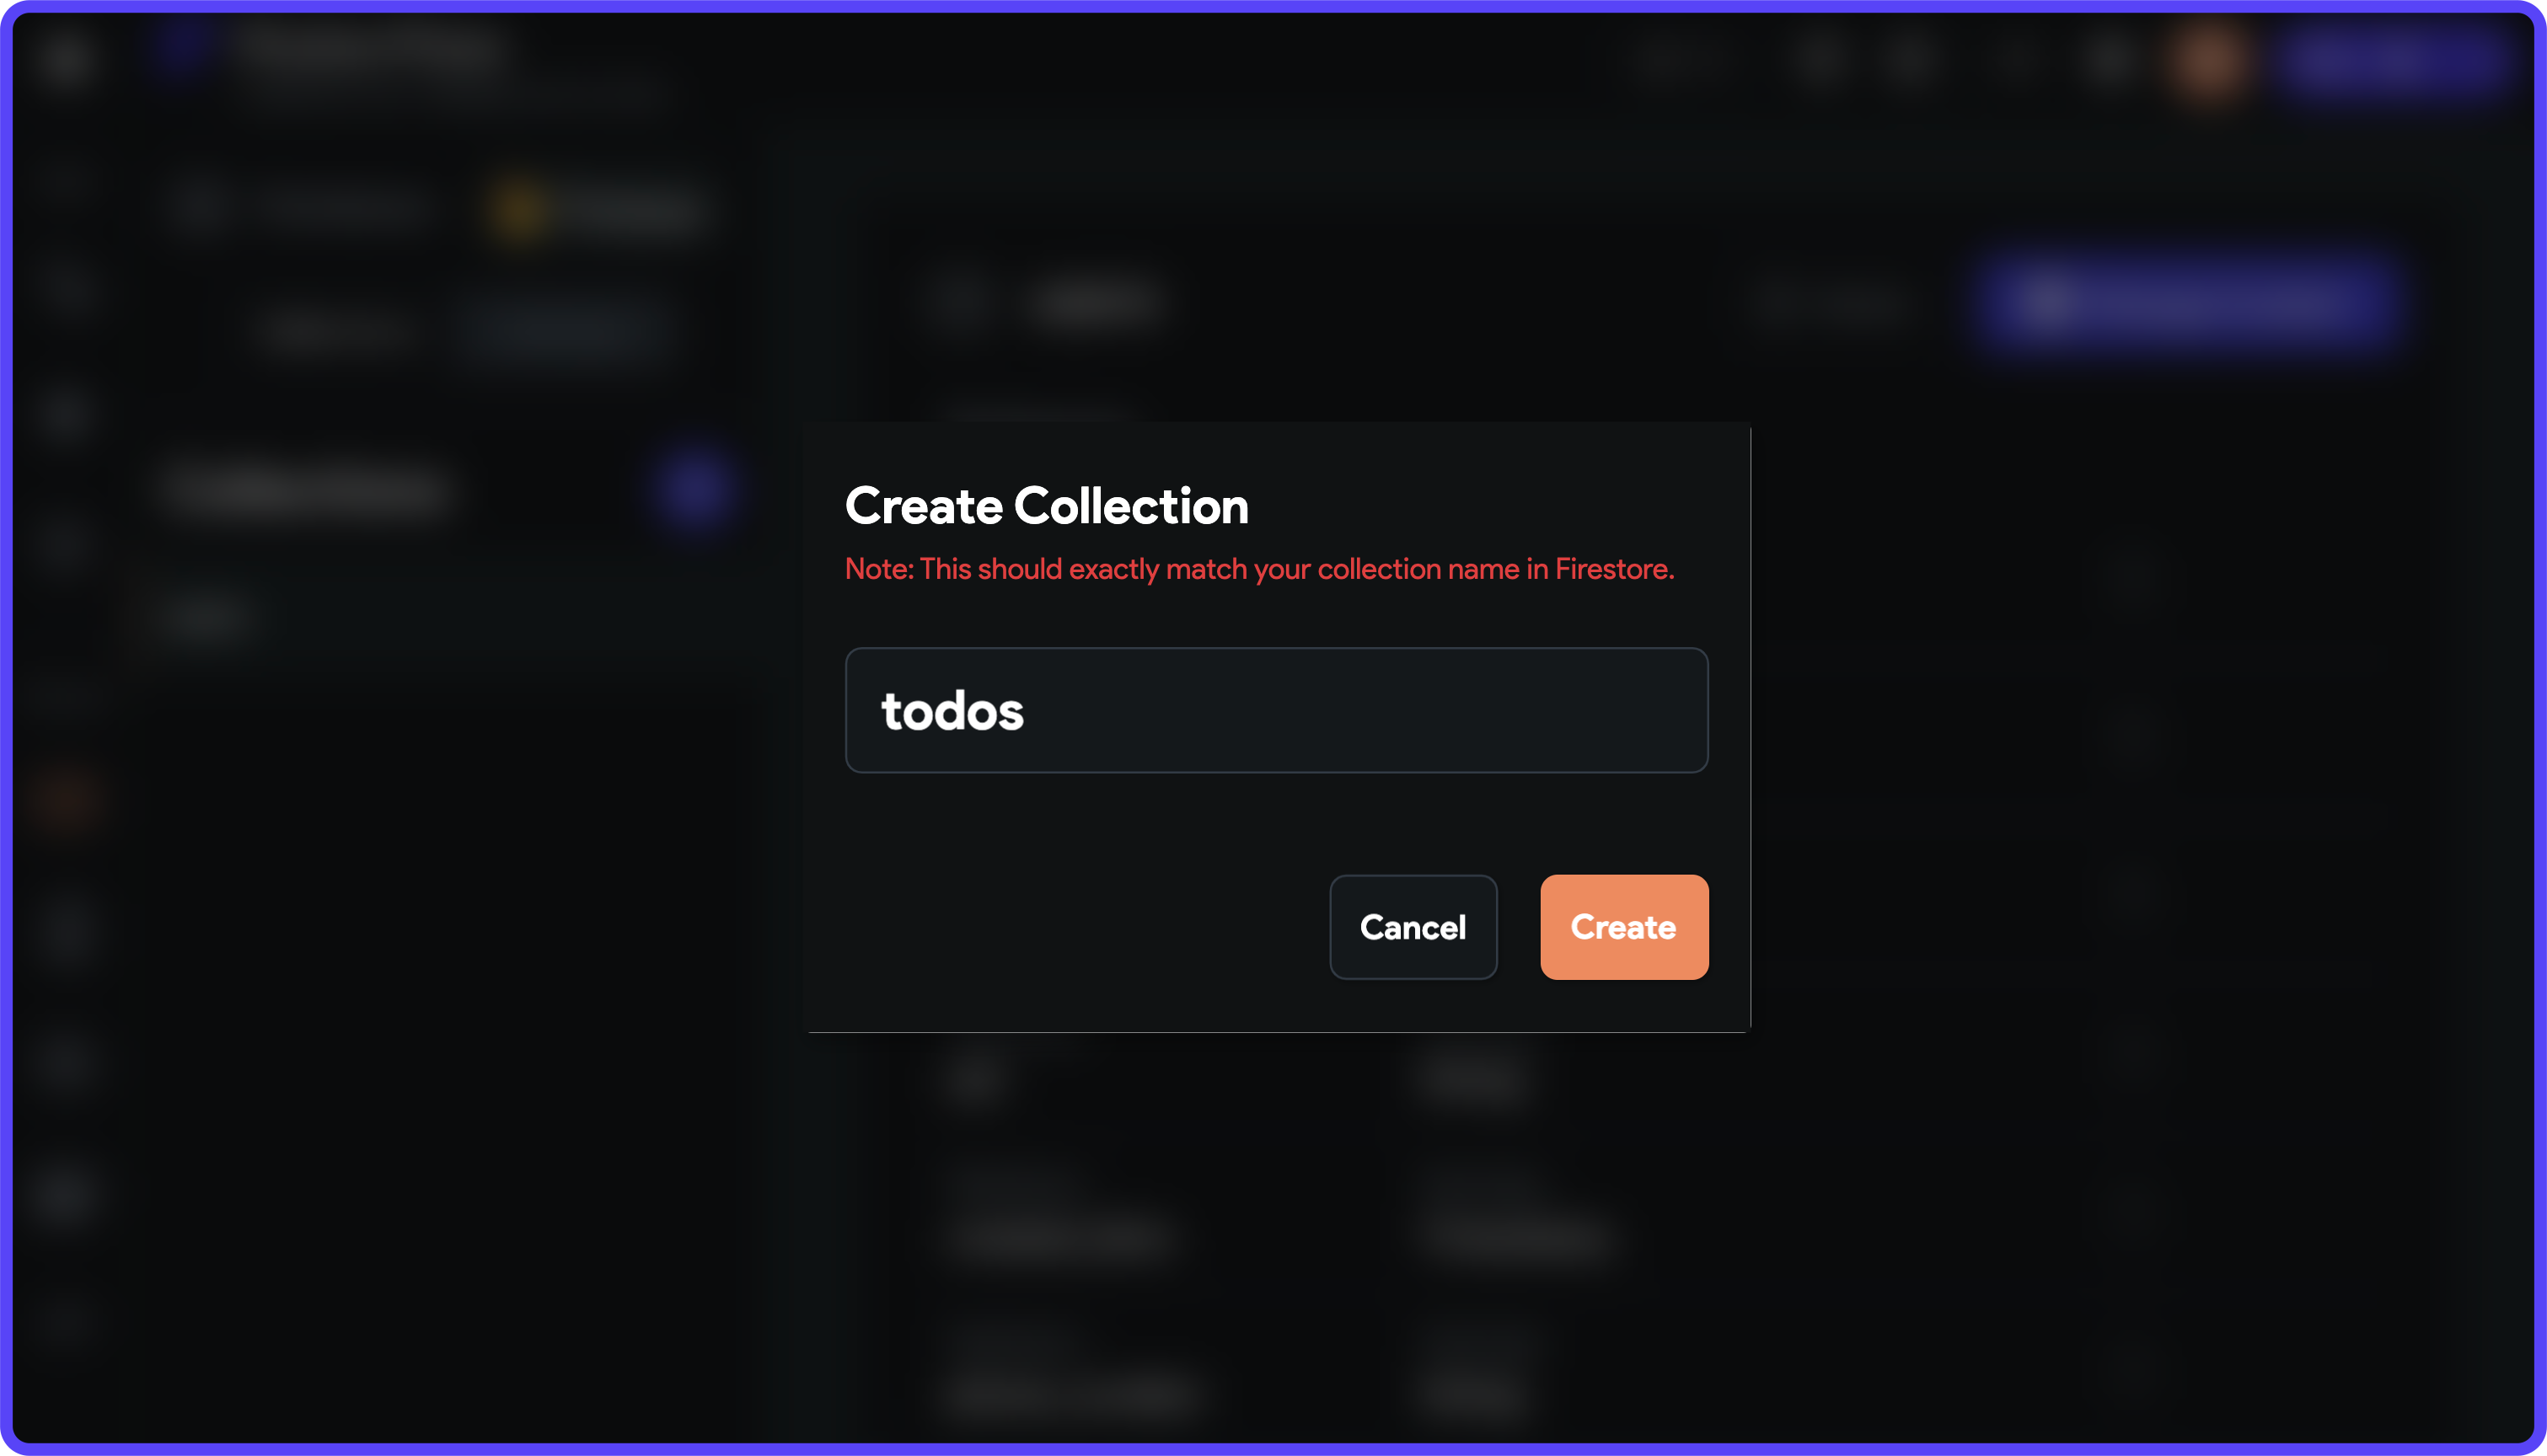
1. Click on the "+" button present beside the Collections.
2. Enter the collection name and click Create.
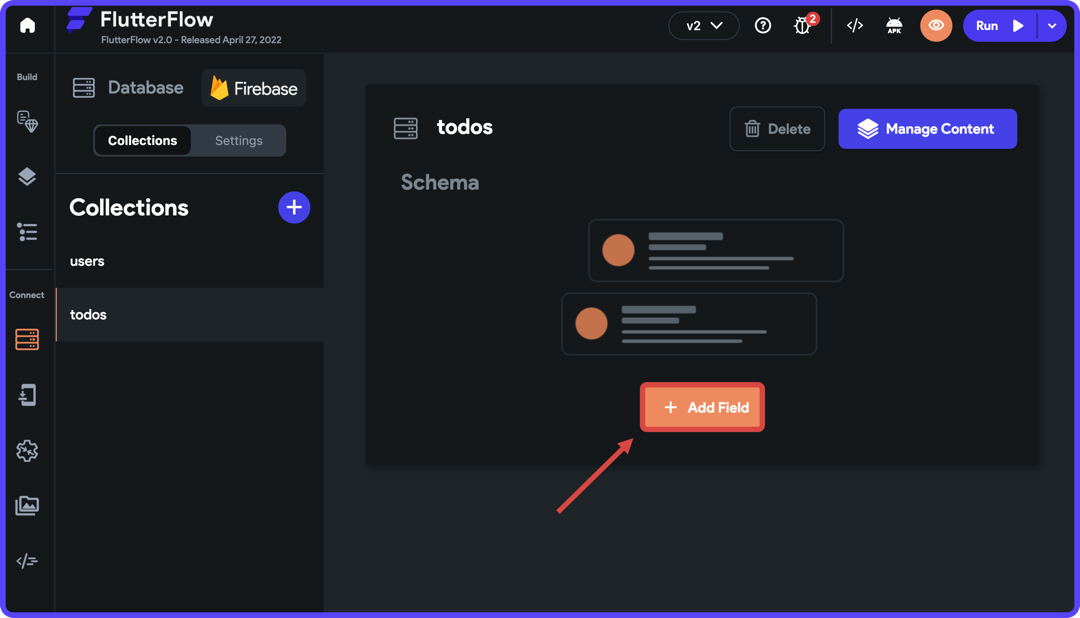
3. Once the collection is created, you can add fields to it by clicking "+ Add Field".
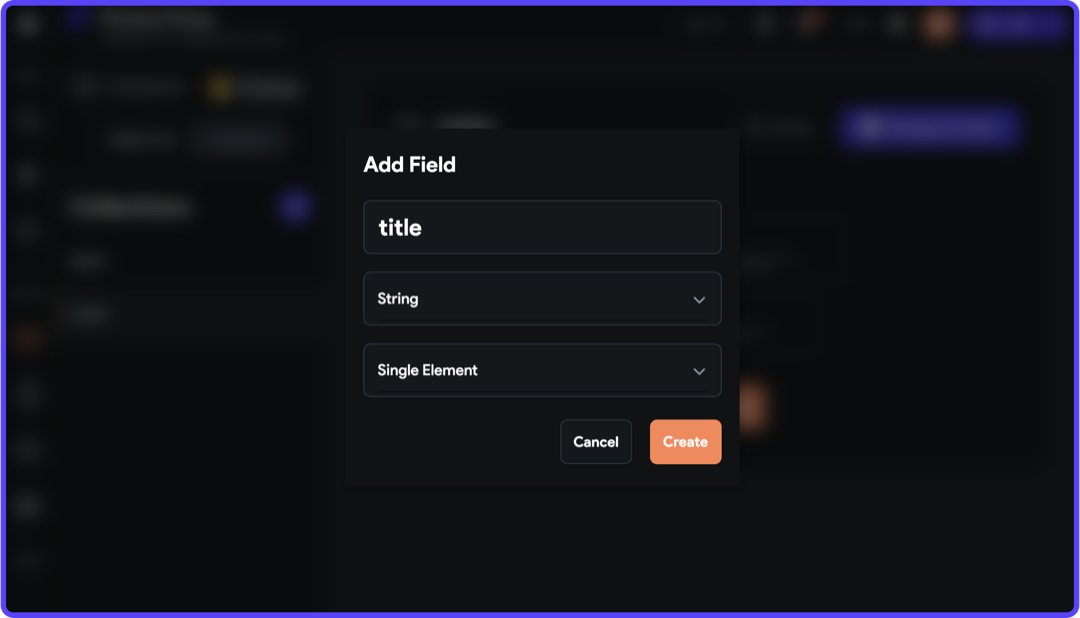
4. Enter the field name, data type, and field type. Click Create.
5. Follow similar steps for adding the rest of the fields.
Once all the fields are added to the todos collection, it would look like this:
Adding security rules
Now that you have the basic structure of the two collections ready, it's time to look at the Firebase Security Rules.
The security rules help to keep your Firebase data secure from malicious users. Firebase allows you to set security rules on Cloud Firestore, Firebase Realtime Database, and Cloud Storage.
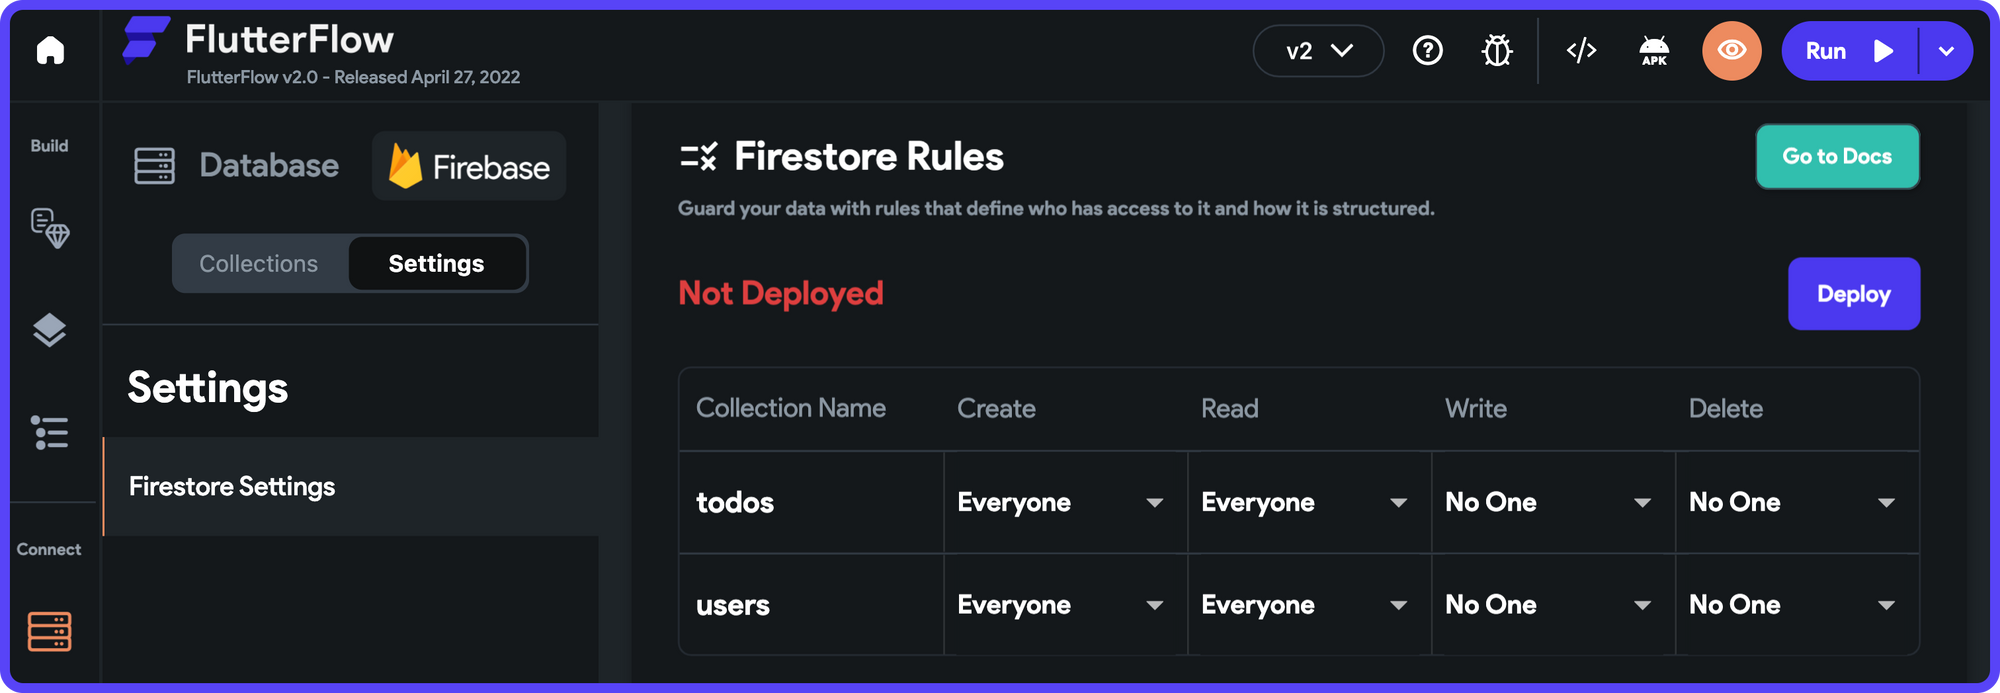
FlutterFlow makes it a lot easier to manage your Firestore security rules. You can access it by going to the Firestore page > Settings tab > Firestore Rules.
Every operation (or database request) done on the Cloud Firestore is evaluated against your security rules before reading or writing any data. You can configure the security rules for the following four types of operations:
- Create: users having access can create a new document inside a collection
- Read: users having access can read documents of a collection
- Write: users having access can update a document of a collection
- Delete: users having access can delete a document of a collection
In FlutterFlow, you can select among the following five levels of access for your data:
- Everyone: Allows both authenticated/unauthenticated users to perform the operation
- No One: Allows none of the users to perform the operation
- Authenticated Users: Allows only the authenticated users to perform the operation
- Tagged Users: Allows users to perform the operation if they have been tagged in the document. To use this rule, you need to select a field from the document representing that user.
- Users Collection: (can only be set on the operations of Users Collection) Allows users having
uid(unique user identifier) same as theidof the document to perform the operation.
The default rules that FlutterFlow sets on any new collection are as follows:
| Operation | Access | Description |
|---|---|---|
| Create | Everyone | Any user can create a document |
| Read | Everyone | Any user can read a document |
| Write | No One | None of the users can write to a document |
| Delete | No One | None of the users can delete a document |
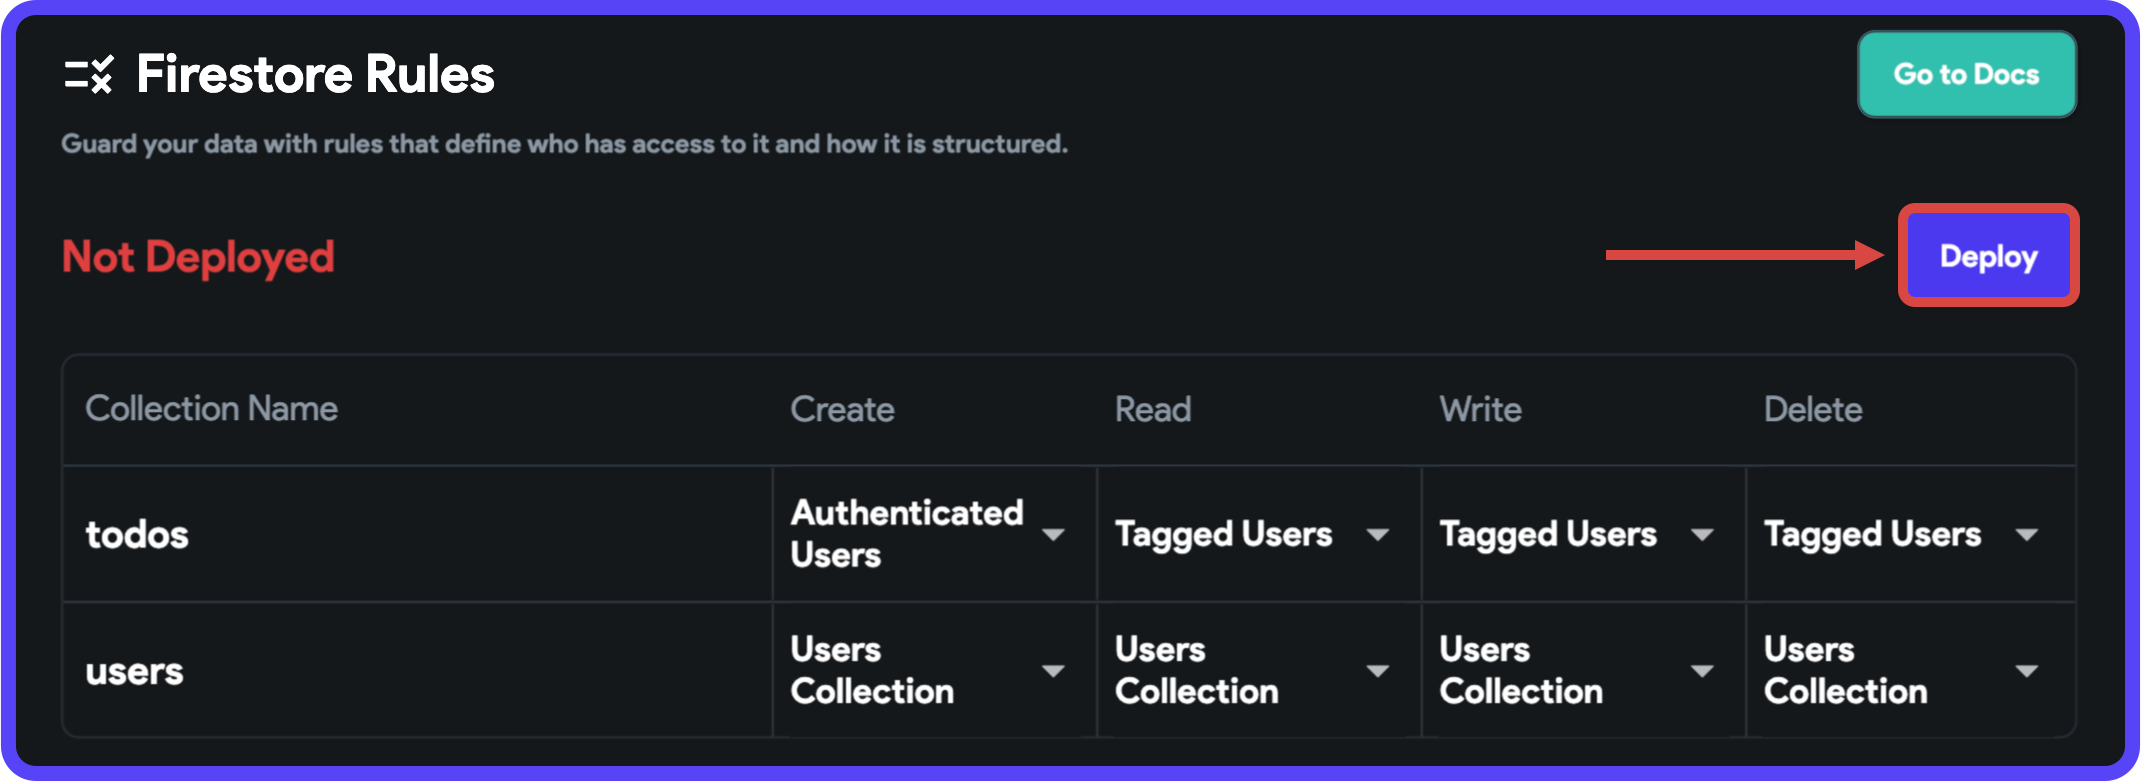
As there are predefined rules for the users collection, you can just set the access level of all the four types of operations as Users Collection.
Let's take a look at what should be the ideal security rules for the todos collection.
- Any authenticated users should be able to create a to-do task.
- Only tagged users (having the same
uidwith which they are authenticated) should be able to read, update (write), or delete a to-do task.
According to the above points, you can set the following security rules to the todos collection:
- Create –> Authenticated Users
- Read –> Tagged Users (with
uidfield) - Write –> Tagged Users (with
uidfield) - Delete –> Tagged Users (with
uidfield)
On selecting the Tagged Users rule, a dialog will appear where you have to choose the field (whose value will be used for verifying the tagged user). Choose uid as the field and click Save Changes.

Once you have the security rules defined, you can also see a preview of the rules. Now, click on the Deploy button to upload the rules to Firestore.
This will open up a dialog showing the updated security rules that you are going to upload. Click Deploy Now.
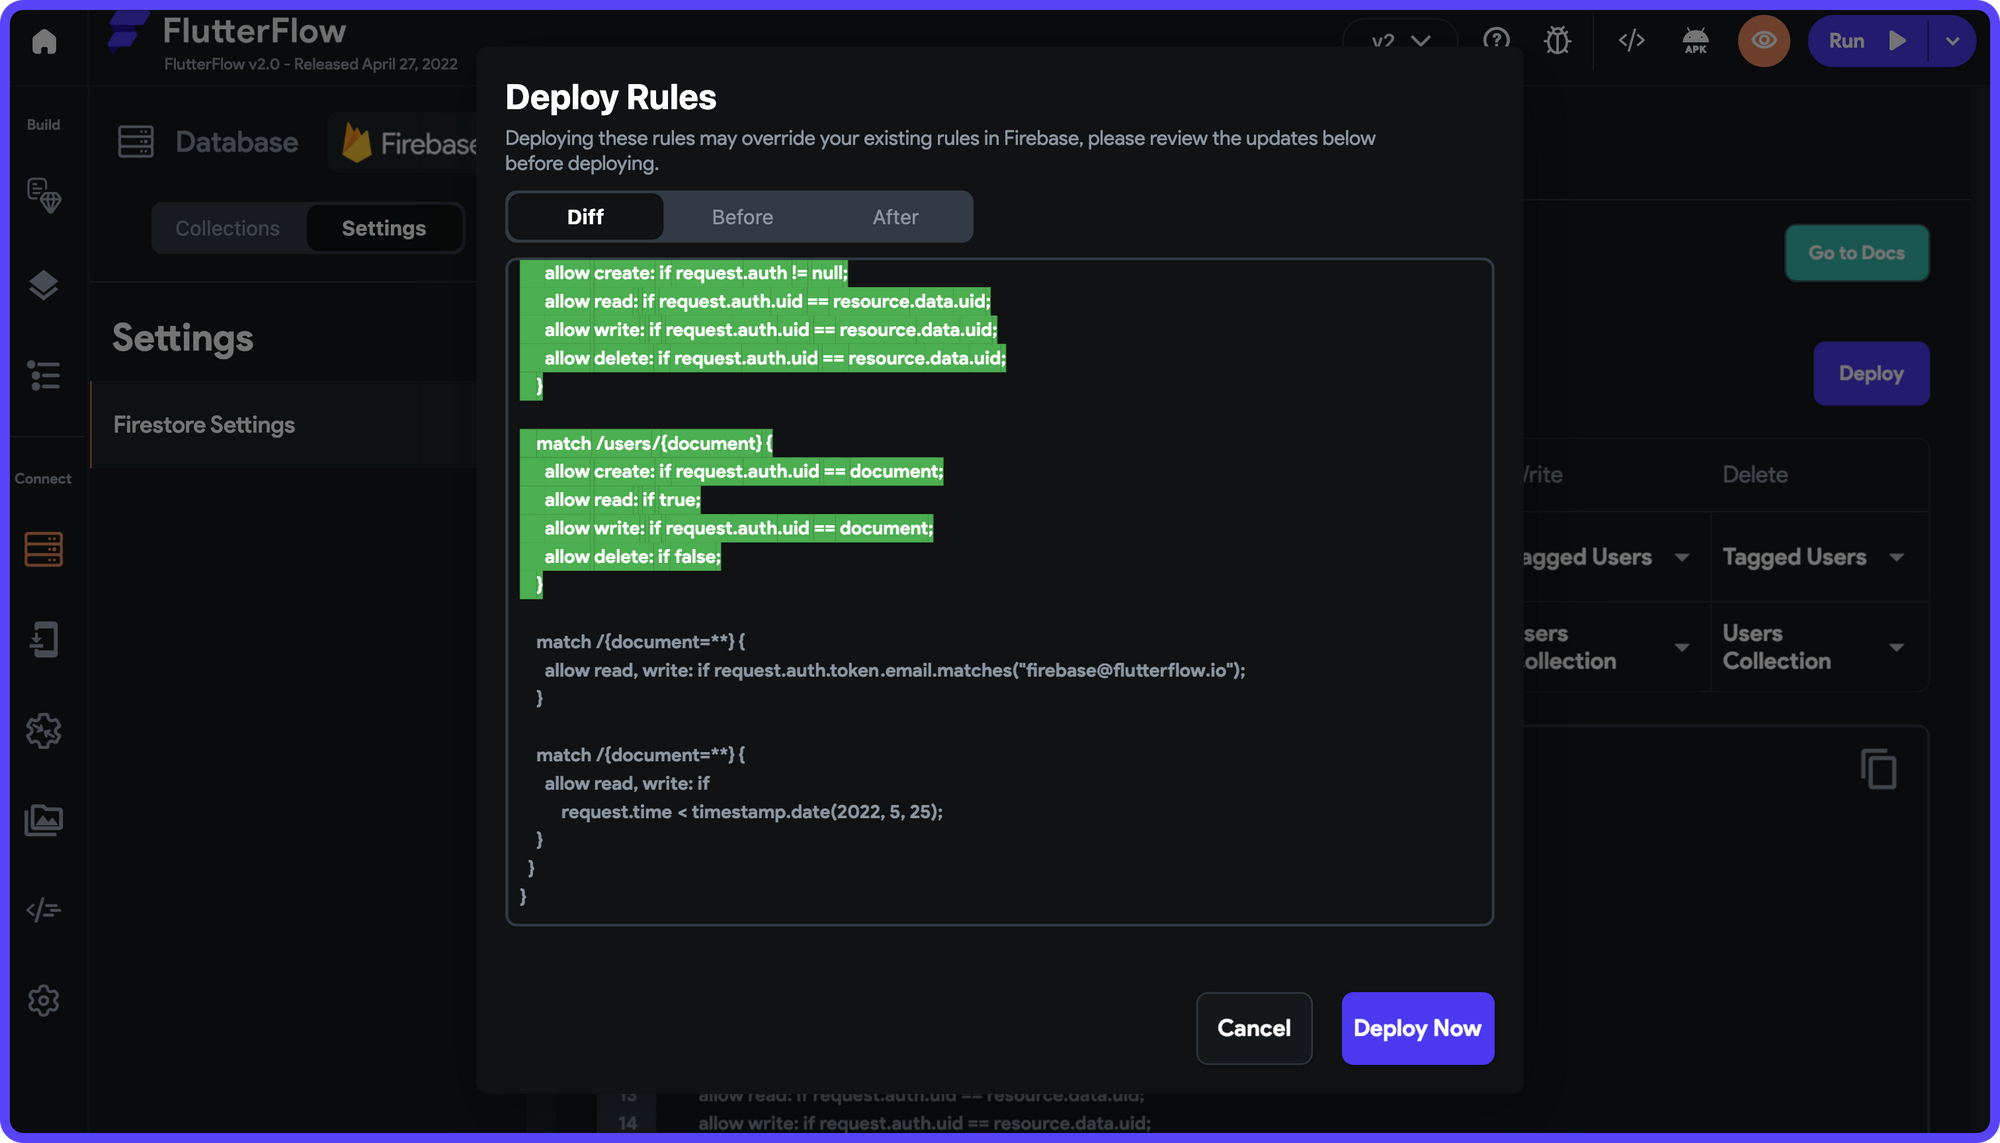
Notice that the following part is still present in the security rules:
match /{document=**} {
	allow read, write: if
		request.time < timestamp.date(2022, 5, 25);
}
This was added earlier as we were using the database in test mode, but now you won't need this part. Remove this rule by following the steps below:
- Go to your Firebase project.
- Select Firestore Database from the left menu.
- Go to the Rules tab.
- Remove that part from the rules, and click Publish.
UI Overview
We'll continue using the interface of the RobinDo app, which you can find among the sample apps of FlutterFlow.
In the previous article, we haven't completed the interface of the MyTasksScreen, so we'll start with that.
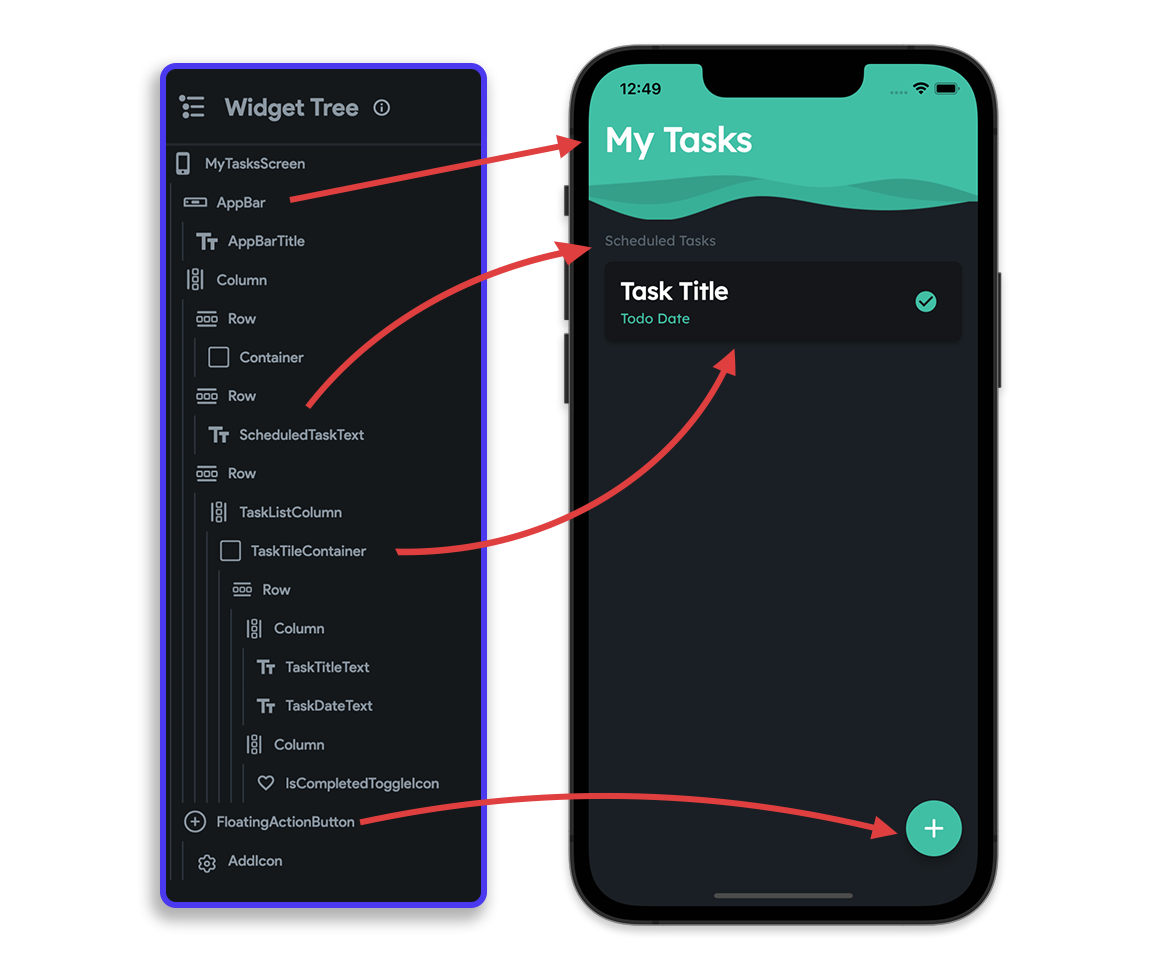
MyTasksScreen
Previously, we had created this page to just contain the Log Out button in order to demonstrate the logging out action of authentication.
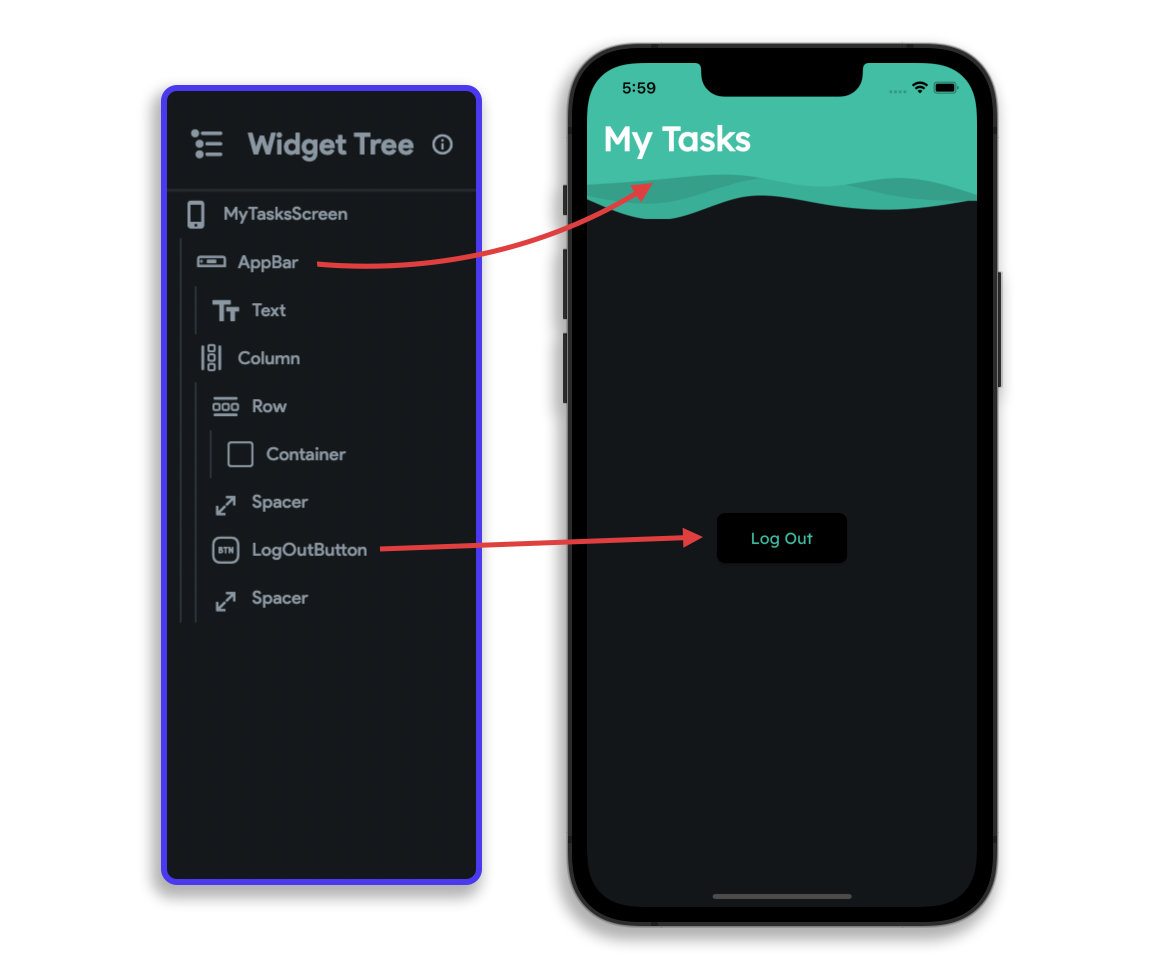
Update this page to display the list of all tasks added by the user (reading from the database):
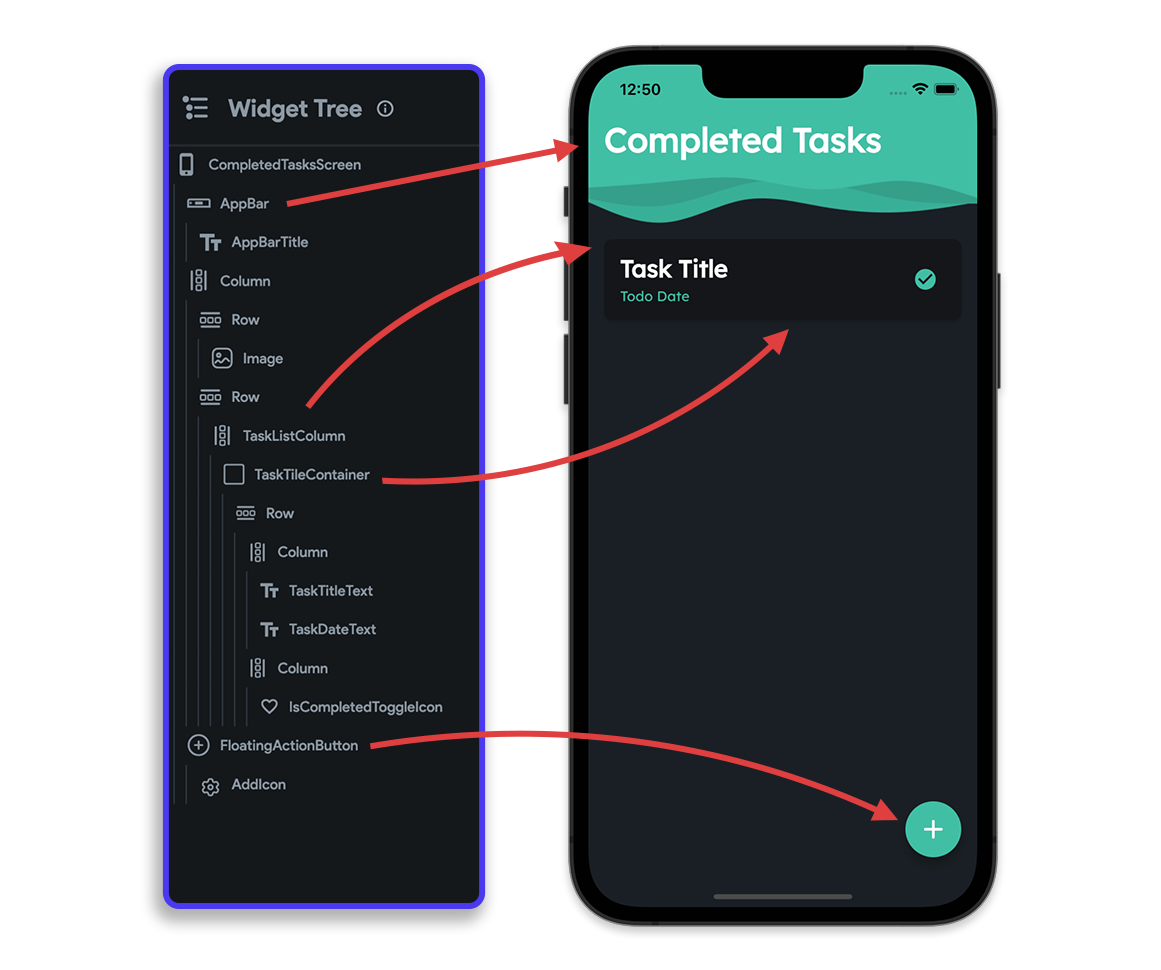
CompletedTasksScreen
Displays a list of all the tasks that the user has already completed (reading from the database).
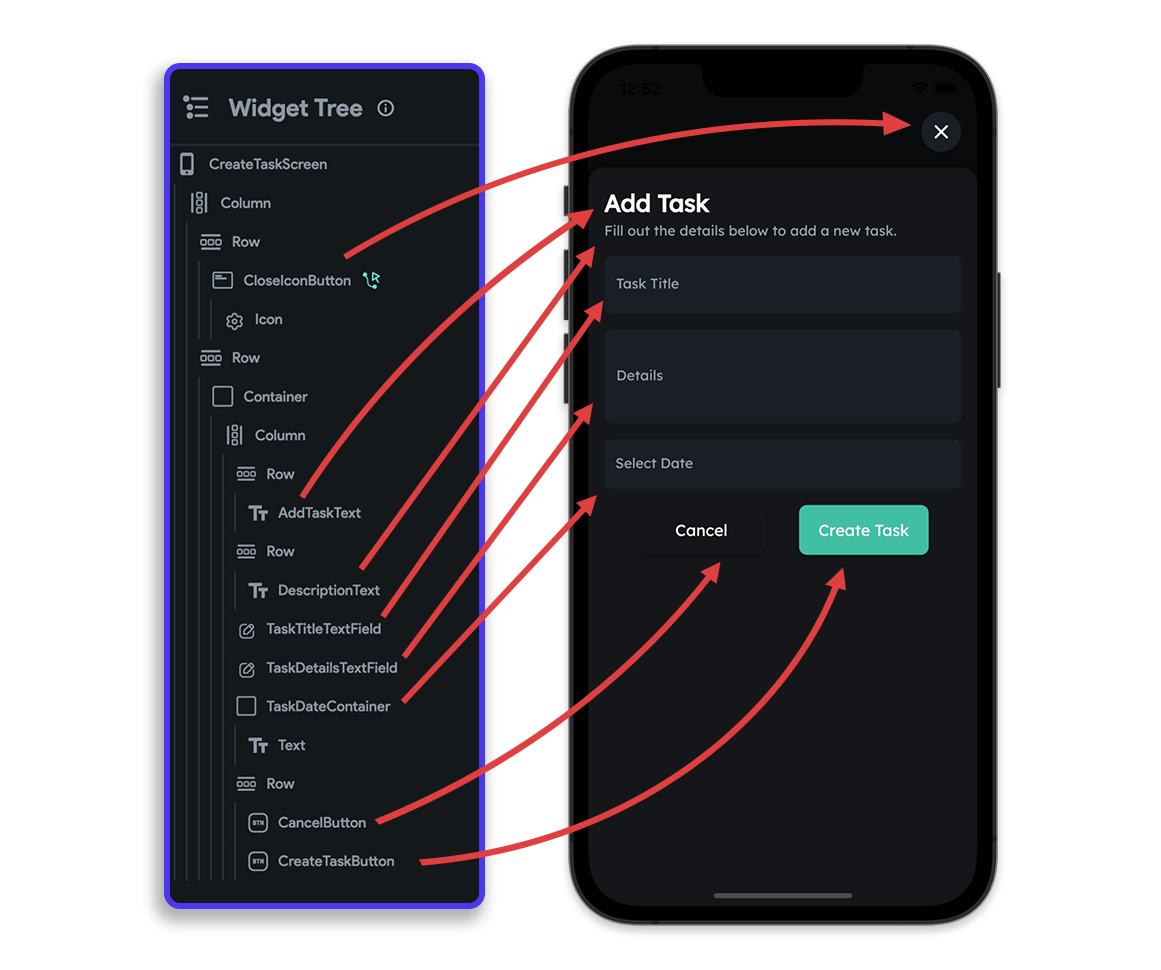
CreateTaskScreen
Users can create or add a new task from this page by entering the required details.
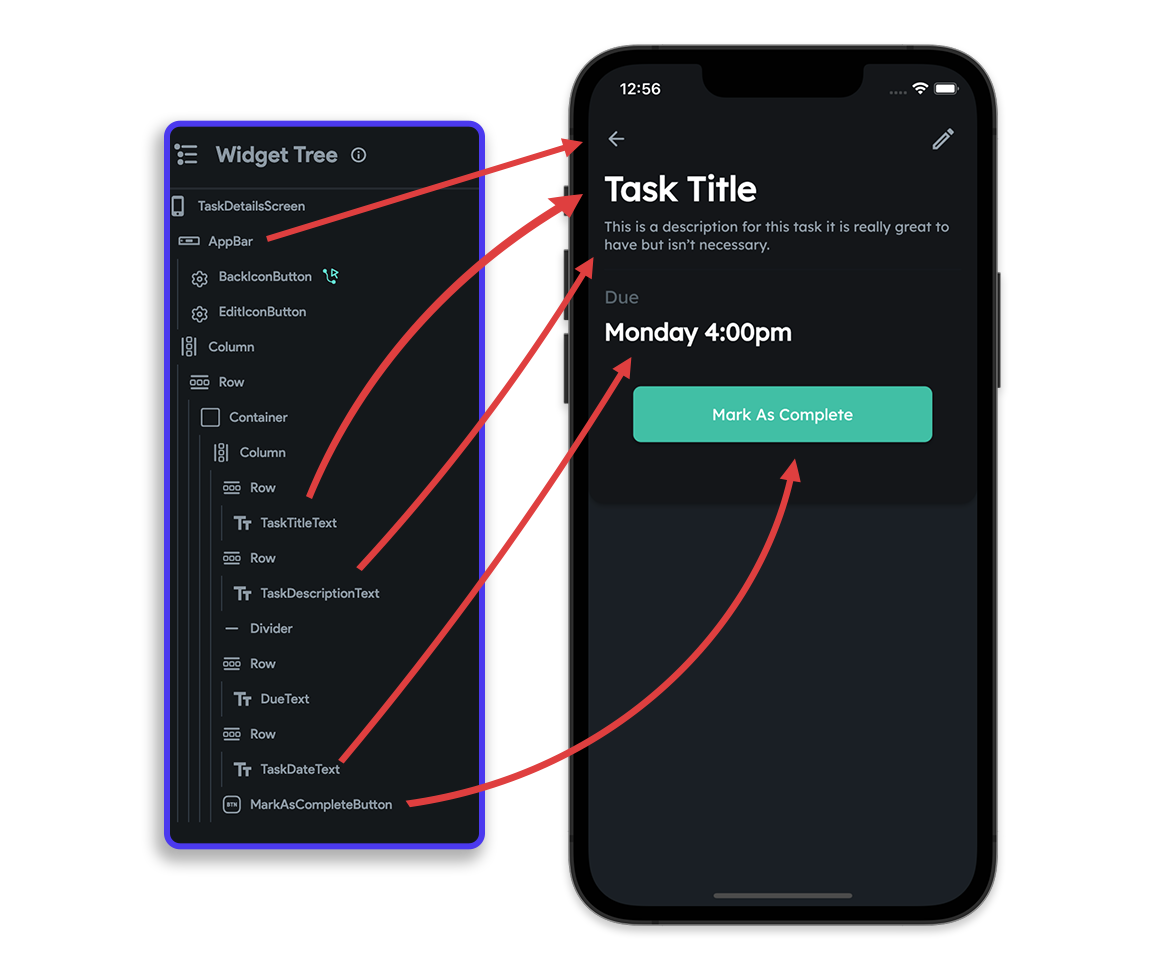
TaskDetailsScreen
Displays the details about a task when a task item is selected from the list. This page will have an option to update or remove the task from the to-do list.
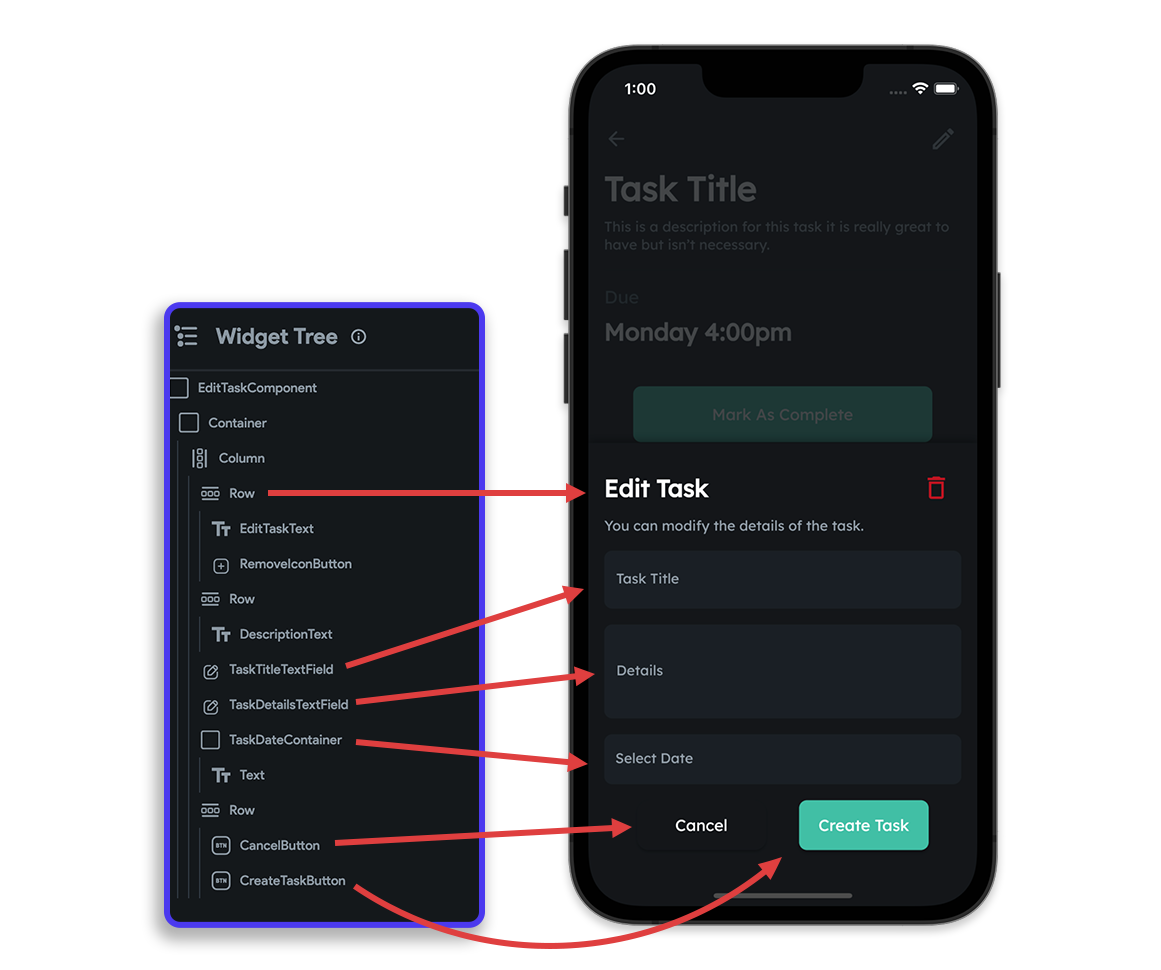
EditTaskComponent
This component will be displayed as a bottom sheet when the edit button is tapped on the TaskDetailsScreen. You can edit the details of a to-do task using this component.
MyProfileScreen
The Log Out button can be shifted to this page. It will also have a button for going to the ProfileEditScreen.

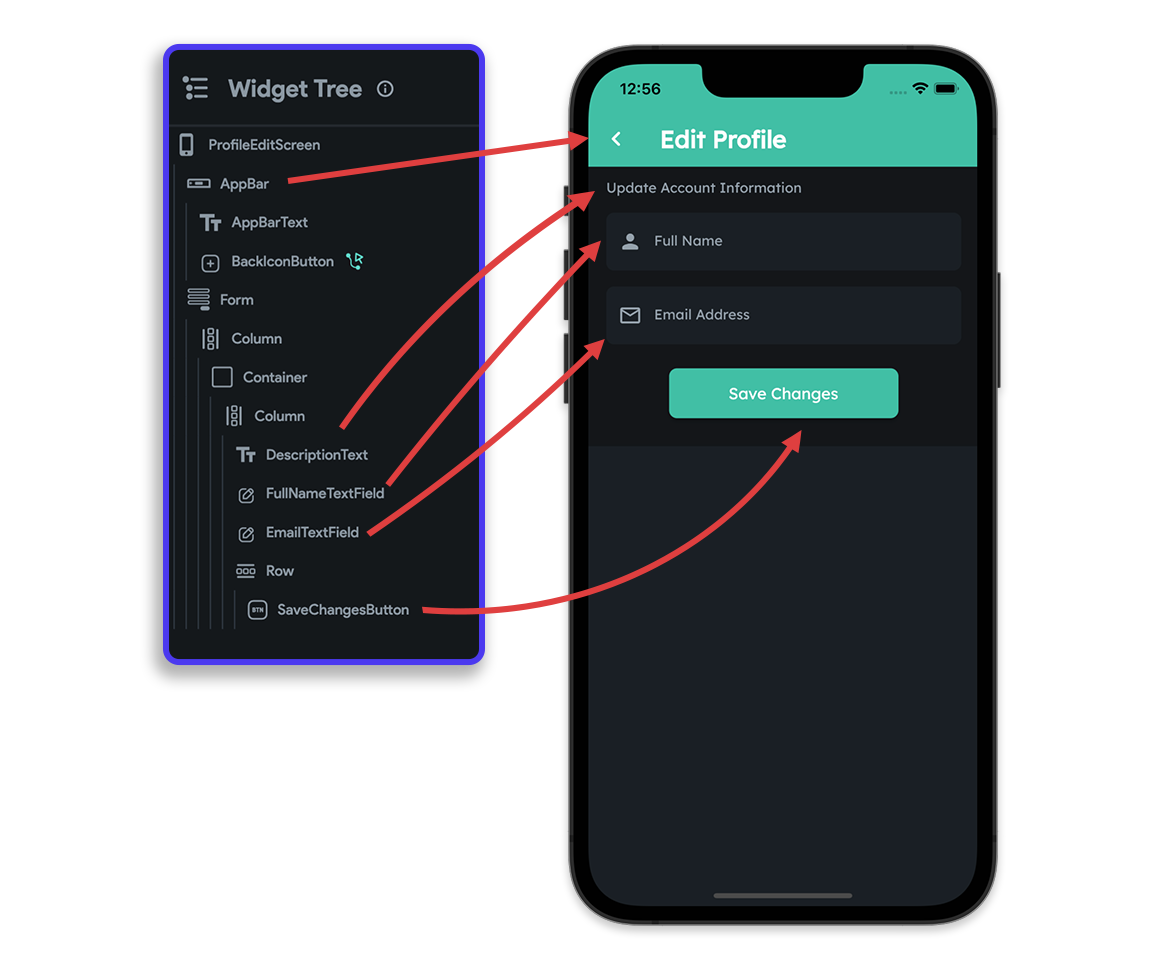
ProfileEditScreen
Users can modify their current profile details from this page.
Adding NavBar
Let's add a bottom navigation bar (or, NavBar) to facilitate quick navigation between the top-level views of the app. We'll add the NavBar to the following pages:
- MyTasksScreen
- CompletedTasksScreen
- MyProfileScreen
Follow the steps below to add a NavBar:
- Go to a page on which you want to add the NavBar.
- Enable the Show on Nav Bar toggle.
- Enter a Label text using which you can easily identify the item.
- Choose a Nav Bar Icon.
- Enter the Icon Size to be
32. - Repeat the above steps for adding the NavBar on other pages as well. You should have the NavBar enabled on at least two pages.
- Navigate to the Settings and Integrations page from the left menu.
- Select NavBar & AppBar under General.
- Enable Show NavBar toggle.
- You can set a Nav Bar Style and customize various properties of it from this page.
Performing CRUD operations
There are three types of Database Actions that can be used to create, update, or delete a record from a Firestore Collection.
Data can be read from the database by defining a Backend Query. You can either retrieve all the documents present inside a collection or just retrieve the data present inside a single document.
This section will give you a walkthrough of performing the CRUD operations on the users and todos collection.
Creating user document
In the last article of this series, we discussed how to define a user authentication flow, but we didn't store any of the user details inside the Firestore database. While building most apps, you need to store the general user details in order to create a good profile for them.
Using Email sign up
To store user details while registering using email/password, you must manually specify the values for the fields you want to store in the users collection.
Follow the steps below:
- Navigate to the RegisterScreen page.
- Select the Create Account button.
- Go to the Actions tab.
- Under the Auth Create Account action, enable Create User Document using the toggle.
- Select the users collection from the dropdown under Collection.
- Set the field values for
email,display_name, andcreated_time.
Use the Value Source as From Variable, select the Source as Widget State, and choose the respective TextField from the Available Options dropdown.
Using Google provider
While using Auth Login Action with the Google provider, just enable the Create User Document toggle. It will automatically assign field values of the users collection (you don't need to specify them manually).
- Navigate to the SplashScreen page.
- Select the Sign in with Google button.
- Go to the Actions tab.
- Enable the Create User Document toggle.
- Select the users collection from the dropdown.
- On the dialog box, click Yes.
Reading user details
Backend Query can be used for retrieving the details from the users collection. We'll need to add the backend query on the MyProfileScreen page.
- Navigate to the MyProfileScreen page.
- We want the query results to be available throughout the page, so you don't need to select any particular widget. Just go to the Backend Query tab from the Properties Panel.
- Select the Query Type as Query Collection.
- Select the users collection from the Collection dropdown.
- In the next Query Type dropdown, choose Single Document.
- Disable the Hide Widget If No Match because we don't want an empty widget if the user's display name is not found (also, as it's part of the registration, so it should always be available).
- Click Save.
Once this query is defined, you should have access to the users collection data throughout the page.
To display the name of the user from the query result, follow the steps below:
- Select the user name Text widget.
- Click Set from Variable on the Properties Panel.
- Choose the Source as users Record.
- Under Available Options, select display_name.
- Click Save.
You would also want to pass the record data over to the ProfileEditScreen as you need access to the record for performing an Update Record action.
Follow the steps below to pass the record to ProfileEditScreen from MyProfileScreen:
- Navigate to the ProfileEditScreen.
- Click on the edit button beside Parameters and click + Add Parameter.
- Enter the Parameter Name as profileData.
- Set the Type as RecordReference and choose users from the Record Type dropdown.
- Click Save.
- Navigate back to the MyProfileScreen.
- Go to the Navigate action defined on the Edit Profile Row.
- Click Pass under Parameters.
- Choose profileData as the Parameter from the dropdown.
- Select the Source as users Record.
- Under Available Options, choose reference.
Editing user details
We have already created the interface of the ProfileEditScreen and passed the users record reference to this page. Let's add the functionality of letting users edit (or update) their details present on the database.
Follow the steps below:
- Select the Save Changes button.
- Go to the Actions tab from the Properties Panel.
- Click + Add Action.
- Make sure On Tap is selected under the Type of Action.
- Select Update Record under Database.
- Choose the Source of the reference as profileData.
- Click + Add Field and set the values for email and display_name fields.
Select the Value Source as From Variable, select Source as Widget State, and choose the respective TextField under Available Options.
Adding a todo task
For creating a new task record on the database, you have to use the Create Record action. Before adding this action, you need to define a Date/Time Picker action on the CreateTaskScreen to let the users select a task completion deadline.
To add the Date/Time Picker action, follow the steps below:
- Select the widget on which to set the action.
- Go to the Actions tab from the Properties Panel.
- Click + Add Action.
- Make sure On Tap is selected under the Type of Action.
- Select the Date/Time Picker action.
- Choose the Picker Type as Date.
- Select the Default Date from a variable, choose the Source as Global Properties and select Current Timestamp under Available Options.
- To display the selected date, select the Text widget.
- From the Properties Panel, click Set from Variable.
- Choose the Source as Widget State, under Available Options choose Date Picked, and select the Date Format Option as MMMMEEEEd.
- In the Default Value field, enter "Select Date" (which will be displayed when the user does not yet pick the date).
- Click Save.
For creating a new task record on the database, follow the steps below:
- Navigate to the CreateTaskScreen.
- Select the Create Task button.
- Go to the Actions tab from the Properties Panel.
- Click + Add Action.
- Make sure On Tap is selected under the Type of Action.
- Select Create Record under Database.
- Choose the action as Create Record under Database.
- Select the Collection as todos.
- Click + Add Field to add new fields to this record.
- Choose the value of the title and description from variable with the Source as Widget State, and under Available Options choose the respective TextFields.
- Choose the value of the timestamp field from variable with Source as Widget State, and under Available Options choose Date Picked.
- Choose the value of the is_done field from a specific value with the Value as False.
- Choose the value of the uid field from variable with Source as Authenticated User, and under Available Options choose User ID.
Add another action after the Create Record action to Navigate the back from this page:
- Select the Create Task button.
- Go to the Actions tab from the Properties Panel.
- Open using the Action Flow Editor.
- Click on the "+" button and select Add Action.
- Choose the action as Navigate Back.
- Click Close.
Displaying todo task list
You can quickly generate a list of widgets from the documents returned from a collection query. We'll also look at how you can apply filtering and ordering to the results.
Follow the steps below:
- Navigate to the MyTasksScreen.
- Select the Column widget containing the task tile widgets.
- Go to the Backend Query tab from the Properties Panel.
- Select the Query Type as Query Collection.
- Choose the Collection as todos.
- Select the Query Type as List of Documents.
- We only want to show the tasks created by the currently logged-in user. You can filter the results according to the uid. Click + Filter button.
- Choose the Field Name as uid.
- Select the Relation as Equal To.
- Choose the Value Source as From Variable, select Source as Authenticated User, and under Available Options choose User ID.
- We also want to apply an ordering on the results. Click + Order By button.
- Select the Field Name as timestamp and choose the Order as Increasing.
- Click Save.
- On the dialog box that appears, click Ok. This will generate the children dynamically inside the Column.
After defining this query, you might see an issue pop up saying, "Firebase indexes not properly deployed for your project".
Just click on that issue; it will take you to the Firestore Settings page. Scroll down to the Firestore Indexes section and click the Deploy button. You need to deploy the indexes while using ordering and filtering on the Firestore results.
To display the data retrieved from the query:
- Select the widget in which you want to use the data.
- Under Properties Panel, click Set from Variable or Tie to Variable.
- Choose the Source as todos Record and select the respective field name under Available Options.
- Click Save.
- Repeat these steps for setting the data on other widgets as well.
We also need the record data on the TaskDetailsScreen. Let's pass it inside the Navigate action as a parameter:
- Select the widget on which you want to define the Navigate action.
- From the Properties Panel, go to the Actions tab.
- Select Navigate action to the TaskDetailsScreen.
- Click + Add Action.
- Make sure On Tap is selected under the Type of Action.
- Under Parameters, click + Define. This will navigate you to the TaskDetailsScreen, from where you can define a new page parameter.
- Click + Add Parameter.
- Enter the Parameter Name as taskData.
- Set the Type as RecordReference and choose todos from the Record Type dropdown.
- Click Save. It will navigate you back to where you were defining the action.
- Click Pass under Parameters.
- Choose taskData as the Parameter from the dropdown.
- Select the Source as todos Record.
- Under Available Options, choose reference.
To display the to-do task fields on the TaskDetailsScreen, you must pass each of them as a parameter.
Define three more parameters on the TaskDetailsScreen and pass their respective values from the MyTasksScreen:
- taskTitle (String)
- taskDescription (String)
- taskDate (String)
Similarly, tasks can also be displayed on the CompletedTasksScreen. Here, you need a second filter to filter the data according to the field is_done and show only those with the value True.
Updating a todo task
There are two places where we need to perform an Update Record action:
- On TaskDetailsScreen, Mark As Complete button should update the
is_donefield of a task to True. - On EditTaskComponent, the Update Task button should update the title, description, and date of the task to the new ones that are specified in the TextFields.
To update a task state to complete, follow the steps below:
- Select the Mark As Complete button present on the TaskDetailsScreen.
- Go to the Actions tab from the Properties Panel.
- Click + Add Action.
- Make sure On Tap is selected under the Type of Action.
- Select Update Record under Database actions.
- Choose the Source of reference as taskData.
- Click + Add Field.
- Set the field value of is_done from a specific value to True.
There's a more efficient way of passing records between pages of the app. Follow the steps below to refactor:
- Remove all the parameters defined on the TaskDetailsScreen.
- Just specify a single parameter called taskData with the Type set as Record, and Record Type as todos. Click Save.
- Update the Set from Variable of the widgets to use the new Source, select the respective field from the Available Options, and click Save.
- Update the Source of the Update Record action and use reference under Available Options.
- Now, go to the MyTasksScreen and select the task tile on which the Navigate action is set. Remove all the non-existing parameters and pass the taskData parameter with the Source as todos Record.
Before you can update a task from the EditTaskComponent, you need to pass the record from the TaskDetailsScreen.
- Select the Edit button on the TaskDetailsScreen.
- Go to the Bottom Sheet action defined on it.
- Click + Define under Parameters. This will navigate you to the EditTaskComponent.
- Click + Add Parameter.
- Enter the Parameter Name as taskData, select Type as Record, and Record Type as todos. Click Save.
- Now, click Pass under Parameters.
- Set the value of taskData as taskData (Source).
Show the current values of the task on the TextFields and also define the Date/Time Picker action:
- Select the TextField widgets and set their Initial Value from variable.
- Use taskData as the Source and the respective field under Available Options. Click Save.
- For displaying the date, set the Text widget value from variable.
- Define Date/Time Picker action with the default value set from
taskData > timestamp.
To define an Update Record action on the EditTaskComponent, follow the steps below:
- Select the Update Task button.
- Go to the Actions tab from the Properties Panel.
- Click + Add Action.
- Make sure On Tap is selected under the Type of Action.
- Select Update Record under Database actions.
- Choose the Source of reference as taskData and select reference under Available Options.
- Click + Add Field button to specify the values of the title, description, and timestamp fields.
- For the title and description fields, use Value Source as From Variable, Source as Widget State, and select the respective TextField under Available Options.
- For the timestamp field, use Value Source as From Variable, Source as Widget State, and select Date Picked under Available Options.
Deleting a todo task
The EditTaskComponent also has an option for deleting a to-do task from the database. Follow the steps below to define the Delete Record action:
- Select the Delete icon button.
- Go to the Actions tab from the Properties Panel.
- Click + Add Action.
- Make sure On Tap is selected under the Type of Action.
- Select Delete Record under Database actions.
- Choose the Source of reference as taskData and select reference under Available Options.
Database operations in action
You can try out the CRUD operations on the database by running the app either using the Run mode or by downloading the project and running it from your system.
The following demonstrates the CRUD operations performed inside the app running on an iOS Simulator.
You can try out this sample app here.
Conclusion
Firestore integration with FlutterFlow makes it much simpler to manage cloud data across devices without worrying about syncing, allows real-time updates, and offers offline support out of the box.
We hope this blog post has made the basic Firestore concepts clear for you and will help you to get more confident while using Firestore in your apps.
In the next part of this blog post series, you will learn to integrate a simple search functionality to this todo app.
