
The ever-evolving landscape of IoT has brought the need for more efficient and interactive apps to the forefront. With a surge in our reliance on smart devices, tools like FlutterFlow and Bluetooth Low Energy (BLE) are stepping up to the challenge. FlutterFlow, a powerful no-code app builder, and BLE, a low power wireless communication standard, together form an impressive duo for creating IoT-based applications.
In this blog post, we'll unlock the process of integrating Bluetooth functionality in a FlutterFlow project using Custom Actions and guide you on how to prep an IoT device for interaction with the app.
This step-by-step guide will serve as a blueprint, providing valuable insights to both seasoned developers and beginners in the realm of IoT app development. So, let's delve into the intriguing world of IoT, BLE, and FlutterFlow and create an app that truly connects.
App Overview
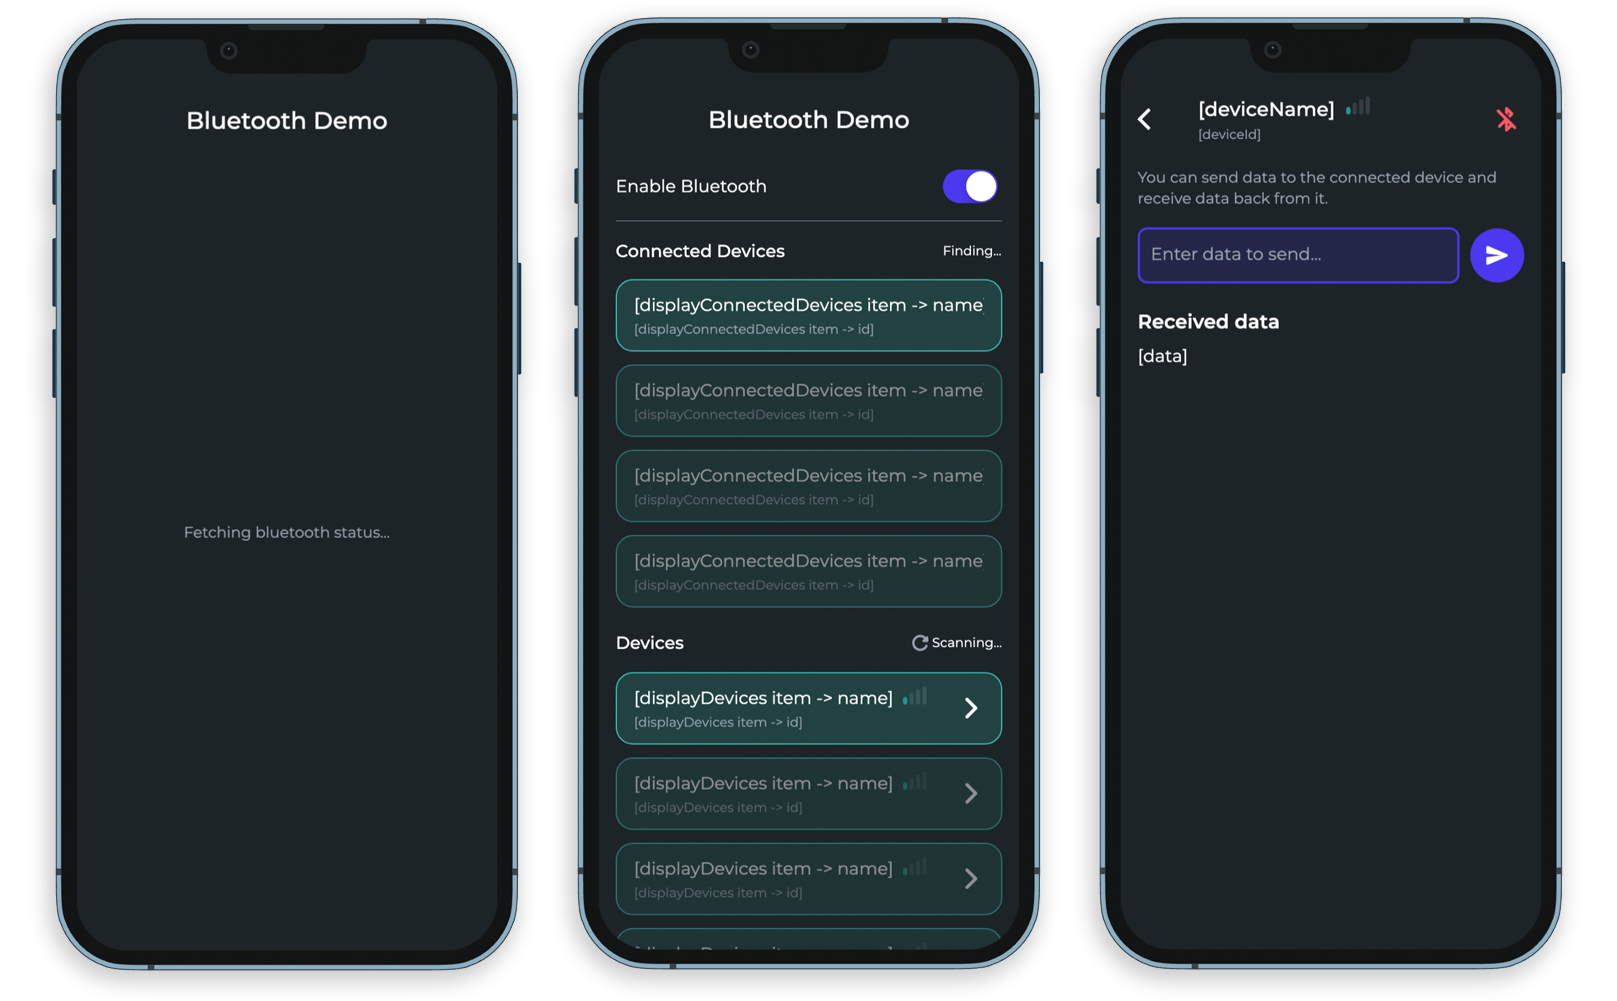
The final app that we will be building will consist of three pages:
- SplashPage: Acting as the gateway to the app, the SplashPage is the first screen users will encounter. Here, we'll request Bluetooth permissions from the user and verify the device's Bluetooth status. It's a crucial step ensuring that our app can interact seamlessly with other Bluetooth-enabled devices.
- HomePage: This is the primary page of the app consisting of a toggle to enable or disable Bluetooth, and displays both the devices currently connected and the nearby discoverable Bluetooth devices.
- DevicePage: Delving deeper into inter-device interaction, the DevicePage comes into play when a user selects a device on the HomePage. Here, we establish a Bluetooth connection with the chosen device and navigate the user to this page. It provides a versatile platform for two-way communication, allowing data sending to the connected device, displaying received data, and featuring a button to disconnect when needed.
To give you a sneak peek into what we're about to build, here are some screenshots of the three pages (in order from left to right):
By integrating the functionalities of these three pages, we'll create a comprehensive app that streamlines user interaction with their IoT devices via Bluetooth.
Understanding the Basics
In this section, we'll look into some of the key concepts and the fundamentals of the tools we'll be using in our project.
About the hardware
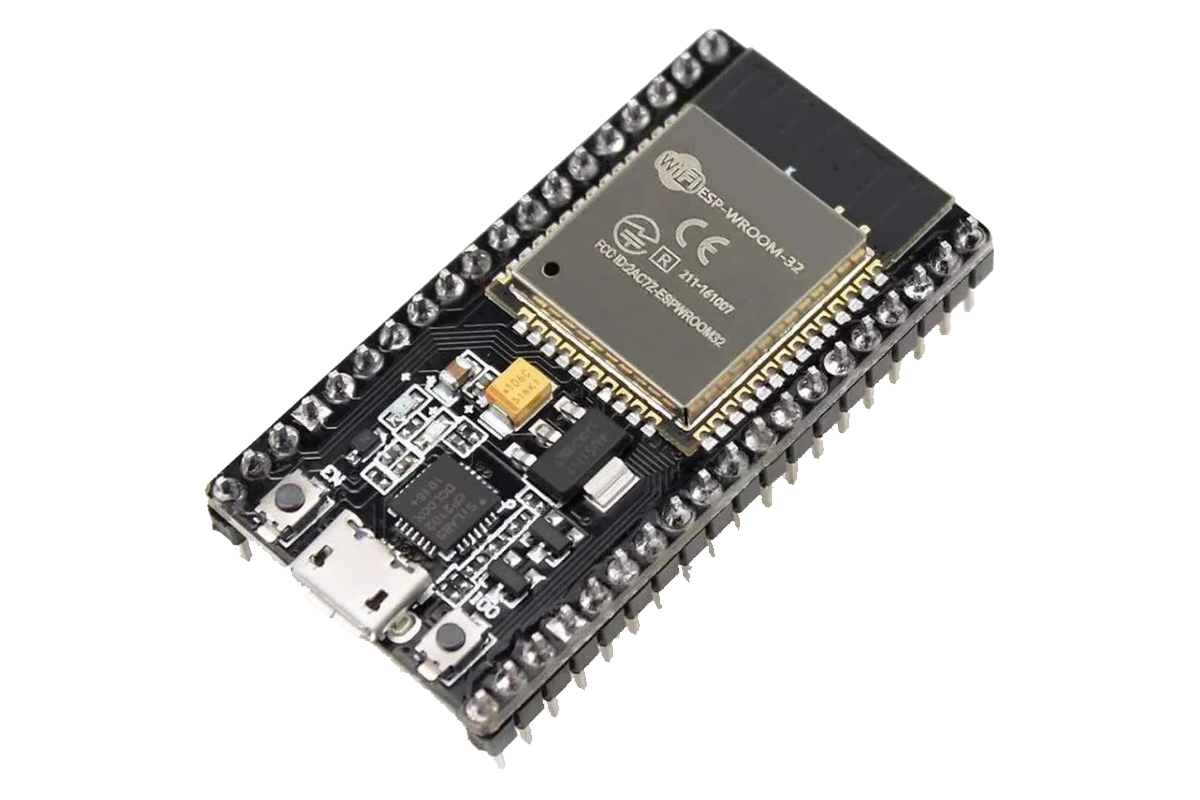
When embarking on an IoT project, a clear understanding of the hardware involved is crucial. For this project, we're using the ESP32 microcontroller. This system-on-a-chip (SoC) integrates Wi-Fi and dual-mode Bluetooth capabilities, making it an excellent choice for our IoT application. Its power, affordability, and flexibility make it well-suited for various IoT scenarios.
Bluetooth Low Energy
Bluetooth Low Energy (BLE), also known as Bluetooth 4.0, is a protocol designed for short-range wireless communication. Developed by the Bluetooth Special Interest Group (SIG), BLE is favored for IoT applications due to its power efficiency. It enables devices to connect and exchange data while consuming minimal power, a critical aspect for battery-operated IoT devices. BLE has widened the realm of possibilities for device communication, marking a significant advancement in IoT.
FlutterFlow and its advantages
FlutterFlow is a no-code app development platform. It offers a drag-and-drop interface, pre-built UI components, and the ability to create and integrate custom codes. These features are designed to streamline the app creation process, reducing the need for extensive coding while maintaining flexibility. Whether you're an experienced developer or a beginner, FlutterFlow provides the tools to bring your app ideas to fruition.
In the following sections, we'll see how these elements come together to create an interactive IoT application.
Setting up FlutterFlow
Before diving into the development process, it's important to ensure that our workspace is ready. We'll be using FlutterFlow as our primary development tool. Here's a quick guide on how to set it up and get started:
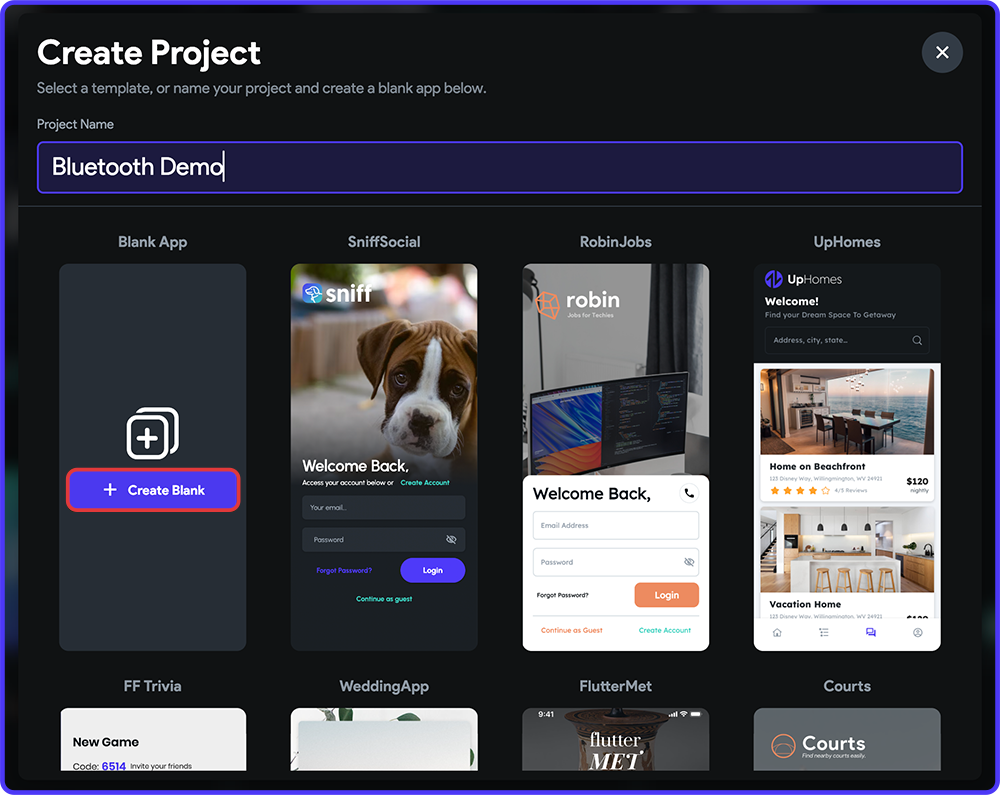
Firstly, log in to your FlutterFlow account. On your dashboard, you'll see the option to "Create New" project.
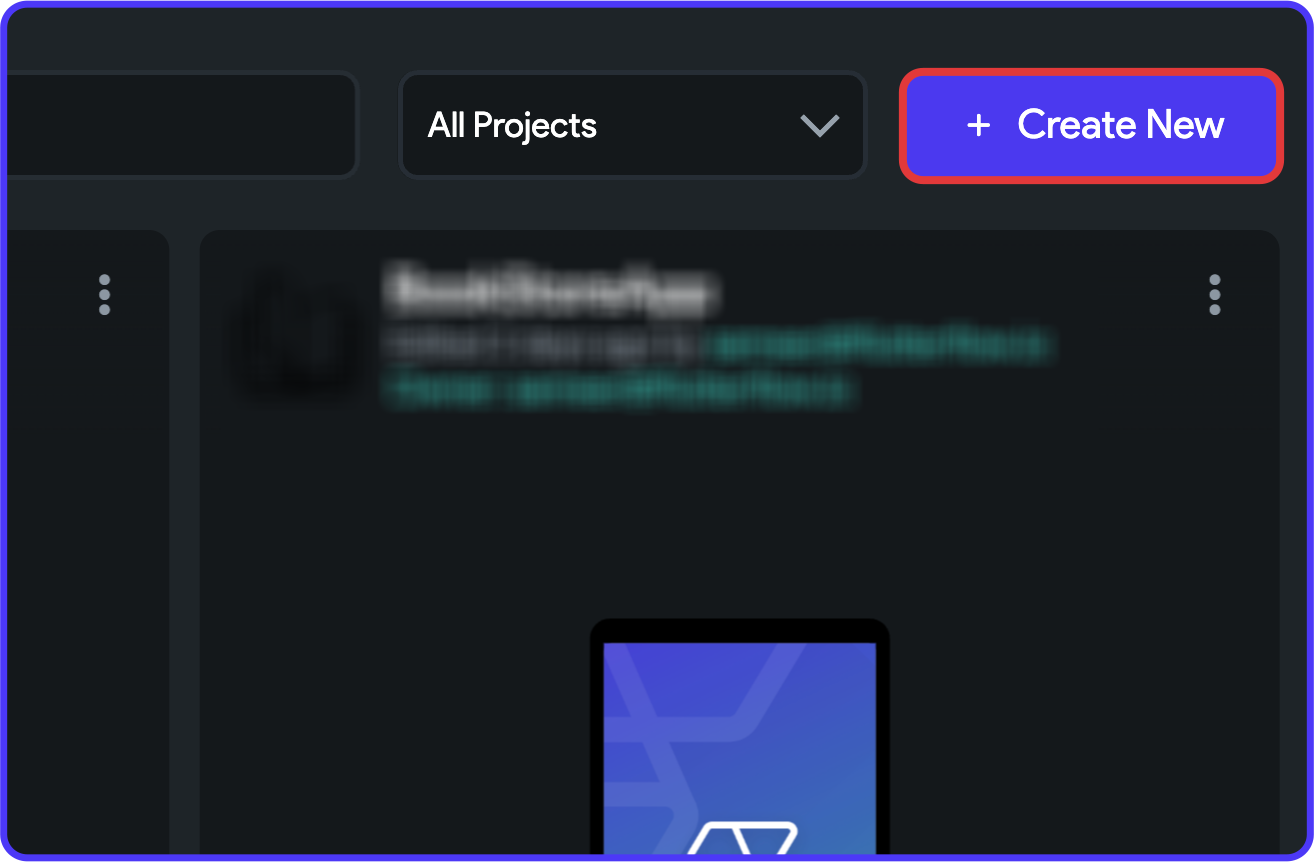
Click on this, and you'll be asked to enter the project name and choose between starting from scratch or using a pre-existing template. For this tutorial, we'll be starting with a blank canvas – so select "Create Blank".
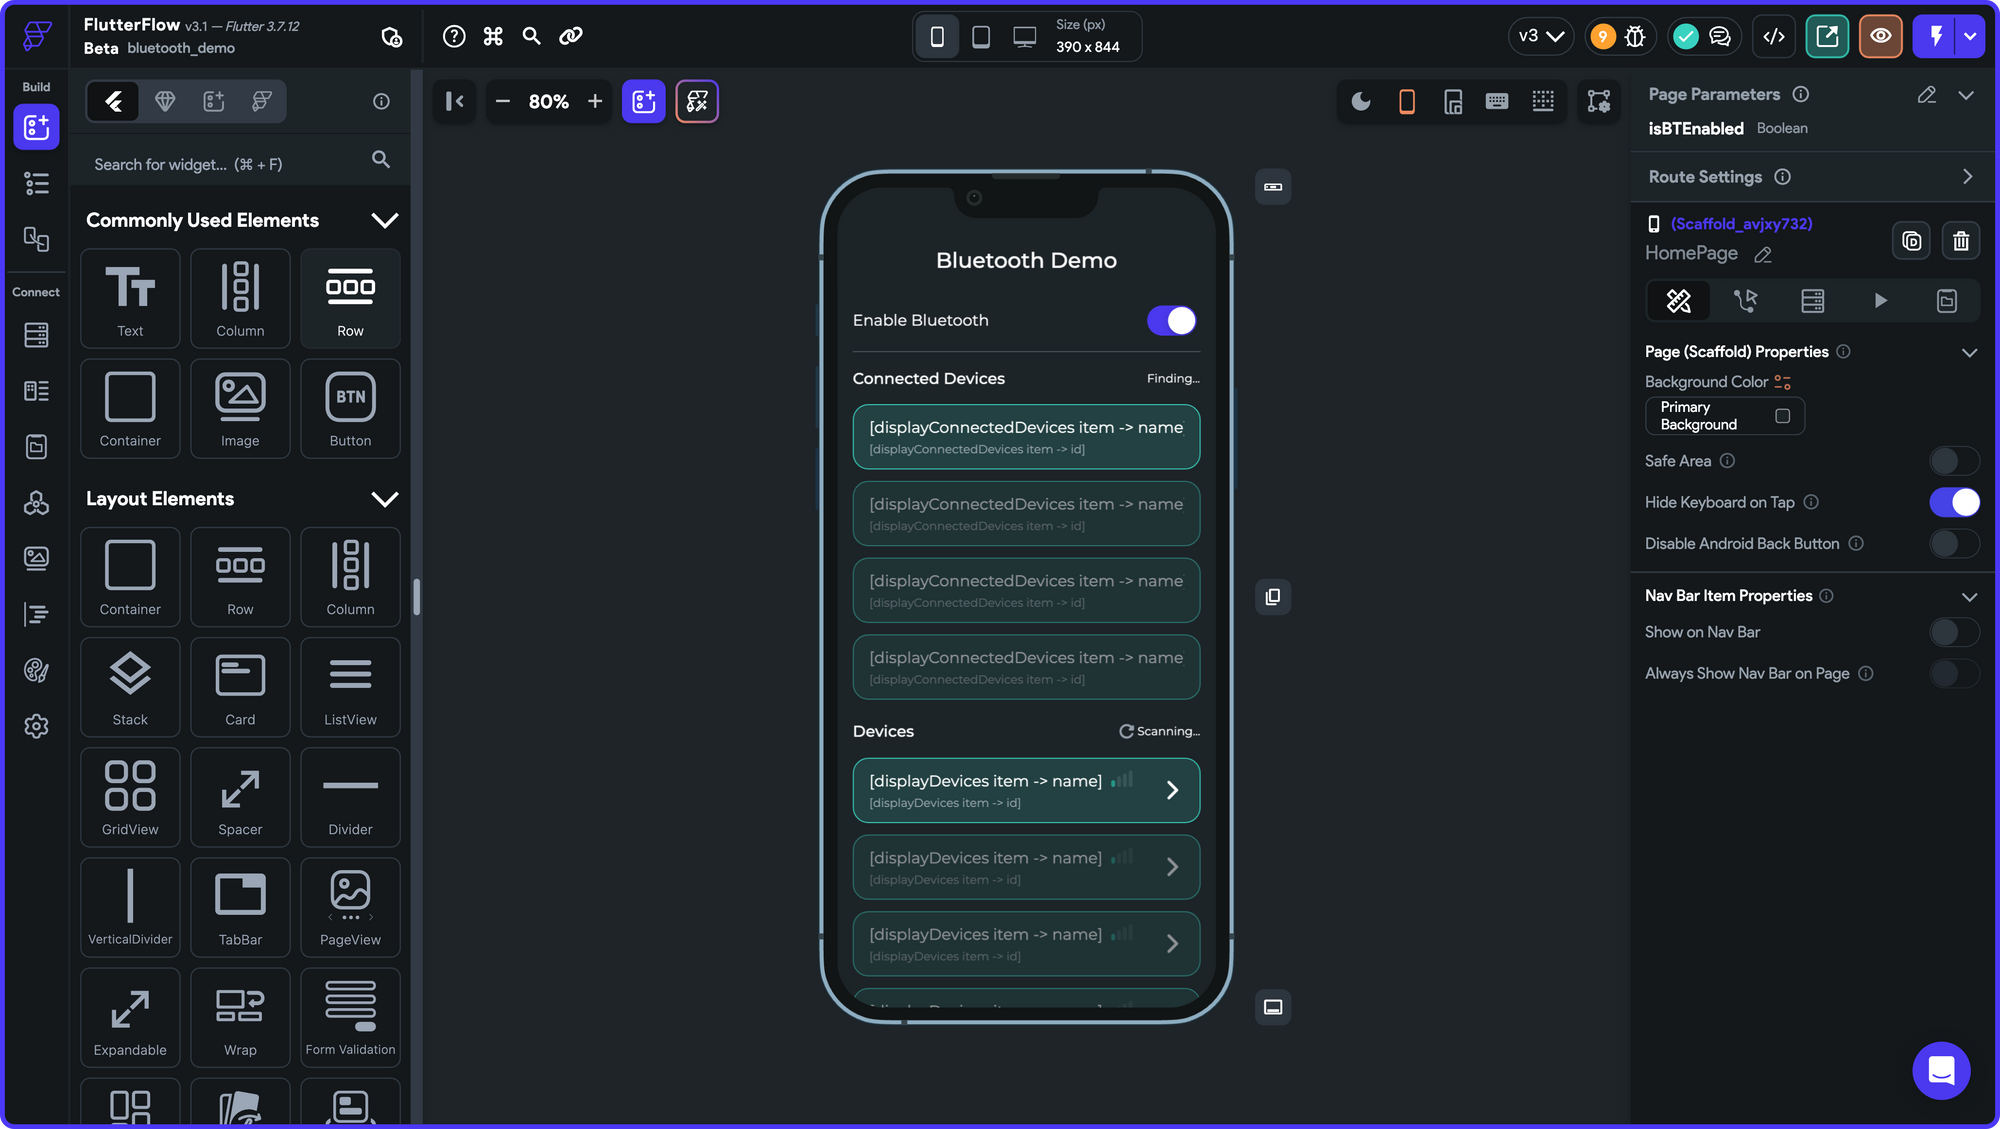
Once you've created your project, you'll be introduced to the FlutterFlow App Builder.
We want to focus on implementing the functionalities of the app rather than building the entire UI from scratch. So, it's recommended that you follow along using the starter project that contains the basic app layout and essential UI components.
Clone the Starter Project from here.
With these preliminary steps complete, you are ready to dive into the crux of creating custom actions and integrating BLE functionality into the FlutterFlow project.
Integrating BLE in FlutterFlow
To facilitate interaction between our FlutterFlow app and BLE-enabled IoT devices, we need to integrate BLE functionality into our FlutterFlow project. We'll achieve this with the help of custom actions and a suitable Flutter package.
What are Custom Actions?
Custom Actions in FlutterFlow are pieces of Dart code that you can write and integrate into your FlutterFlow project. These actions provide extended functionalities that aren't inherently present in FlutterFlow's pre-defined Actions.
In the context of our project, we'll be creating custom actions that facilitate enabling/disabling Bluetooth of the device, scanning for BLE devices, connecting to a device, and handling data transmission.
Required Flutter package
For integrating the Bluetooth functionality inside FlutterFlow, we'll use the flutter_blue_plus package. This Flutter plugin supports connectivity with other BLE devices, making it an ideal choice for our project. It provides APIs for finding devices, connecting to them, and exchanging data.
flutter_blue_plus package only supports Android and iOS devices. So, you won't be able to compile or test the custom actions on the web while working on the project.Writing Custom Actions
We will need the following custom actions for fully implementing the BLE functionality inside our FlutterFlow project:
List of Custom Actions
isBluetoothEnabled: To verify whether the device's Bluetooth is enabled.turnOnBluetooth: To turn on the device's Bluetooth (only works on Android).turnOffBluetooth: To turn off the device's Bluetooth (only works on Android).findDevices: To find nearby devices accessible via Bluetooth.getConnectedDevices: To fetch the devices with which your device is already connected.connectDevice: To connect with a Bluetooth device.disconnectDevice: To disconnect from a Bluetooth device.getRssi: To fetch the signal strength (RSSI) of the connected device.sendData: To send data to the connected IoT device via BLE.receiveData: To receive data from the connected IoT device via BLE.
1. isBluetoothEnabled Action
This action will be used to verify whether the device's Bluetooth is enabled. Let's start creating our first Custom Action:
- While inside your FlutterFlow project, navigate to the Custom Code page from the left menu.
- Click Add > Action.
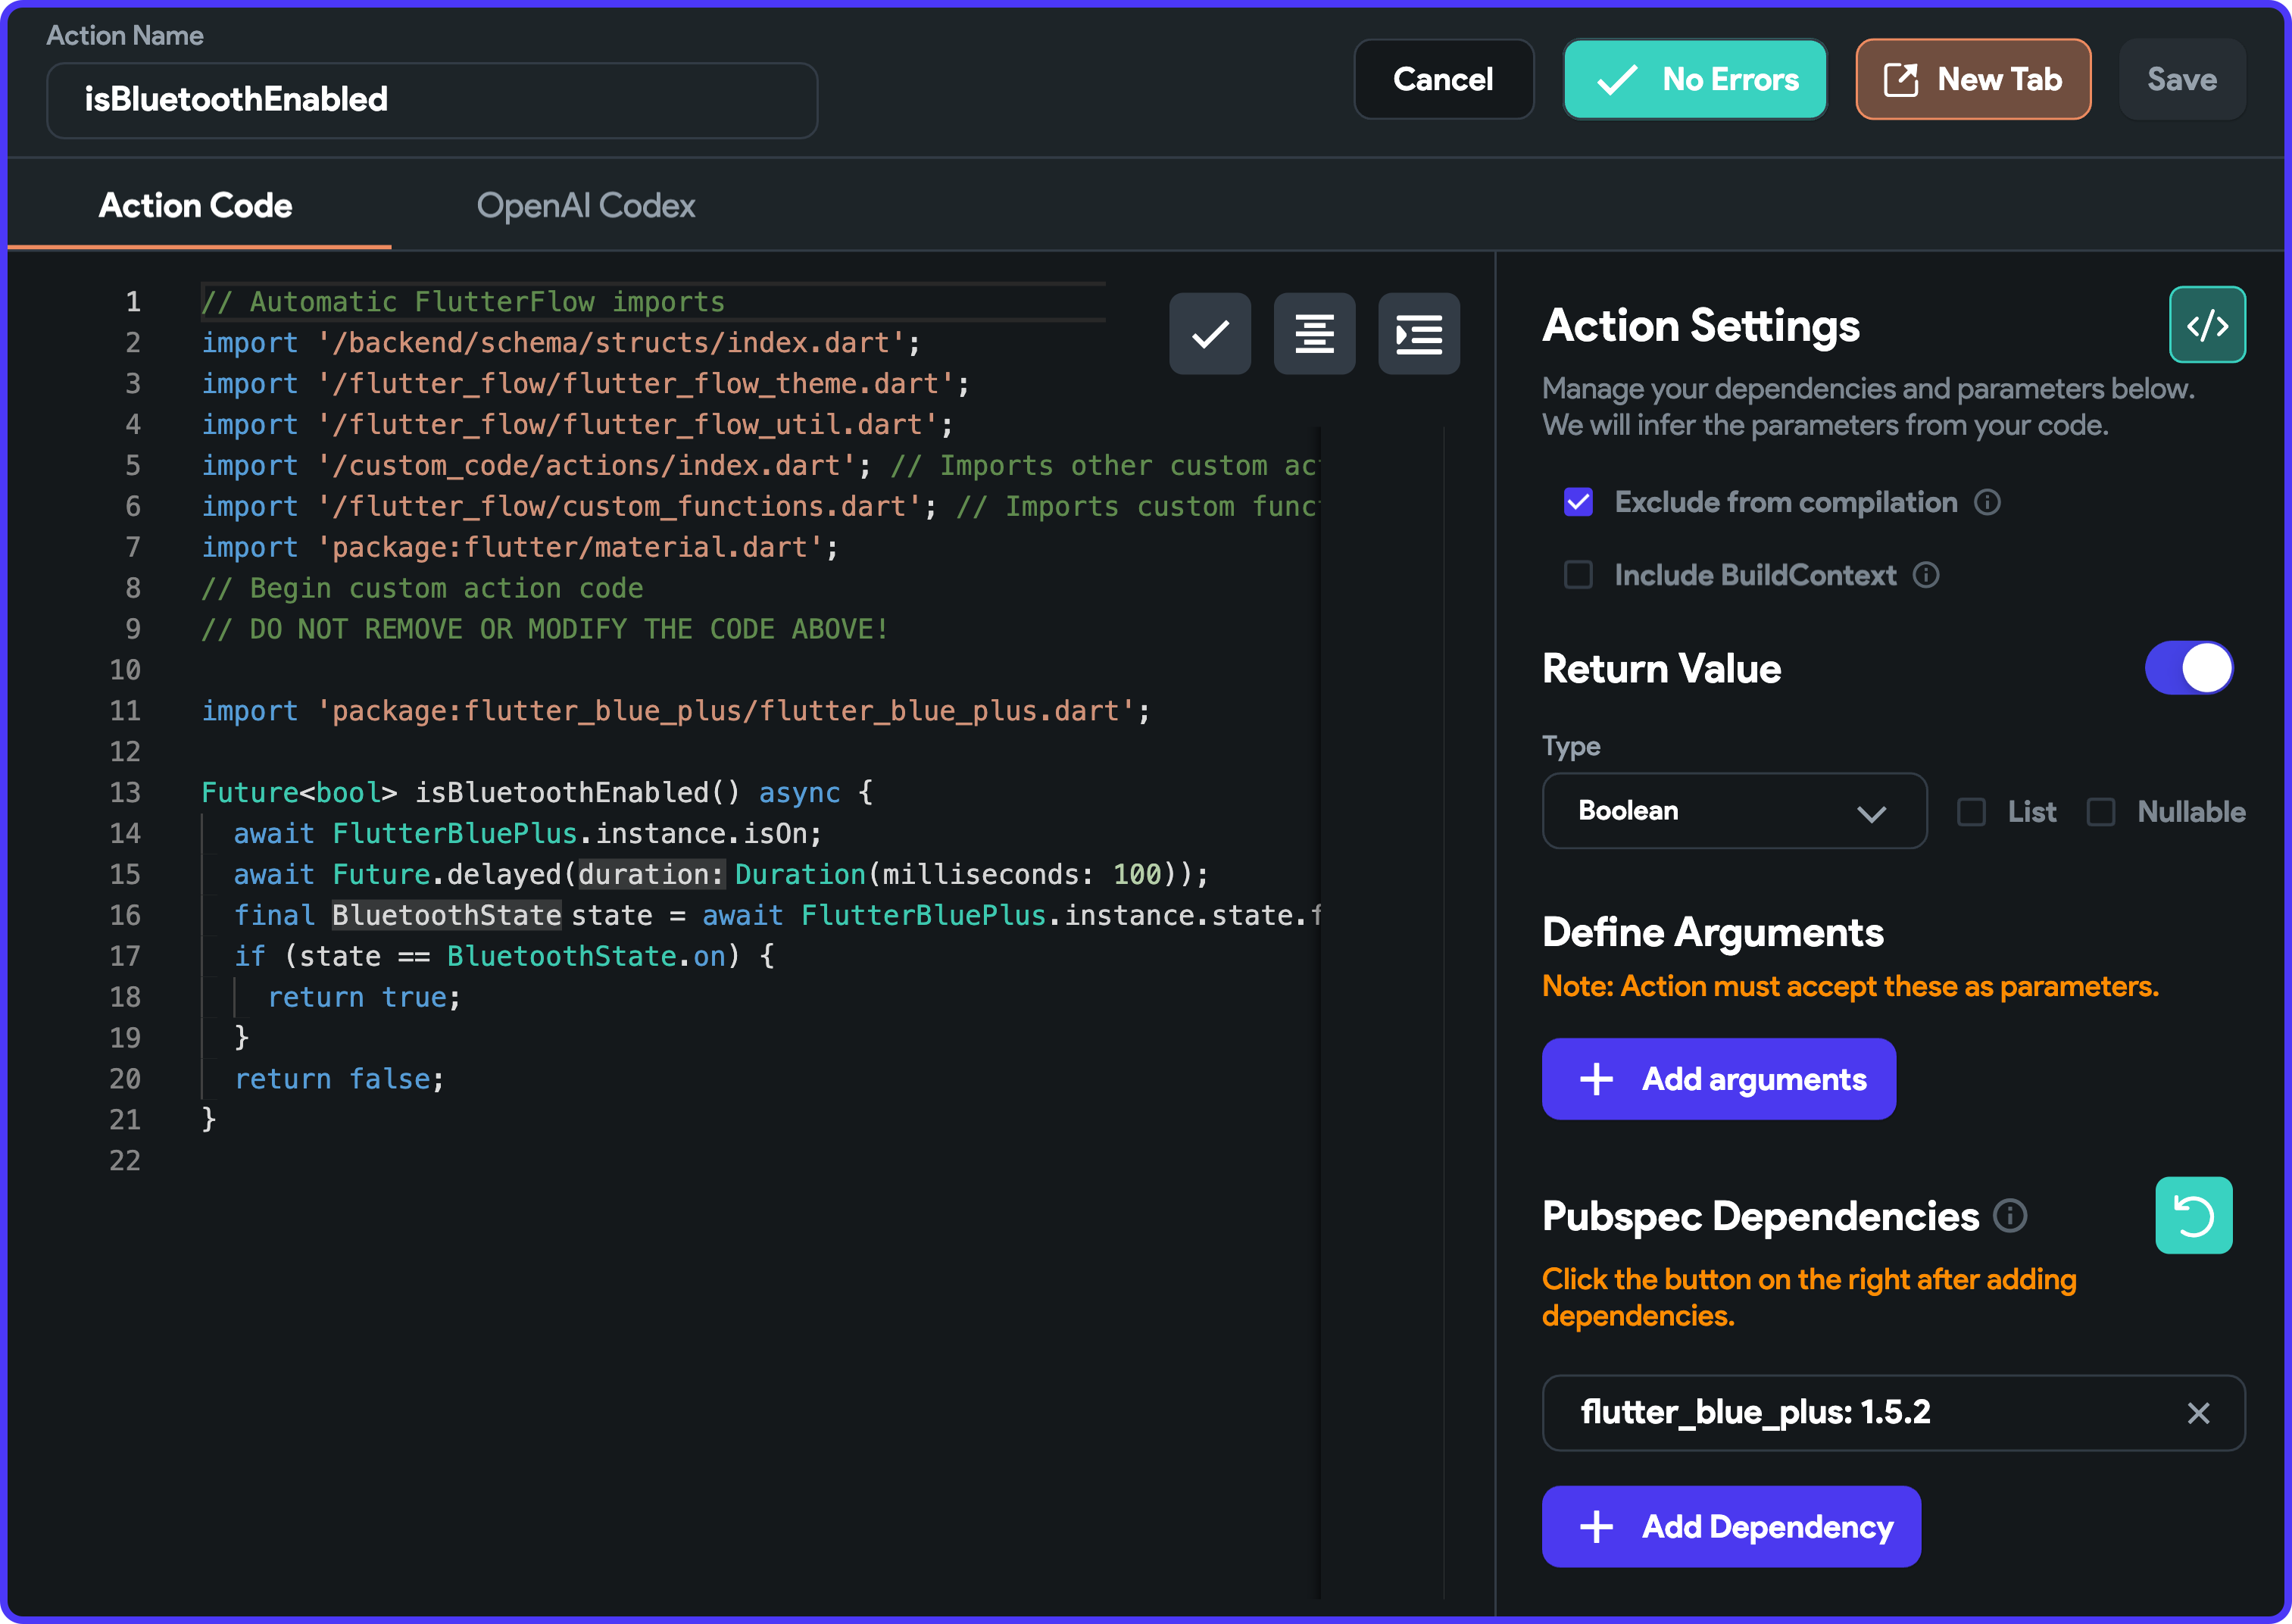
- Enter the name of the custom action as "isBluetoothEnabled".
- This action should return a boolean value indicating whether Bluetooth is enabled. From the right panel, enable the toggle beside Return Value. Select the Type as Boolean, and make sure you uncheck both List and Nullable.
- Add the required Pubspec Dependency. And click on the refresh button to fetch the dependency.
- Now, you can use the code icon present in the top right corner to generate the boilerplate code and insert it into your editor. Add the import statement of the package and the code as follows:
// DO NOT REMOVE OR MODIFY THE CODE ABOVE!
// Add the following code:
import 'package:flutter_blue_plus/flutter_blue_plus.dart';

Future<bool> isBluetoothEnabled() async {
  await FlutterBluePlus.instance.isOn;
  await Future.delayed(Duration(milliseconds: 100));
  final state = await FlutterBluePlus.instance.state.first;
  if (state == BluetoothState.on) {
    return true;
  }
  return false;
}
- Make sure you check the "Exclude from compilation" checkmark (because this action can't be compiled on the web platform).
- Click Save.
For each of the custom actions that we'll be writing today, the arguments and return value might differ, but we will need the same Pubspec Dependency:
flutter_blue_plus: 1.5.2pub.dev page of the package.2. turnOnBluetooth Action
This action can be used to turn on the device's Bluetooth (only works on Android). Let's take a look at a different method for adding a custom action.
- Enter the name of the action as
turnOnBluetooth. - Add the following code to the editor:
import 'package:flutter_blue_plus/flutter_blue_plus.dart';

Future<bool> turnOnBluetooth() async {
  if (isAndroid) {
    return await FlutterBluePlus.instance.turnOn();
  }
  return true;
}
- Add the
flutter_blue_plusdependency. - Check "Exclude from compilation" checkbox.
- Click Save.
This will automatically parse the code and define the return value and the arguments (if any). For adding the next custom actions, you can follow this method.
3. turnOffBluetooth Action
This action can be used to turn off the device's Bluetooth (only works on Android). Use the following code:
Future<bool> turnOffBluetooth() async {
  if (isAndroid) {
    return await FlutterBluePlus.instance.turnOff();
  }
  return true;
}
4. findDevices Action
This action can be used to find nearby devices accessible via Bluetooth and return them as a list.
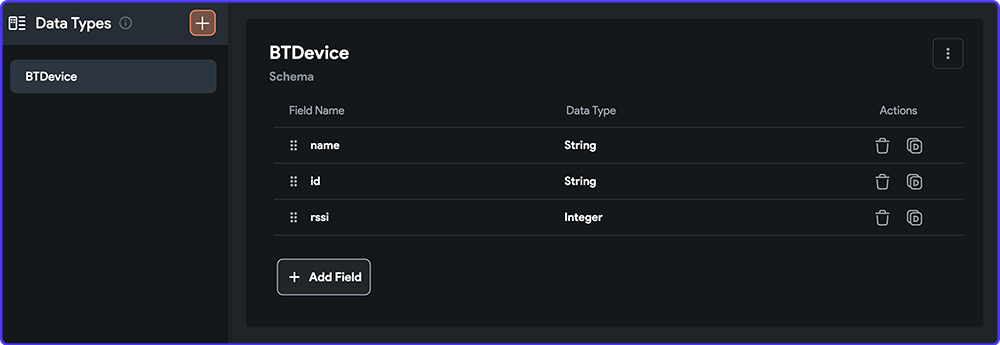
Before adding this custom action, let's define a new Data Type called "BTDevice". This will make it simpler to store important IoT device information that we will require for managing the connection and for sending/receiving data. Follow the steps below:
- Go to the Data Types page from the left menu.
- Click on "+ Create Data Type" button.
- Enter the name as "BTDevice". Click Create.
- Click "+ Add Field". And, add the following fields one by one:
Use the following code for the custom action:
import 'package:flutter_blue_plus/flutter_blue_plus.dart';

Future<List<BTDeviceStruct>> findDevices() async {
  final flutterBlue = FlutterBluePlus.instance;
  List<BTDeviceStruct> devices = [];
  flutterBlue.scanResults.listen((results) {
    List<ScanResult> scannedDevices = [];
    for (ScanResult r in results) {
      if (r.device.name.isNotEmpty) {
        scannedDevices.add(r);
      }
    }
    scannedDevices.sort((a, b) => b.rssi.compareTo(a.rssi));
    devices.clear();
    scannedDevices.forEach((deviceResult) {
      devices.add(BTDeviceStruct(
        name: deviceResult.device.name,
        id: deviceResult.device.id.toString(),
        rssi: deviceResult.rssi,
      ));
    });
  });
  final isScanning = flutterBlue.isScanningNow;
  if (!isScanning) {
    await flutterBlue.startScan(
      timeout: const Duration(seconds: 5),
    );
  }

  return devices;
}
5. getConnectedDevices Action
This action will be used to fetch the devices with which your device is already connected. Remember, connected devices don't show up in the scanned devices list. So, we need to use this separate action.
Code is as follows:
import 'package:flutter_blue_plus/flutter_blue_plus.dart';

Future<List<BTDeviceStruct>> getConnectedDevices() async {
  final flutterBlue = FlutterBluePlus.instance;
  final connectedDevices = await flutterBlue.connectedDevices;
  List<BTDeviceStruct> devices = [];
  for (int i = 0; i < connectedDevices.length; i++) {
    final deviceResult = connectedDevices[i];
    final deviceState = await deviceResult.state.first;
    if (deviceState == BluetoothDeviceState.connected) {
      final deviceRssi = await deviceResult.readRssi();
      devices.add(BTDeviceStruct(
        name: deviceResult.name,
        id: deviceResult.id.toString(),
        rssi: deviceRssi,
      ));
    }
  }
  return devices;
}
6. connectDevice Action
You can use this action to connect with a Bluetooth device. It takes a BTDevice as one of its arguments and returns whether the connected device has write characteristics (we will discuss more about this while setting up our IoT device). Use the following code:
import 'package:flutter_blue_plus/flutter_blue_plus.dart';

Future<bool> connectDevice(BTDeviceStruct deviceInfo) async {
  final device = BluetoothDevice.fromId(deviceInfo.id, name: deviceInfo.name);
  try {
    await device.connect();
  } catch (e) {
    print(e);
  }
  var hasWriteCharacteristic = false;
  final services = await device.discoverServices();
  for (BluetoothService service in services) {
    for (BluetoothCharacteristic characteristic in service.characteristics) {
      final isWrite = characteristic.properties.write;
      if (isWrite) {
        debugPrint(
            'Found write characteristic: ${characteristic.uuid}, ${characteristic.properties}');
        hasWriteCharacteristic = true;
      }
    }
  }
  return hasWriteCharacteristic;
}
7. disconnectDevice Action
This action can be used to disconnect from an already connected device. You need to pass the BTDevice from which you want to disconnect.
Code is as follows:
import 'package:flutter_blue_plus/flutter_blue_plus.dart';

Future disconnectDevice(BTDeviceStruct deviceInfo) async {
  final device = BluetoothDevice.fromId(deviceInfo.id, name: deviceInfo.name);
  try {
    await device.disconnect();
  } catch (e) {
    print(e);
  }
}
8. getRssi Action
Once you are connected to a device, this action can be used to fetch the signal strength (RSSI or Received Signal Strength Indicator) between your device and the connected device (as you go further away from the device, your signal strength decreases). The signal strength reading is returned as an integer.
Use the following code:
import 'package:flutter_blue_plus/flutter_blue_plus.dart';

Future<int> getRssi(BTDeviceStruct deviceInfo) async {
  final device = BluetoothDevice.fromId(deviceInfo.id, name: deviceInfo.name);
  return await device.readRssi();
}9. sendData Action
This action can be used to send a String data to the connected IoT device via BLE. Use the following code:
import 'package:flutter_blue_plus/flutter_blue_plus.dart';

Future sendData(BTDeviceStruct deviceInfo, String data) async {
  final device = BluetoothDevice.fromId(deviceInfo.id, name: deviceInfo.name);
  final services = await device.discoverServices();
  for (BluetoothService service in services) {
    for (BluetoothCharacteristic characteristic in service.characteristics) {
      final isWrite = characteristic.properties.write;
      if (isWrite) {
        await characteristic.write(data.codeUnits);
      }
    }
  }
}
10. receiveData Action
You can use this action to receive data from the IoT device. The received data is usually in UTF-16 format (while reading, it will be of List<int> type), so we need to use the String.fromCharCodes() method to convert it to a String and return it.
Use the following code:
import 'package:flutter_blue_plus/flutter_blue_plus.dart';

Future<String?> receiveData(BTDeviceStruct deviceInfo) async {
  final device = BluetoothDevice.fromId(deviceInfo.id, name: deviceInfo.name);
  final services = await device.discoverServices();
  for (BluetoothService service in services) {
    for (BluetoothCharacteristic characteristic in service.characteristics) {
      final isRead = characteristic.properties.read;
      final isNotify = characteristic.properties.notify;
      if (isRead && isNotify) {
        final value = await characteristic.read();
        return String.fromCharCodes(value);
      }
    }
  }
  return null;
}
With this, you have completed defining all the custom actions required for implementing Bluetooth functionality inside your app. The final step involves connecting these custom actions to your UI components.
Connecting with the UI
Now that we have written our custom actions for BLE functionality, it's time to link these actions with the user interface (UI) of our app. We'll go through this process for each of our app's pages:
SplashPage
On this page, the app will request Bluetooth permissions and check the Bluetooth status before navigating the user to the HomePage.
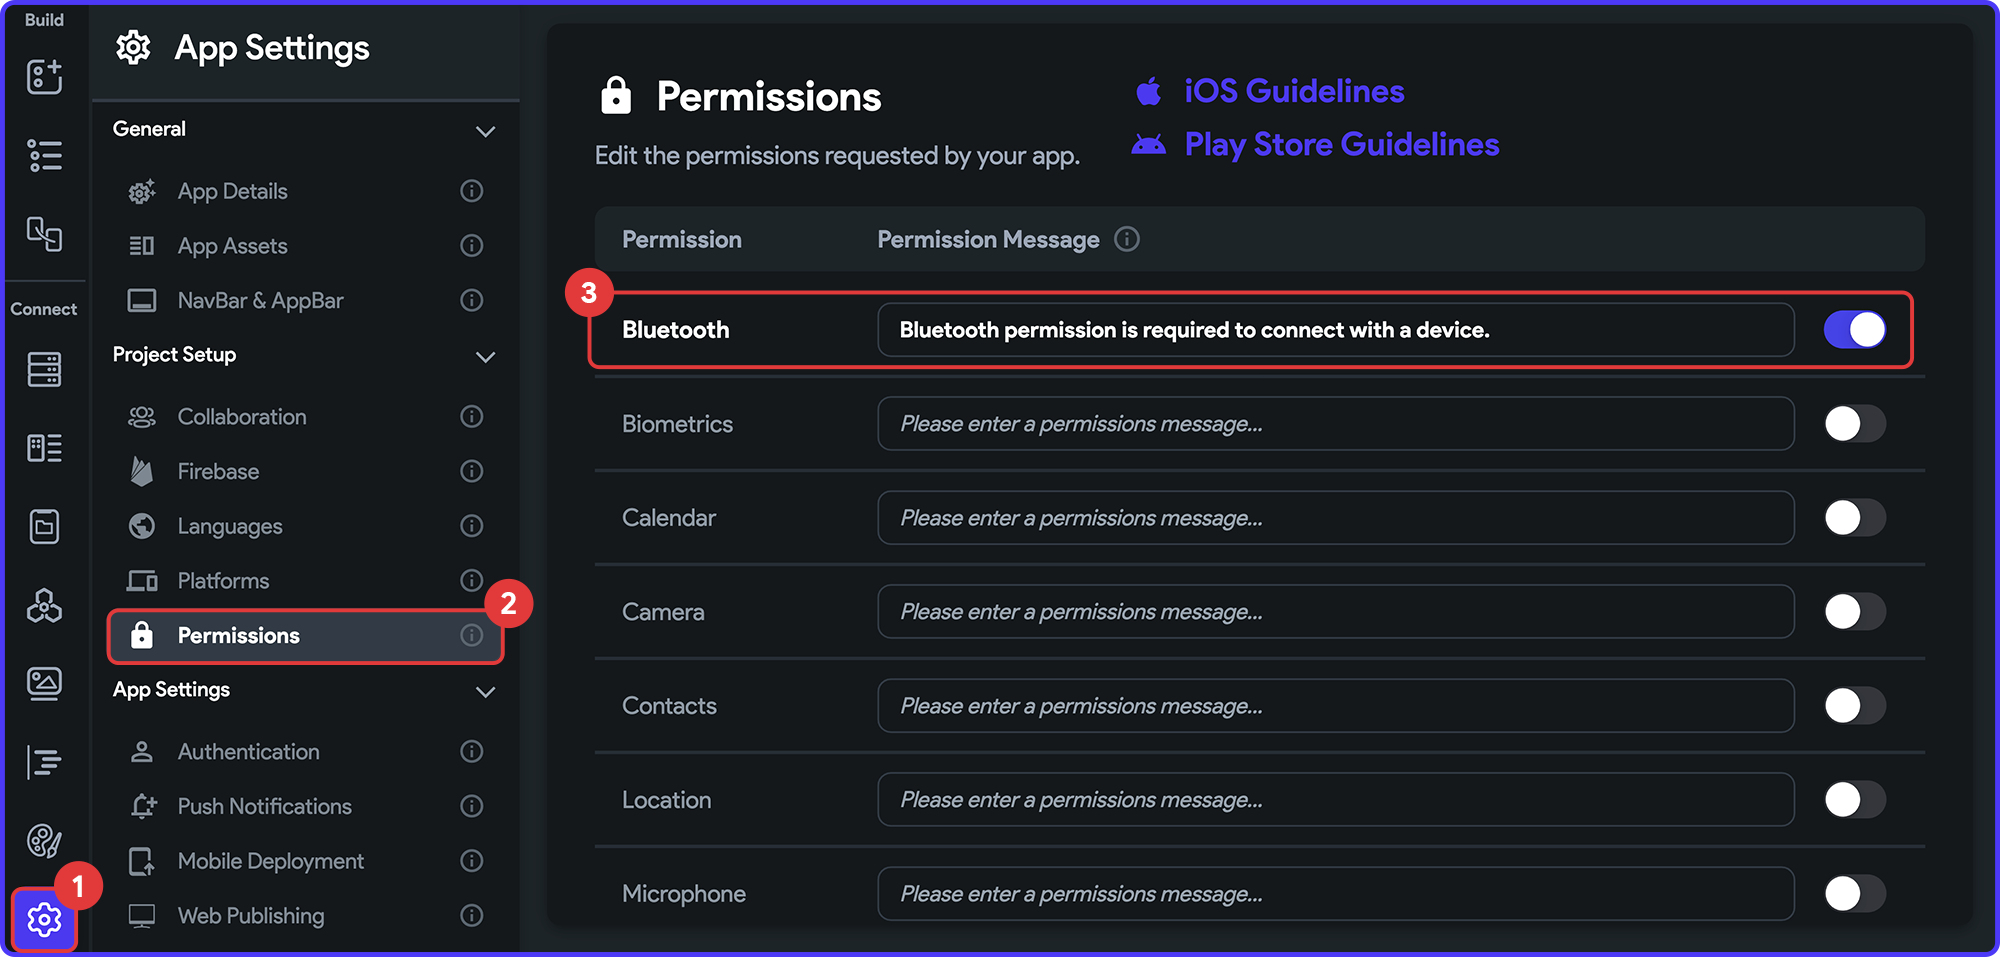
First, you need to enable the Bluetooth permissions for the app inside FlutterFlow:
- Go to the Settings and Integrations page from the left menu.
- Select the Permissions tab (under Project Setup).
- Enable Bluetooth permission toggle.
- Enter a Permission Message that will be displayed to the user once this permission is requested.
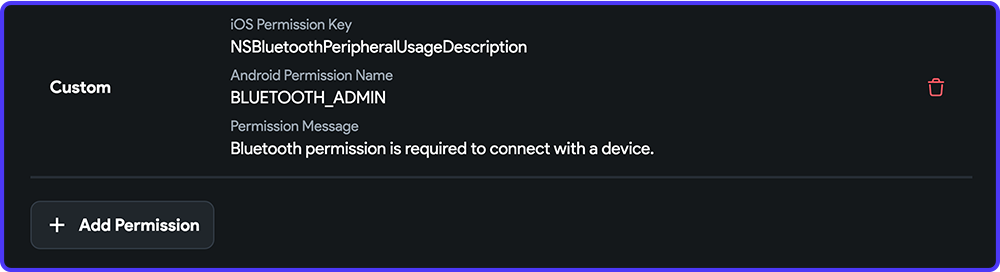
Next, you need to add one more Bluetooth permission which will allow you to interact with the connected IoT device.
- Click "+ Add Permission" button at the bottom of the page.
- Enter the iOS Permission Key as
NSBluetoothPeripheralUsageDescription. - Enter Android Permission Name as
BLUETOOTH_ADMIN. - You can use the same Permission Message as used in the other Bluetooth permission.
- Click the check icon to save.
Now, let's define the actions:
- Go to the SplashPage.
- We will ask for the permissions as soon as the page loads. Don't select any widget on the page (or, you can select the Scaffold), and go to the Actions tab from the Properties panel (right).
- Click on "+ Add Action" and make sure On Page Load is selected.
- Select Request Permissions action. Choose the permission type as Bluetooth.
- We need to add a few more actions, so click on Open beside the Action Flow Editor.
- Now, click on the "+" button just below the first action, and select Add Action.
- Select Custom Action > isBluetoothEnabled. Enter the output variable as
bluetoothEnabled. - Add another action after this, Navigate To > HomePage.
- Pass the value for
isBTEnabledparameter to the HomePage. Specify the value from Action Outputs >bluetoothEnabled.
The SplashPage is now ready! Time to move on to the primary page of the app, HomePage.
HomePage
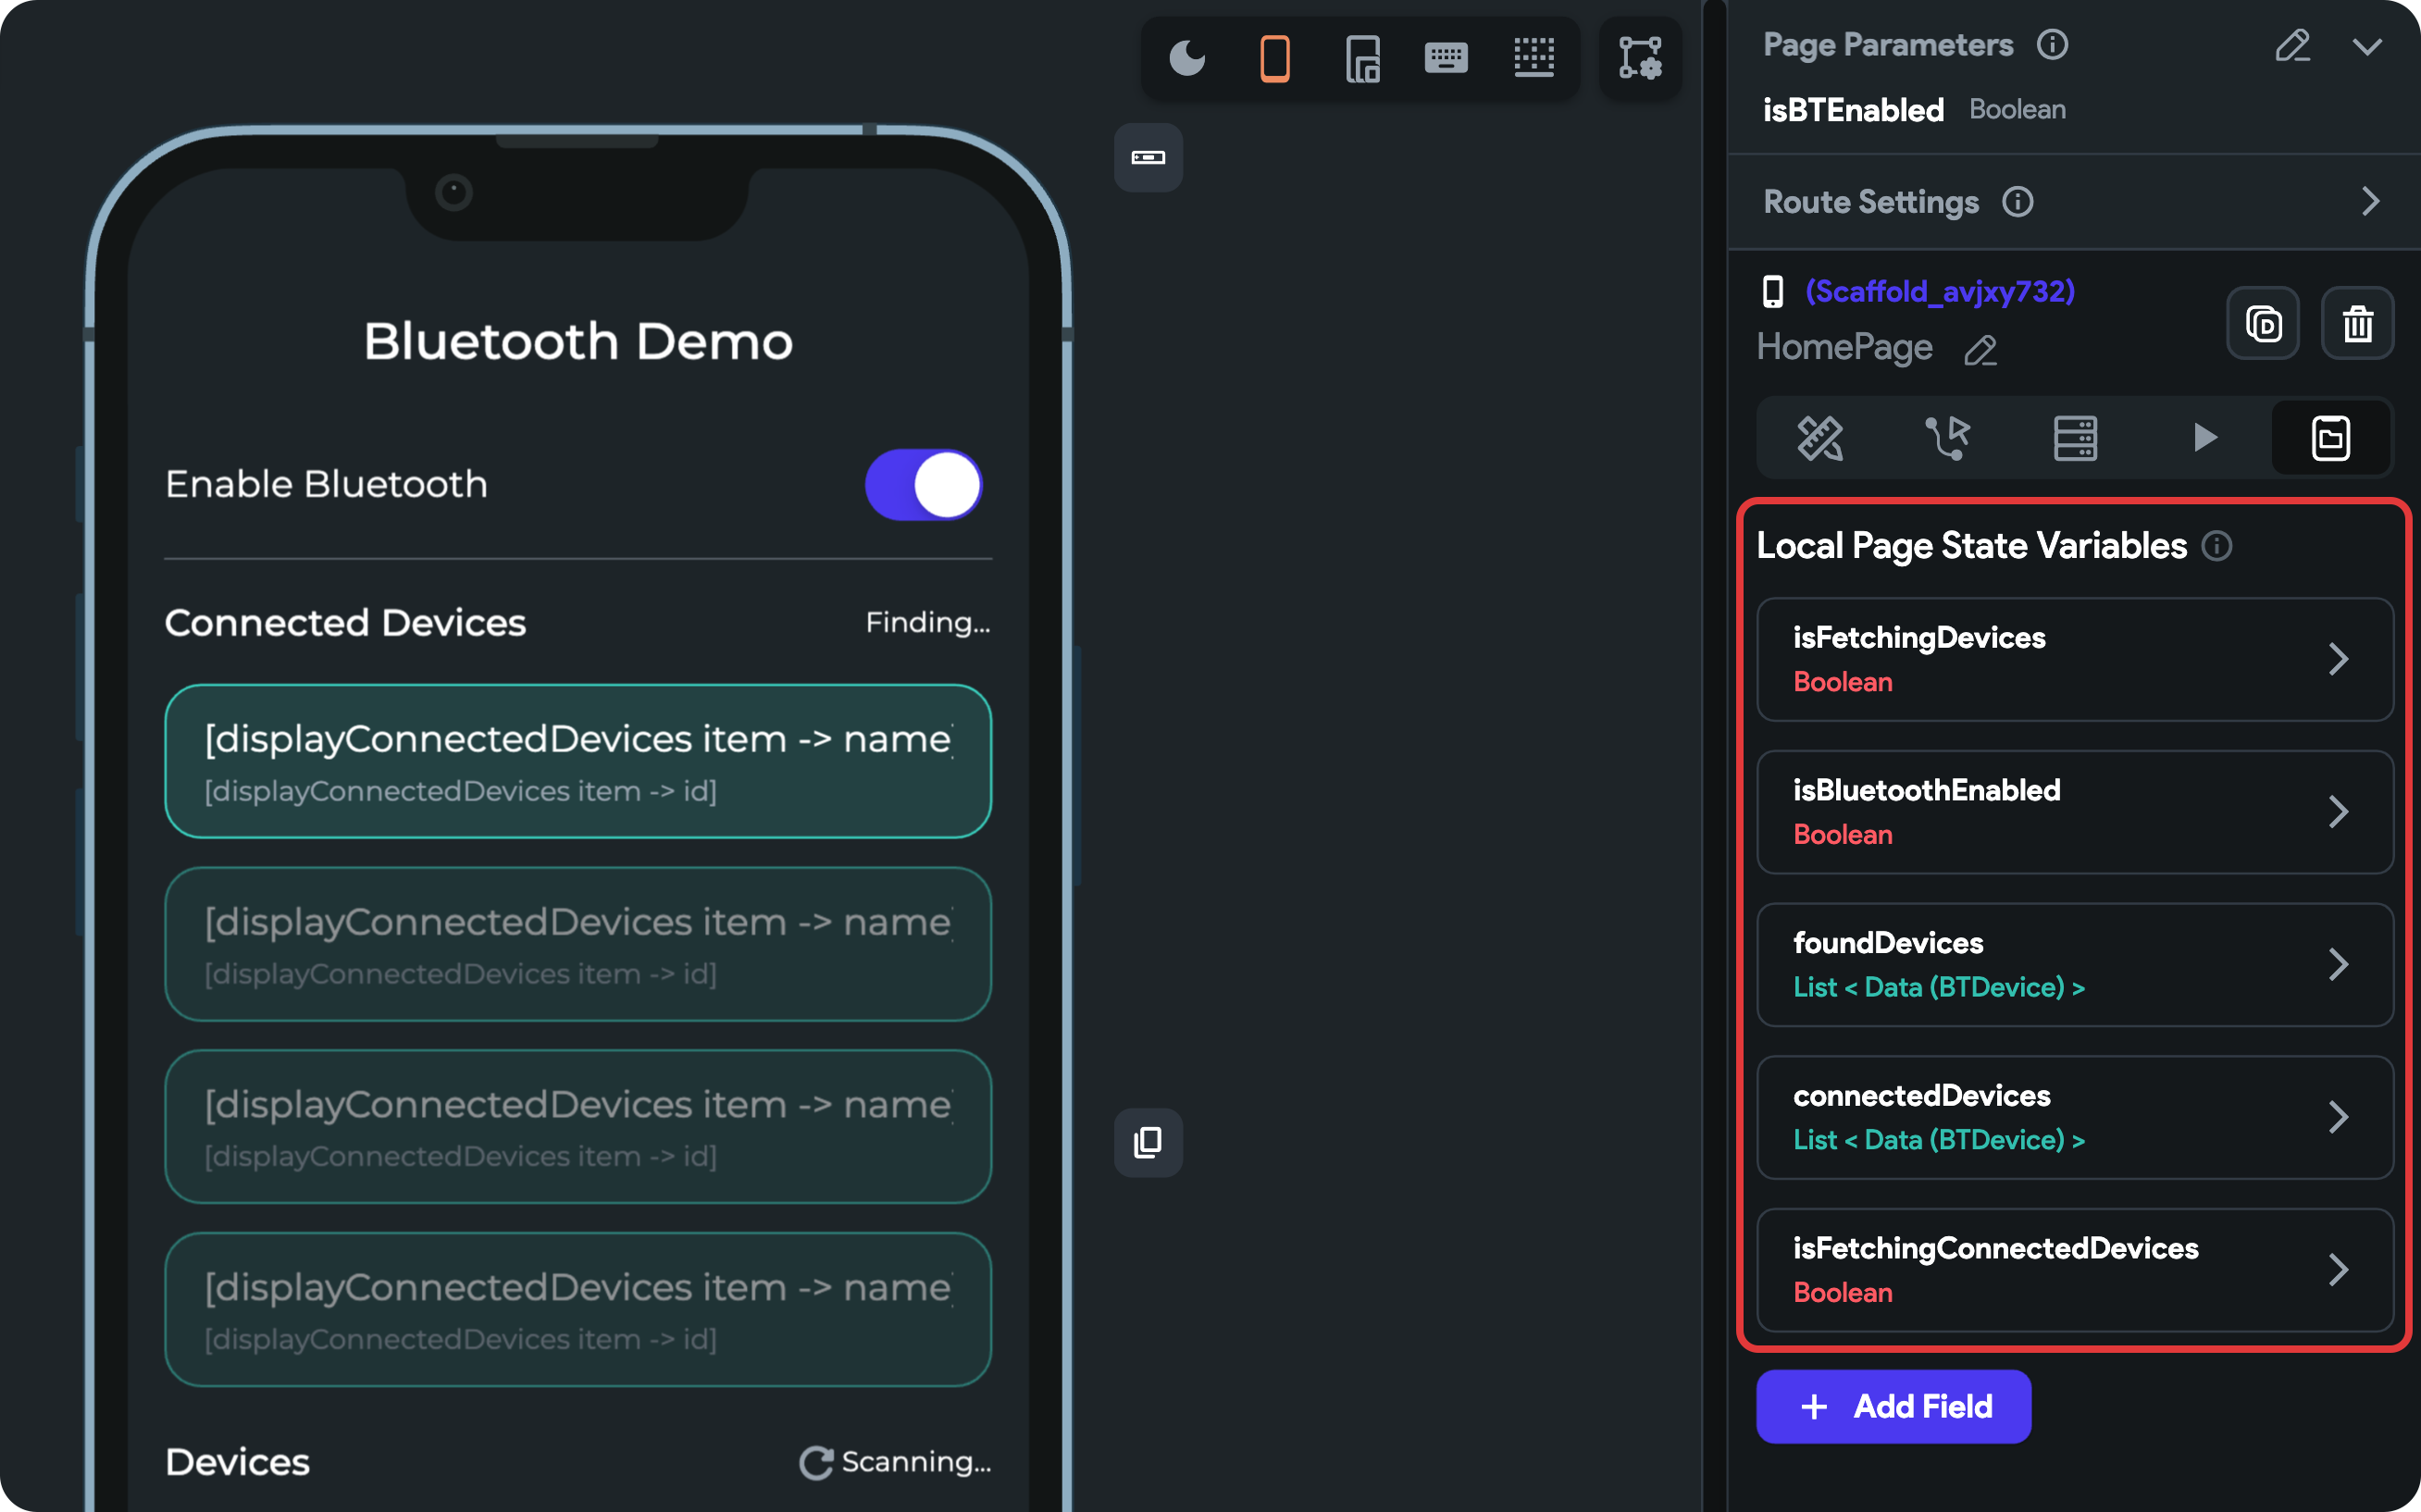
The HomePage will feature a toggle to enable or disable Bluetooth. Additionally, this page will scan and display the connected and nearby devices.
If you are using the Starter Project, you will find that we already have some Local Page State Variables inside the State Management tab of the Properties Panel (right). We will be requiring these variables for storing values, that we will be using on this page.
Page Load actions
Let's start by defining some On Page Load actions that will trigger as soon as the user is navigated to this page. The actions in order of the flow are as follows:
- Update Page State action:
- Field:
isBluetoothEnabled. - Set Value > Page Parameters >
isBTEnabled.
- Field:
- Add a Conditional Action to check whether the Bluetooth is enabled based on the
isBluetoothEnabledpage state variable. Only if it's true, we will execute the following actions, so define all the next actions under the TRUE branch. - Update Page State action:
- isFetchingDevices > True.
- isFetchingConnectedDevices > True.
- Custom Action > getConnectedDevices:
- Output Valrible Name:
fetchedConnectedDevices.
- Output Valrible Name:
- Update Page State action:
- isFetchingConnectedDevices > False.
- connectedDevices:
- Set the value from Action Outputs > fetchedConnectedDevices.
- Custom Action > findDevices:
- Output Valrible Name:
devices.
- Output Valrible Name:
- Update Page State action:
- isFetchingDevices > False.
- foundDevices:
- Set the value from Action Outputs > devices
Great! This was the most essential part of this page to fetch the connected and nearby devices. Next, we need to add functionality to the Switch widget for enabling or disabling the device's Bluetooth.
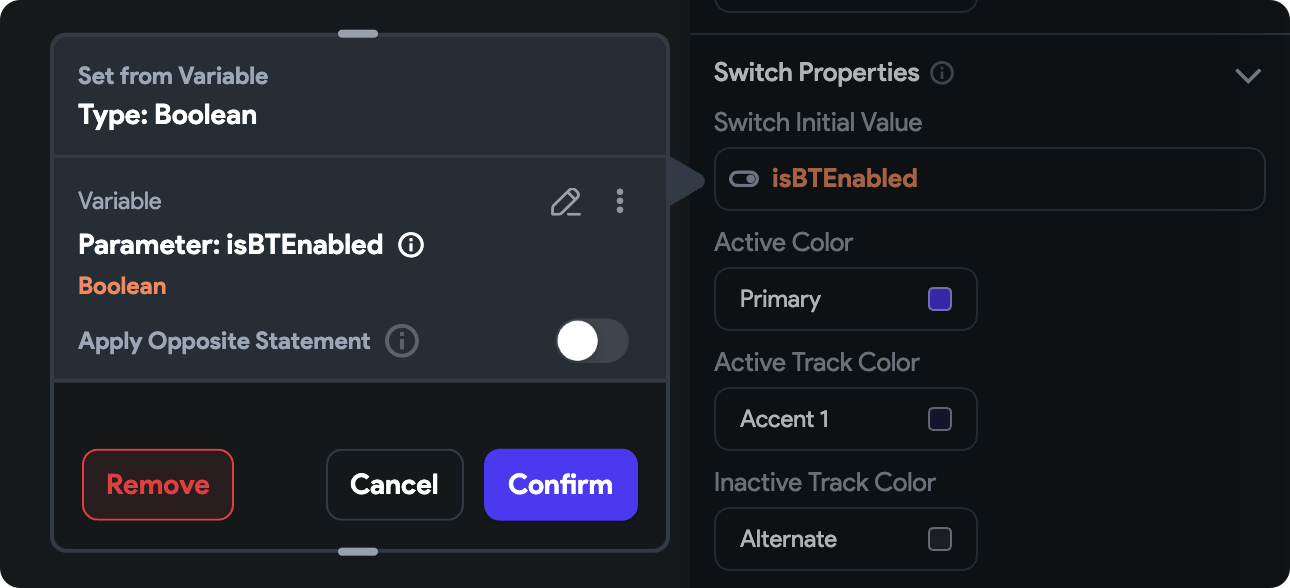
Setting actions on Switch
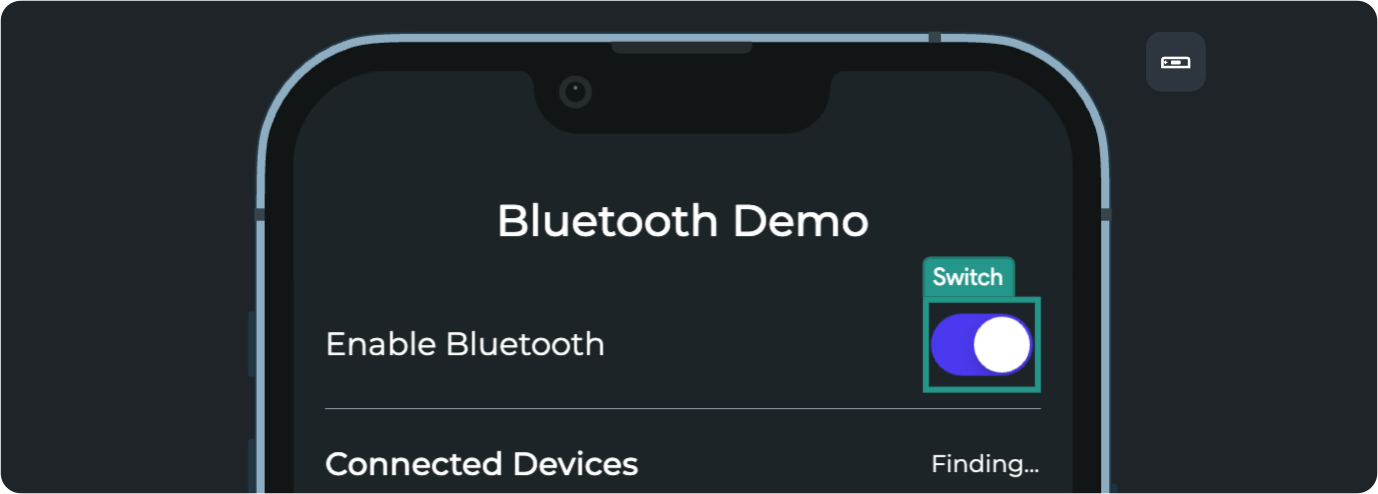
Select the Switch widget and set the initial value from the isBTEnabled page parameter.
Keep the Switch widget selected. Go to the Actions tab and open the Action Flow Editor. Here you can define actions on Toggled On and on Toggled Off.
Actions for On Toggled On:
- Turn on the Bluetooth:
- Custom Action > turnOnBluetooth
- Name the output variable as
isTurningOn.
- Add a Wait action having
1000msto provide a short delay and let the Bluetooth state change. - Add an Update Page State action to set the value of
isBluetoothEnabledto True. - Repeat the actions for updating the page states and fetching the connected and nearby devices (you can copy-paste the actions defined inside the On Page Load action, but use different output variable names).
Actions for On Toggled Off:
- Turn off the Bluetooth:
- Custom Action > turnOffBluetooth
- Name the output variable as
isTurningOff.
- Add an Update Page State action to set the value of
isBluetoothEnabledto False.
turnOnBluetooth and turnOffBluetooth custom actions only work on Android. If you want a solution for iOS, you can use a separate package (like app_settings) to navigate the user to the Bluetooth settings page and let them enable Bluetooth. However, we won't be looking into other packages in this article.Displaying the connected devices
To display the connected devices inside a list, follow the steps below:
- Select the ListView named ConnectedDevicesList.
- Go to the Generate Dynamic Children tab inside the Properties Panel.
- Enter the variable name as displayConnectedDevices.
- Select the value from Page State > connectedDevices.
- Click Confirm. You will get a dialog saying it will generate the list's children dynamically from the variable, click Ok.
Now, you can display the connected device details inside the first Container of the ListView named ConnectedDeviceTile:
- Click on the first DeviceName Text.
- From the Properties Panel, set the Text from a variable.
- Select the value from displayConnectedDevices Item > Data Structure Field > name.
- Click Confirm.
- Set the value of the DeviceId Text by following similar steps.
There's one more widget inside the ConnectedDeviceTile called StrengthIndicator. It is a pre-defined component inside the Starter Project that will help to display the strength of the BLE signal coming from the IoT device.
Let's set the values for the StrengthIndicator widget properties:
- Select the StrengthIndicator widget.
- Set the rssi value from displayConnectedDevices item > rssi.
- Next, we need to set the color of the strength indicator, and we want it to change based on the rssi value. We can use a Conditional Value to set the color:
- Set color from variable, select Conditional Value.
- Add the IF condition as: rssi >= -67, then color Success (green).
- Add another condition, ELSE IF as: rssi >= -90, then color Warning (yellow).
- Add ELSE condition color as Error (red).
- Optional: You can choose the default color value as Success.
- Click Confirm.
Next, we need to set an action on the ConnectedDeviceTile to navigate to the DevicePage and pass the device details:
- Select the ConnectedDeviceTile widget.
- Go to the Actions tab inside Properties Panel.
- Add an action as Navigate To > DevicePage.
- Pass the required parameters like deviceName, deviceId, and deviceRssi from displayConnectedDevices item > Data Structure Field > [field_name].
- Also, pass the value of hasWriteCharacteristic as True (as the connected devices would always have write characteristic because we only allow connection with any device if they have "write" characteristic as per the
connectDevicecustom action).
In a similar way, set you can generate the children items for the ListView named ScannedDevicesList and set its value from the Page State > foundDevices. Also, set the appropriate values inside the ScannedDeviceTile widget.
The actions on ScannedDeviceTile will be a bit different as we are not yet connected with these devices:
- Select the ScannedDeviceTile widget.
- Open the Action Flow Editor.
- Add the first action as Custom Action > connectDevice. Pass the
deviceInfoargument as displayDevices item. - Name the action output as hasWrite (the action returns whether the connected device has
writecharacteristics ). - Add another action, Update Page State > connectedDevices > Add to List > displayDevices item.
- Finally, add the action to navigate to the DevicePage and pass appropriate parameter values.
This completes our HomePage! Now, it's time to send and receive data to/from the connected device.
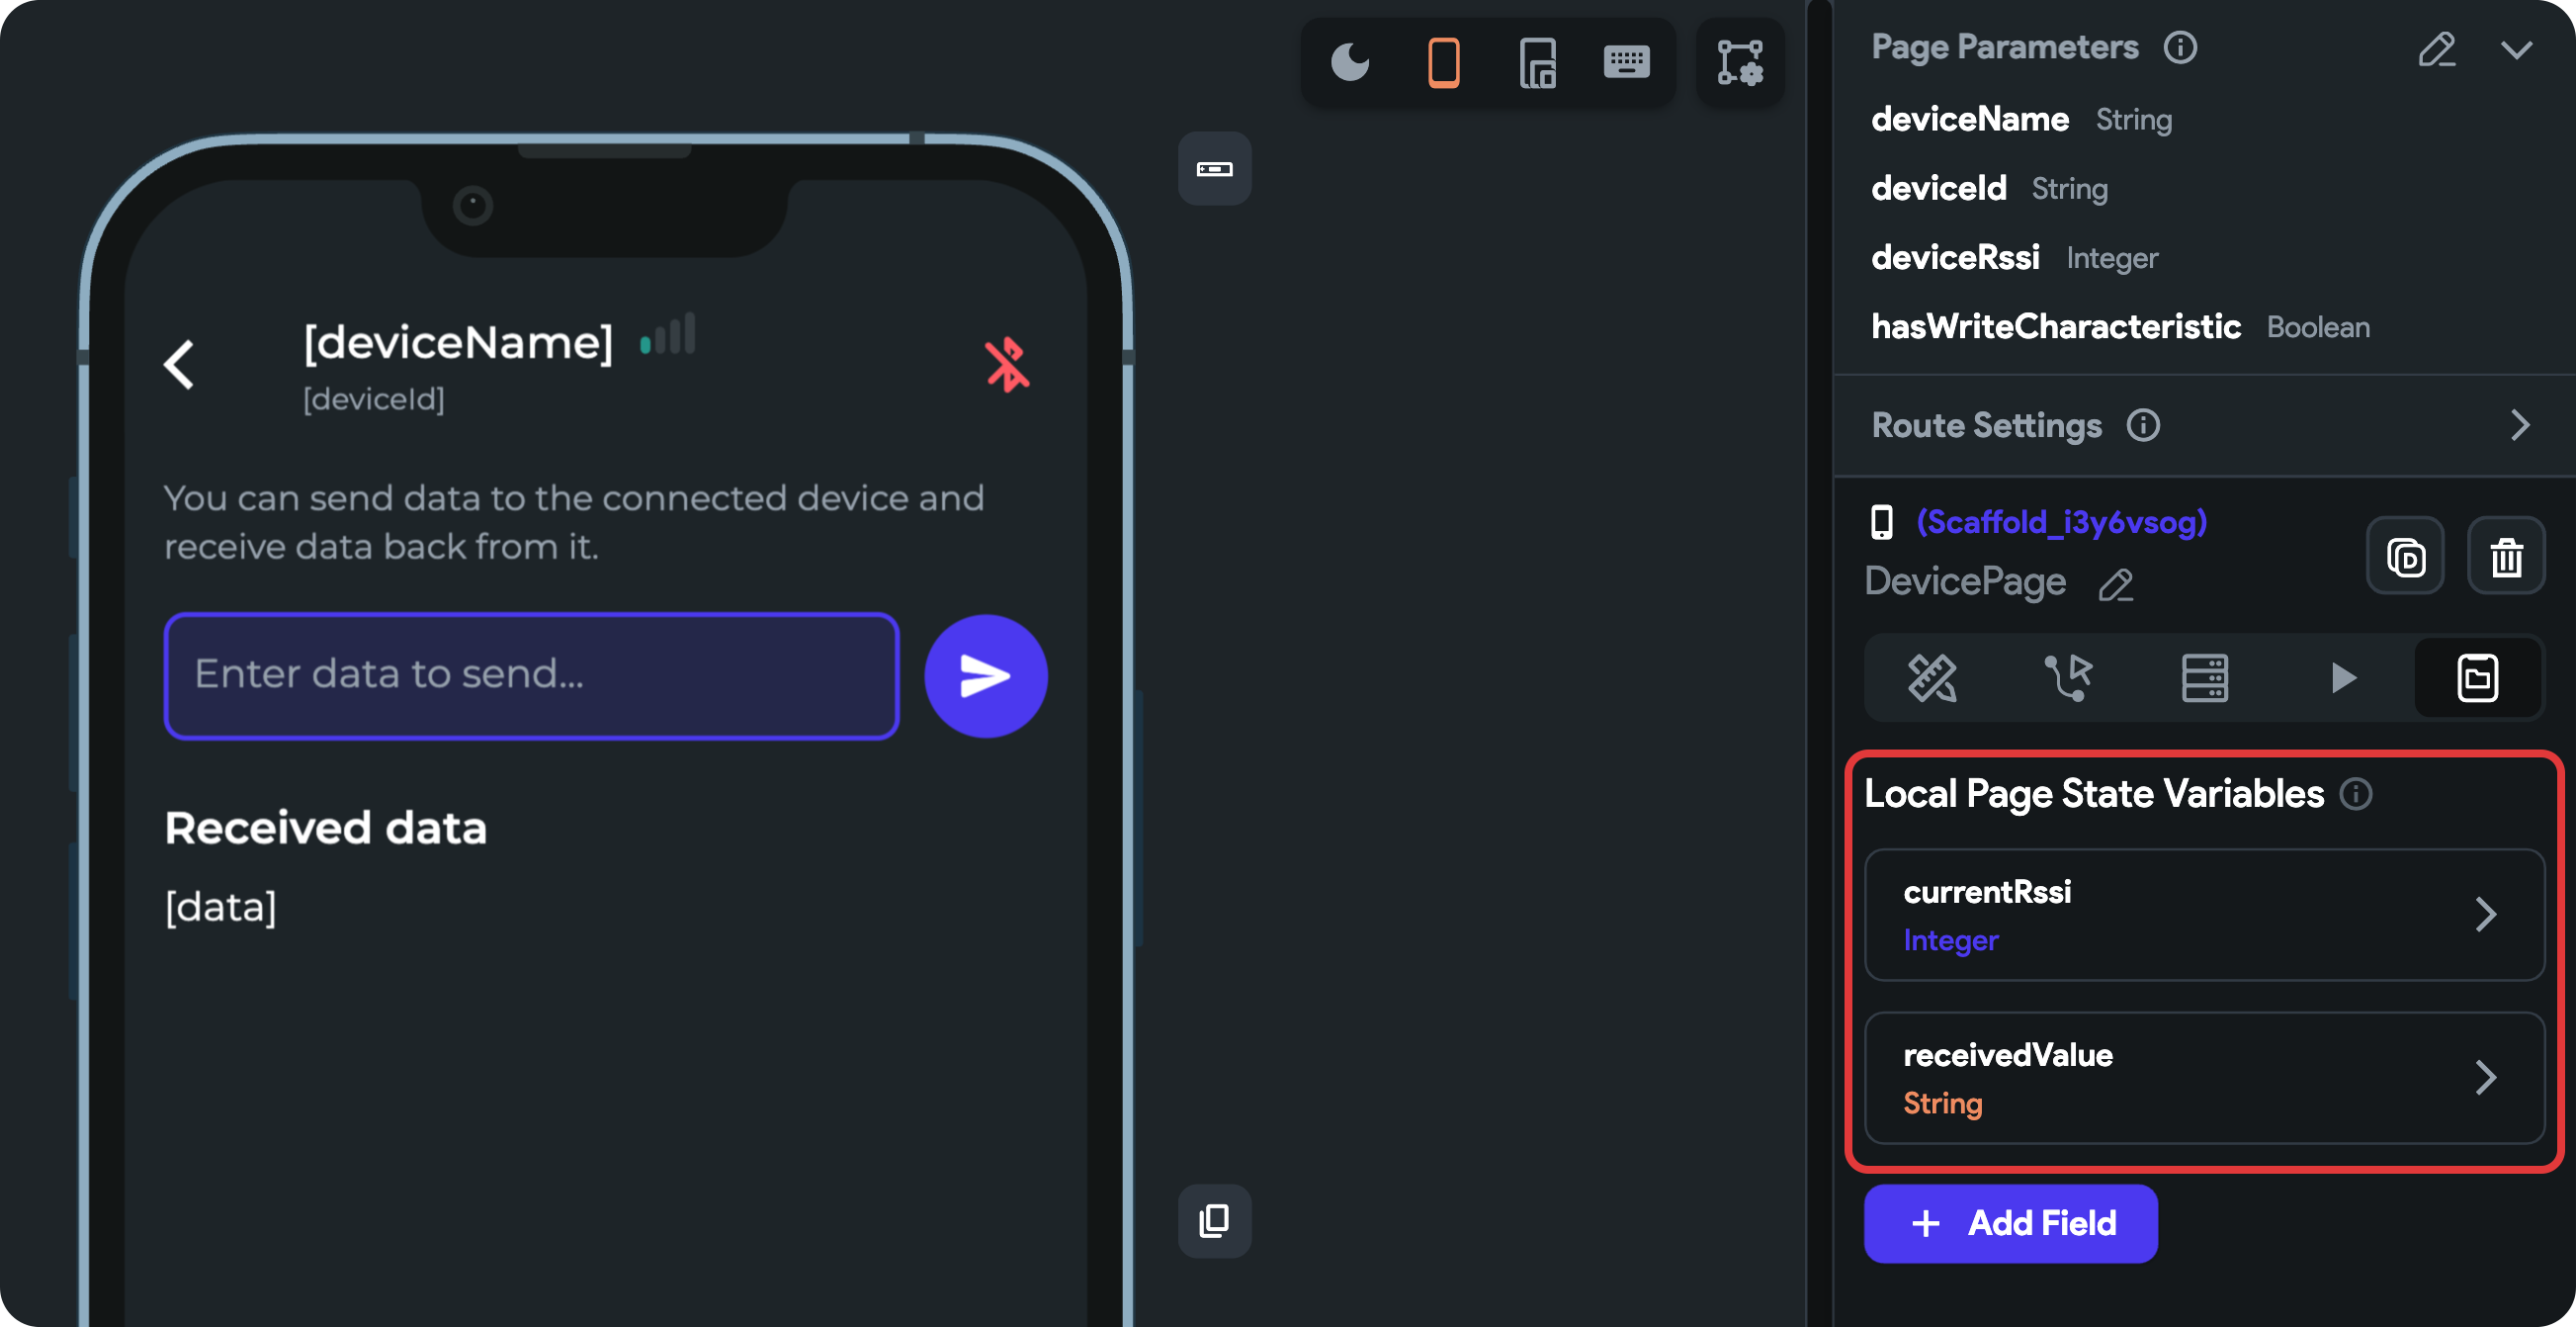
DevicePage
On this page, we will allow users to input any text and send it to the connected device, show received data from the IoT device, and also provide a button to disconnect.
You will find in the Starter Project there are already two Local Page State Variables defined, currentRssi and receivedValue. We will use these variables to store necessary data to easily display them on the page.
The connected device name, id, and strength indicator values are already set from the appropriate page parameters or page state variables.
But we want the strength indicator to show real-time data so that the user can understand how good is their signal strength when they move further away from the IoT device.
Let's define some On Page Load actions:
- First, add an Update Page State action. Add the
deviceRssifield and set its value from the Page Parameter > deviceRssi. - Next, add Start Periodic Action.
- Set the time interval to
2000milliseconds. - Keep the Start Action immediately disabled.
- Name the timer as "rssiUpdateTimer".
- Set the time interval to
- Add Custom Action > getRssi.
- Pass the value for deviceInfo argument by using Create Data Type. Set the appropriate values for the fields from the page parameters. Click Confirm.
- Name the output variable as "updatedRssi".
- Add Update Page State action to set the value of
currentRssifrom Action Outputs > updatedRssi.
Now, the device strength indicator (RSSI value) will update after every 2 seconds interval.
There's already a TextField to take the user input, so let's add actions to the SendButton for sending the data to the connected device:
- Open the Action Flow Editor.
- Add Custom Action > sendData. Set the value of
deviceInfoargument from Create Data Type (BTDevice) and passdeviceName,deviceId, andcurrentRssivalues respectively. Set the value ofdataargument from Widget State > TextField value. - Add a Show Snack Bar action with a message like "Data sent to device" to indicate that the data has been sent successfully.
To display the data returned from the IoT device, we can use the DisplayReceivedData component.
- On the DevicePage, pass the value for the device property to the DisplayReceivedData component.
- Double-click on the component to open the details. You will find there's already a Local Component State Variable called
data. - Define On Initialization actions in this component. We want to check whether there's any received data every 1 second interval.
- Add Start Periodic Action. Set the time interval to
1000milliseconds. Enter the timer name as "receiveDataTimer". - Add Custom Action > receiveData. Set the value of the deviceInfo argument from the page state variable. Enter the output variable name as "receivedData".
- Add Update Component State action. Add data field and set its value from Action Outputs > receivedData.
Finally, we need to set actions on the disconnect device icon button:
- Select the disconnect device IconButton.
- Open the Action Flow Editor.
- Add the first action as Custom Action > disconnectDevice. Set the value of
deviceInfoargument from Create Data Type (BTDevice) and passdeviceName,deviceId, andcurrentRssivalues respectively. - Add another action to Navigate Back.
Great job! This completes our Flutter app.
Setting up the IoT device
For our FlutterFlow app to interact with IoT devices, we need to ensure that our device is correctly set up. In this section, we will cover the steps required to prepare an ESP32 microcontroller to communicate via its built-in Bluetooth v4.2 (BLE).
Download Arduino IDE
The first step is to download and install the Arduino IDE, which we'll use to write and upload the firmware to our ESP32. You can download the latest version of the IDE from the official Arduino website.
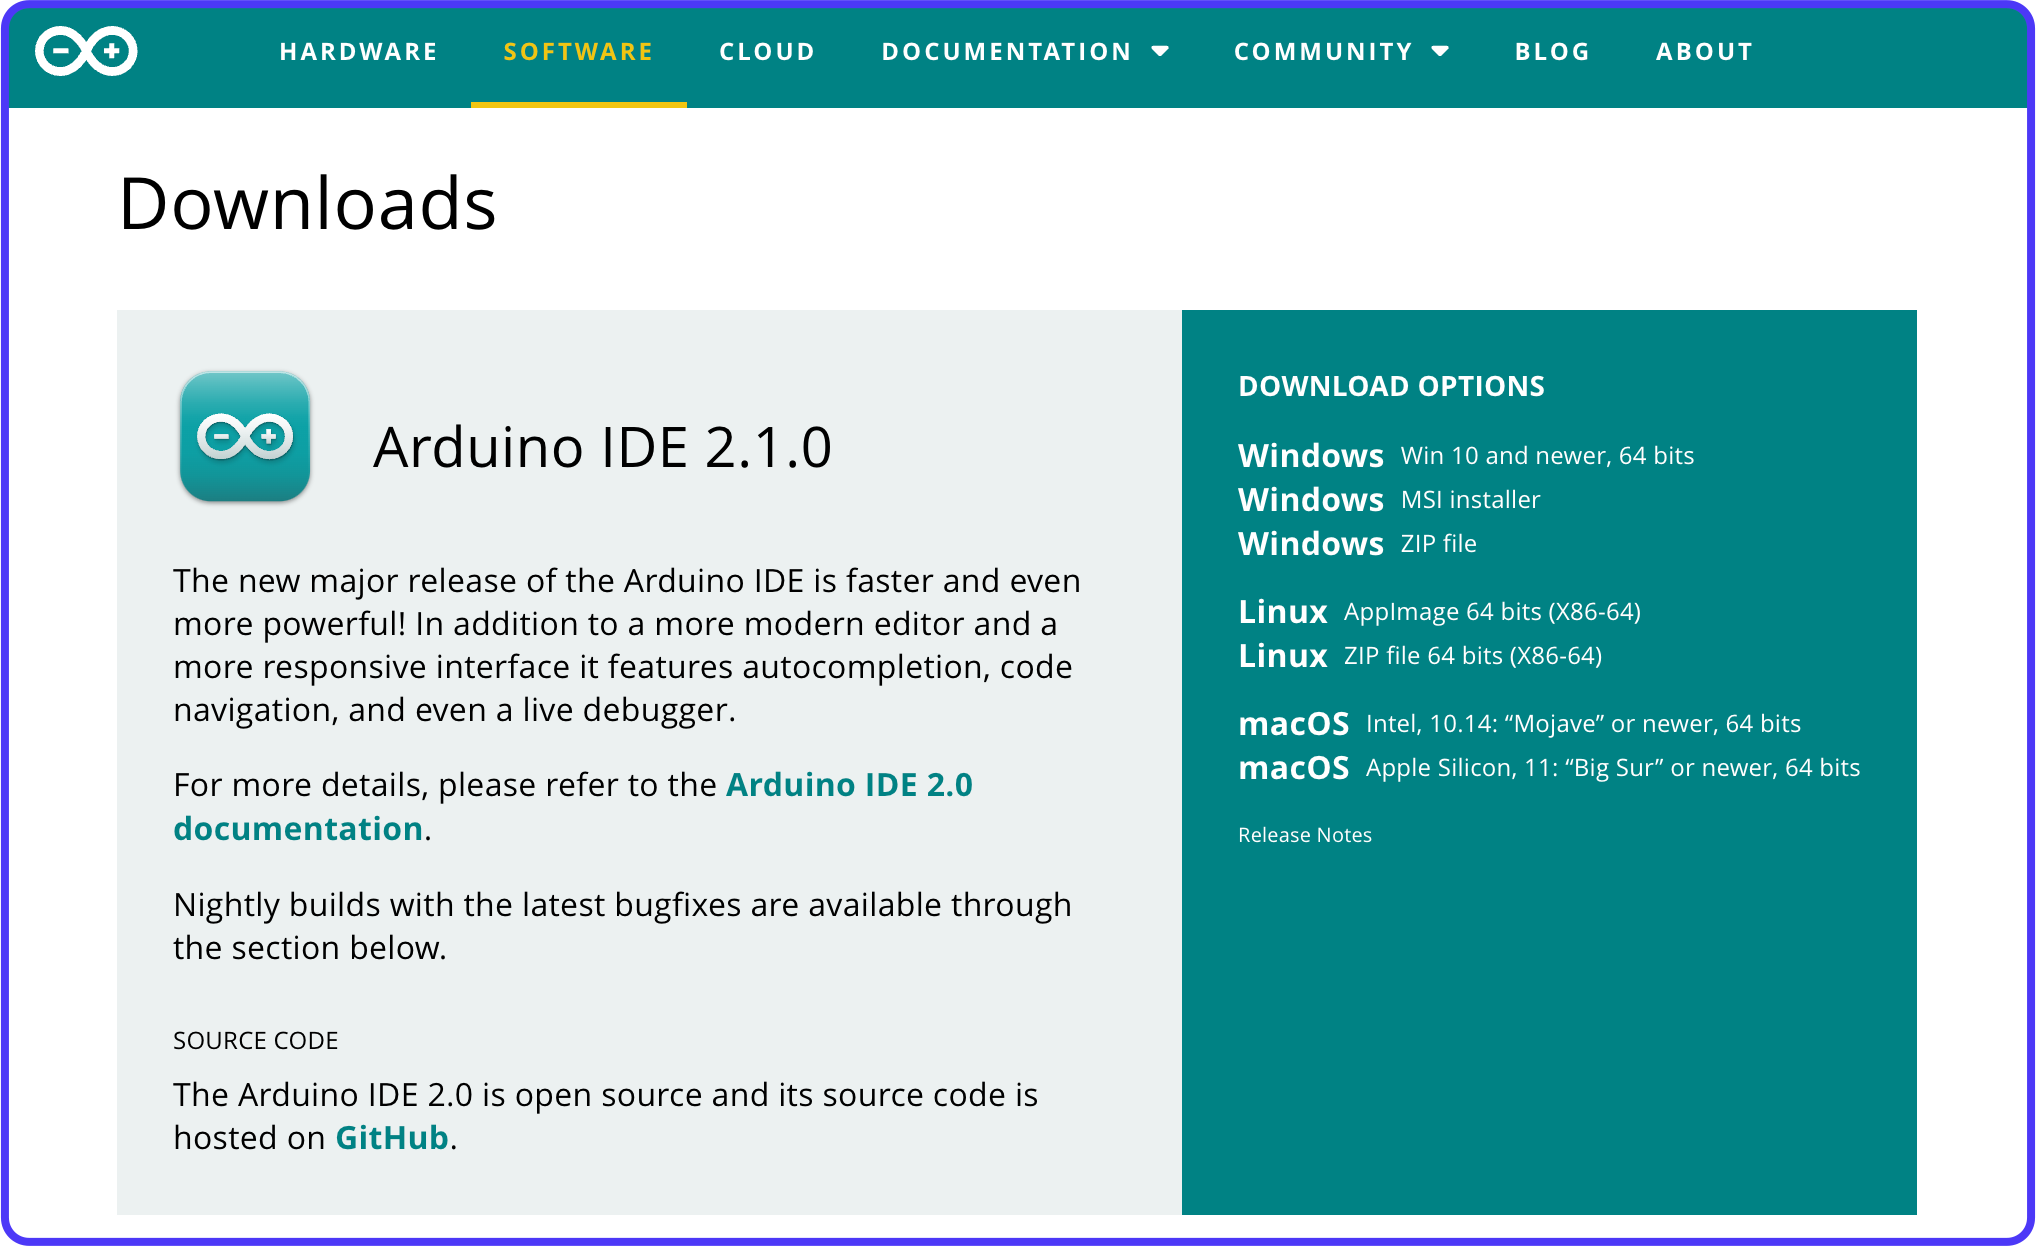
Once you have downloaded the Arduino IDE, install it on your system.
Configure for ESP32
The Arduino IDE comes preconfigured to support Arduino boards, but there are two steps required to add ESP32 support to it:
- Adding support for ESP32 boards in settings/preferences.
- Adding support for the ESP32 hardware, via the Board Manager.
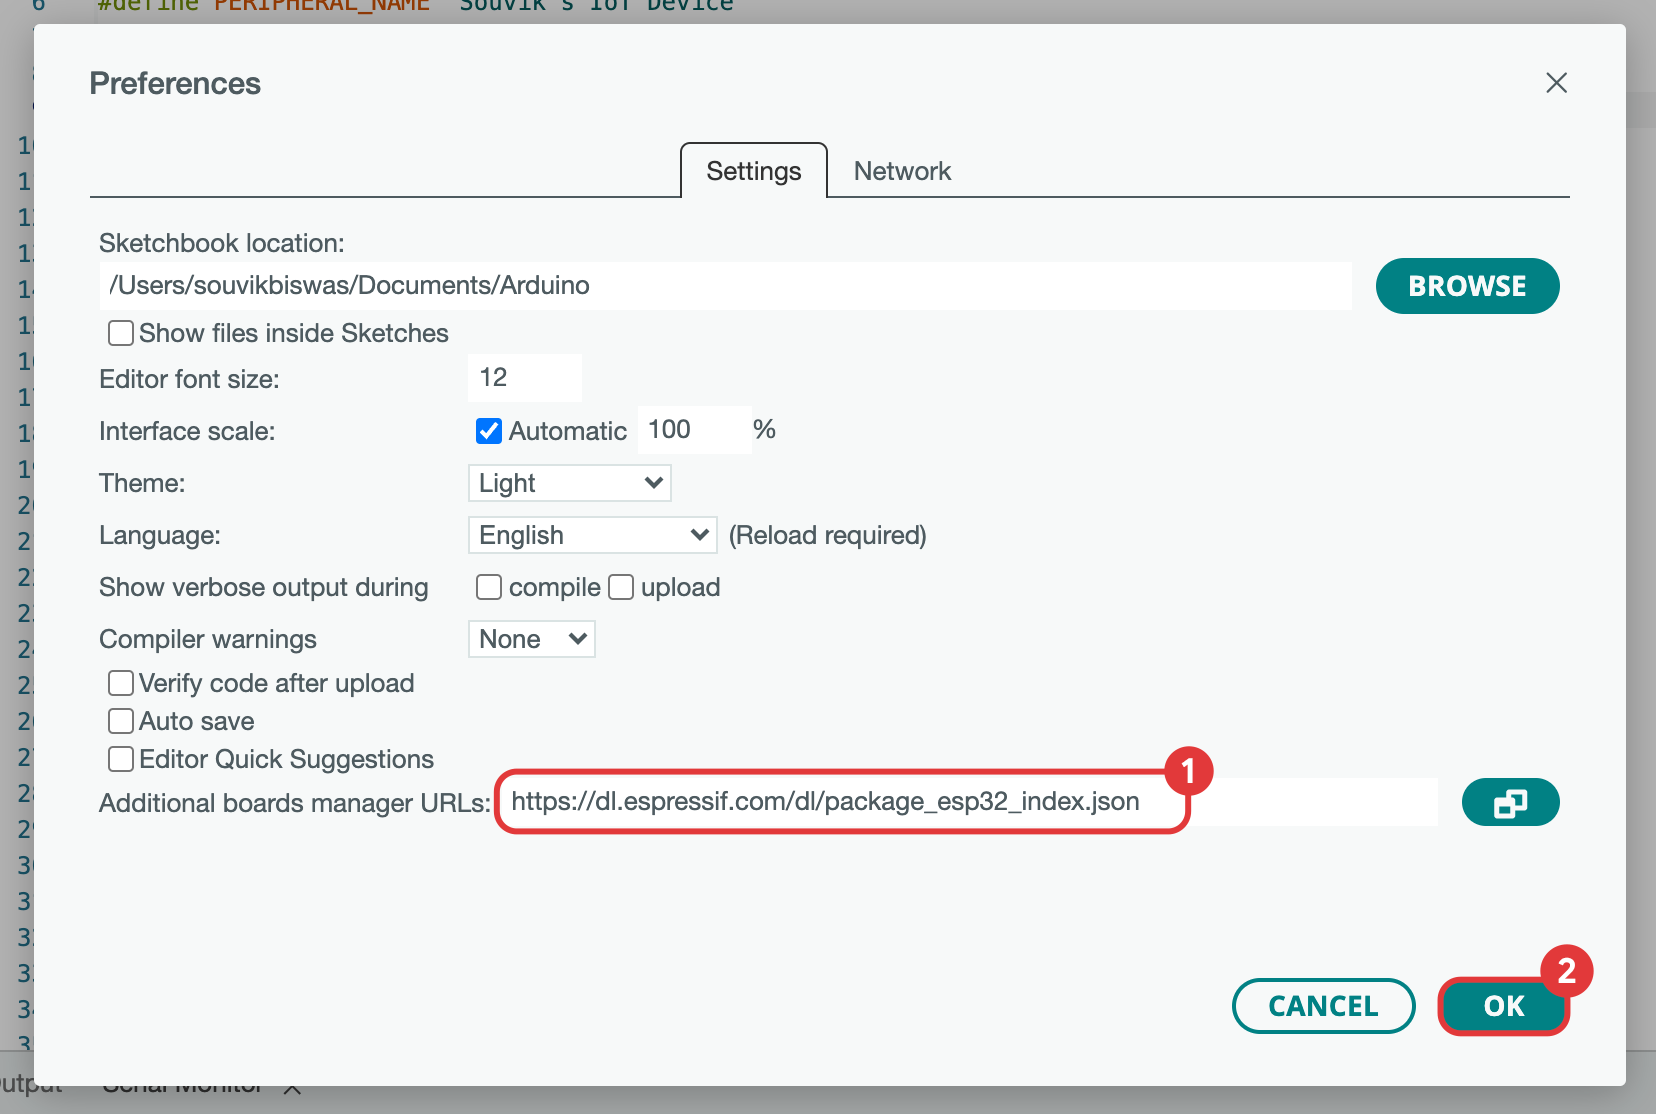
1. Preferences update
Follow these steps to add ESP32 board support:
- Open the Arduino Preferences dialog (also known as Settings).
- In the field for Additional boards manager URLs, enter this:
https://dl.espressif.com/dl/package_esp32_index.json. - Click Ok.
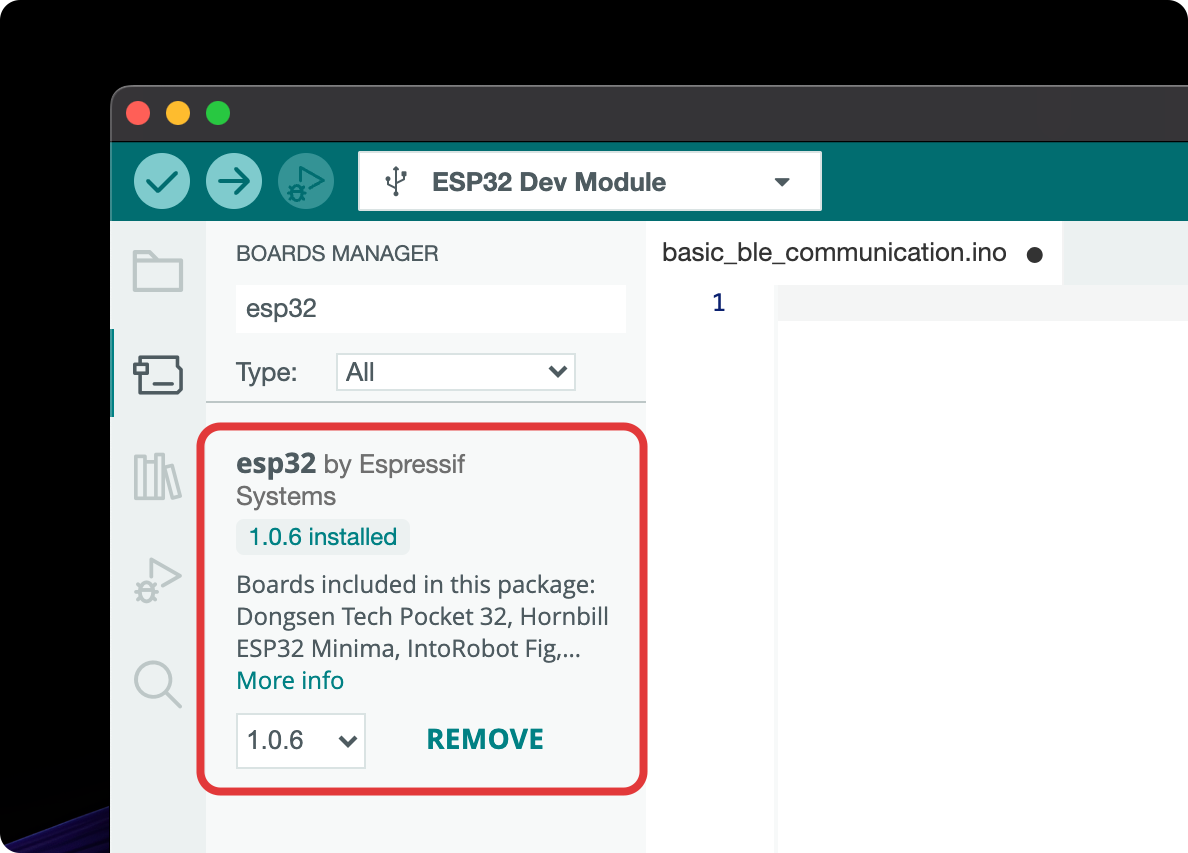
2. Board Manager
To add the ESP32 Board:
- Select the Board Manager from the left menu.
- Search for "esp32".
- Install "esp32 by Espressif".
- Connect the ESP32 module to your system.
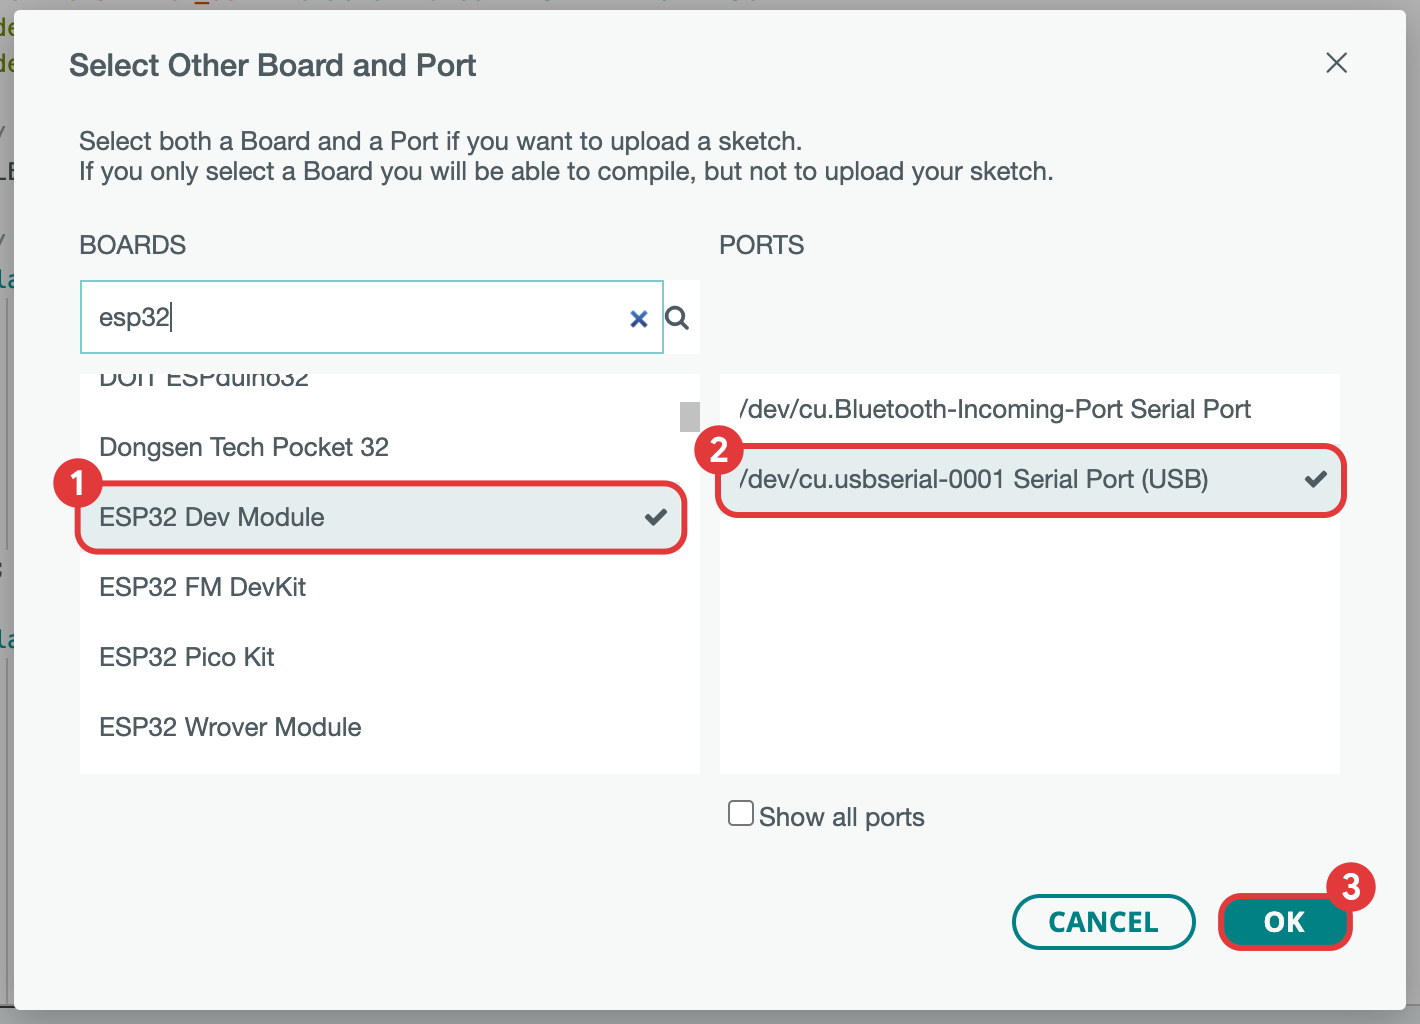
- From the board selector dropdown, go to "Select other board and port...".
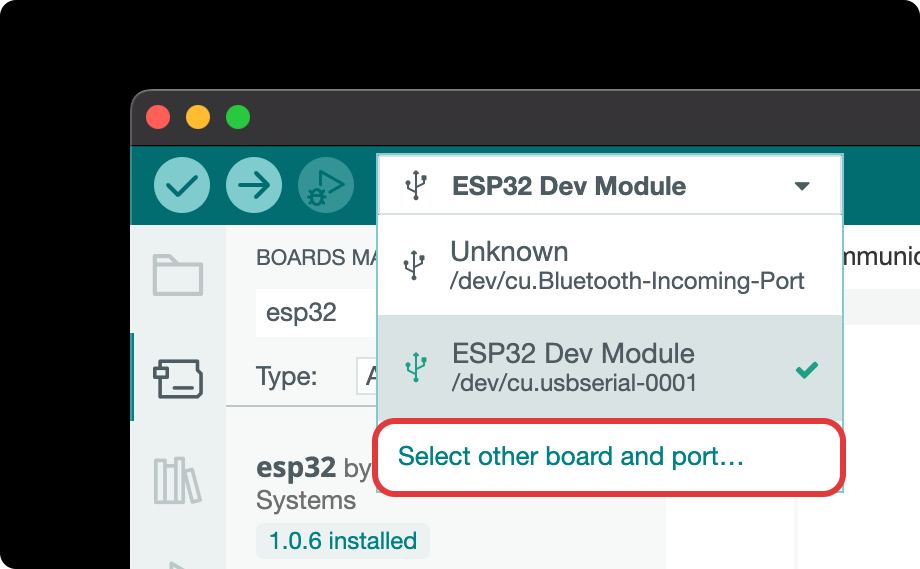
- Search for "esp32".
- Select ESP32 Dev Module.
- Choose the correct serial port (USB).
- Click Ok.
Awesome! Your system is now connected to the ESP32 module, and you are ready to write and flash the code.
Writing the BLE code
First, create a Sketch by going to File > New. This will create a new Sketch, which is basically a file where you can write and save your Arduino code in .ino format.
Every Arduino Sketch consists of two primary functions:
setup(): This is where you make the program configurations or initialization.loop(): Add anything here that you want to repeat over certain interval as long as the board is powered. Thedelay()functions helps to define the intervals.
Today, we won't go into the depths of understanding the entire Arduino code line by line. But let's discuss some keys concepts that you need to know for implementing BLE functionality.
A BLE peripheral has four primary components:
Server: In BLE terminology, a server is a device that has data to provide to other devices. For example, in our case, the ESP32 microcontroller acts as a server. The server hosts one or more services that can be accessed by client devices.
Service: A service in BLE represents a collection of data and associated behaviors to accomplish a particular function or feature on a device. For example, a "Heart Rate" service on a fitness tracker provides data about the user's heart rate. A service is identified by a unique UUID (Universally Unique Identifier).
Characteristic: A characteristic in BLE represents a specific piece of data within a service. It's the smallest unit of data exposed by a BLE device. For example, within a "Heart Rate" service, you might have characteristics like "Heart Rate Measurement" and "Body Sensor Location". Like services, characteristics also have unique UUIDs.
Characteristics can have different properties defining how their value can be used:
- Read: The value of the characteristic can be read.
- Write: The value of the characteristic can be written.
- Notify: The client device can subscribe to updates of the characteristic's value.
Advertising: Advertising is a crucial concept in BLE and it's the way a device broadcasts its availability to connect with other devices. An advertising device periodically sends out packets that can include the device's name, its services, and other information to help nearby devices decide if they want to connect. In our project, the ESP32 would advertise its existence and the services it supports, so the Flutter app can find and connect to it.
Enough of chip-chat, now let's dive into the code!
Here's the entire code for implementing a simple BLE connectivity on an IoT device:
Brief summary of what the above code does:
- Include BLE Library: The necessary BLE libraries are included at the start of the script (
BLEDevice.h,BLEUtils.h,BLEServer.h). - Define UUIDs and Names: Unique identifiers for the device's service and characteristics are defined. The name of the device that is broadcasted (
PERIPHERAL_NAME) is also defined. - Define BLE Characteristics: An output characteristic is defined (
pOutputChar). This is used later in the script to send responses back to the client device. - Define Callback Classes: Two classes,
ServerCallbacksandInputReceivedCallbacks, are defined. The former handles events when a client connects and disconnects. The latter handles the event when data is sent to the ESP32 device by a client. - Setup Function: In the
setup()function, the ESP32's serial communication is initialized, and then the BLE device is set up. It creates a BLE server and service using the UUID defined earlier. It also creates two characteristics: an input characteristic to handle data sent from a client and the output characteristic mentioned earlier. Callbacks for server events and input characteristic are set. Then, the service is started and the device starts advertising itself as a BLE server. - Loop Function: In this particular script, the
loop()function is empty, as the ESP32 acts as a server waiting for client interactions, and the handling of these interactions is done via the defined callbacks.
In one line, currently the main functionality of the IoT device is to receive data from the app, and once a new data is received an acknowledgement message with "Last Received: [data]" will be send back to the client.
Flashing to the IoT device
The final step is to compile and upload the code to your ESP32 module:
- Click on the Compile button (check icon).
- Once the compilation is done, click on the Upload button (right arrow icon).
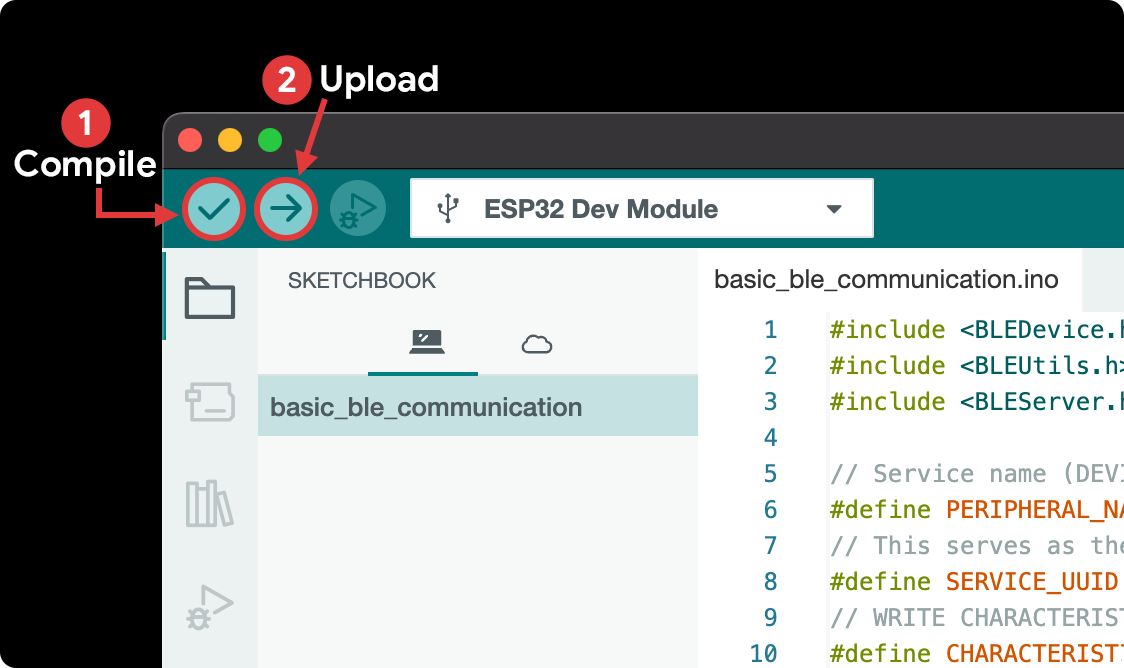
Cool, your IoT device is now ready to connect and communicate with the app!
Testing the App
It's time to test our application and observe how it interacts with the IoT device. It is important to test the app on a real device because BLE features won't work on an emulator or Simulator.
You have two options to run the FlutterFlow app on a real device:
- Download the code from FlutterFlow.
- Push the code to GitHub and pull the changes locally on your system.
To run the app on a device, connect a physical device (Android or iOS) to your system, and use this command from the project directory:
flutter runHere's a demo of the app in action:
Congratulations! 🎉 You've now built an app using FlutterFlow that can interact with an IoT device over Bluetooth Low Energy. It's an exciting achievement and opens up a world of possibilities for you.
Conclusion
In this tutorial, we have successfully created a FlutterFlow app that communicates with an IoT device using Bluetooth Low Energy (BLE). By using FlutterFlow's Custom Actions and integrating a BLE plugin, we established a bridge between our app and an ESP32 microcontroller, opening the door to countless IoT project possibilities.
The entire template app is available on FlutterFlow Marketplace
Here are a few potential applications of this knowledge:
- Home automation system where the mobile app controls various appliances.
- Health tracker application that collects data from a wearable device.
- Industrial IoT applications for remote monitoring and control.
We hope you enjoyed this guide and found it useful. Don't forget to share your creations with us. We look forward to seeing what you build next!
