
In today's fast-paced world, video calling has become an essential means of communication, enabling people to connect with their loved ones, friends, and colleagues from anywhere in the world. With the rapid growth of remote work, online learning, and socializing, the demand for high-quality, easy-to-use video calling apps is higher than ever.
In this guide, you will learn how to create a cross-platform video calling app for Android, iOS, and Web using Agora & Flutter.
We'll cover the technical aspects of integrating Agora's SDK with Flutter and setting up a serverless backend for Agora token generation using Firebase Cloud Functions. We'll also delve into creating video call rooms and implementing essential features like audio control and camera switching.
So, grab your favorite beverage, put on your developer hat, and let's embark on this exciting journey to create a stellar video calling app using Agora and Flutter!
App Overview
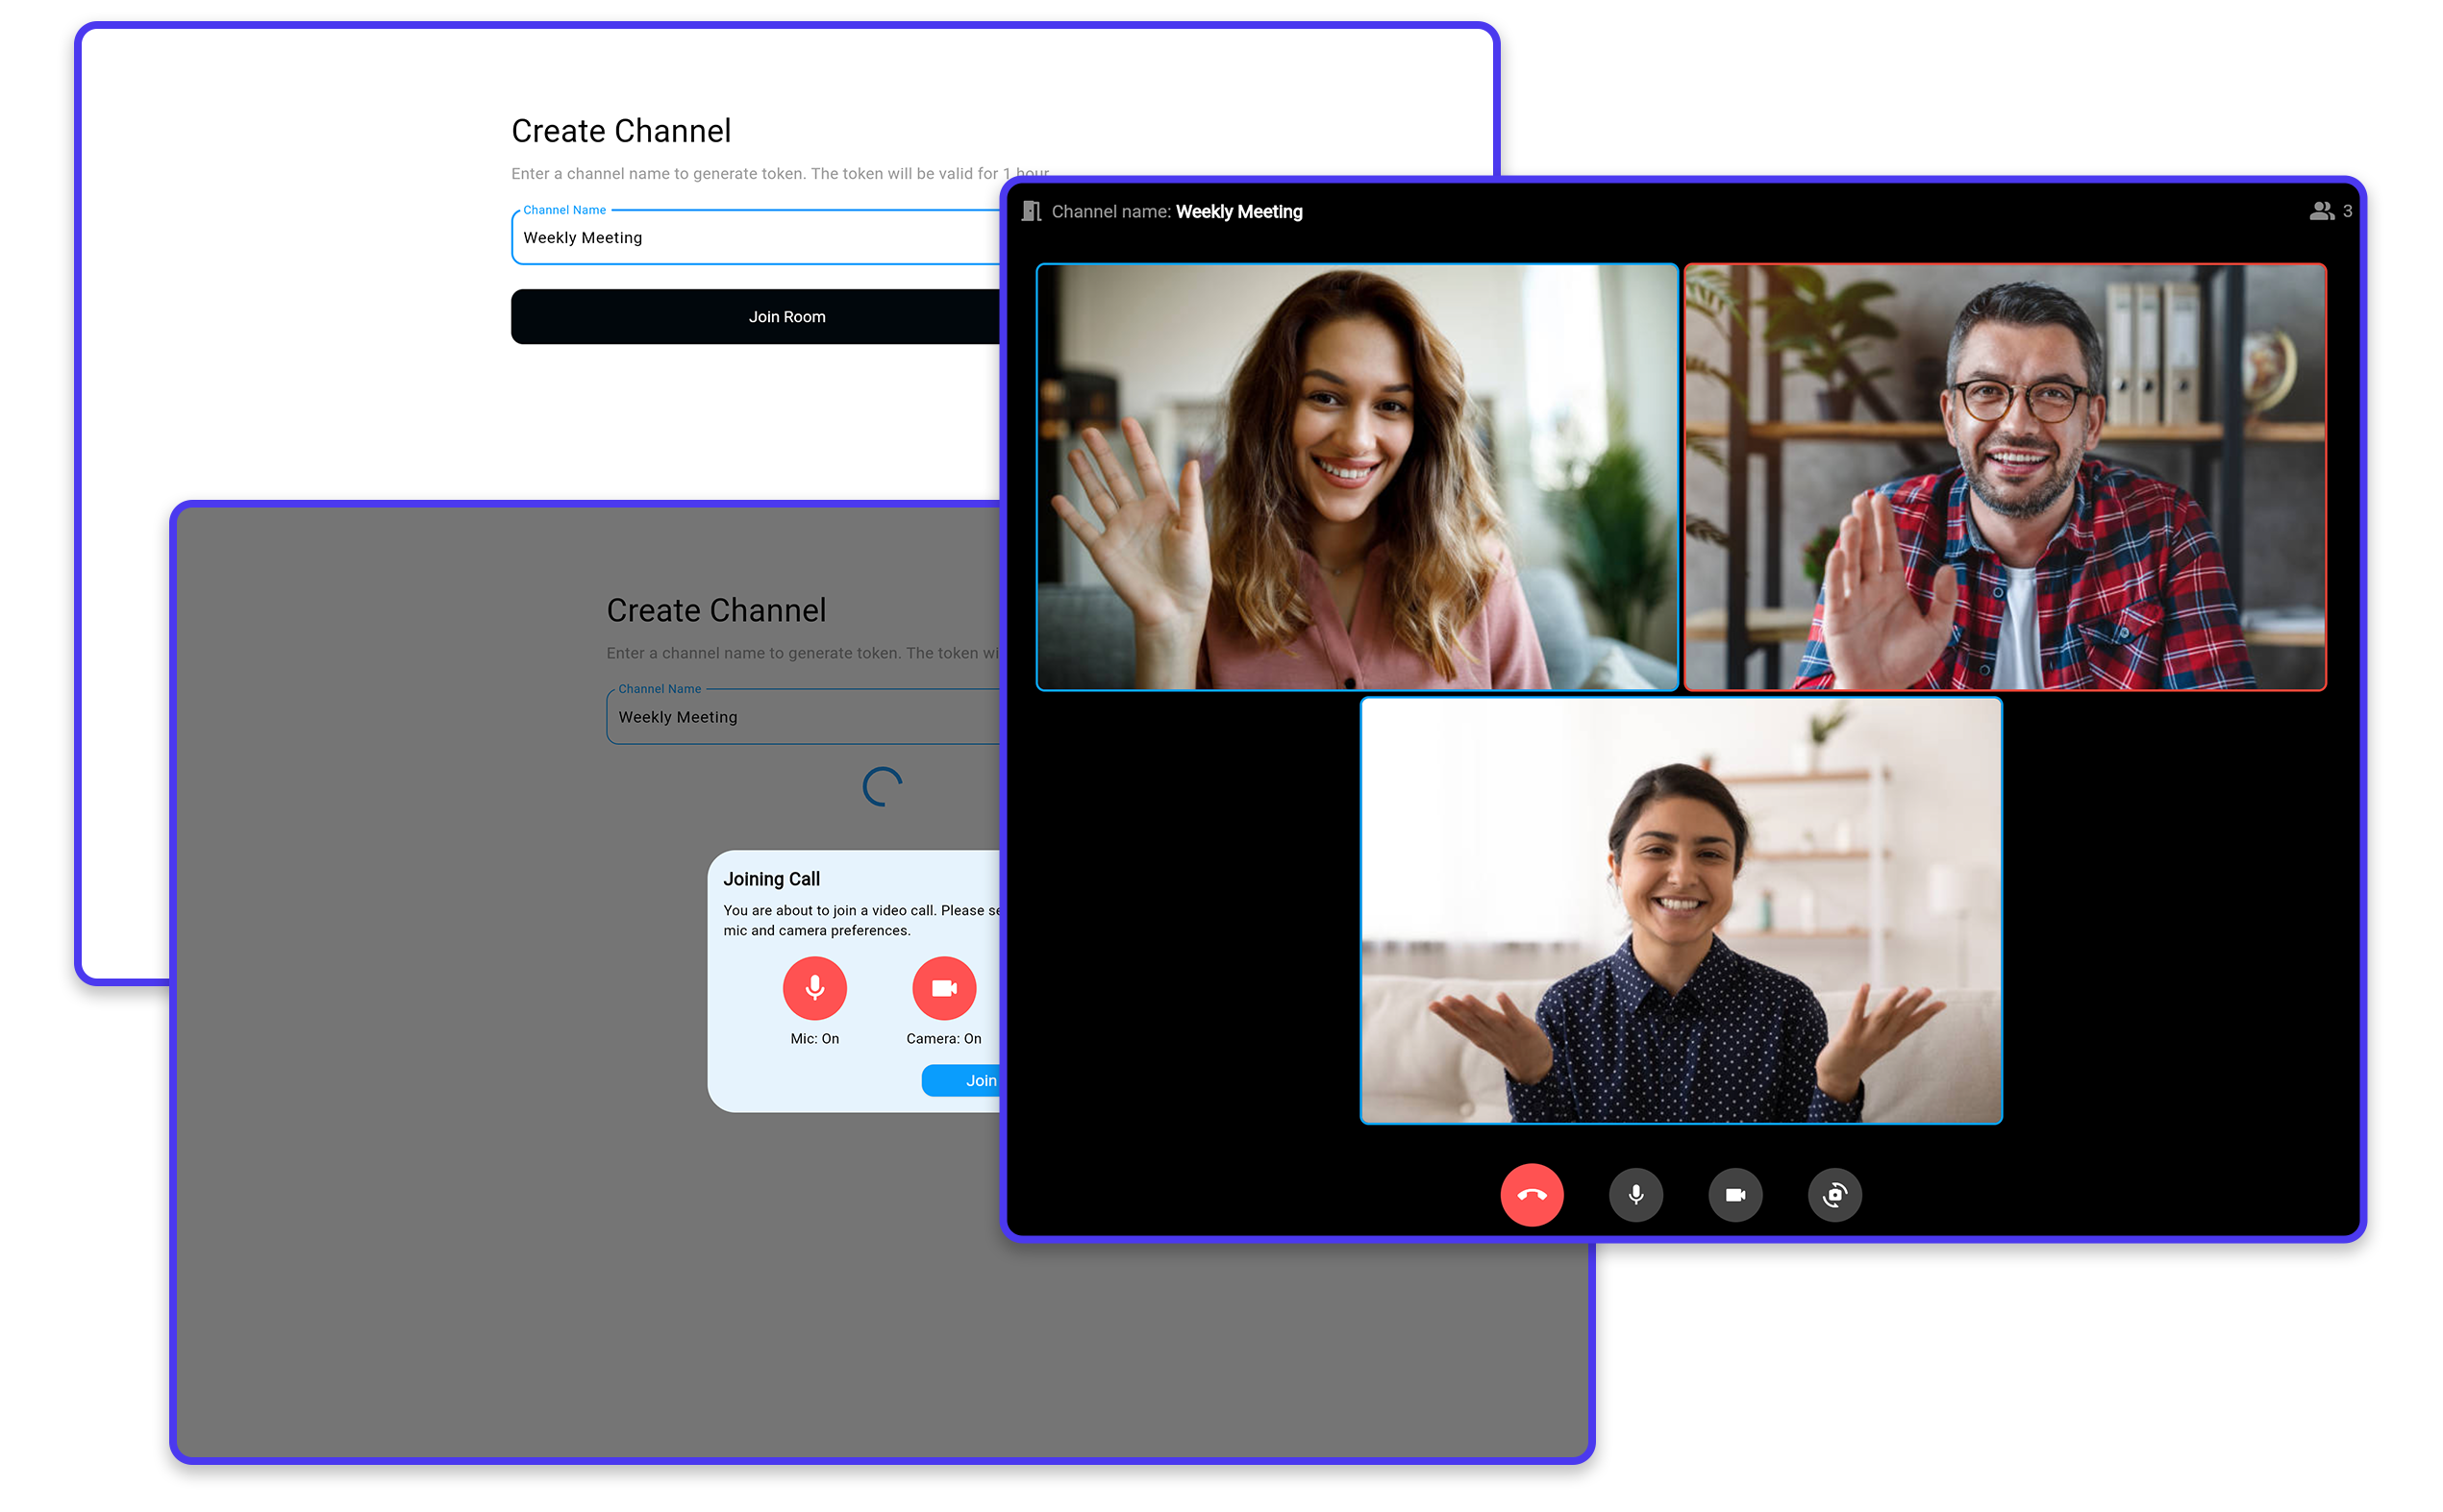
Throughout this guide, we'll build a simple yet functional video calling app that demonstrates the power of Agora and Flutter. The app will consist of two primary pages: Create Channel Page and Video Call Page.
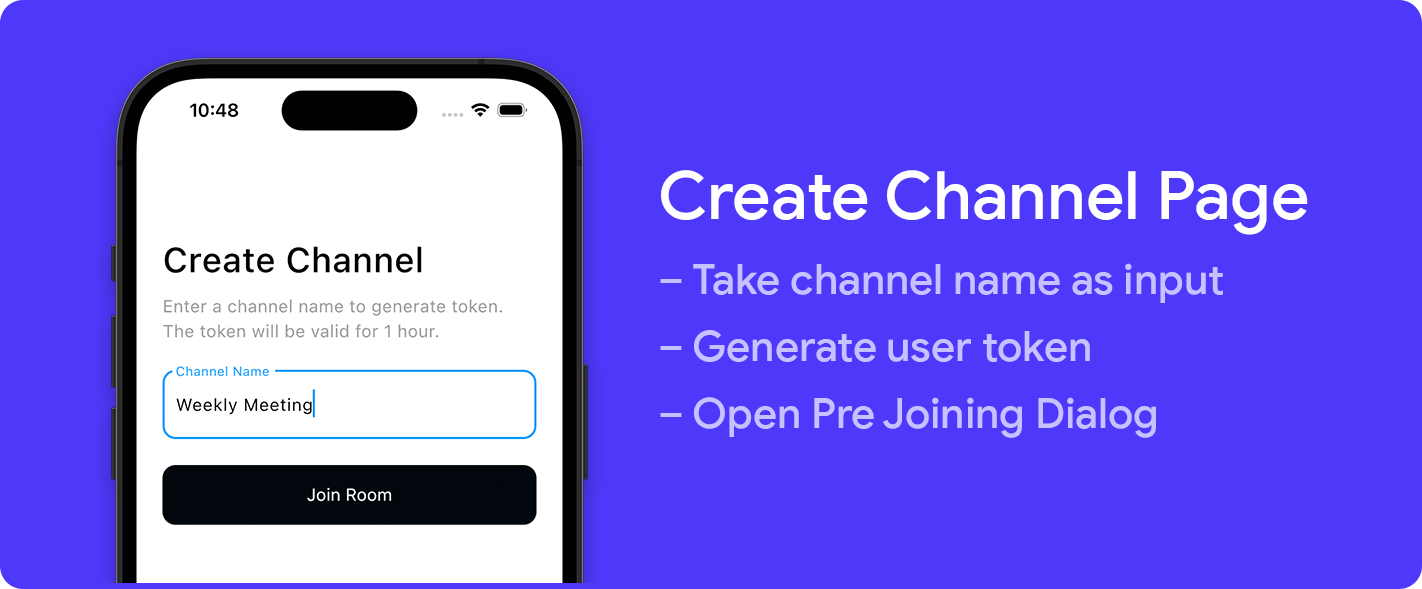
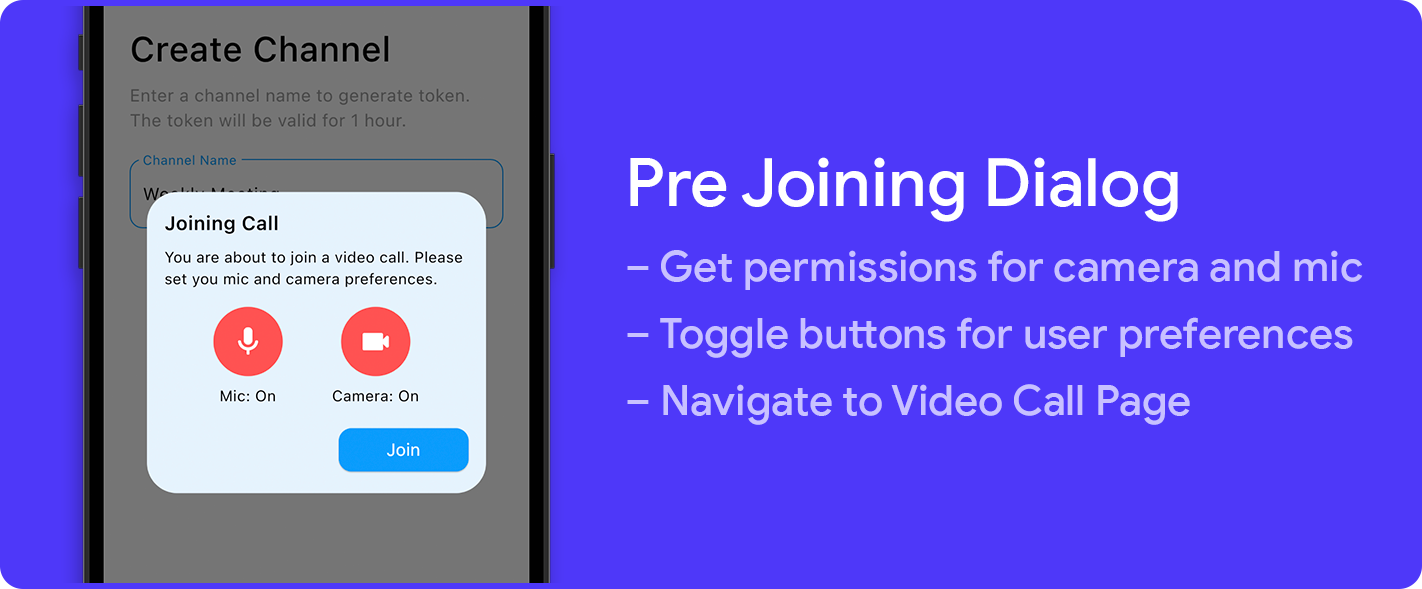
- Create Channel Page: This page will serve as the starting point for users to initiate a video call. They will be able to enter a channel name, which will be used to create a unique video call room. Users will also get a dialog for selecting their preference for microphone and camera on/off before joining the call. By clicking the "Join" button, users will be directed to the Video Call Page, where they'll be able to participate in the video call with other users who have joined the same channel.
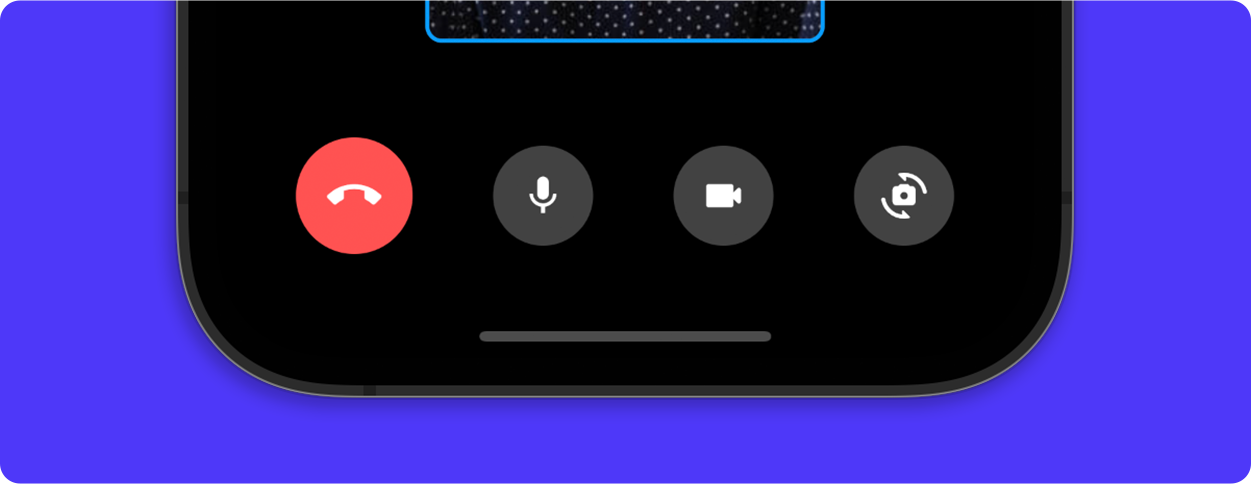
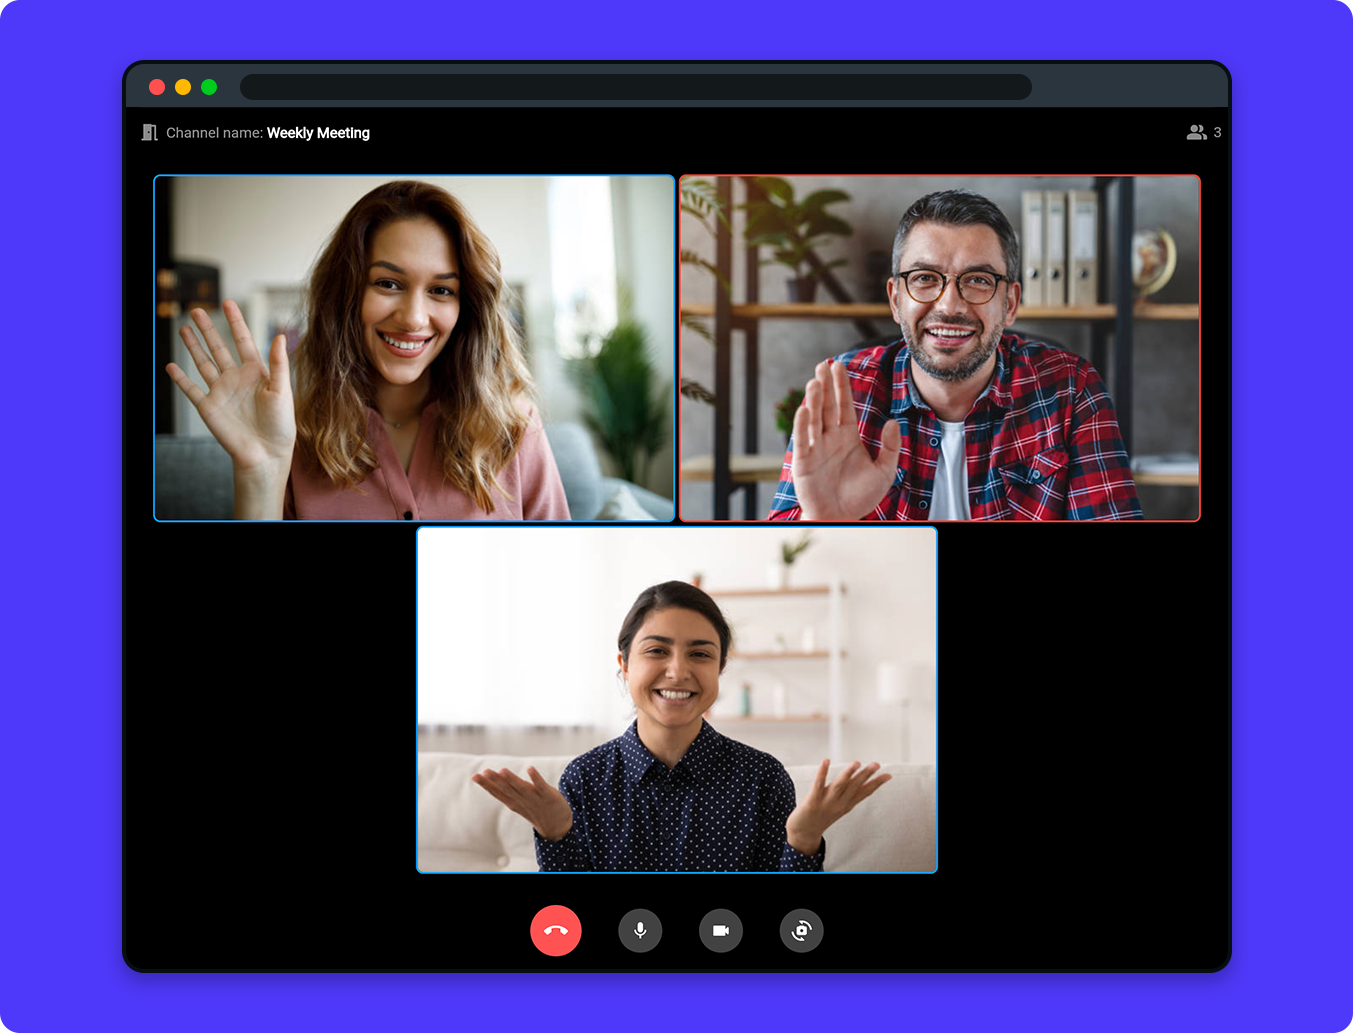
- Video Call Page: This is where the actual video calling experience takes place. Users who have joined the same channel will be able to see and hear each other in real-time. On this page, they will have access to essential call actions such as muting/unmuting audio, switching between front and rear cameras, and leaving the channel to return to the Create Channel Page.

The final app will also have a responsive layout that will adapt to large screen sizes when run as a web app.
Getting Started
Before diving into the core implementation of our video calling app, we need to set up a new Flutter project. In this section, we'll guide you through the process of initializing a Flutter project and adding some basic code to ensure everything is working as expected.
1. Install Flutter: If you haven't already, make sure to install Flutter on your development machine. You can follow the official Flutter installation guide for your operating system here.
2. Create a new Flutter project: Open a terminal and run the following command to create a new Flutter project:
flutter create agora_demo3. Open the project in your favorite IDE: Open the newly created project in your preferred code editor, such as Visual Studio Code or Android Studio.
4. Modify main.dart: Locate the lib/main.dart file in your project directory. Replace its content with the following basic code snippet:
import 'package:flutter/material.dart';
import 'pages/create_channel_page.dart';

void main() {
  runApp(const MyApp());
}

class MyApp extends StatelessWidget {
  const MyApp({super.key});

  @override
  Widget build(BuildContext context) {
    return MaterialApp(
      title: 'Flutter Agora Demo',
      debugShowCheckedModeBanner: false,
      theme: ThemeData(
        useMaterial3: true,
        colorScheme: ColorScheme.fromSwatch(
          primarySwatch: Colors.blue,
        ),
        elevatedButtonTheme: ElevatedButtonThemeData(
          style: ElevatedButton.styleFrom(
            backgroundColor: Colors.blue,
            foregroundColor: Colors.white,
            shape: RoundedRectangleBorder(
              borderRadius: BorderRadius.circular(12.0),
            ),
            textStyle: const TextStyle(
              fontSize: 16.0,
              color: Colors.white,
            ),
          ),
        ),
      ),
      home: CreateChannelPage(),
    );
  }
}
5. Add CreateChannelPage: Create a new file pages/create_channel_page.dart and add the following code:
import 'package:flutter/material.dart';

class CreateChannelPage extends StatefulWidget {
  const CreateChannelPage({super.key});

  @override
  State<CreateChannelPage> createState() => _CreateChannelPageState();
}

class _CreateChannelPageState extends State<CreateChannelPage> {
  @override
  Widget build(BuildContext context) {
    return const Scaffold();
  }
}
We will come back to this page in a while. With this foundation, we're now ready to proceed with the Agora setup and other crucial components of the video calling app.
Agora Setup
To integrate Agora's video calling capabilities into our Flutter app, you first need to set up an Agora account and obtain the necessary API credentials.
Follow these steps to get started:
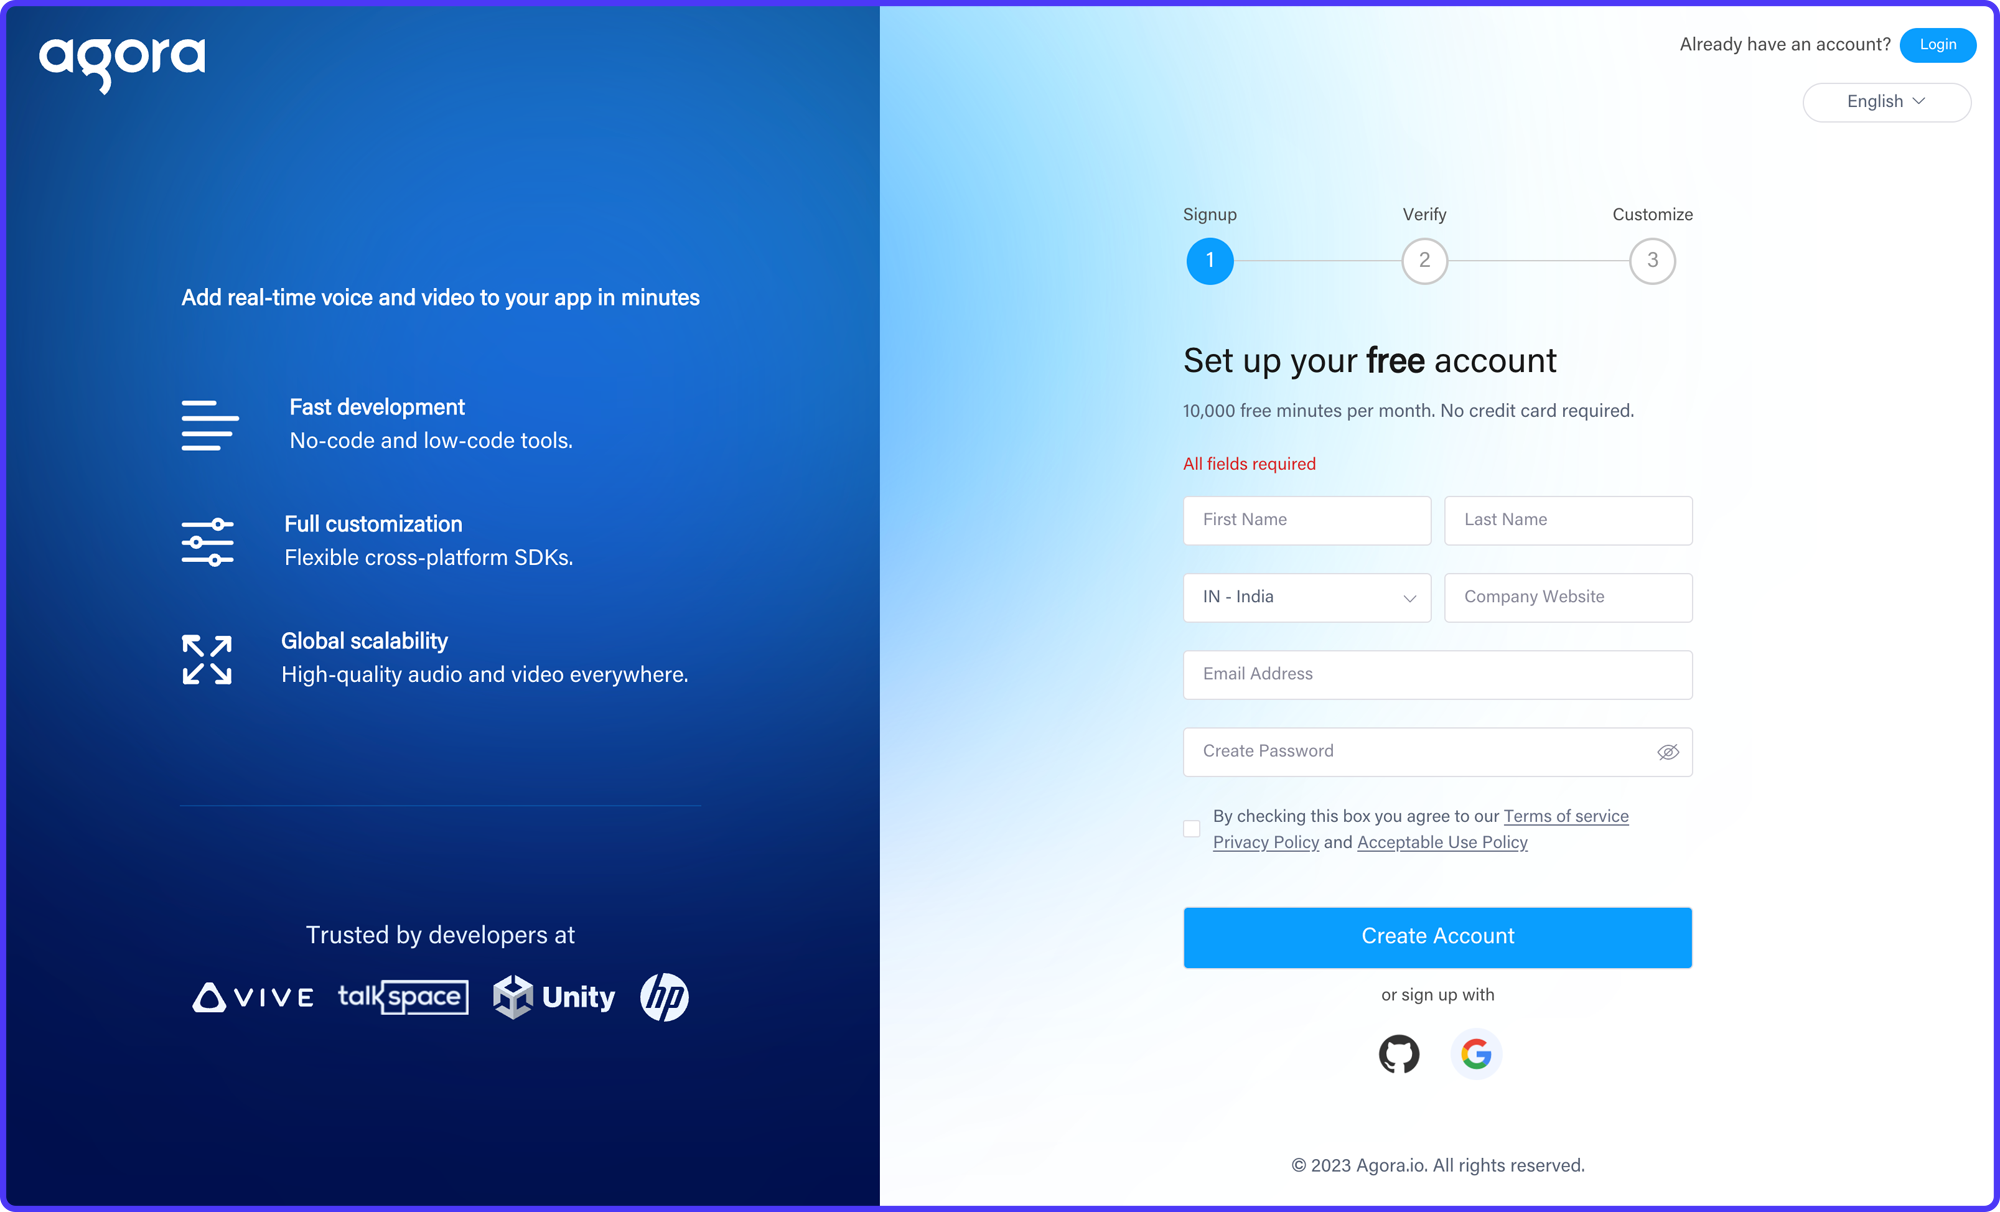
1. Create an Agora Account
Visit the Agora website and sign up for a free account. You'll be prompted to enter your name, email, and password.
2. Log in to the Agora Console
After creating your account, log in to the Agora Console using your email and password.
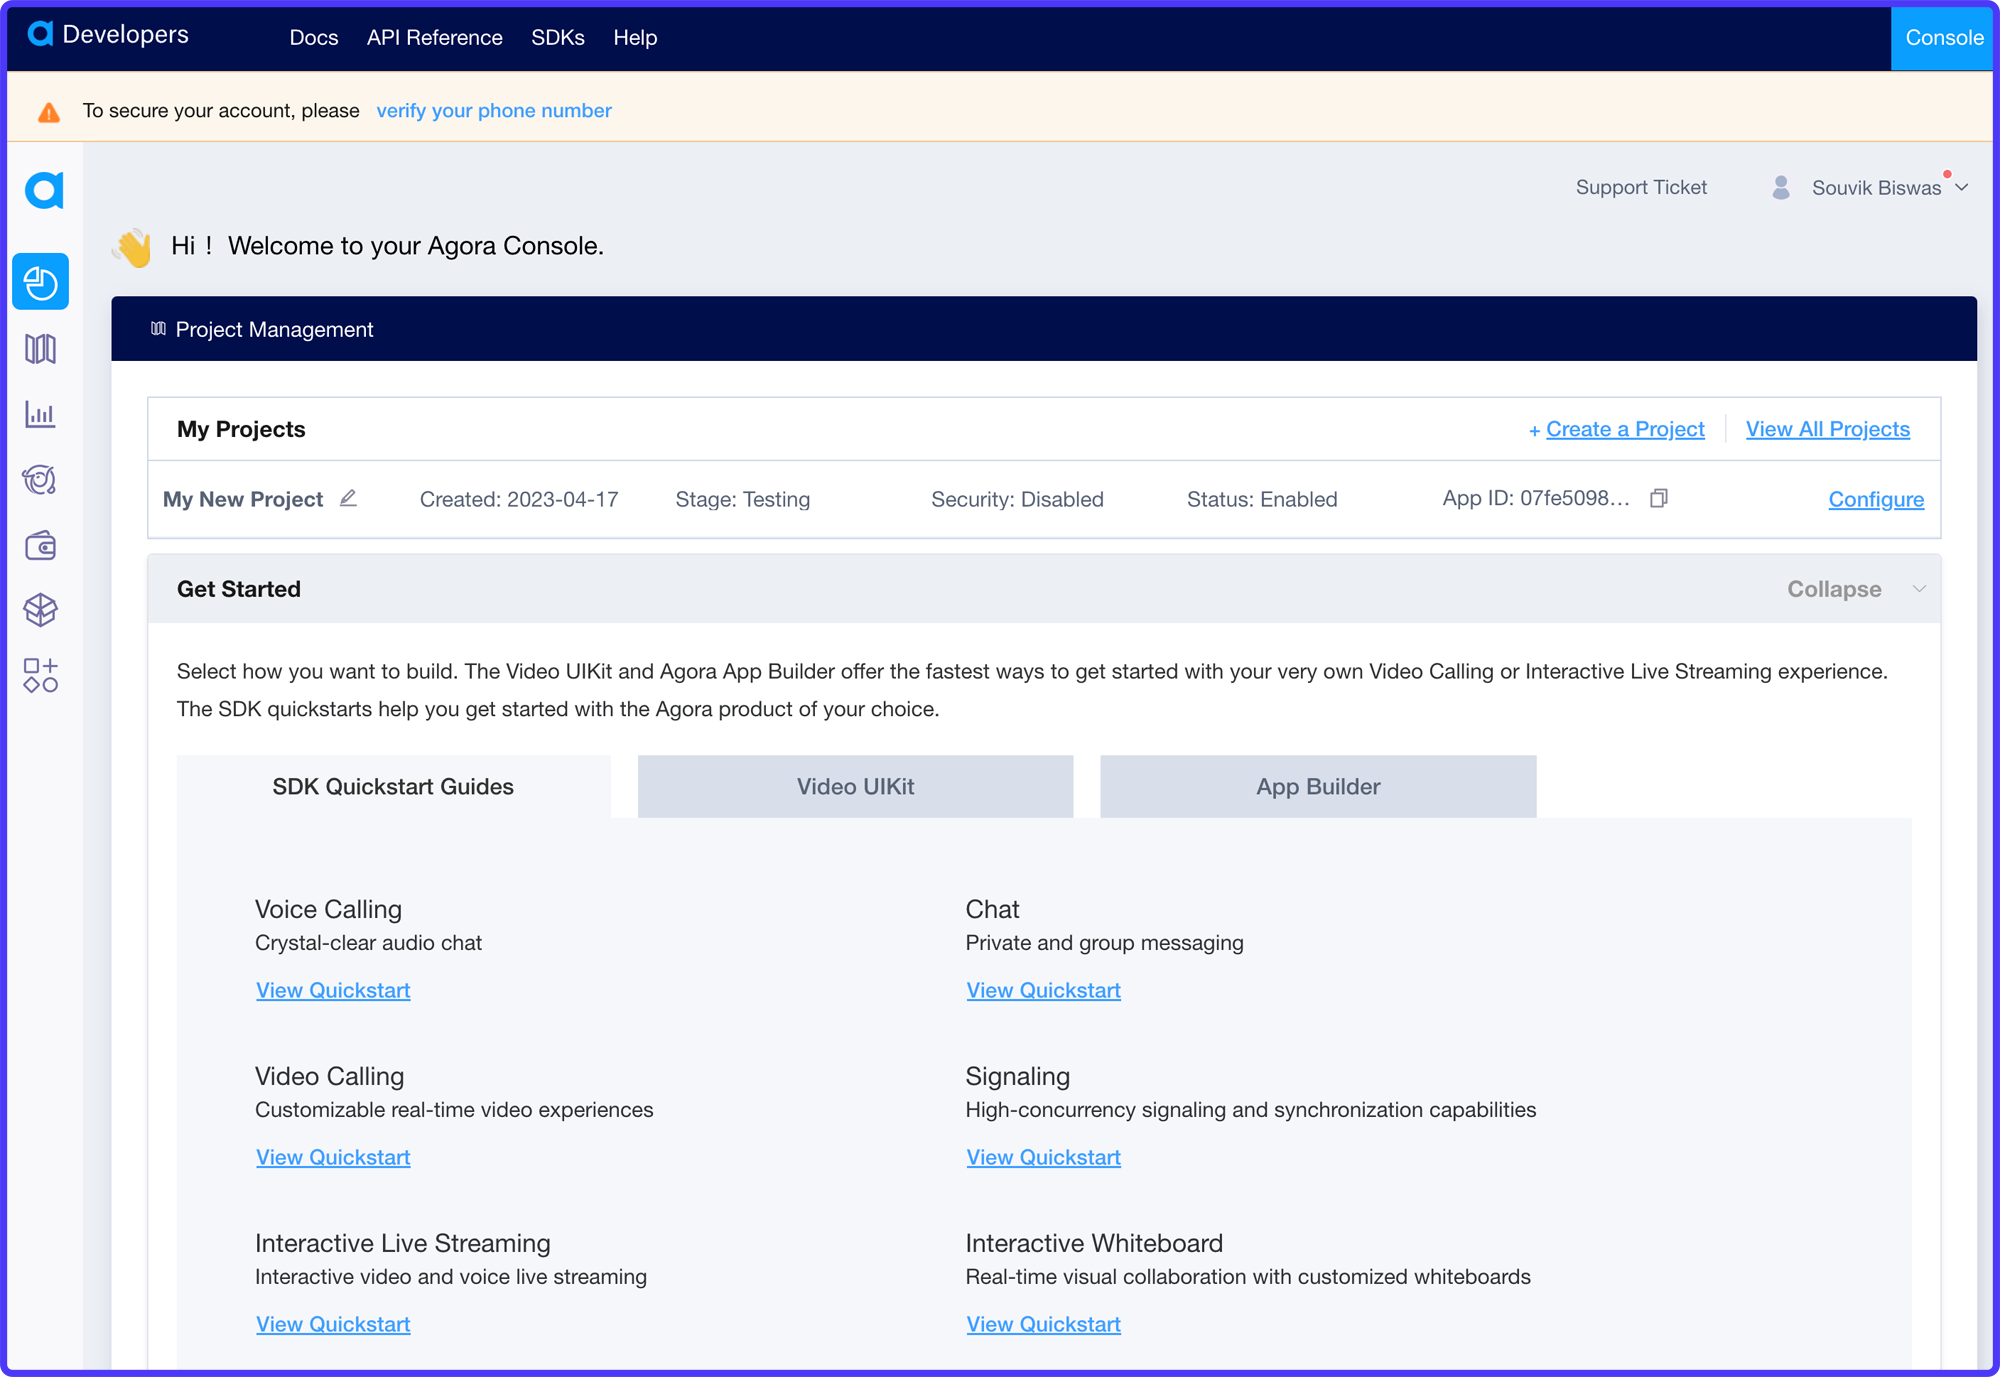
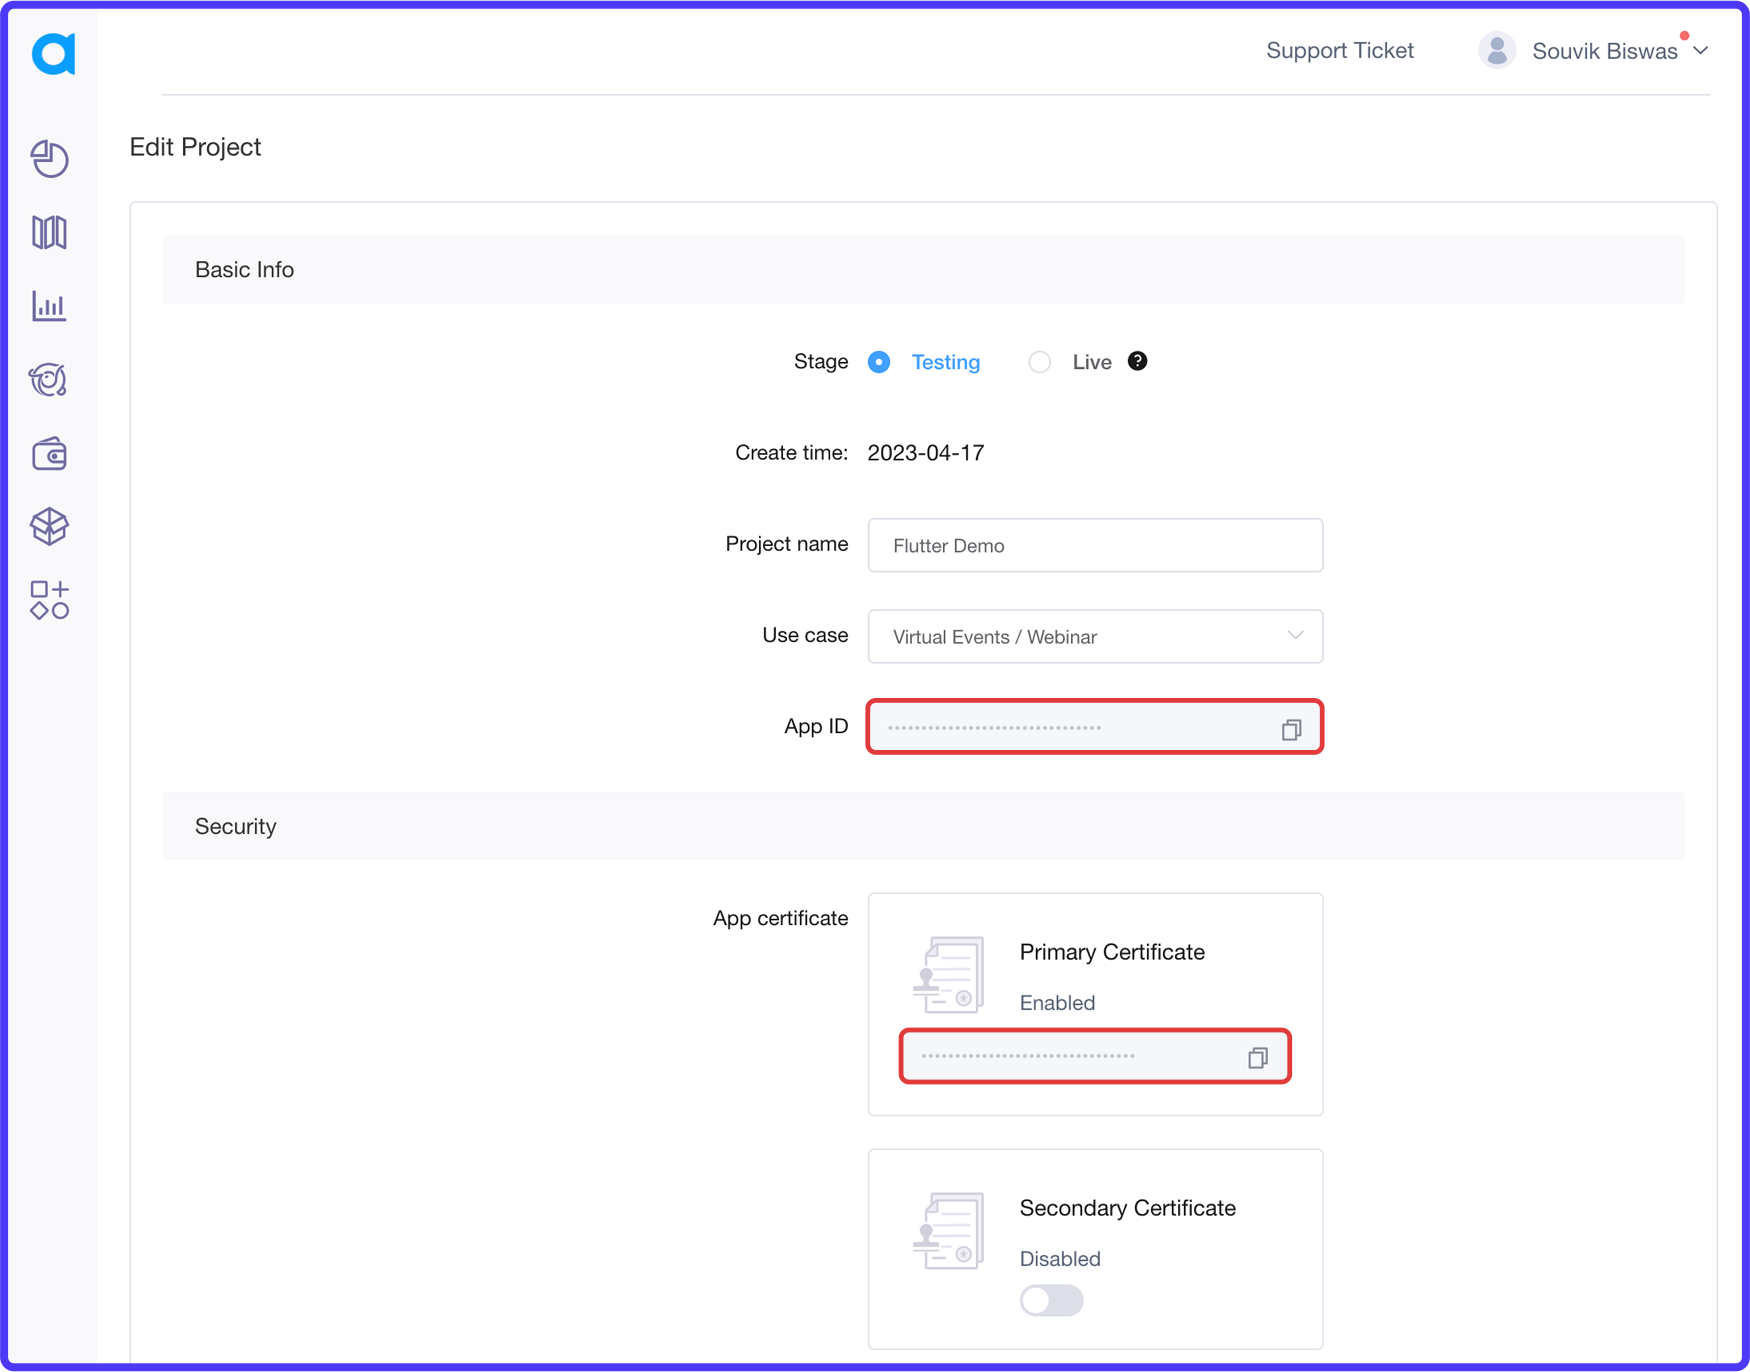
3. Create a New Project
Once logged in, navigate to the Project Management tab on the left sidebar, and click the Create a Project button (or, if you already have a project auto-created, you can continue using that but use the following configuration).
Enter a project name, select a use case, and then choose "Secured mode: APP ID + Token" as the authentication mechanism.
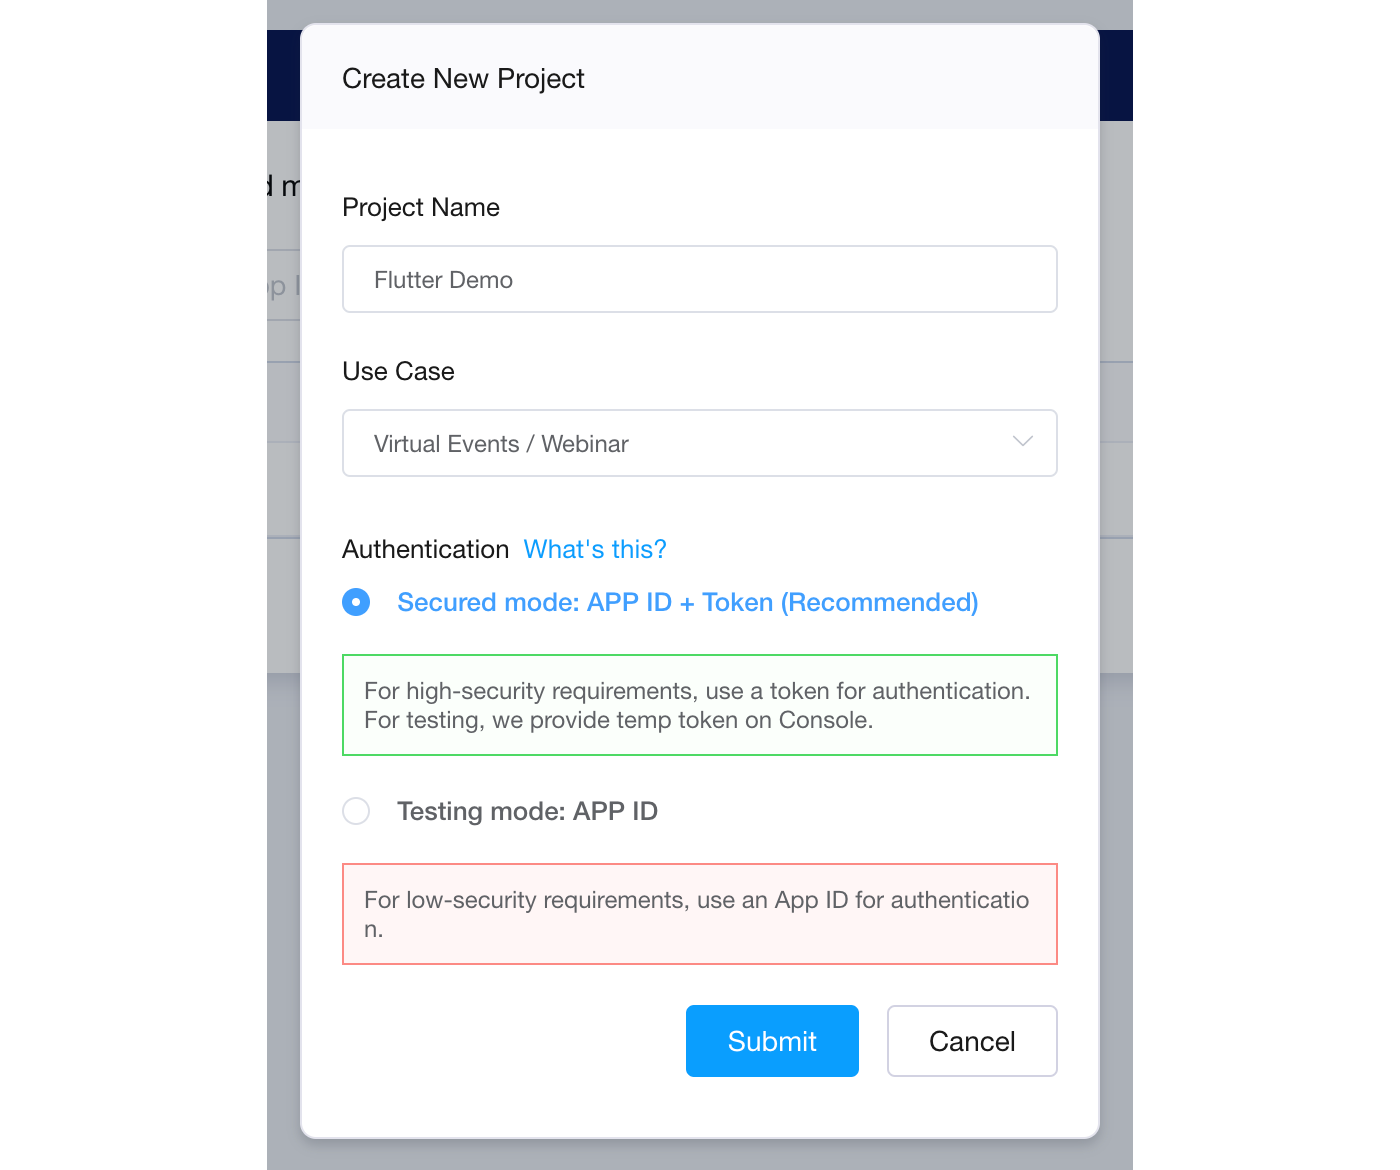
Click Submit to create your new project.
4. Obtain API Credentials
After creating the project, click Configure to open the project details page.
Here, you'll find your App ID, which is a unique identifier for your project, and the App Certificate to generate tokens for user authentication. Make sure to keep both the App ID and App Certificate safe, as you'll need them later when configuring the app.
Now that you have your Agora account set up and API credentials ready, we can move on to configuring the Firebase and Agora SDKs within the Flutter project.
Firebase Configurations
To set up a serverless backend for our Agora token generation, we'll be using Firebase Cloud Functions. In this section, we'll guide you through creating and integrating a new Firebase project with your Flutter app.
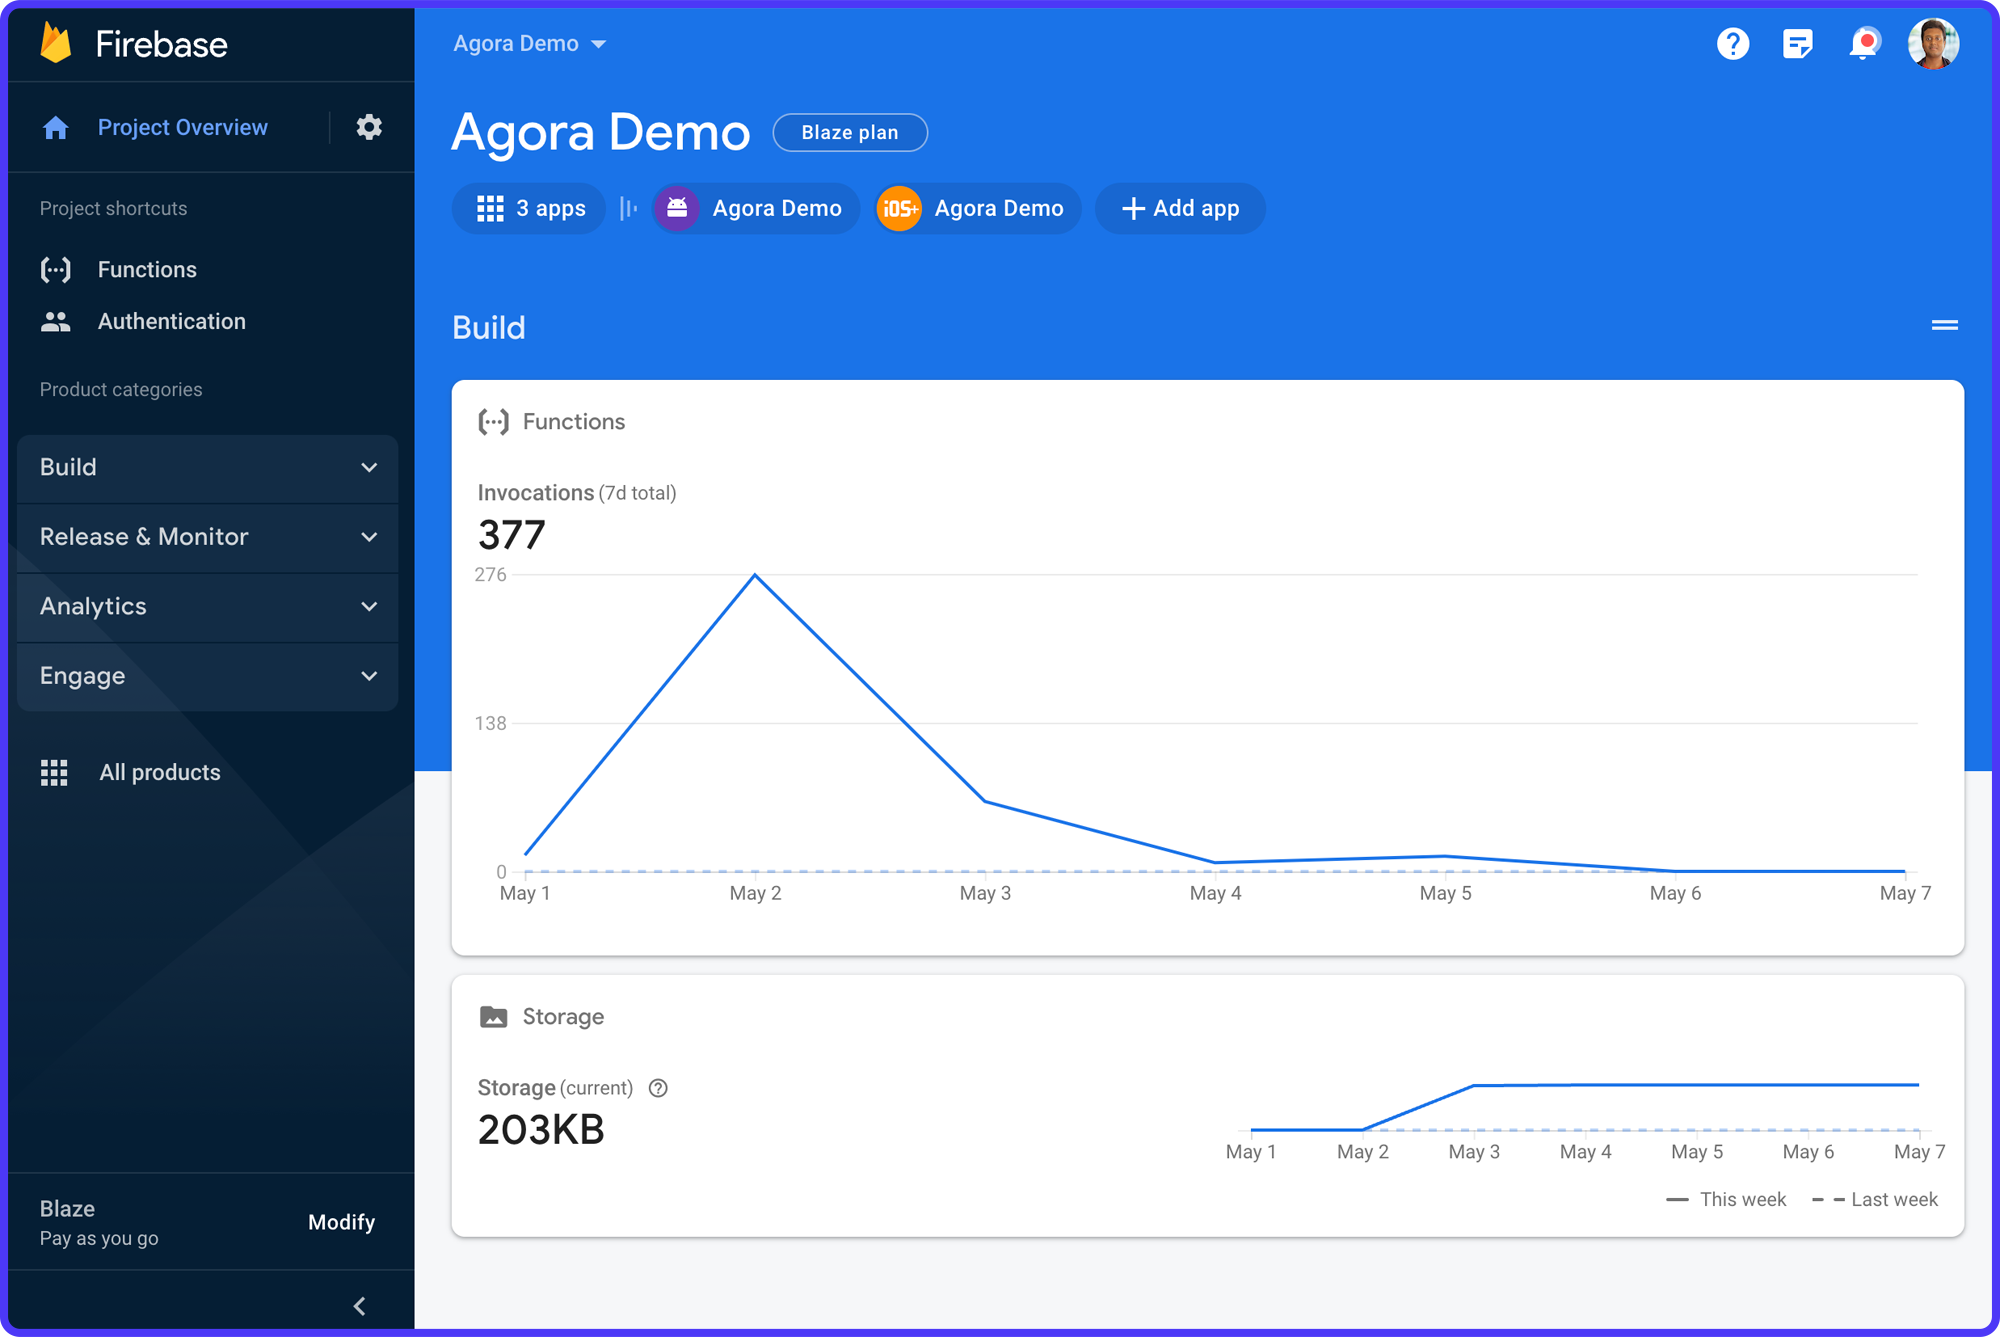
1. Create a Firebase Project
Visit the Firebase Console and sign in with your Google account. Click on the Add project button, and follow the on-screen instructions to set up your new Firebase project.
2. Add Firebase to your Flutter App
To connect your Flutter app to Firebase, you need to register your app with the Firebase project you just created. There are two ways to do this:
- Dart-only initialization (recommended for a Flutter project)
- Manually adding and setting up apps in your Firebase project for each platform (Android, iOS, and Web).
Follow the steps mentioned in the links above to integrate Firebase with your Flutter app.
Make sure you add the firebase_core dependency and update the main() function to initialize Firebase:
Future<void> main() async {
  WidgetsFlutterBinding.ensureInitialized();
  // Use this if using the recommended first method:
  // await Firebase.initializeApp(
  //  options: DefaultFirebaseOptions.currentPlatform,
  //);

  // Or this if using manual config.
  // Add the `google-services.json` and `GoogleService-Info.plist`
  // for your Android and iOS projects. For web you can use
  // `FirebaseOptions` and define the configurations there.
  await Firebase.initializeApp(
    options: firebaseOptions,
  );
  runApp(const MyApp());
}
3. Enable Cloud Functions
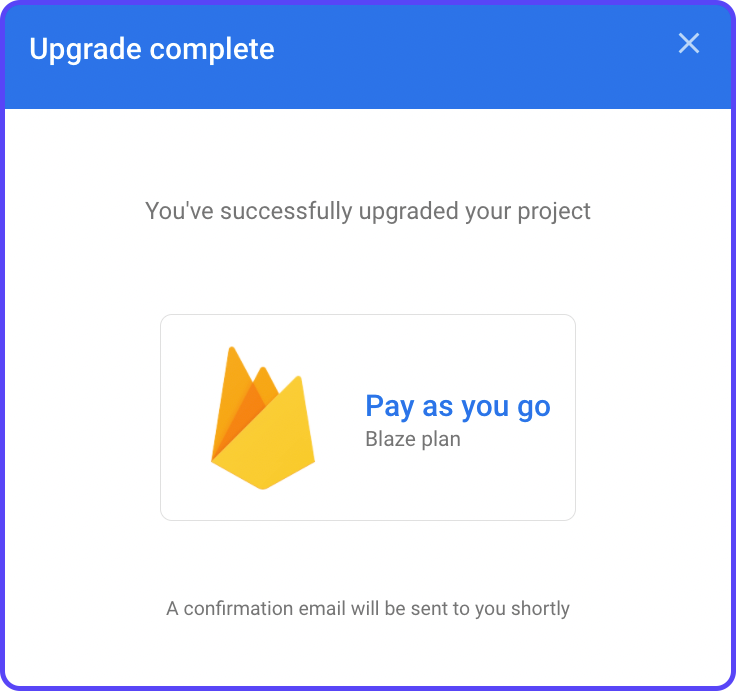
For using Cloud Functions, your project should be in the Blaze Plan. By default, every Firebase project is in Spark Plan.
In the Firebase Console, click on Upgrade from the left menu, select the Blaze Plan, and choose a billing account. Navigate to the "Functions" tab on the left sidebar, and follow the instructions to enable Cloud Functions for your project.
With the Firebase configuration done, you can now proceed to create and deploy the Agora token generation server using Firebase Cloud Functions.
Token Generator
Agora uses token-based authentication to validate the identity of each user before they can create or join a video call. This kind of authentication is typically done on a separate server to decouple it from the client-side app. But we'll use a serverless framework called Firebase Cloud Functions to make it easily maintainable.
1. Initialize Cloud Functions
First, make sure you have the Firebase CLI installed. If not, follow the Firebase CLI documentation to install it.
Next, navigate to your project directory in the terminal and run the following command to log in to Firebase:
firebase loginOnce logged in, initialize Cloud Functions by running:
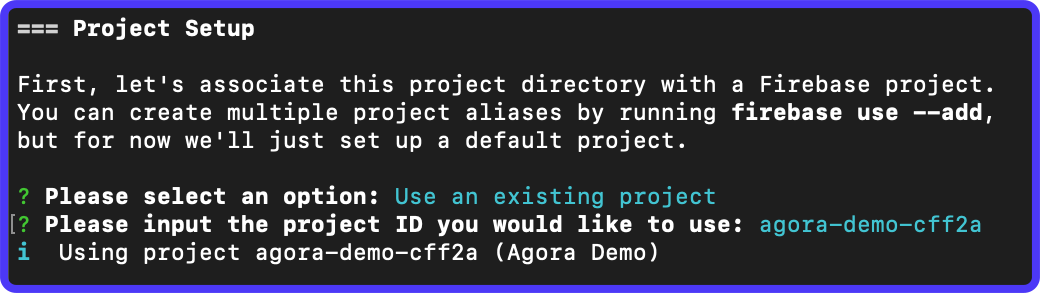
firebase initAmong the features to set up, select Functions.
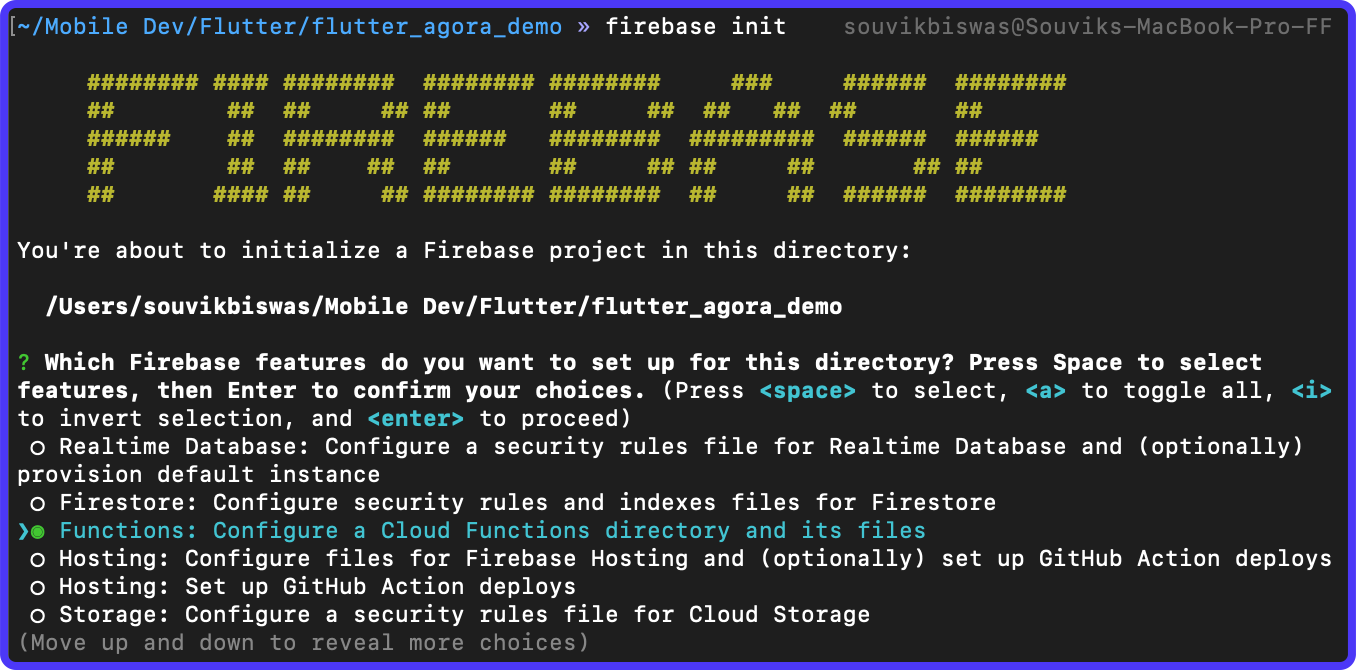
In Project Setup, choose to Use an existing project and enter the project ID of the Firebase project you created earlier.
In Functions Setup, use the following:
- Language: JavaScript
- ESLint enable: Yes
- Install dependencies: Yes
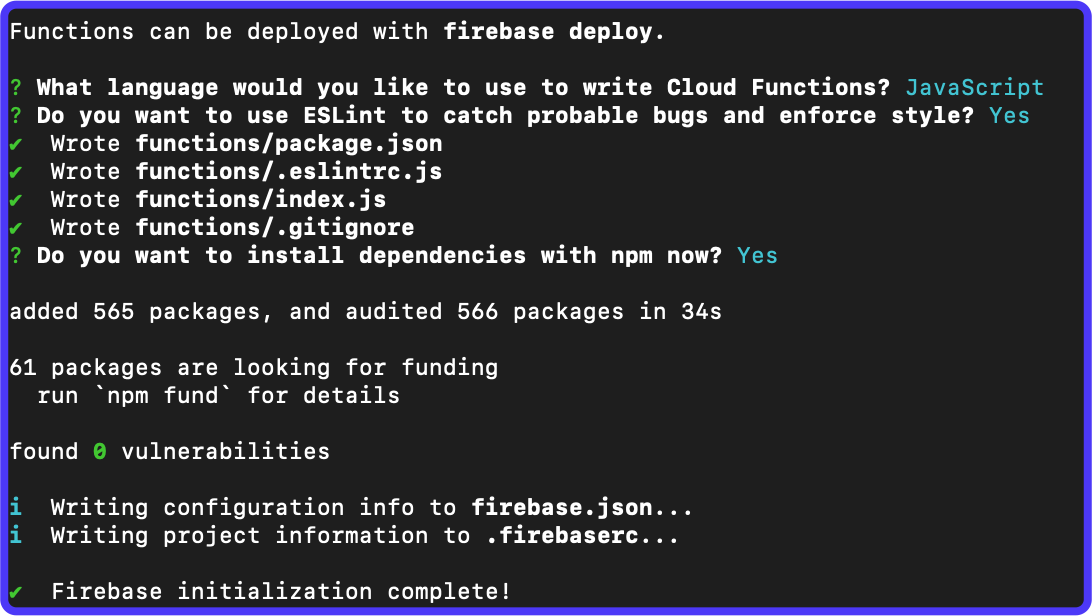
Once the initialization process completes, you will find a new folder is generated inside your Flutter project directory called functions:
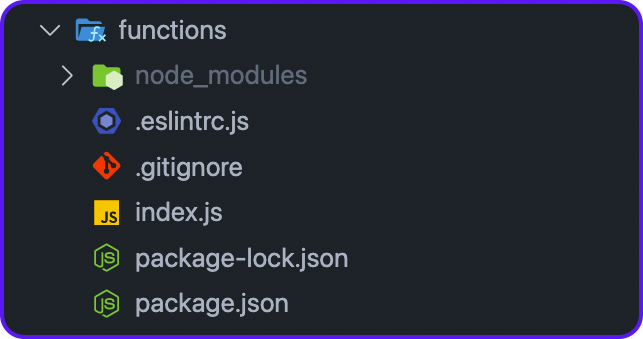
Here, index.js is the file where you have to write the functions. You will find all the dependencies of the Cloud Functions inside the package.json file.
2. Write the Token Generator Function
We will write a generateToken function that will take the user ID (optional), channel name, and expiry time as input and generate a token.
Add a .env file inside the functions folder containing your Agora App ID and App Certificate:
APP_ID=<YOUR_AGORA_APP_ID>
APP_CERTIFICATE=<YOUR_AGORA_CERTIFICATE><YOUR_AGORA_APP_ID> and <YOUR_AGORA_CERTIFICATE> with your App ID and App Certificate respectively, generated from the Agora console.Before starting to write the function, install the required dependencies:
cd functions
npm i agora-token
npm i dotenv
This will add the dependencies to your package.json file.
agora-tokenprovides the Node.js token generation SDK for Agora.dotenvwill help us to read the Agora credentials from the.envfile.
Import the dependencies inside the index.js file. Add the following code:
const functions = require("firebase-functions");
const dotenv = require("dotenv");
const {
  RtcTokenBuilder,
  RtcRole,
} = require("agora-token");
Load the environment variables from .env file:
dotenv.config();Define the generateToken function:
exports.generateToken = functions.https.onCall(async (data, context) => {
  const appId = process.env.APP_ID;
  const appCertificate = process.env.APP_CERTIFICATE;
  const channelName = data.channelName;
  const uid = data.uid || 0;
  const role = RtcRole.PUBLISHER;

  const expirationTimeInSeconds = data.expiryTime;
  const currentTimestamp = Math.floor(Date.now() / 1000);
  const privilegeExpiredTs = currentTimestamp + expirationTimeInSeconds;

  if (channelName === undefined || channelName === null) {
    throw new functions.https.HttpsError(
        "aborted",
        "Channel name is required",
    );
  }

  try {
    const token = RtcTokenBuilder.buildTokenWithUid(
        appId,
        appCertificate,
        channelName,
        uid,
        role,
        privilegeExpiredTs,
    );
    return token;
  } catch (err) {
    throw new functions.https.HttpsError(
        "aborted",
        "Could not generate token",
    );
  }
});
Your cloud function is ready to be deployed!
3. Deploy the Cloud Function
To deploy the cloud function to Firebase, you can use this command:
firebase deploy --only functions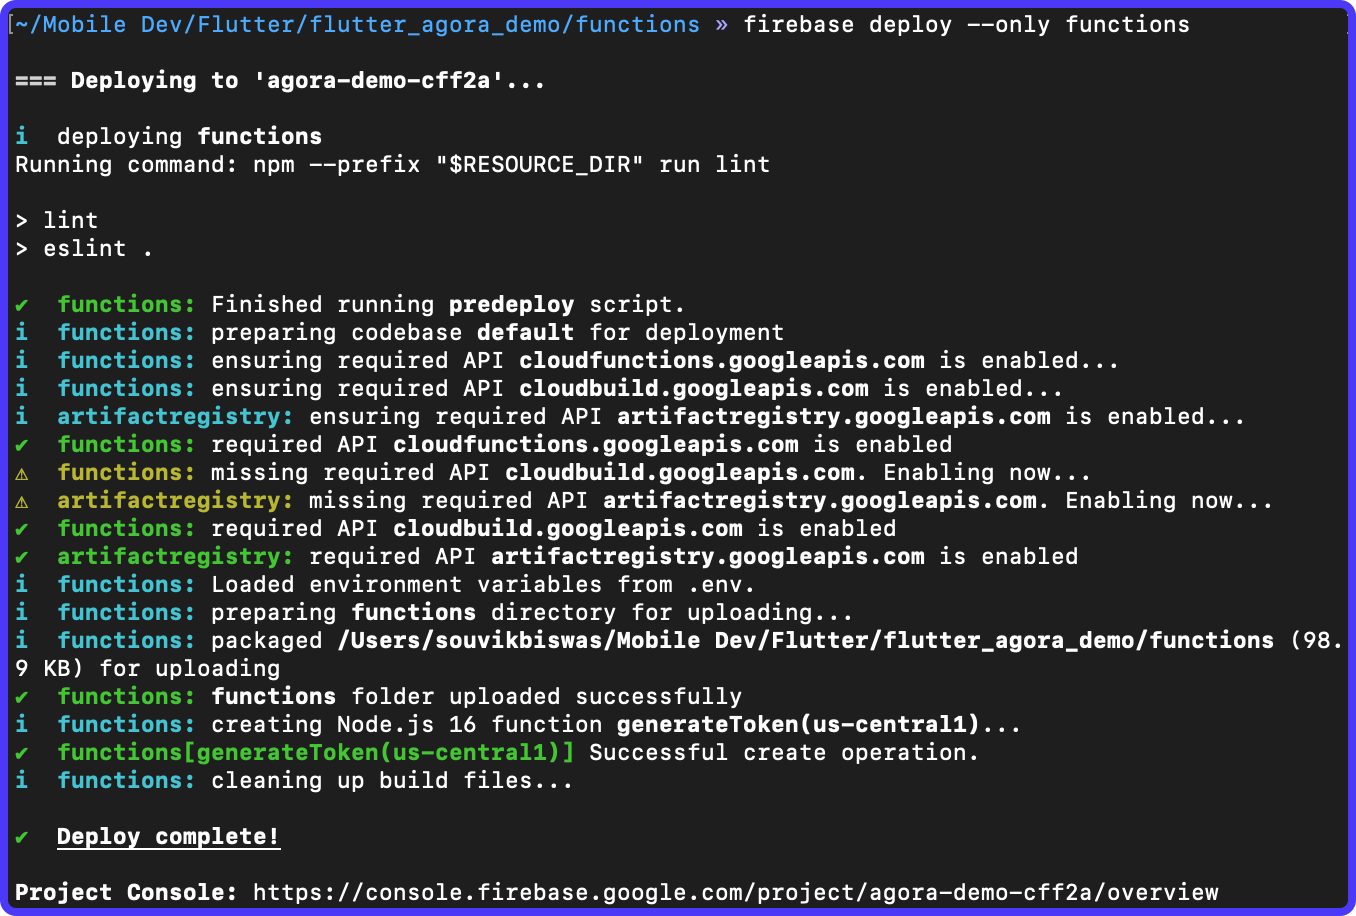
Now that your token generator is up and running, we can move on to creating the Agora channel and implementing the video call features in the app.
Authenticating User
In this section, we'll walk through the process of authenticating a user to access the Agora video calling service in the Flutter app.
Here, we'll use the channel name provided by the user and generate an Agora token using the deployed Cloud Function.
1. Add Cloud Function dependency
Add the cloud_functions dependency to your Flutter app. We'll need that for calling the Cloud Function. Use the following command:
flutter pub add cloud_functions2. Create a Channel Name Input Field
Go back to the CreateChannelPage that we created earlier. On this page, we want to take the channel name as an input and generate the user token.
You can use the TextFormField widget to accept the user input:
TextFormField(
  autofocus: true,
  controller: _channelNameController,
  obscureText: false,
  decoration: InputDecoration(
    labelText: 'Channel Name',
    labelStyle: const TextStyle(
      color: Colors.blue,
      fontSize: 16.0,
      fontWeight: FontWeight.normal,
    ),
    hintText: 'Enter your channel name...',
    hintStyle: const TextStyle(
      color: Color(0xFF57636C),
      fontSize: 16.0,
      fontWeight: FontWeight.normal,
    ),
    enabledBorder: OutlineInputBorder(
      borderSide: const BorderSide(
        color: Colors.blue,
        width: 1.0,
      ),
      borderRadius: BorderRadius.circular(12.0),
    ),
    focusedBorder: OutlineInputBorder(
      borderSide: const BorderSide(
        color: Colors.blue,
        width: 2.0,
      ),
      borderRadius: BorderRadius.circular(12.0),
    ),
    errorBorder: OutlineInputBorder(
      borderSide: const BorderSide(
        color: Colors.red,
        width: 1.0,
      ),
      borderRadius: BorderRadius.circular(12.0),
    ),
    focusedErrorBorder: OutlineInputBorder(
      borderSide: const BorderSide(
        color: Colors.red,
        width: 2.0,
      ),
      borderRadius: BorderRadius.circular(12.0),
    ),
  ),
  style: const TextStyle(
    color: Colors.black,
    fontSize: 16.0,
    fontWeight: FontWeight.normal,
  ),
  keyboardType: TextInputType.text,
  validator: _channelNameValidator,
)
3. Create a Join Button
Next, we can use the channel name entered in the text field to call the cloud function and authenticate the user. Let's define a "Join Room" button:
ElevatedButton(
  style: ElevatedButton.styleFrom(
    backgroundColor: Colors.black,
  ),
  onPressed: _joinRoom,
  child: const Text('Join Room'),
)
4. Generate Agora Token
When this button is tapped, we want to trigger the _joinRoom() method where we will handle the token generation. The method can be defined like this:
// To call the cloud function make sure to import this dependency
import 'package:cloud_functions/cloud_functions.dart';

  // Method for generating the token and proceeding to join
  // the room.
  Future<void> _joinRoom() async {
    final input = <String, dynamic>{
      'channelName': _channelNameController.text,
      'expiryTime': 3600, // 1 hour
    };
    try {
      final response = await FirebaseFunctions.instance
          .httpsCallable('generateToken')
          .call(input);
      final token = response.data as String?;
      if (token != null) {
        debugPrint('Token generated successfully!');
        await Future.delayed(
          const Duration(seconds: 1),
        );
        if (context.mounted) {
          await showDialog(
            context: context,
            builder: (context) => PreJoiningDialog(
              channelName: _channelNameController.text,
              token: token,
            ),
          );
        }
      }
    } catch (e) {
      debugPrint('Error generating token: $e');
    }
  }
If the token is successfully generated, we can proceed and show the PreJoiningDialog where we will take the user's preference for the camera and microphone before joining the video call.
Mic & camera settings
Before users join a video call, it's essential to give them the option to configure their camera and microphone settings. Let's look into how you can get the necessary permissions and present users with a dialog to select their preferences before joining the call.
1. Add the permission_handler package
There's a nice package called permission_handler that lets you easily configure permissions in your Flutter app.
Add the package to your Flutter project using this command:
flutter pub add permission_handlerpermission_handler package works on the Android and iOS platforms, but not on the Web.For Android, there's no additional setup required, the permissions work out of the box. But for iOS, there are a few steps that you need to follow in order to fetch the permissions.
Navigate to ios/Podfile and add the permission for camera and microphone:
post_install do |installer|
  installer.pods_project.targets.each do |target|
    flutter_additional_ios_build_settings(target)
    # Start of the permission_handler configuration
    target.build_configurations.each do |config|
      config.build_settings['GCC_PREPROCESSOR_DEFINITIONS'] ||= [
        '$(inherited)',
        'PERMISSION_CAMERA=1',
        'PERMISSION_MICROPHONE=1',
      ]
    end
    # End of the permission_handler configuration
  end
end
Now, go to the ios/Runner/Info.plist file, and add the following to specify why you need the camera and microphone permissions:
<key>NSCameraUsageDescription</key>
<string>In order to join a video call, this app requires permission to access the camera.</string>
<key>NSMicrophoneUsageDescription</key>
<string>In order to join a video call, this app requires permission to access the microphone.</string>
2. Define PreJoiningDialog widget
The PreJoiningDialog widget should accept the token and channelName as parameters. You can define this inside lib/widgets/pre_joining_dialog.dart file:
class PreJoiningDialog extends StatefulWidget {
  const PreJoiningDialog({
    super.key,
    required this.token,
    required this.channelName,
  });

  final String token;
  final String channelName;

  @override
  State<PreJoiningDialog> createState() => _PreJoiningDialogState();
}

class _PreJoiningDialogState extends State<PreJoiningDialog> {
3. Fetch camera and microphone permissions
To get the permissions, add the following methods, getMicPermisions and getCameraPermissions to the PreJoiningDialog:
class _PreJoiningDialogState extends State<PreJoiningDialog> {
  bool _isMicEnabled = false;
  bool _isCameraEnabled = false;
  bool _isJoining = false;

  Future<void> _getMicPermissions() async {
    if (!kIsWeb && (Platform.isAndroid || Platform.isIOS)) {
      final micPermission = await Permission.microphone.request();
      if (micPermission == PermissionStatus.granted) {
        setState(() => _isMicEnabled = true);
      }
    } else {
      setState(() => _isMicEnabled = !_isMicEnabled);
    }
  }

  Future<void> _getCameraPermissions() async {
    if (!kIsWeb && (Platform.isAndroid || Platform.isIOS)) {
      final cameraPermission = await Permission.camera.request();
      if (cameraPermission == PermissionStatus.granted) {
        setState(() => _isCameraEnabled = true);
      }
    } else {
      setState(() => _isCameraEnabled = !_isCameraEnabled);
    }
  }

  Future<void> _getPermissions() async {
    await _getMicPermissions();
    await _getCameraPermissions();
  }

  // ...
}
Ask for the permissions (if not granted earlier) as soon as this dialog open:
  @override
  void initState() {
    _getPermissions();
    super.initState();
  }
4. Add Toggle Buttons for camera and microphone
Inside the PreJoiningDialog widget, add two toggle buttons that allow users to enable or disable their camera and microphone.
// Button for enabling or disabling microphone
InkWell(
  borderRadius: BorderRadius.circular(32),
  onTap: () {
    if (_isMicEnabled) {
      setState(() => _isMicEnabled = false);
    } else {
      _getMicPermissions();
    }
  },
  child: CircleAvatar(
    backgroundColor: Colors.redAccent,
    radius: 32.0,
    child: Icon(
      _isMicEnabled
          ? Icons.mic_rounded
          : Icons.mic_off_rounded,
      size: 32,
    ),
  ),
)

// Button for enabling or disabling camera
InkWell(
  borderRadius: BorderRadius.circular(32),
  onTap: () {
    if (_isCameraEnabled) {
      setState(() => _isCameraEnabled = false);
    } else {
      _getCameraPermissions();
    }
  },
  child: CircleAvatar(
    backgroundColor: Colors.redAccent,
    radius: 32.0,
    child: Icon(
      _isCameraEnabled
          ? Icons.videocam_rounded
          : Icons.videocam_off_rounded,
      size: 32,
    ),
  ),
)
5. Pass necessary configurations to Video Call Page
Let's define a "Join" button inside the dialog:
ElevatedButton(
  onPressed: _joinCall,
  child: const Text('Join'),
),
The _joinCall() method can be defined like this:
Future<void> _joinCall() async {
  setState(() => _isJoining = true);
  // Step 1
  await dotenv.load(fileName: "functions/.env");
  final appId = dotenv.env['APP_ID'];
  if (appId == null) {
    throw Exception('Please add your APP_ID to .env file');
  }
  setState(() => _isJoining = false);
  if (context.mounted) {
    // Step 2
    Navigator.of(context).pop();
    // Step 3
    await Navigator.of(context).push(
      MaterialPageRoute(
        builder: (context) => VideoCallPage(
          appId: appId,
          token: widget.token,
          channelName: widget.channelName,
          isMicEnabled: _isMicEnabled,
          isVideoEnabled: _isCameraEnabled,
        ),
      ),
    );
  }
}
In Step 1, we load the App ID from the environment variable saved inside functions/.env file. You will need the flutter_dotenv package to use the dotenv.load() method. Run the following command to add this dependency:
flutter pub add flutter_dotenvImport the package by adding the following line on top of the file:
import 'package:flutter_dotenv/flutter_dotenv.dart';In Step 2, the dialog is closed. And in Step 3, we navigate to the VideoCallPage page with the required parameters.
Great! Users can now choose their camera and mic settings before joining a video call. In the upcoming sections, we'll start by initializing the Agora video calling engine, implement call actions, and create the video viewer layout to complete the video calling experience.
Initializing Agora Engine
In this section, we'll guide you through initializing the Agora engine using the agora_rtc_engine package and setting up event handlers to manage call events.
1. Add Agora dependency
Start by adding the agora_rtc_engine package to your pubspec.yaml file:
dependencies:
  agora_rtc_engine: ^5.3.1
Don't forget to run flutter pub get after updating the pubspec.yaml file.
2. Define Video Call Page
You can define the VideoCallPage widget like this:
import 'dart:io';
import 'dart:math';

import 'package:agora_rtc_engine/rtc_engine.dart';
import 'package:flutter/foundation.dart';
import 'package:flutter/material.dart';
import 'package:agora_rtc_engine/rtc_local_view.dart' as rtc_local_view;
import 'package:agora_rtc_engine/rtc_remote_view.dart' as rtc_remote_view;
import 'package:flutter_agora_demo/res/palette.dart';
import 'package:flutter_agora_demo/utils/agora_user.dart';
import 'package:flutter_agora_demo/widgets/call_actions_row.dart';

class VideoCallPage extends StatefulWidget {
  const VideoCallPage({
    super.key,
    required this.appId,
    required this.token,
    required this.channelName,
    required this.isMicEnabled,
    required this.isVideoEnabled,
  });

  final String appId;
  final String token;
  final String channelName;
  final bool isMicEnabled;
  final bool isVideoEnabled;

  @override
  State<VideoCallPage> createState() => _VideoCallPageState();
}

class _VideoCallPageState extends State<VideoCallPage> {
We have added a bunch of import statements that we'll require as we start adding functionality to this page.
Also, define the following variables that we'll need later on:
class _VideoCallPageState extends State<VideoCallPage> {
  late final RtcEngine _agoraEngine;
  late final _users = <AgoraUser>{};
  late double _viewAspectRatio;

  int? _currentUid;
  bool _isMicEnabled = false;
  bool _isVideoEnabled = false;
3. Model class for user info
Create AgoraUser class to hold each user's information and configurations:
import 'package:flutter/material.dart';

class AgoraUser {
  final int uid;
  String? name;
  bool? isAudioEnabled;
  bool? isVideoEnabled;
  Widget? view;

  AgoraUser({
    required this.uid,
    this.name,
    this.isAudioEnabled,
    this.isVideoEnabled,
    this.view,
  });
}
4. Initialize the Agora RTC Engine
Create a new method called _initAgoraRtcEngine() where we'll initialize the RTC engine and specify some configurations.
Future<void> _initAgoraRtcEngine() async {
  _agoraEngine = await RtcEngine.create(widget.appId);
  VideoEncoderConfiguration configuration = VideoEncoderConfiguration();
  configuration.orientationMode = VideoOutputOrientationMode.Adaptative;
  await _agoraEngine.setVideoEncoderConfiguration(configuration);
  await _agoraEngine.enableAudio();
  await _agoraEngine.enableVideo();
  await _agoraEngine.setChannelProfile(ChannelProfile.LiveBroadcasting);
  await _agoraEngine.setClientRole(ClientRole.Broadcaster);
  await _agoraEngine.muteLocalAudioStream(!widget.isMicEnabled);
  await _agoraEngine.muteLocalVideoStream(!widget.isVideoEnabled);
}
Here, we are using Agora's Live Streaming SDK, which helps you to connect with a group of people using real-time voice and video interaction.
In the above code, we have used the microphone and camera configurations (whether to keep them enabled or disabled) as selected by the user in the previous dialog.
5. Setup Agora Event Handlers
You can use the RtcEngineEventHandler class to handle the important events emitted by the Agora RTC engine. We'll go ahead and define the following event handlers inside the _addAgoraEventHandlers() method:
void _addAgoraEventHandlers() => _agoraEngine.setEventHandler(
      RtcEngineEventHandler(
        error: (code) {
          final info = 'LOG::onError: $code';
          debugPrint(info);
        },
        joinChannelSuccess: (channel, uid, elapsed) {
          final info = 'LOG::onJoinChannel: $channel, uid: $uid';
          debugPrint(info);
          setState(() {
            _currentUid = uid;
            _users.add(
              AgoraUser(
                uid: uid,
                isAudioEnabled: _isMicEnabled,
                isVideoEnabled: _isVideoEnabled,
                view: const rtc_local_view.SurfaceView(),
              ),
            );
          });
        },
        firstLocalAudioFrame: (elapsed) {
          final info = 'LOG::firstLocalAudio: $elapsed';
          debugPrint(info);
          for (AgoraUser user in _users) {
            if (user.uid == _currentUid) {
              setState(() => user.isAudioEnabled = _isMicEnabled);
            }
          }
        },
        firstLocalVideoFrame: (width, height, elapsed) {
          debugPrint('LOG::firstLocalVideo');
          for (AgoraUser user in _users) {
            if (user.uid == _currentUid) {
              setState(
                () => user
                  ..isVideoEnabled = _isVideoEnabled
                  ..view = const rtc_local_view.SurfaceView(
                    renderMode: VideoRenderMode.Hidden,
                  ),
              );
            }
          }
        },
        leaveChannel: (stats) {
          debugPrint('LOG::onLeaveChannel');
          setState(() => _users.clear());
        },
        userJoined: (uid, elapsed) {
          final info = 'LOG::userJoined: $uid';
          debugPrint(info);
          setState(
            () => _users.add(
              AgoraUser(
                uid: uid,
                view: rtc_remote_view.SurfaceView(
                  channelId: widget.channelName,
                  uid: uid,
                ),
              ),
            ),
          );
        },
        userOffline: (uid, elapsed) {
          final info = 'LOG::userOffline: $uid';
          debugPrint(info);
          AgoraUser? userToRemove;
          for (AgoraUser user in _users) {
            if (user.uid == uid) {
              userToRemove = user;
            }
          }
          setState(() => _users.remove(userToRemove));
        },
        firstRemoteAudioFrame: (uid, elapsed) {
          final info = 'LOG::firstRemoteAudio: $uid';
          debugPrint(info);
          for (AgoraUser user in _users) {
            if (user.uid == uid) {
              setState(() => user.isAudioEnabled = true);
            }
          }
        },
        firstRemoteVideoFrame: (uid, width, height, elapsed) {
          final info = 'LOG::firstRemoteVideo: $uid ${width}x $height';
          debugPrint(info);
          for (AgoraUser user in _users) {
            if (user.uid == uid) {
              setState(
                () => user
                  ..isVideoEnabled = true
                  ..view = rtc_remote_view.SurfaceView(
                    channelId: widget.channelName,
                    uid: uid,
                  ),
              );
            }
          }
        },
        remoteVideoStateChanged: (uid, state, reason, elapsed) {
          final info = 'LOG::remoteVideoStateChanged: $uid $state $reason';
          debugPrint(info);
          for (AgoraUser user in _users) {
            if (user.uid == uid) {
              setState(() =>
                  user.isVideoEnabled = state != VideoRemoteState.Stopped);
            }
          }
        },
        remoteAudioStateChanged: (uid, state, reason, elapsed) {
          final info = 'LOG::remoteAudioStateChanged: $uid $state $reason';
          debugPrint(info);
          for (AgoraUser user in _users) {
            if (user.uid == uid) {
              setState(() =>
                  user.isAudioEnabled = state != AudioRemoteState.Stopped);
            }
          }
        },
      ),
    );
6. Call Initialization Function
Finally, to complete the initialization process, we'll define a method called _initialize() and call it inside the initState() method:
Future<void> _initialize() async {
  // Set aspect ratio for video according to platform
  if (kIsWeb) {
    _viewAspectRatio = 3 / 2;
  } else if (Platform.isAndroid || Platform.isIOS) {
    _viewAspectRatio = 2 / 3;
  } else {
    _viewAspectRatio = 3 / 2;
  }
  // Initialize microphone and camera
  setState(() {
    _isMicEnabled = widget.isMicEnabled;
    _isVideoEnabled = widget.isVideoEnabled;
  });
  await _initAgoraRtcEngine();
  _addAgoraEventHandlers();
  final options = ChannelMediaOptions(
    publishLocalAudio: _isMicEnabled,
    publishLocalVideo: _isVideoEnabled,
  );
  // Join the channel
  await _agoraEngine.joinChannel(
    widget.token,
    widget.channelName,
    null, // optionalInfo (unused)
    0, // User ID
    options,
  );
}

@override
void initState() {
  _initialize();
  super.initState();
}
In the above code, inside the _agoraEngine.joinChannel() method we have passed in 0 as the user ID, which means Agora will auto-generate a random user ID and assign it to the user when someone joins the channel.
It's alright to use the auto-generated user ID for this demo app. But while building an app for a practical use case, it's always preferred to manage the user IDs, as it will also help to get some finer controls per user basis.
7. Dispose Agora
To release the resources and prevent any memory leaks, it's recommended to dispose of the Agora RTC Engine when the user navigates to a different page:
@override
void dispose() {
  _users.clear();
  _disposeAgora();
  super.dispose();
}

Future<void> _disposeAgora() async {
  await _agoraEngine.leaveChannel();
  await _agoraEngine.destroy();
}
Implementing Call Actions
While inside a video call, it's essential to provide a way for the users to control various call actions, such as toggling audio, toggling the camera, switching the camera, and ending the call. These actions will help users manage their video call experience effectively.
1. Toggle Audio Action
Define a method called _onToggleAudio() that will let users mute or unmute the local audio:
void _onToggleAudio() {
  setState(() {
    _isMicEnabled = !_isMicEnabled;
    for (AgoraUser user in _users) {
      if (user.uid == _currentUid) {
        user.isAudioEnabled = _isMicEnabled;
      }
    }
  });
  _agoraEngine.muteLocalAudioStream(!_isMicEnabled);
}
2. Toggle Camera Action
Define a method called _onToggleCamera() that will let users enable or disable the local video:
void _onToggleCamera() {
  setState(() {
    _isVideoEnabled = !_isVideoEnabled;
    for (AgoraUser user in _users) {
      if (user.uid == _currentUid) {
        setState(() => user.isVideoEnabled = _isVideoEnabled);
      }
    }
  });
  _agoraEngine.muteLocalVideoStream(!_isVideoEnabled);
}
3. Switch Camera Action
Define a method called _onSwitchCamera() that will let users switch between the front and rear cameras:
void _onSwitchCamera() => _agoraEngine.switchCamera();4. Call End Action
Define a method called _onCallEnd() that will let users end the call and leave the channel. Once someone leaves the call, they will be navigated back to the Create Channel Page.
Future<void> _onCallEnd(BuildContext context) async {
  await _agoraEngine.leaveChannel();
  if (context.mounted) {
    Navigator.of(context).pop();
  }
}
5. Building Call Actions UI
Let's build a UI and wire up these functions with their corresponding buttons. We build a widget called CallActionsRow which would look like this:
Start with designing the button UI. We'll create a widget called CallActionButton:
import 'package:flutter/material.dart';

class CallActionButton extends StatelessWidget {
  const CallActionButton({
    super.key,
    this.onTap,
    required this.icon,
    this.callEnd = false,
    this.isEnabled = true,
  });

  final Function()? onTap;
  final IconData icon;
  final bool callEnd;
  final bool isEnabled;

  @override
  Widget build(BuildContext context) {
    return InkWell(
      borderRadius: BorderRadius.circular(32),
      onTap: onTap,
      child: CircleAvatar(
        backgroundColor: callEnd
            ? Colors.redAccent
            : isEnabled
                ? Colors.grey.shade800
                : Colors.white,
        radius: callEnd ? 28 : 24,
        child: Icon(
          icon,
          size: callEnd ? 26 : 22,
          color: callEnd
              ? Colors.white
              : isEnabled
                  ? Colors.white
                  : Colors.grey.shade600,
        ),
      ),
    );
  }
}
Now, define the CallActionRow widget, which will encapsulate the action buttons:
import 'package:flutter/material.dart';
import 'package:flutter_agora_demo/widgets/call_action_button.dart';

class CallActionsRow extends StatelessWidget {
  const CallActionsRow({
    super.key,
    required this.isMicEnabled,
    required this.isVideoEnabled,
    required this.onCallEnd,
    required this.onToggleAudio,
    required this.onToggleCamera,
    required this.onSwitchCamera,
  });

  final bool isMicEnabled;
  final bool isVideoEnabled;
  final Function()? onCallEnd;
  final Function()? onToggleAudio;
  final Function()? onToggleCamera;
  final Function()? onSwitchCamera;

  @override
  Widget build(BuildContext context) {
    return SizedBox(
      width: 400,
      child: Row(
        mainAxisAlignment: MainAxisAlignment.spaceEvenly,
        children: <Widget>[
          CallActionButton(
            callEnd: true,
            icon: Icons.call_end,
            onTap: onCallEnd,
          ),
          CallActionButton(
            icon: isMicEnabled ? Icons.mic : Icons.mic_off,
            isEnabled: isMicEnabled,
            onTap: onToggleAudio,
          ),
          CallActionButton(
            icon: isVideoEnabled
                ? Icons.videocam_rounded
                : Icons.videocam_off_rounded,
            isEnabled: isVideoEnabled,
            onTap: onToggleCamera,
          ),
          CallActionButton(
            icon: Icons.cameraswitch_rounded,
            onTap: onSwitchCamera,
          ),
        ],
      ),
    );
  }
}
Finally, use this widget on the VideoCallPage and wire up the respective functionalities:
CallActionsRow(
  isMicEnabled: _isMicEnabled,
  isVideoEnabled: _isVideoEnabled,
  onCallEnd: () => _onCallEnd(context),
  onToggleAudio: _onToggleAudio,
  onToggleCamera: _onToggleCamera,
  onSwitchCamera: _onSwitchCamera,
)
Awesome! You've completed implementing the call actions – users can now manage their audio and camera settings during a video call. In the next section, we'll create the video viewer layout to complete the video calling experience.
Creating Video Layout
In this section, we'll guide you through creating a responsive video viewer layout for your video call. We'll use the Agora RTC Engine to display local and remote video feeds, and create a layout that adapts to multiple users.
1. Create users video view
Define a widget called AgoraVideoView which will help to preview the local or remote user's video feed in real-time.
class AgoraVideoView extends StatelessWidget {
  const AgoraVideoView({
    super.key,
    required double viewAspectRatio,
    required AgoraUser user,
  })  : _viewAspectRatio = viewAspectRatio,
        _user = user;

  final double _viewAspectRatio;
  final AgoraUser _user;

  @override
  Widget build(BuildContext context) {
    return Flexible(
      child: Padding(
        padding: const EdgeInsets.all(2.0),
        child: AspectRatio(
          aspectRatio: _viewAspectRatio,
          child: Container(
            decoration: BoxDecoration(
              color: Colors.grey.shade900,
              borderRadius: BorderRadius.circular(8.0),
              border: Border.all(
                color: _user.isAudioEnabled ?? false ? Colors.blue : Colors.red,
                width: 2.0,
              ),
            ),
            child: Stack(
              children: [
                Center(
                  child: CircleAvatar(
                    backgroundColor: Colors.grey.shade800,
                    maxRadius: 18,
                    child: Icon(
                      Icons.person,
                      color: Colors.grey.shade600,
                      size: 24.0,
                    ),
                  ),
                ),
                if (_user.isVideoEnabled ?? false)
                  ClipRRect(
                    borderRadius: BorderRadius.circular(8 - 2),
                    child: _user.view,
                  ),
              ],
            ),
          ),
        ),
      ),
    );
  }
}
When any user has their video feed disabled, it will show a dark grey background with a person icon. Whether a user is muted, is indicated by the red border around the video preview (otherwise, it's a blue border).
2. Responsive video layout
We'll create an AgoraVideoLayout widget, which will handle the responsive layout and auto-scale to accommodate all the user's video previews inside the screen.
class AgoraVideoLayout extends StatelessWidget {
  const AgoraVideoLayout({
    super.key,
    required Set<AgoraUser> users,
    required List<int> views,
    required double viewAspectRatio,
  })  : _users = users,
        _views = views,
        _viewAspectRatio = viewAspectRatio;

  final Set<AgoraUser> _users;
  final List<int> _views;
  final double _viewAspectRatio;

  @override
  Widget build(BuildContext context) {
    int totalCount = _views.reduce((value, element) => value + element);
    int rows = _views.length;
    int columns = _views.reduce(max);

    List<Widget> rowsList = [];
    for (int i = 0; i < rows; i++) {
      List<Widget> rowChildren = [];
      for (int j = 0; j < columns; j++) {
        int index = i * columns + j;
        if (index < totalCount) {
          rowChildren.add(
            AgoraVideoView(
              user: _users.elementAt(index),
              viewAspectRatio: _viewAspectRatio,
            ),
          );
        } else {
          rowChildren.add(
            const SizedBox.shrink(),
          );
        }
      }
      rowsList.add(
        Flexible(
          child: Row(
            mainAxisAlignment: MainAxisAlignment.center,
            children: rowChildren,
          ),
        ),
      );
    }
    return Column(
      mainAxisAlignment: MainAxisAlignment.center,
      children: rowsList,
    );
  }
}
3. Formula for building video layout
In order to correctly calculate the number of video previews in each row and the total number of columns that should be in the layout, we'll use the following method:
List<int> _createLayout(int n) {
  int rows = (sqrt(n).ceil());
  int columns = (n / rows).ceil();

  List<int> layout = List<int>.filled(rows, columns);
  int remainingScreens = rows * columns - n;

  for (int i = 0; i < remainingScreens; i++) {
    layout[layout.length - 1 - i] -= 1;
  }

  return layout;
}
This returns the number of views that should be in each row of the layout.
4. Use Orientation Builder to determine the aspect ratio
To use the AgoraVideoLayout widget inside the build() method of the VideoCallPage, we'll wrap it with an OrientationBuilder to determine the aspect ratio based on the orientation of the mobile screen.
OrientationBuilder(
  builder: (context, orientation) {
    final isPortrait = orientation == Orientation.portrait;
    if (_users.isEmpty) {
      return const SizedBox();
    }
    WidgetsBinding.instance.addPostFrameCallback(
      (_) => setState(
          () => _viewAspectRatio = isPortrait ? 2 / 3 : 3 / 2),
    );
    final layoutViews = _createLayout(_users.length);
    return AgoraVideoLayout(
      users: _users,
      views: layoutViews,
      viewAspectRatio: _viewAspectRatio,
    );
  },
)
In the above code, we have also used the calculated layout views based on the formula and passed it to the AgoraVideoLayout widget.
With this setup, your app will create a video view for each user in the channel, allowing for a group video call experience. Adjust the layout as necessary to suit your specific use case.
Conclusion
Through the course of this article, we've embarked on a journey of creating a video calling application using Agora and Flutter. From setting up Agora and Firebase to implementing critical features such as creating Agora channels, handling mic and camera settings, defining call actions, and creating a dynamic video layout, we've covered essential aspects of building a real-time communication experience.
This knowledge should provide you a solid base for your journey into building more complex real-time applications. Keep exploring and keep coding!
