
Most apps require user authentication to show relevant data curated for each user. One of the popular methods is phone authentication. It works by sending a One-Time-Password (OTP) to the user's phone number via an SMS, which needs to be provided in the app for the authentication to be successful.
This method is also considered more secure than password-based authentication as the unique code (OTP), as the name indicates, can be used just once. On top of that, the OTP might have a timeout duration attached to it, after which it won't be valid.
In this article, you will learn to integrate Phone Authentication using Firebase into your FlutterFlow app.
App Overview
We will be adding phone authentication to a sample voice chatting application using which users can create 1:1 voice chat sessions as well as conferences for group voice chat (this article just focuses on the authentication part of the app).
The app will consist of the following screens:
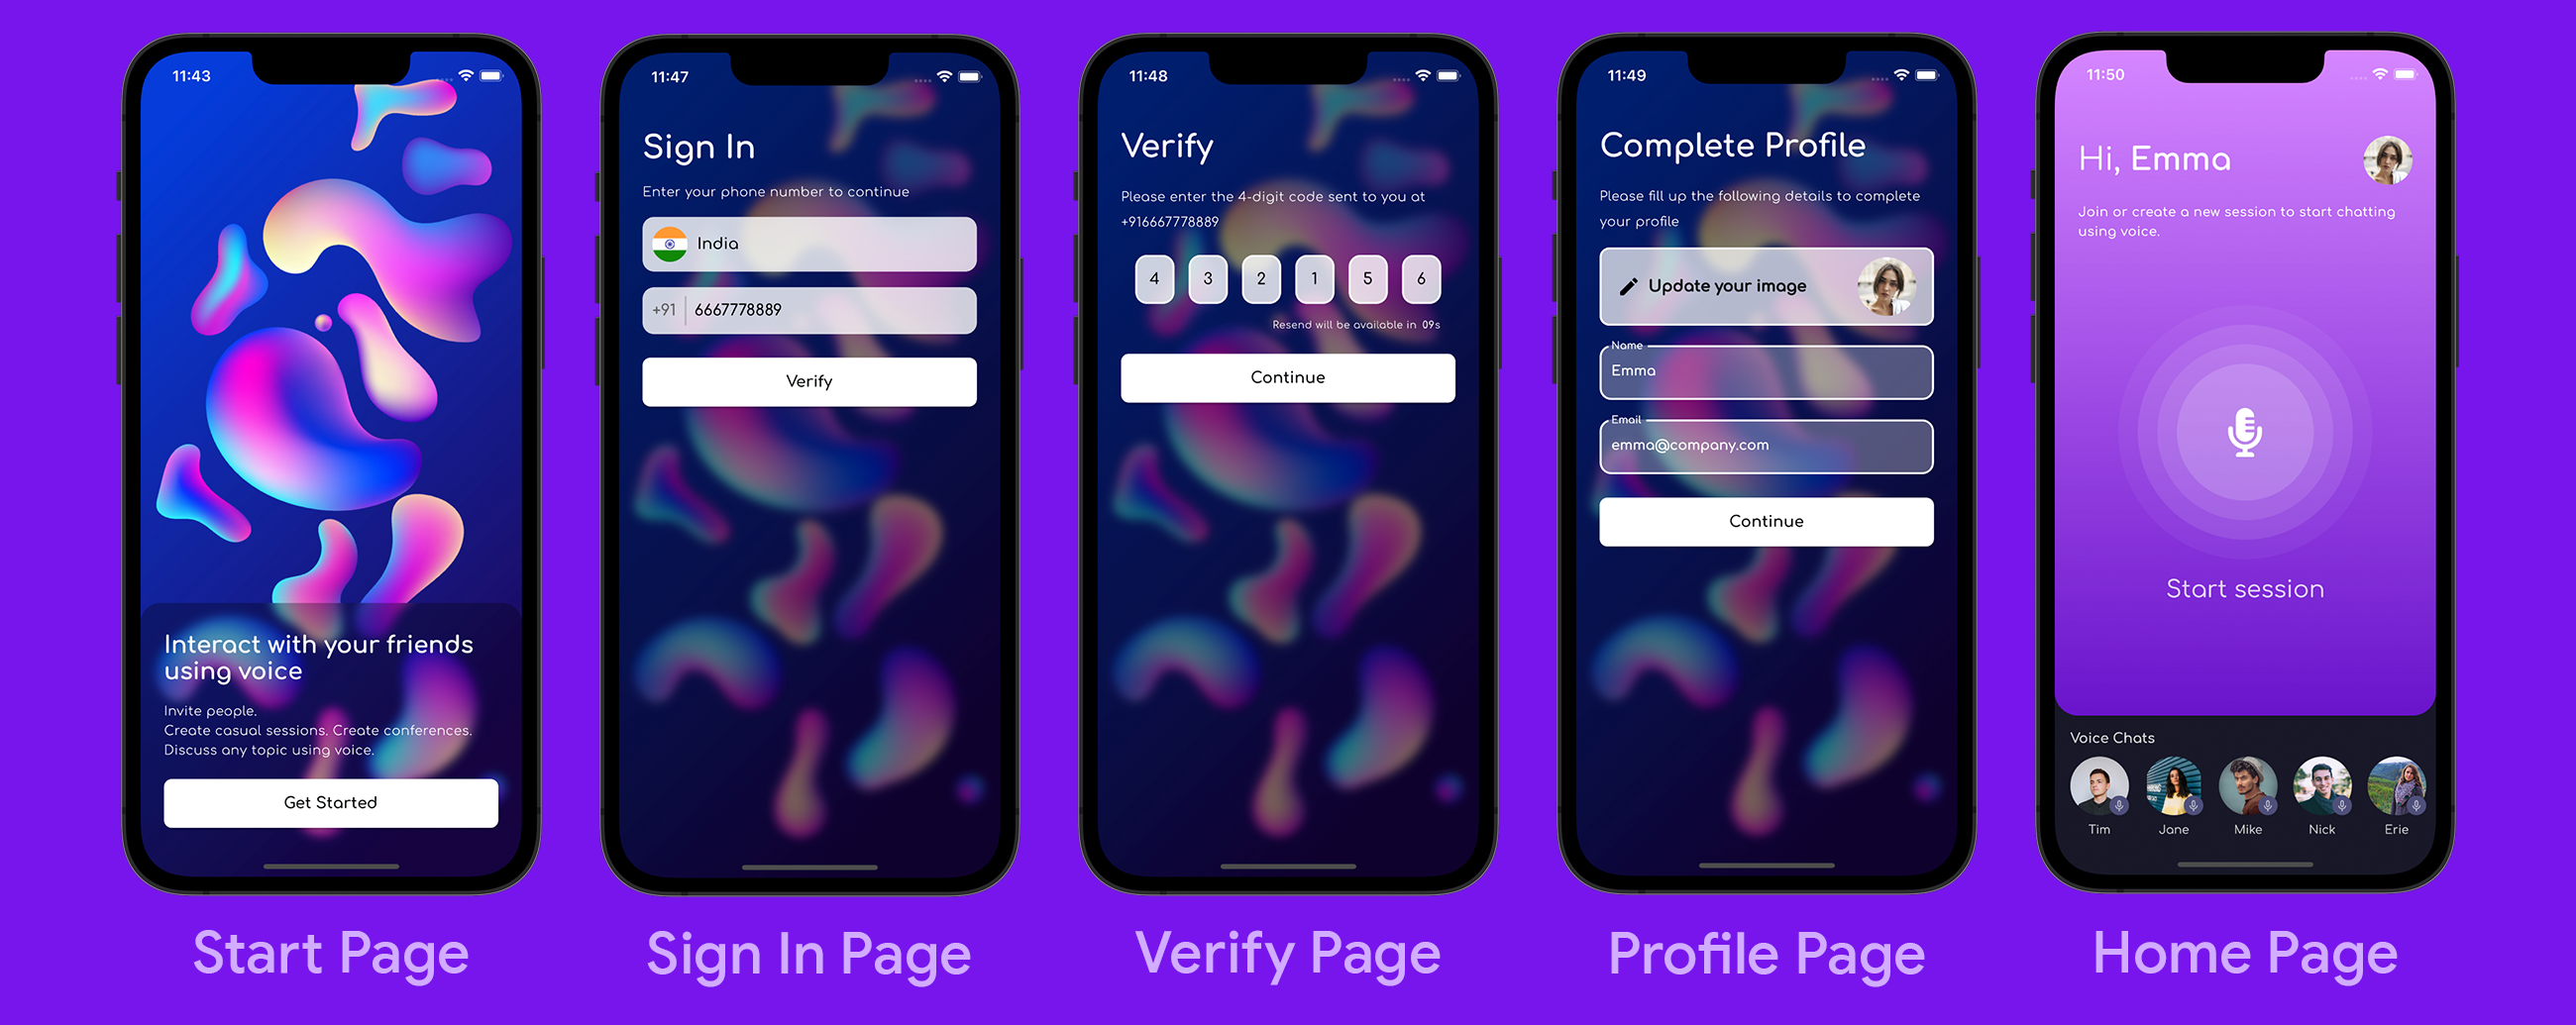
- Start Page: Welcome screen of the app (only shown to new users)
- Sign In Page: Takes the user's phone number as input and initiates the verification.
- Verify Page: Captures the OTP to verify the phone number (has a timer of 30 seconds, after which the user can request to resend the OTP if the previous one has not yet reached).
- Profile Page: Stores some additional information to create the user profile.
- Home Page: First screen of the app after the user onboarding is complete, it has a Bottom Sheet to display all the user information and provides an option to log out of the current account.
Clone the Starter Project to follow along.
The starter project consists of the app pages with some basic interface. We will add new widgets per our requirement and integrate phone authentication into the project.
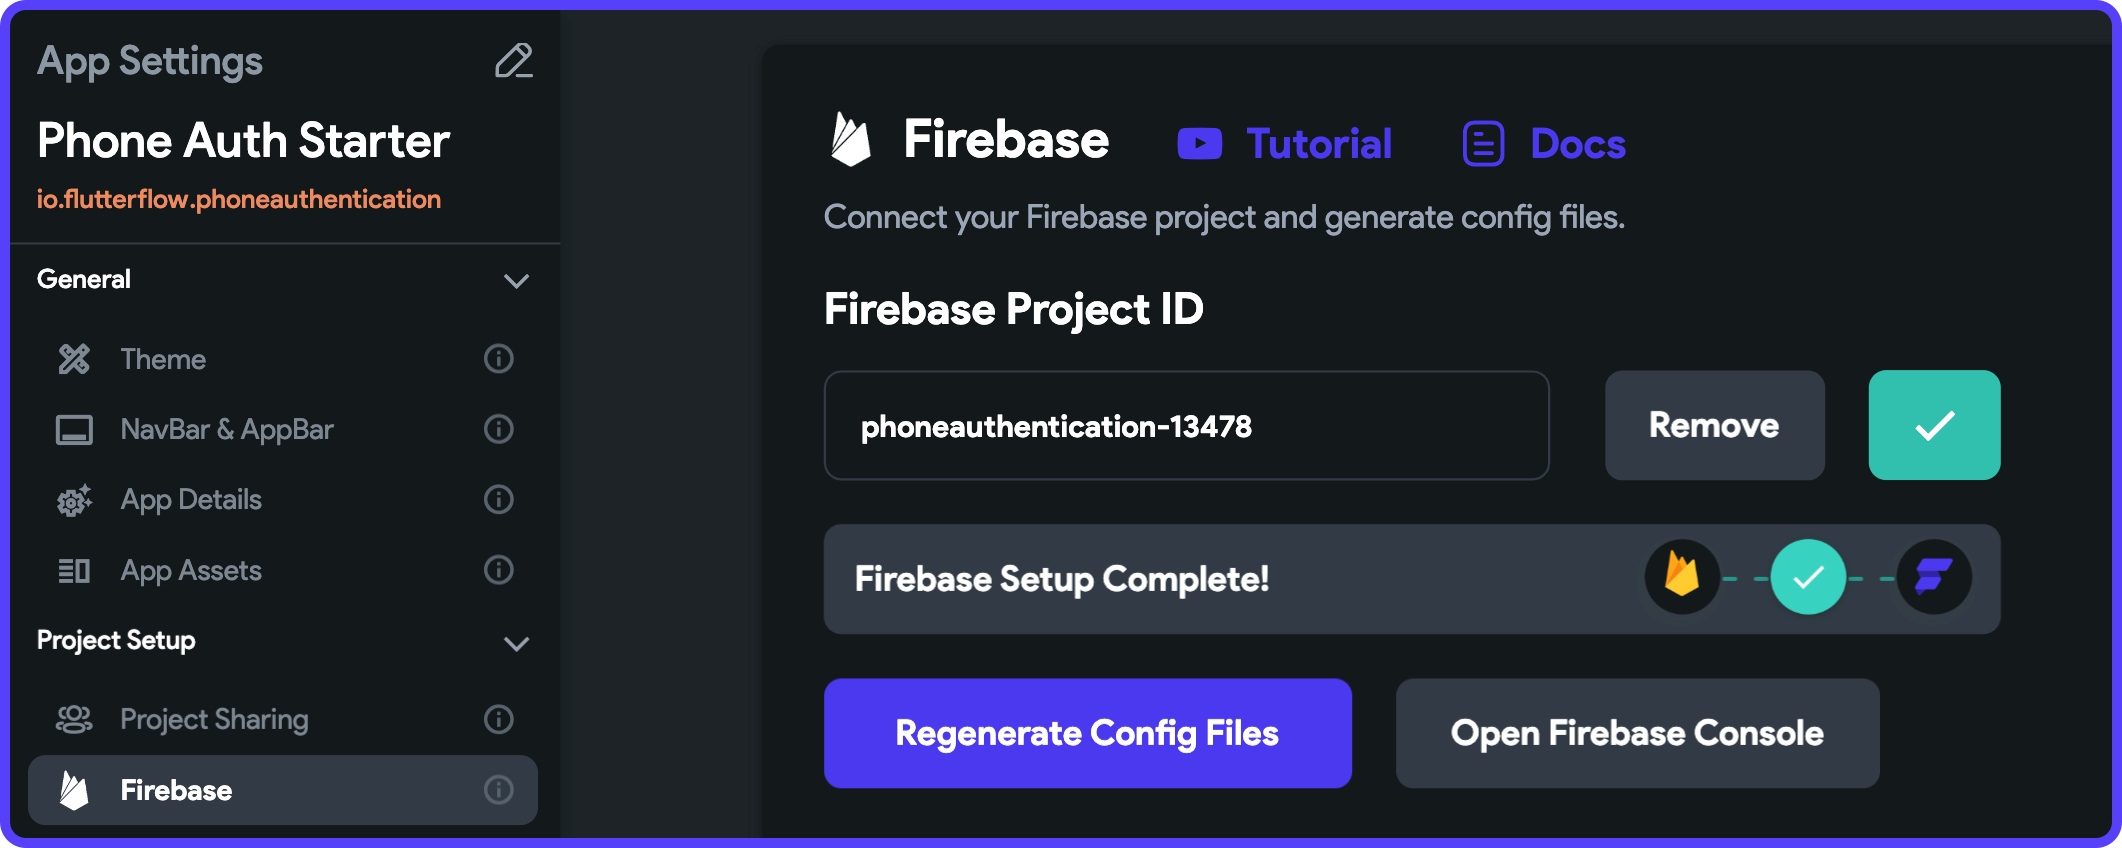
Setup Firebase project
To use phone authentication, first, you need to create a Firebase project. Follow these guides to complete your Firebase project setup:
Once you have completed the Firebase setup and connected your FlutterFlow project, you are ready to use Firebase Phone Authentication.
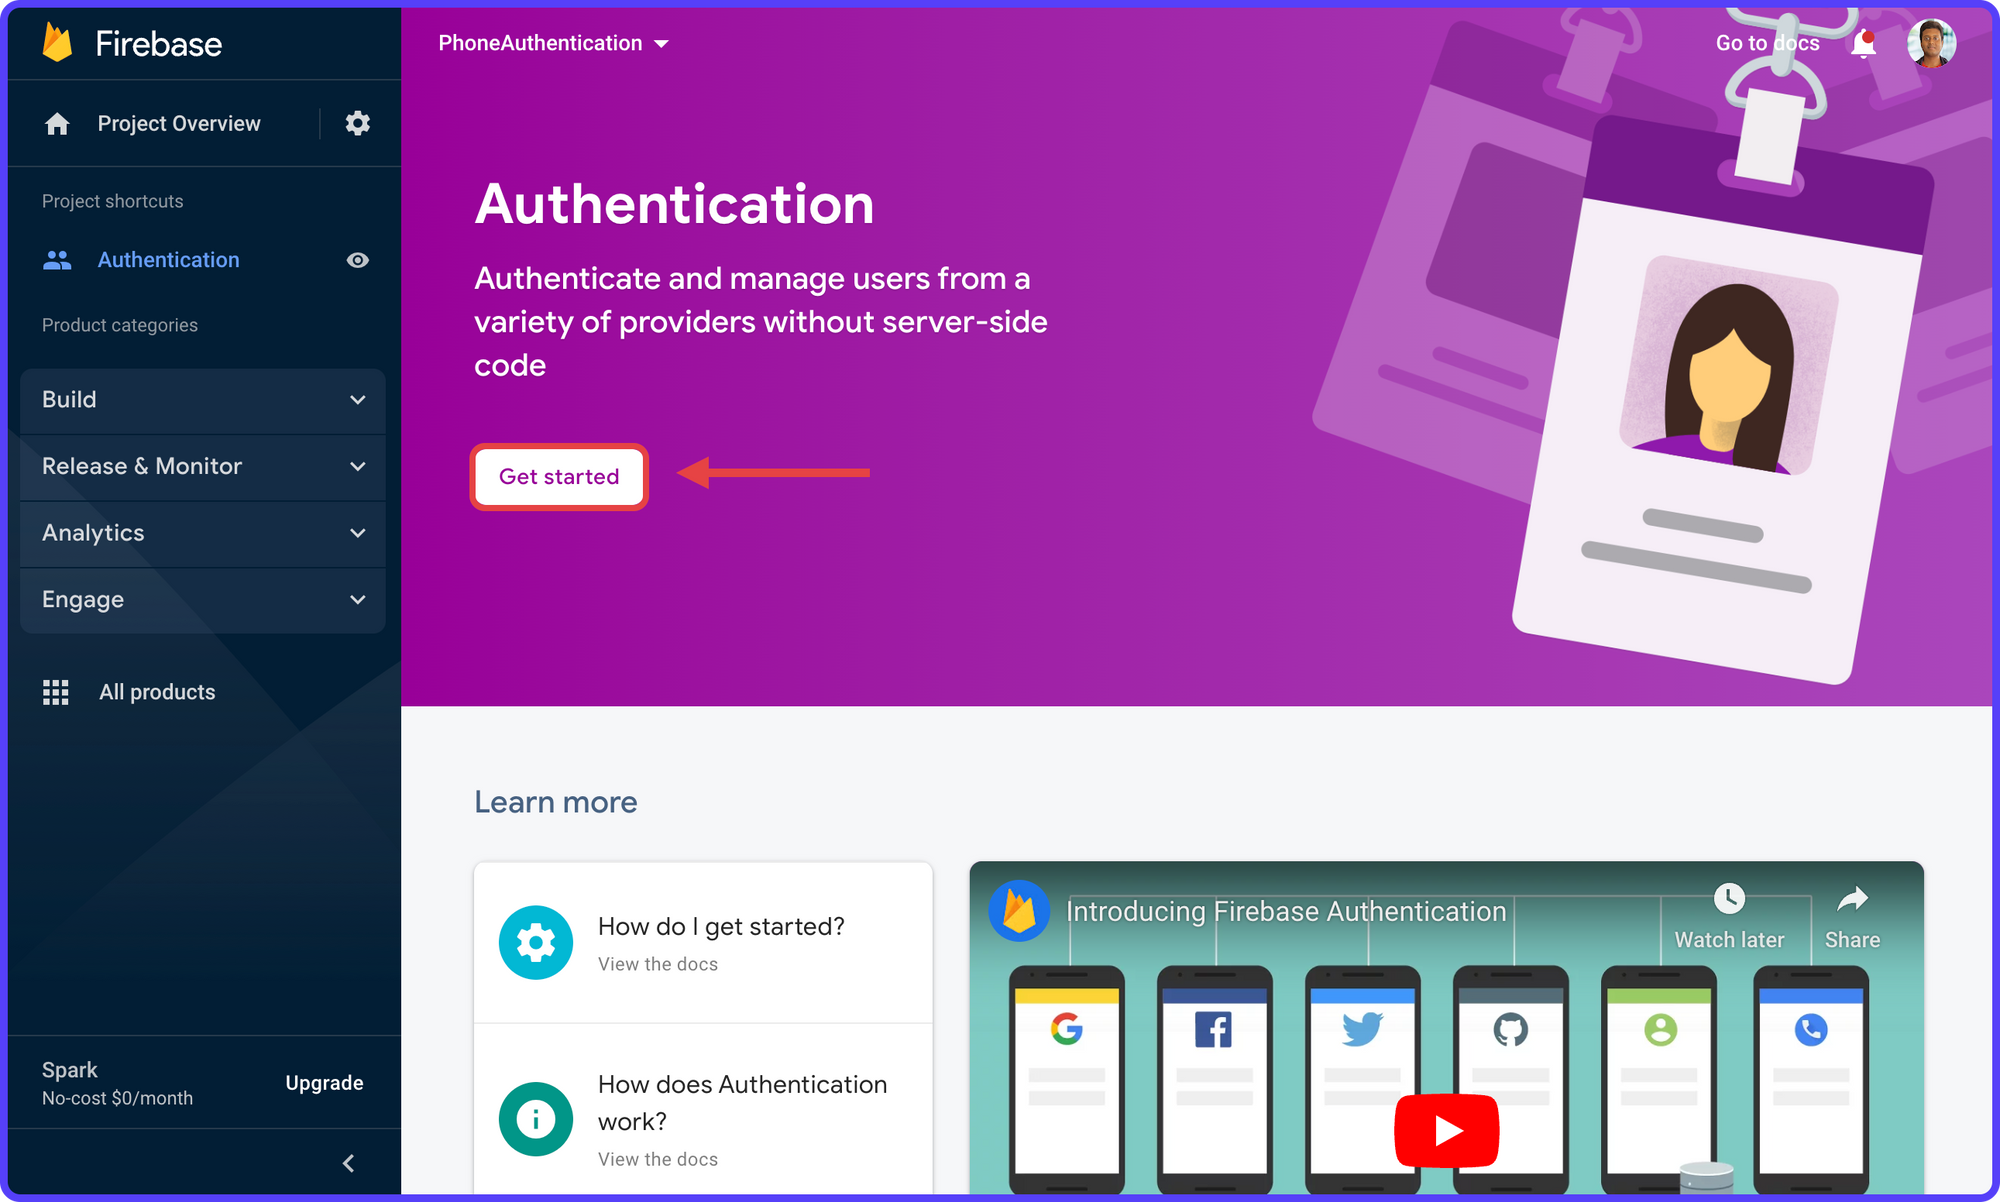
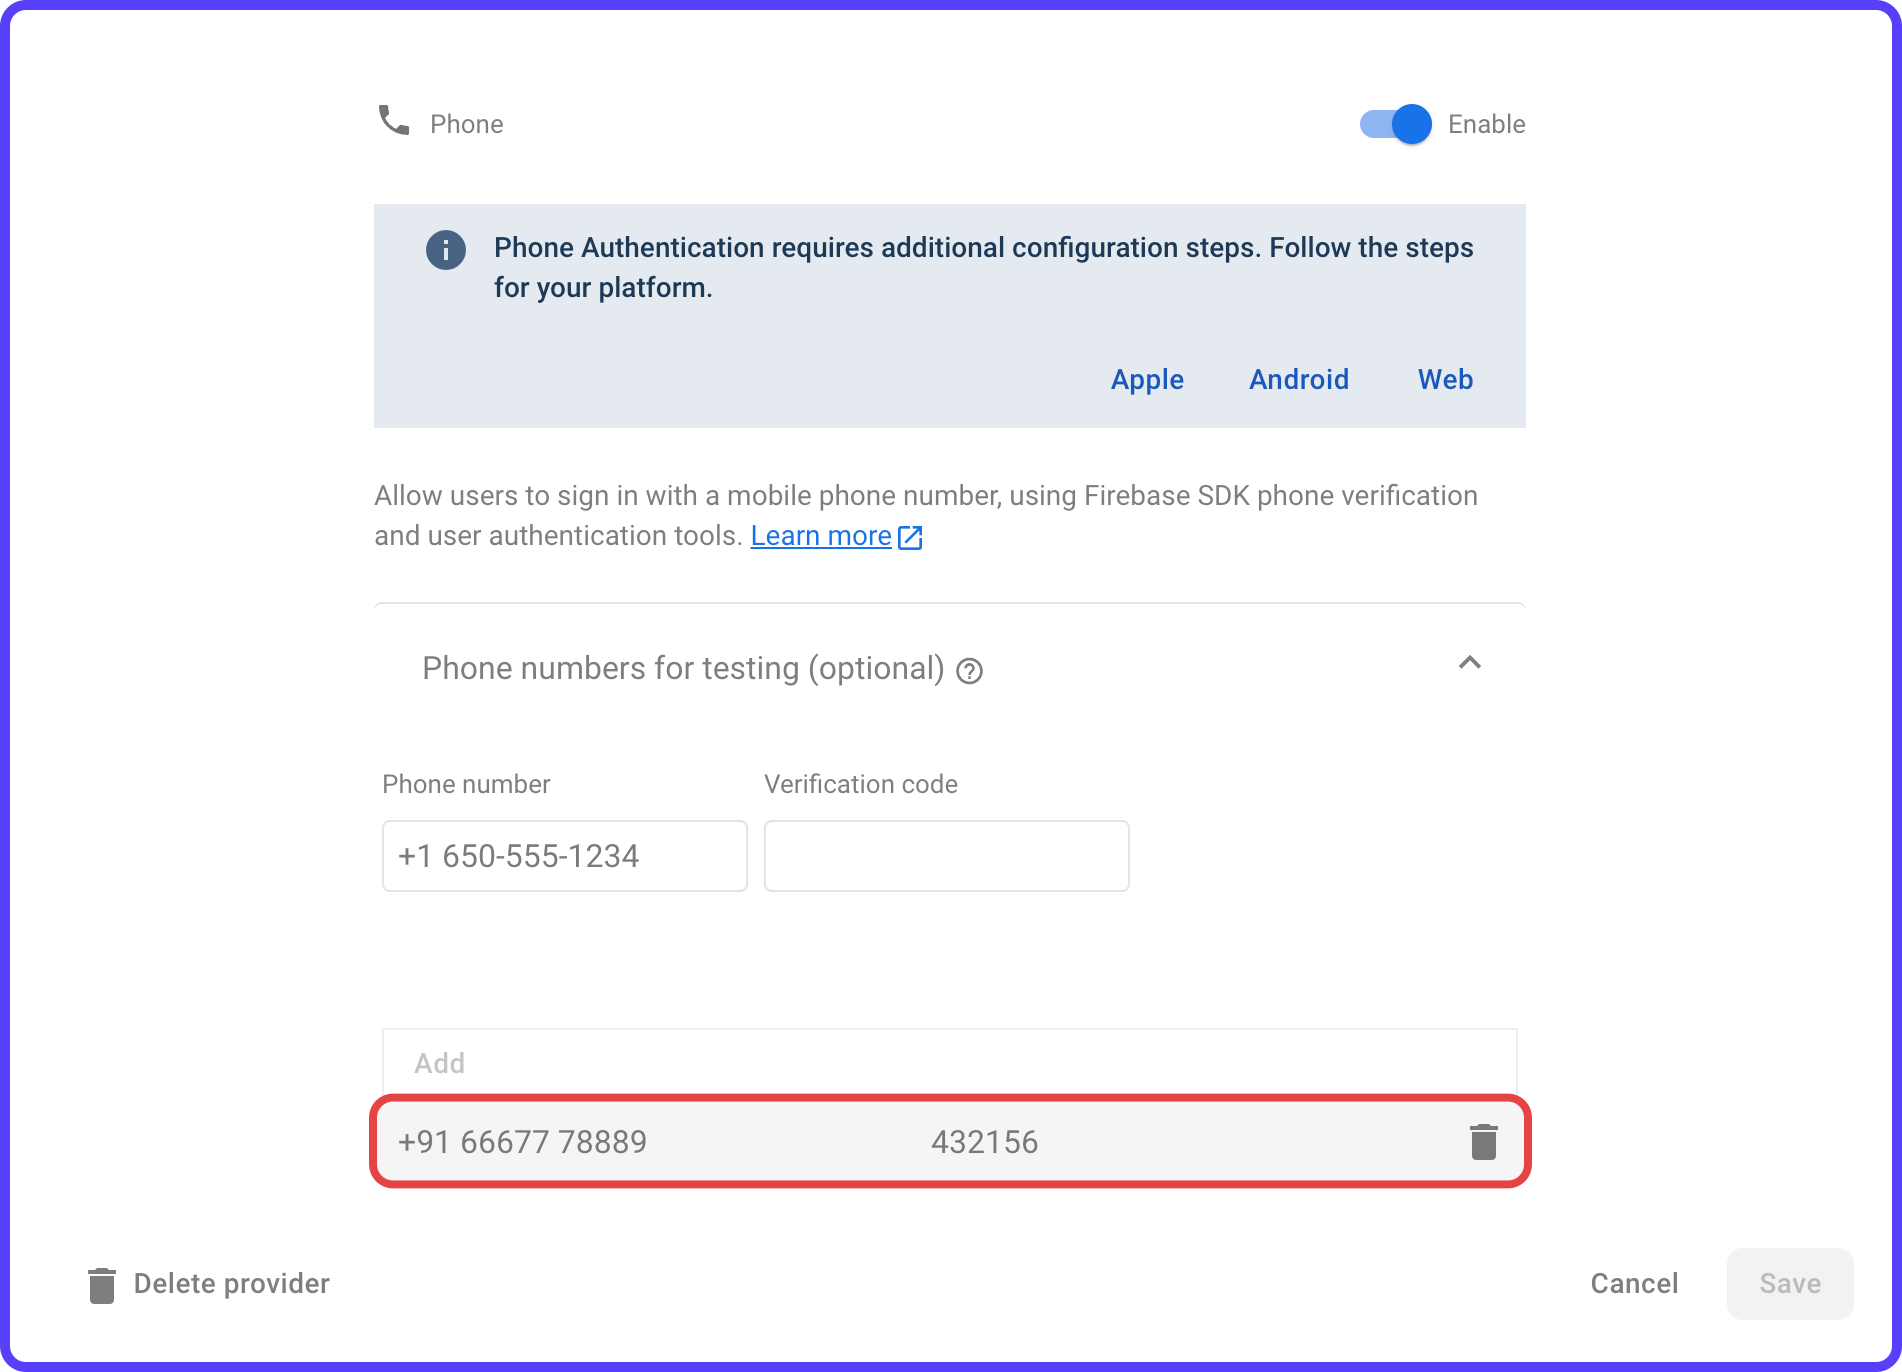
1. Go to the Authentication page of your Firebase project by expanding the Build section of the left menu. Click Get started.
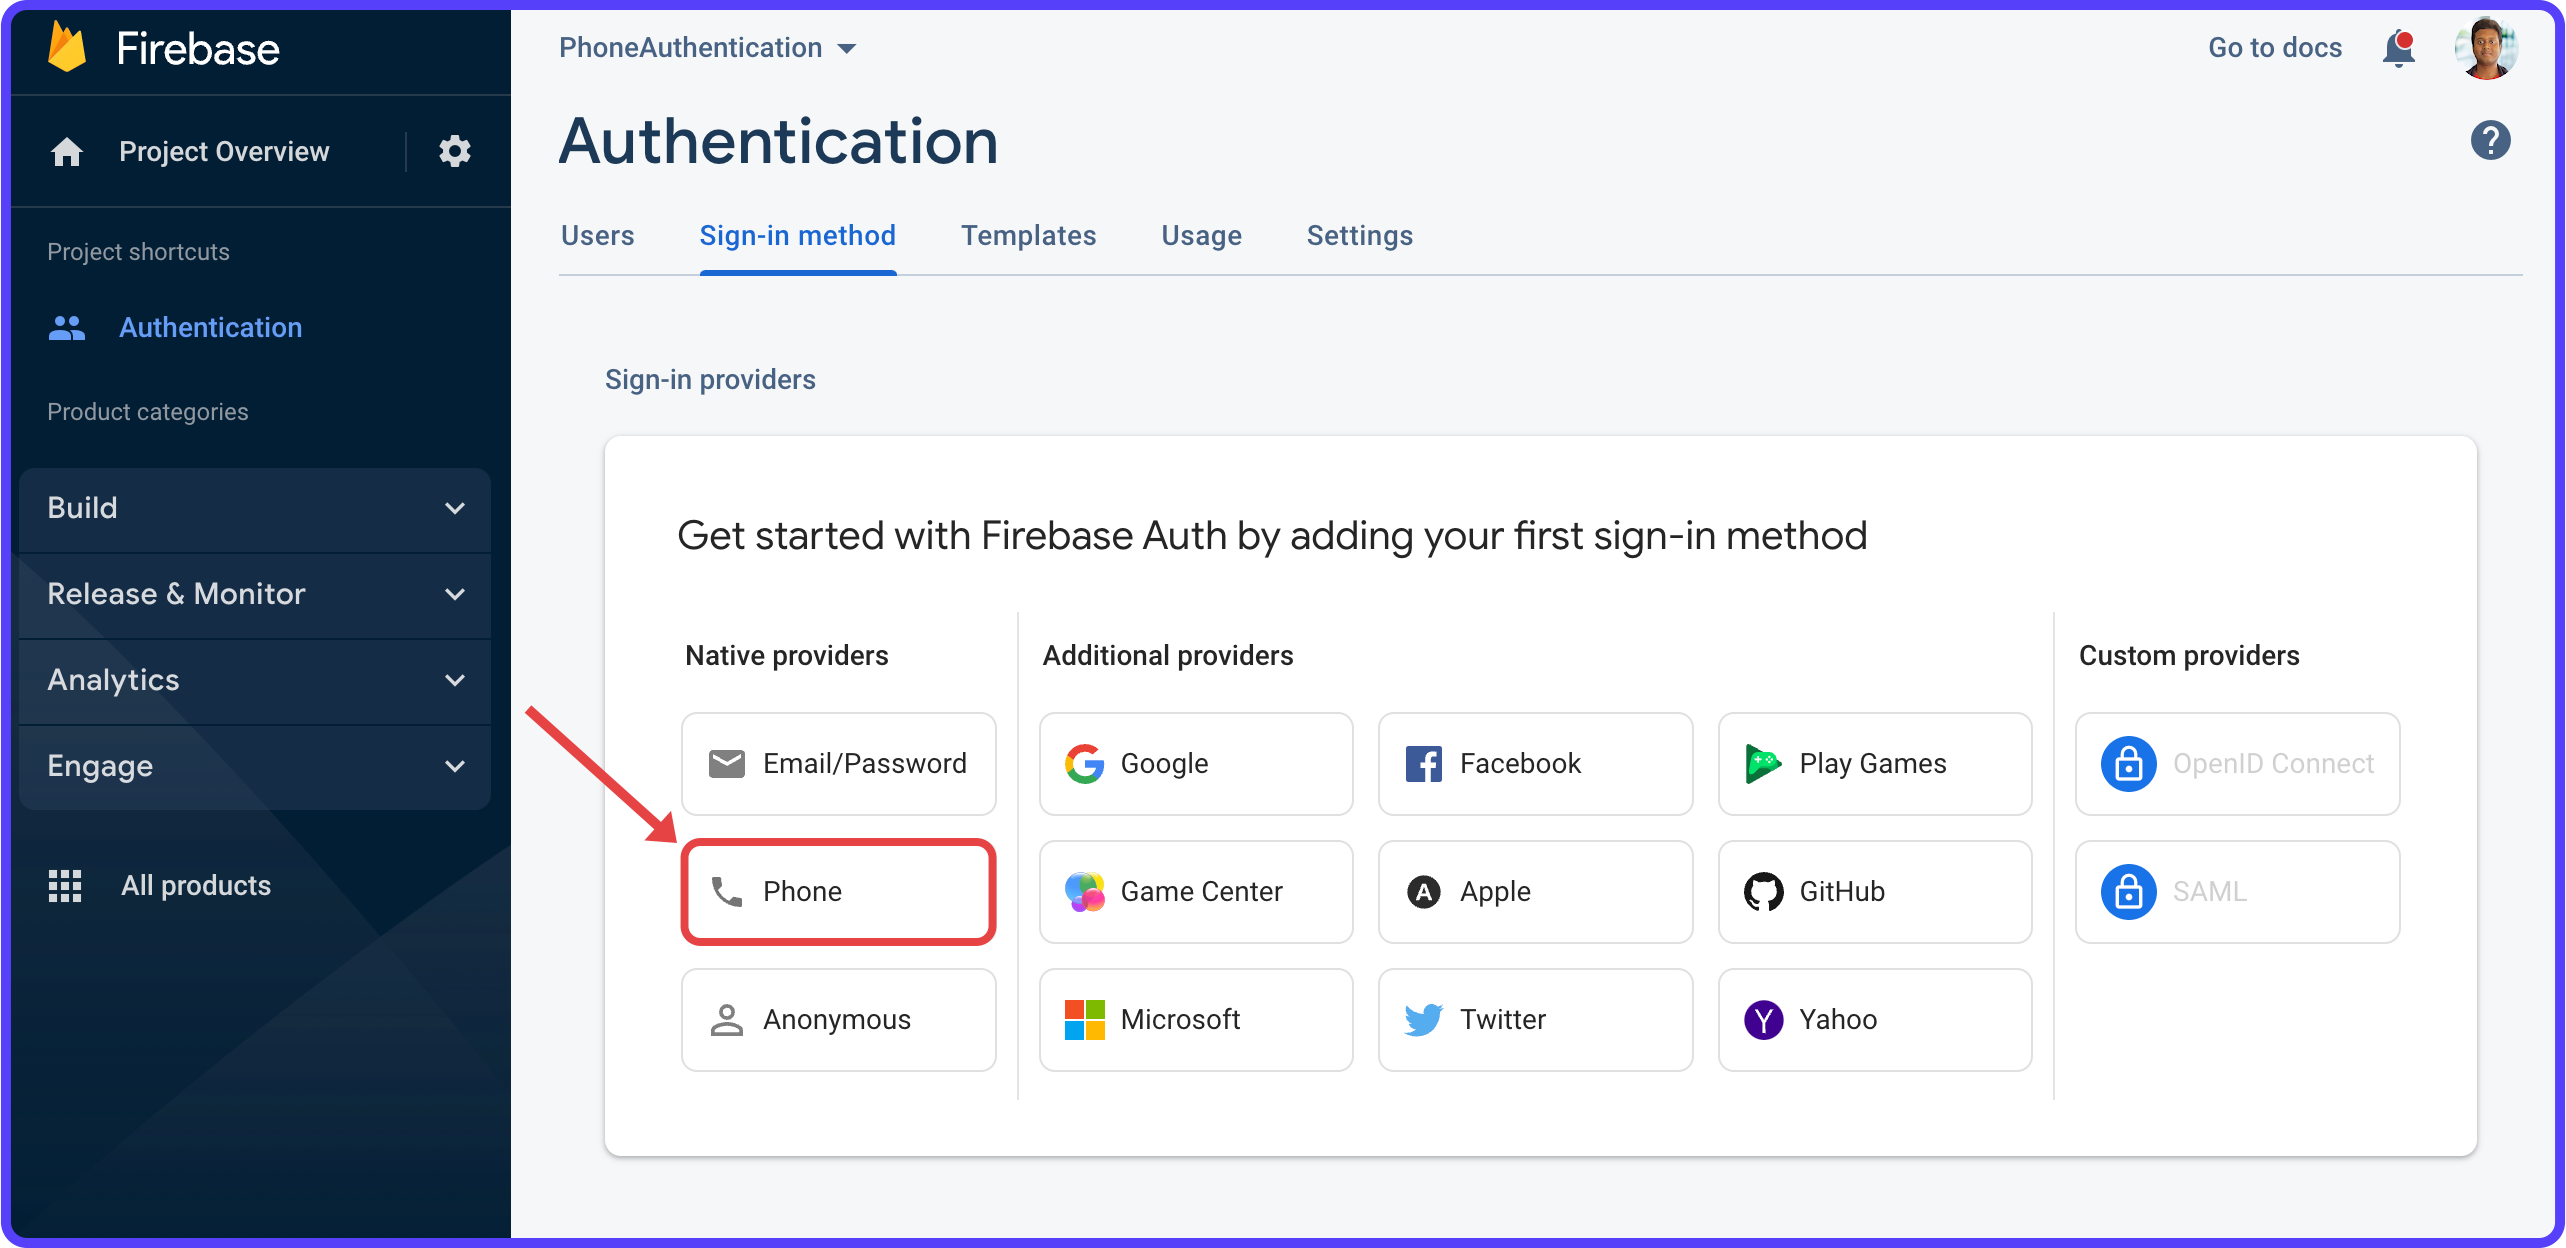
2. Under the Sign-in method tab, click Phone.
3. Enable the Phone sign-in provider and click Save.
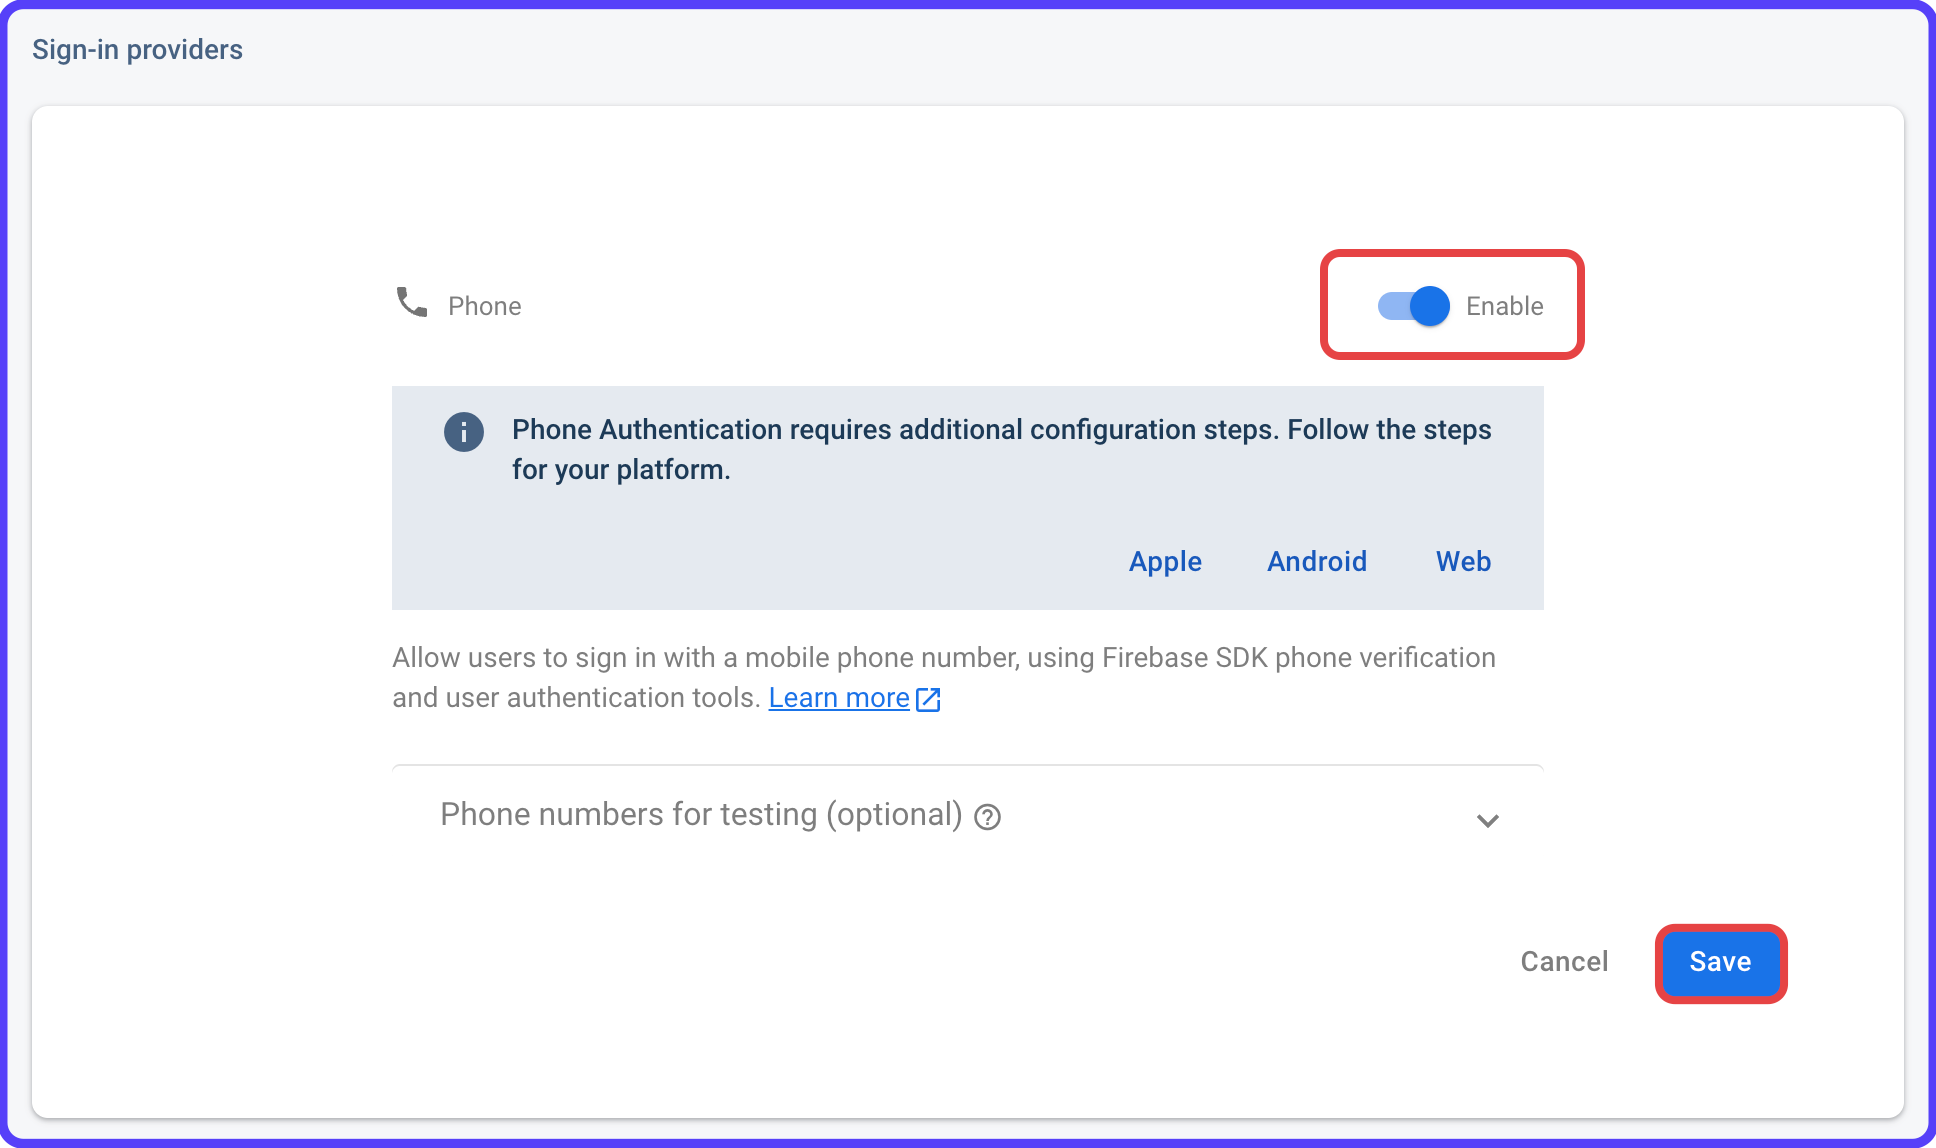
4. (Optional) To make testing more accessible, you can add any phone number along with an OTP.
There are two more steps if you want to use phone authentication on an Android device:
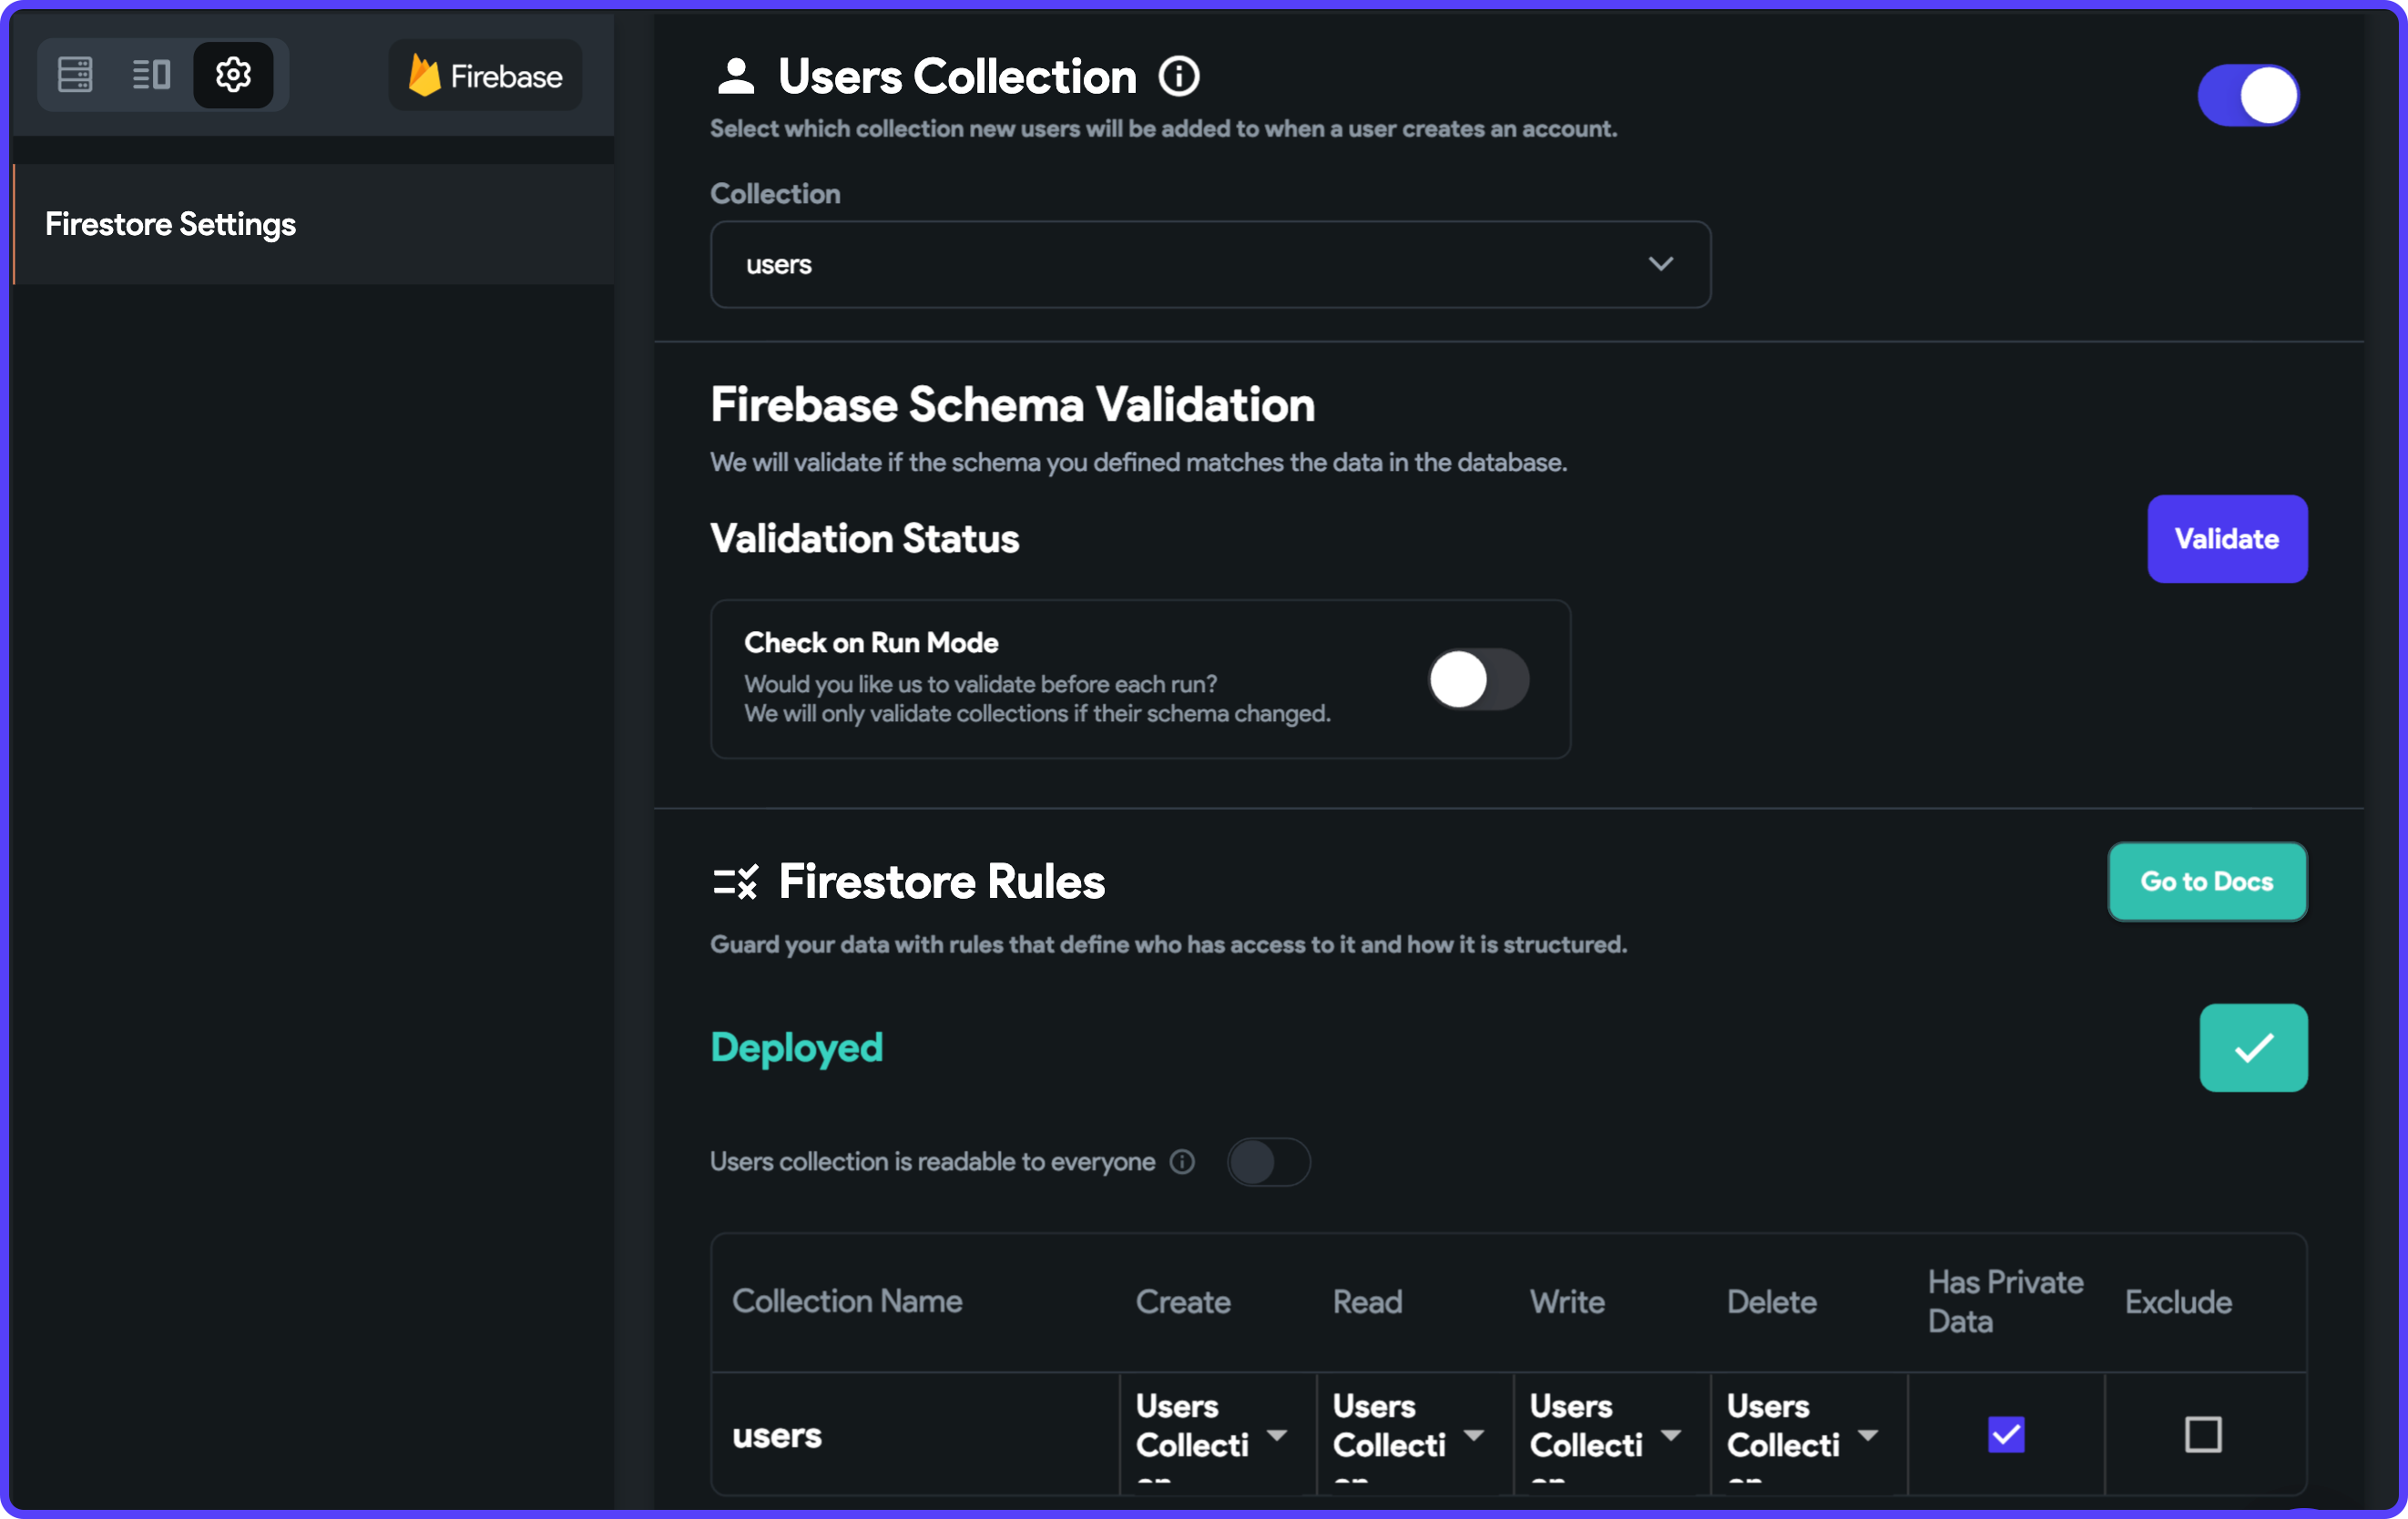
Finally, to store the user details, create a users collection and enable it in Firestore Settings. Make sure you deploy the Firestore Rules.
Accepting user's phone number
The first step of phone authentication is taking the user's correct phone number as input. Each country has its unique calling code, so before you take the actual phone number as input, you should accept the user's country as input.
Let's build the following UI consisting of a Country Selector and a Phone Number Input field:
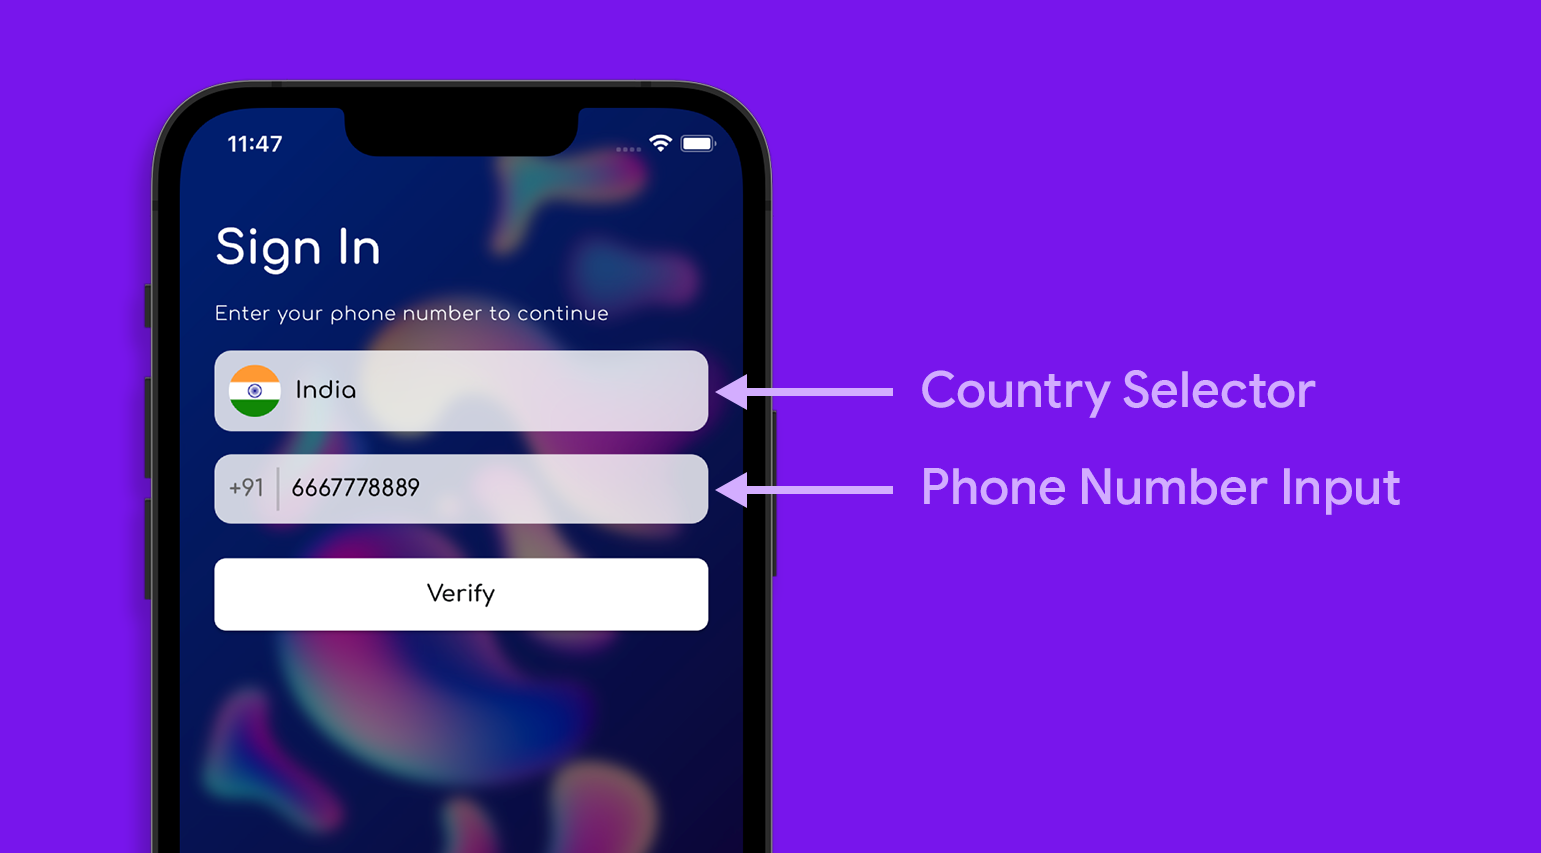
Country Selector
The country selector can be created by placing an Image (for showing the flag) and a TextField widget with autocomplete (for choosing a country) side by side.
Here's what the widget tree for the country selector will be like:

Follow these steps:
- Drag and drop a Container widget. Add appropriate padding on top and customize the widget as per your design.
- Add a Row inside the Container having some padding.
- Add a CircleImage widget inside the Row with the width set to
36pxand box fit set toCover. Keep the image type as Network and make it Cached (automatically adds a subtle animation while switching between network images). Later, we will use a custom function to generate a flag image to show here. - Add a TextField widget beside the CircleImage. Give some padding on the left. Turn off Autofocus and turn on Autocomplete, add some options for now. Later, we'll use a custom function to show countries as the Autocomplete Options. Enable Update Page On Change and set the update delay to
100ms. You can customize the other properties as per your requirement.
To add a list of countries to the Autocomplete Options, create a Custom Function called getCountryList:
1. Go to the Custom Functions page from the left menu.
2. Click "+ Create".
3. Enter the name of the function. Choose the Return Type as String and set Is List to True.
4. Go to the Code tab. Add the following code to inside the function:
5. Click Check Errors. Then click Save.
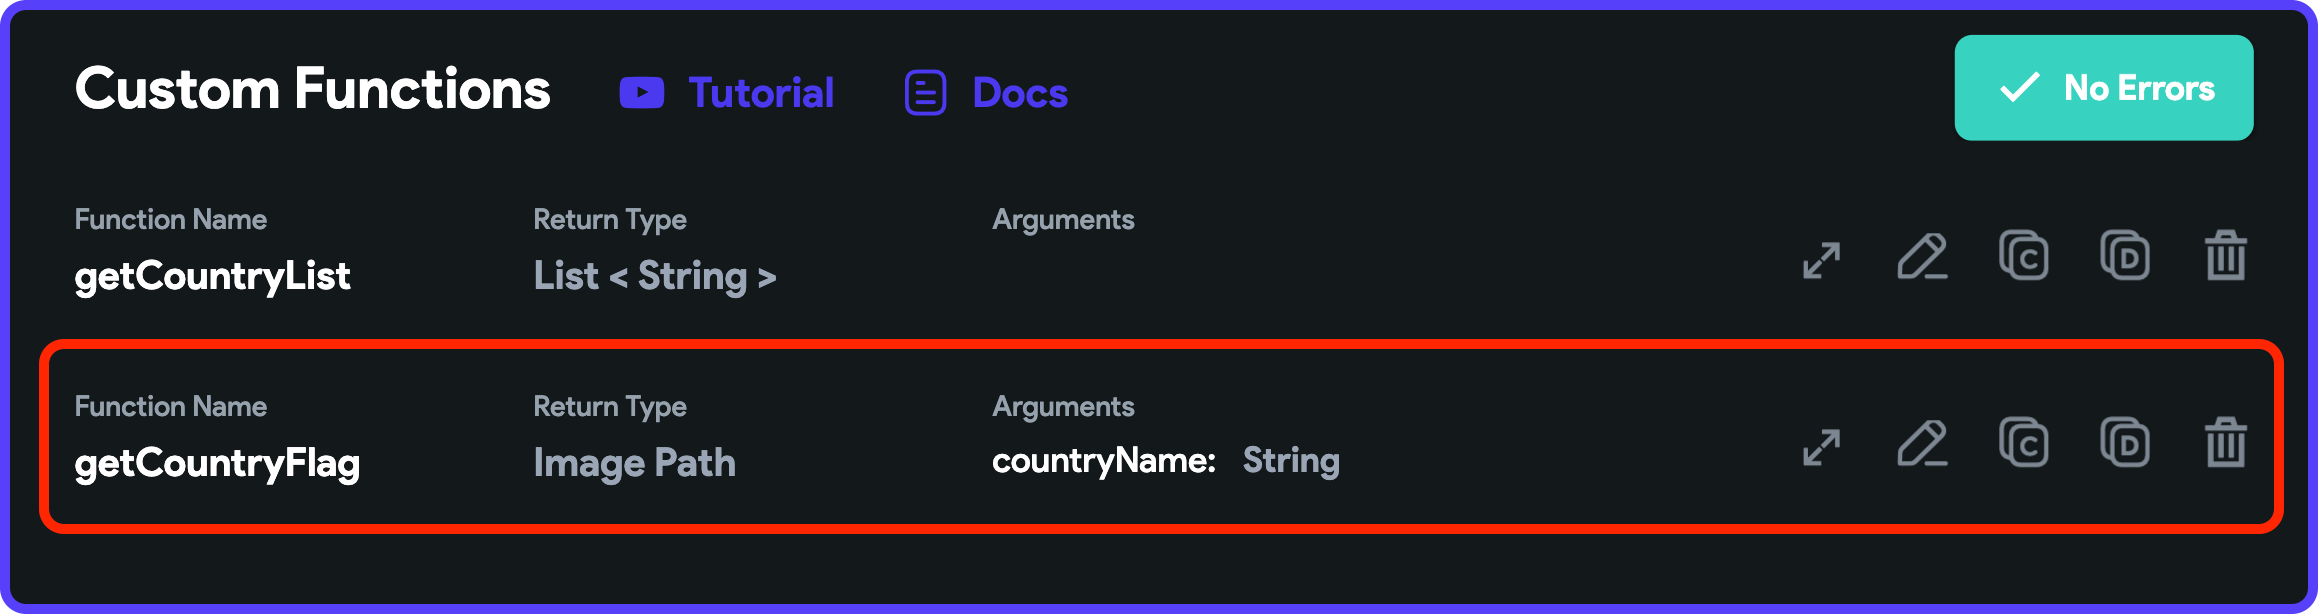
Similarly, add one more custom function called getCountryFlag with:
- Return Type: Image Path (Nullable: True)
- Function Argument: countryName (String, Nullable: True)
Add the following code to this function:
Now, use the getCountryList custom functions to set the value of the Autocomplete Options and use the getCountryFlag to retrieve the flag image by passing the chosen country name as the argument.
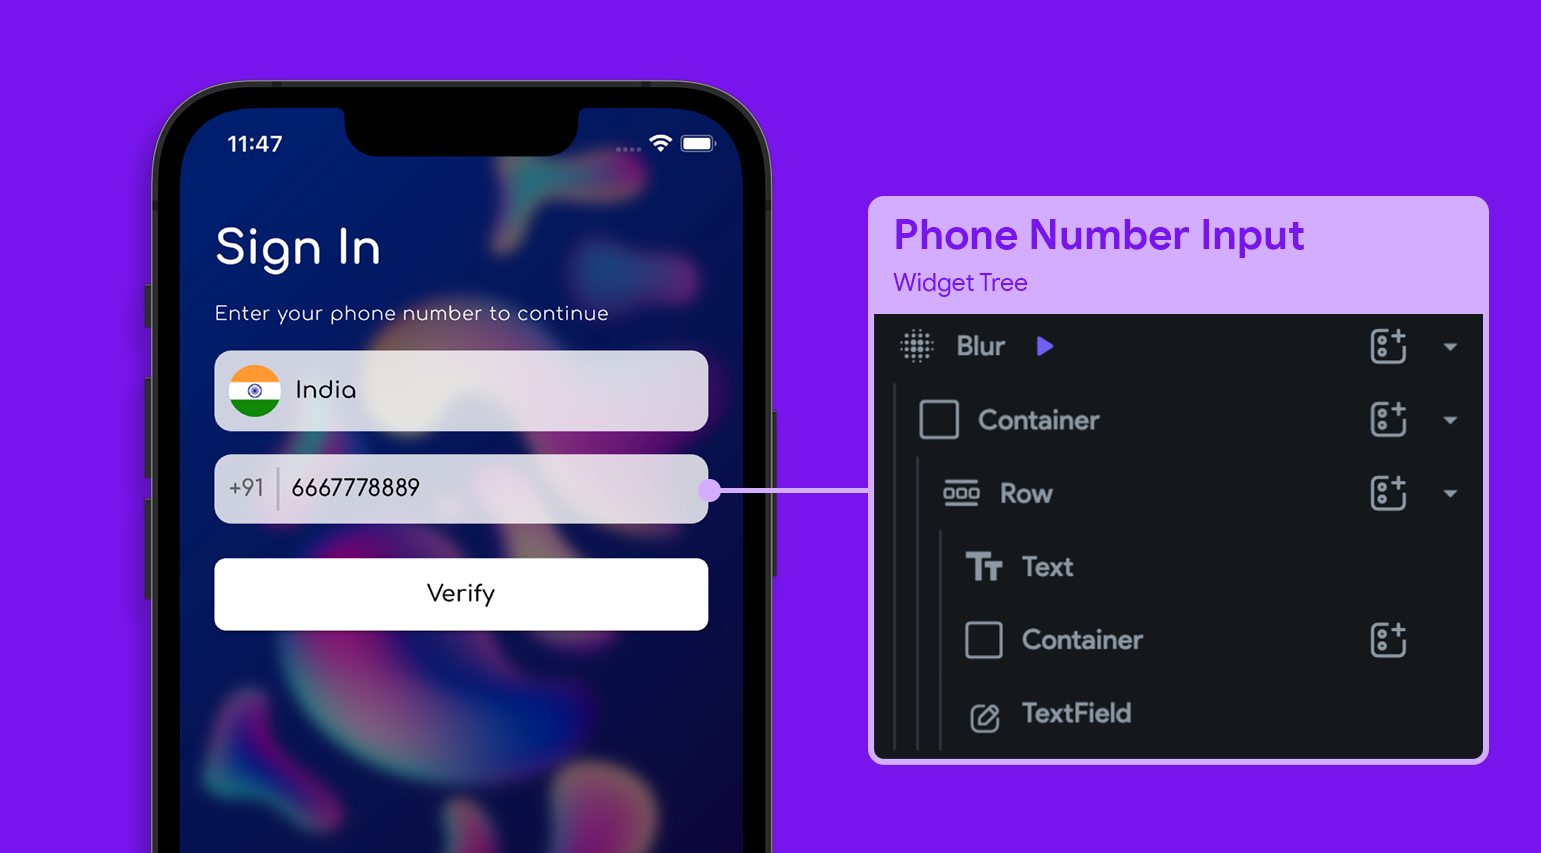
Phone Number Input
The phone number input will consist of a Text (for showing the selected country code) and a TextField widget (to take the phone number as input) with a Container in between them (acting as a divider).
Widget tree of the phone number input will look like this:
Follow the steps below:
1. Drag and drop a Container widget below the country selector. Apply similar customizations as the previous one.
2. Add a Row widget inside the Container and apply some padding.
3. Add a Text widget inside the Row. Later, we will show this value from a custom function that will return the country code.
4. Besides the Text, add a Container widget with width 2px and height 30px.
5. Besides the Container, add a TextField widget with Keyboard Type as Number.
Add a custom function called getDialCode with:
- Return Type: String (Nullable: True)
- Function Argument: countryName (String, Nullable: True)
Add the following code to this function:
Use the getDialCode function to set the value of the Text widget displaying the phone country code. Pass the country name argument value from the country TextField Selected Option.
Triggering Phone Auth
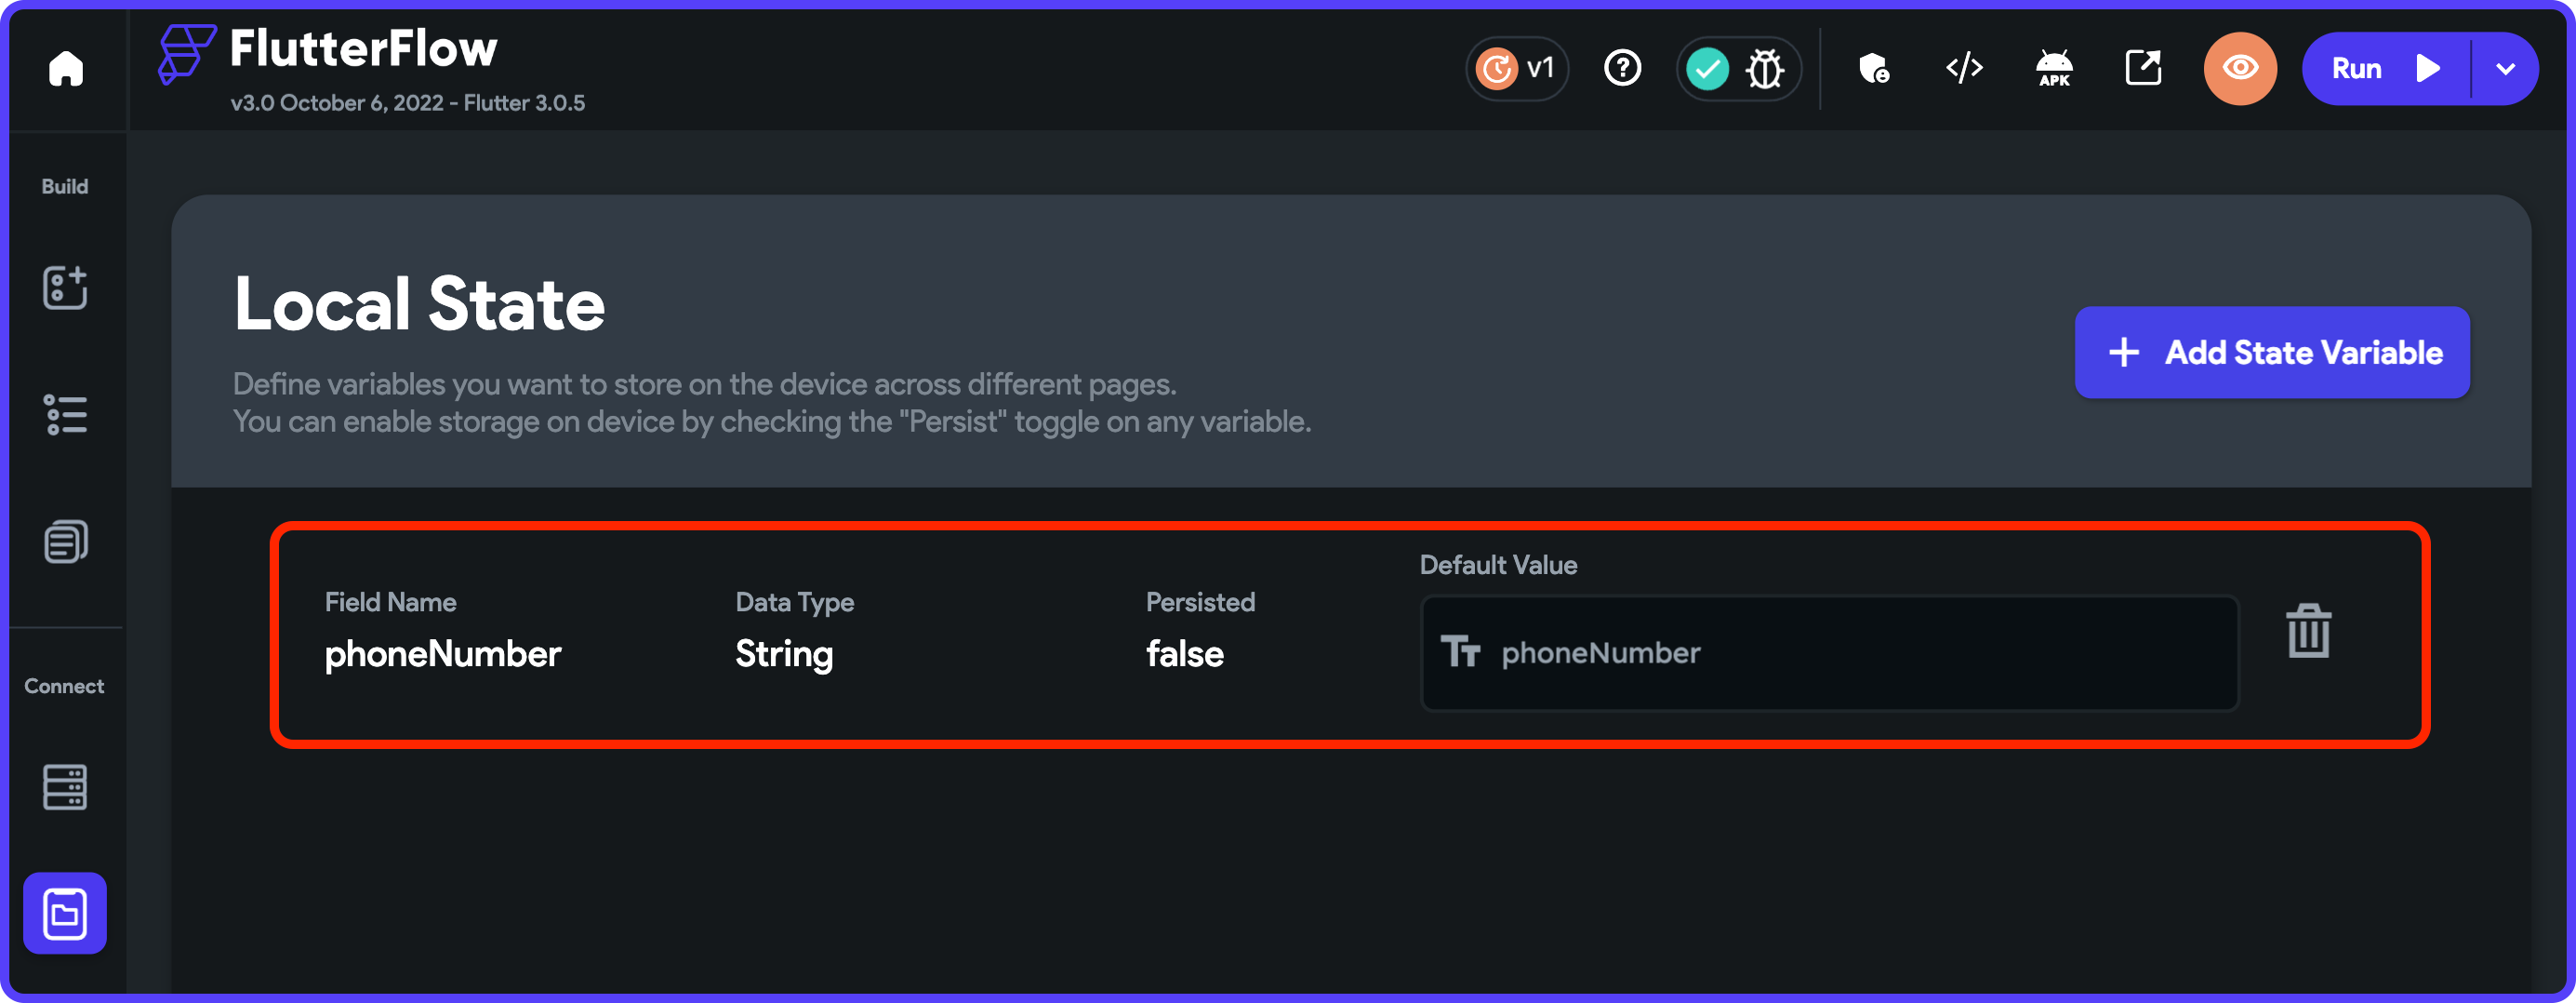
Before setting up the phone authentication trigger, add a Local State variable for storing the phone number along with the country code:
- Name:
phoneNumber - Data Type:
String
For triggering the phone authentication:
- Add a Button widget with text "Verify". Customize the properties to match your theme.
- Add an action to Update Local State. Select the
phoneNumberfield, set the update type to Set Value, and choose the value from variable. Select Combine Text, set the first value from thegetDialCodecustom function and the second value from the phone number TextField. - Open the Action Flow Editor. Add another action, Firebase Authentication > Phone Sign In. Select the phone number from the local state, and select the Verify SMS Code Page as VerifyPage.
Once the Verify button is pressed, it will send an OTP to the user's provided phone number and navigate to the VerifyPage.
Verifying using OTP
The next step is to take the OTP as input and verify whether it is correct. For taking the OTP as input, you can use the PinCode widget.
Follow the steps below:
- Go to the VerifyPage.
- Drag and drop a PinCode widget onto the canvas.
- Change the Pin Length to
6. - Customize other properties as per your requirement.
Sometimes, the user might not receive the SMS because of network issues. To solve that, you should always have a provision for resending the OTP after a stipulated time (the delay helps reduce network traffic and prevents users from abusing the Resend button).
Let's add a text along with a timer:
- Add a Row widget. Apply padding if required and make the main axis alignment to End.
- Add a Text widget inside the Row. Customize it as per your requirement and change the text to "Resend will be available in".
- Add a Timer widget. Change the format to ss and the countdown time to 30000 ms (30 seconds).
- Add another Text widget with the unit of the time as "s" (seconds).
- Now, add an On Page Load Action as Timer > Start Timer.
- Select the Row containing the text and the timer, enable Conditional Visibility, and select Conditions > Single Condition. Set the first value as Widget State > Timer Time (ms). Set the condition as Not Equal To. Set the second value as Specific Value > "0".
Follow these steps to add a Resend button:
- Add a Row widget. Apply some padding on top.
- Add a Text widget inside the Row. Customize and update the text to "Didn't get the code?".
- Add a Button widget beside the Text. Customize and update the text to "Resend".
- Keep the Button selected. Add an action Firebase Authentication > Phone Sign In, select the phone number from the local state, and choose the Verify SMS Code Page as VerifyPage.
- Select the Row, enable Conditional Visibility, and select Conditions > Single Condition. Set the first value as Widget State > Timer Time (ms). Set the condition as Equal To. Set the second value as Specific Value > "0".
To add the Continue button that would verify whether the OTP is correct and proceed to the next screen, follow these steps:
- Drag and drop a Button widget.
- Customize it and change the button text to "Continue".
- Add an action as Firebase Authentication > Verify SMS Code. Select the SMS Code from Widget State > PinCode.
- Open the Action Flow Editor.
- Add one more action as Navigate To > ProfilePage. Disable the Allow Back Navigation toggle.
On this page, you can also show the phone number on which the user would receive the OTP via SMS. Just add a Text widget and set its value from the phoneNumber local state.
Storing additional info
Once the user has verified the OTP, Firebase will complete the authentication of that user and also create a document record under the users collection with uid, created_time, and phone_number as the fields.
If you want to store additional information for the user, you can update the document and add other field values. Follow these steps:
- Go to the ProfilePage. Here we'll accept some more information from the user – profile picture, name, and email.
- Select the Continue button on this page.
- From the Properties Panel, go to the Actions tab.
- Add an action as Database > Update Document. Select the Reference to Update from the Authenticated User > User Reference.
- Now, define the field values that you want to store.
- Open the Action Flow Editor.
- Add another action as Navigate To > HomePage. Disable Allow Back Navigation.
Using user details
You can retrieve the user details stored by using a Backend Query and use them in any page widget.
Follow the steps below:
- Go to the HomePage.
- From the Properties Panel, select the Backend Query tab (you don't need to select any widget because we want the query result to be available throughout this page).
- Choose the Query Type as Document from Reference.
- Select the Collection as users.
- Select the document reference from Authenticated User > User Reference.
- You can enable Single Time Query if you just want the query to run once. Click Confirm.
- Now, we want to display the user's name on this page. Select the Text widget to show the name. Click Set from Variable. Select the value source as users Document > display_name.
- Similarly, if you want to show the profile picture of the user. Use the
photo_urlfield on Image/CircleImage widget.
We would display all the user details on a Bottom Sheet. To use a bottom sheet, first, you need to create a component and then use the Bottom Sheet Action to open it. The starter app already has a component called ProfileDetails, let's open it as a bottom sheet:
- Add an action on the CircleImage as Bottom Sheet > Show.
- Choose the Display Component as ProfileDetails.
- Leave the Height blank if you want the size of the bottom sheet to be equivalent to its contents.
- Select a background and barrier color.
- To show the user details on the bottom sheet, you must pass it as a parameter. Click "+ Define". Define a parameter on the bottom sheet as
userDetails, set the Type to Document (users). Click Confirm. - Pass the parameter as users Document > Document (users).
- Now, go to the ProfileDetails component and set the values of the widgets from the users collection fields.
Signing out of account
Users should have a provision to sign out of the existing account, in case they want to use a different account. Let's add a button on the bottom sheet for logging out the user:
- Go to the ProfileDetails component.
- Drag and drop a Button widget. Customize it as per your design requirement and change the button text to "Logout".
- Keep the button selected and go to the Actions tab.
- Add an action as Firebase Authentication > Log out.
- Open the Action Flow Editor.
- Add another action as Navigate To > StartPage. Disable Allow Back Navigation.
App in action
You can try out the phone authentication flow by running the app either using the Test/Run mode or by downloading the project and running it from your system.
The following demonstrates the phone authentication running on an iOS Simulator.
You can try out this sample app here.
Conclusion
Woohoo!🎉 you have successfully integrated Firebase Phone Authentication with your FlutterFlow app. If you are releasing your app for Android users, make sure you use the SHA-1 and SHA-256 keys generated by Play Store, check this out for more details.
Firebase provides a lot of other authentication types as well, check out this page to learn more about them and integrate them with your app.
Find the clonable version of this entire app here.
