
This article will guide you in building a full-fledged live video streaming app using FlutterFlow and Mux.
Mux provides an API-based video streaming service that can be integrated with an application and streamed using the device camera to an RTMP URL.
App Overview
Let's have a quick overview of the screens present in the final app:
- Login Page: To authenticate the existing users of the app.
- Create Account Page: For new users to create an account on this app.
- Streams Page: Displaying a list of video streams.
- Broadcast Page: Preview camera feed and control (start/stop) a broadcast.
- Live Video Page: Using a video player to play the live stream.
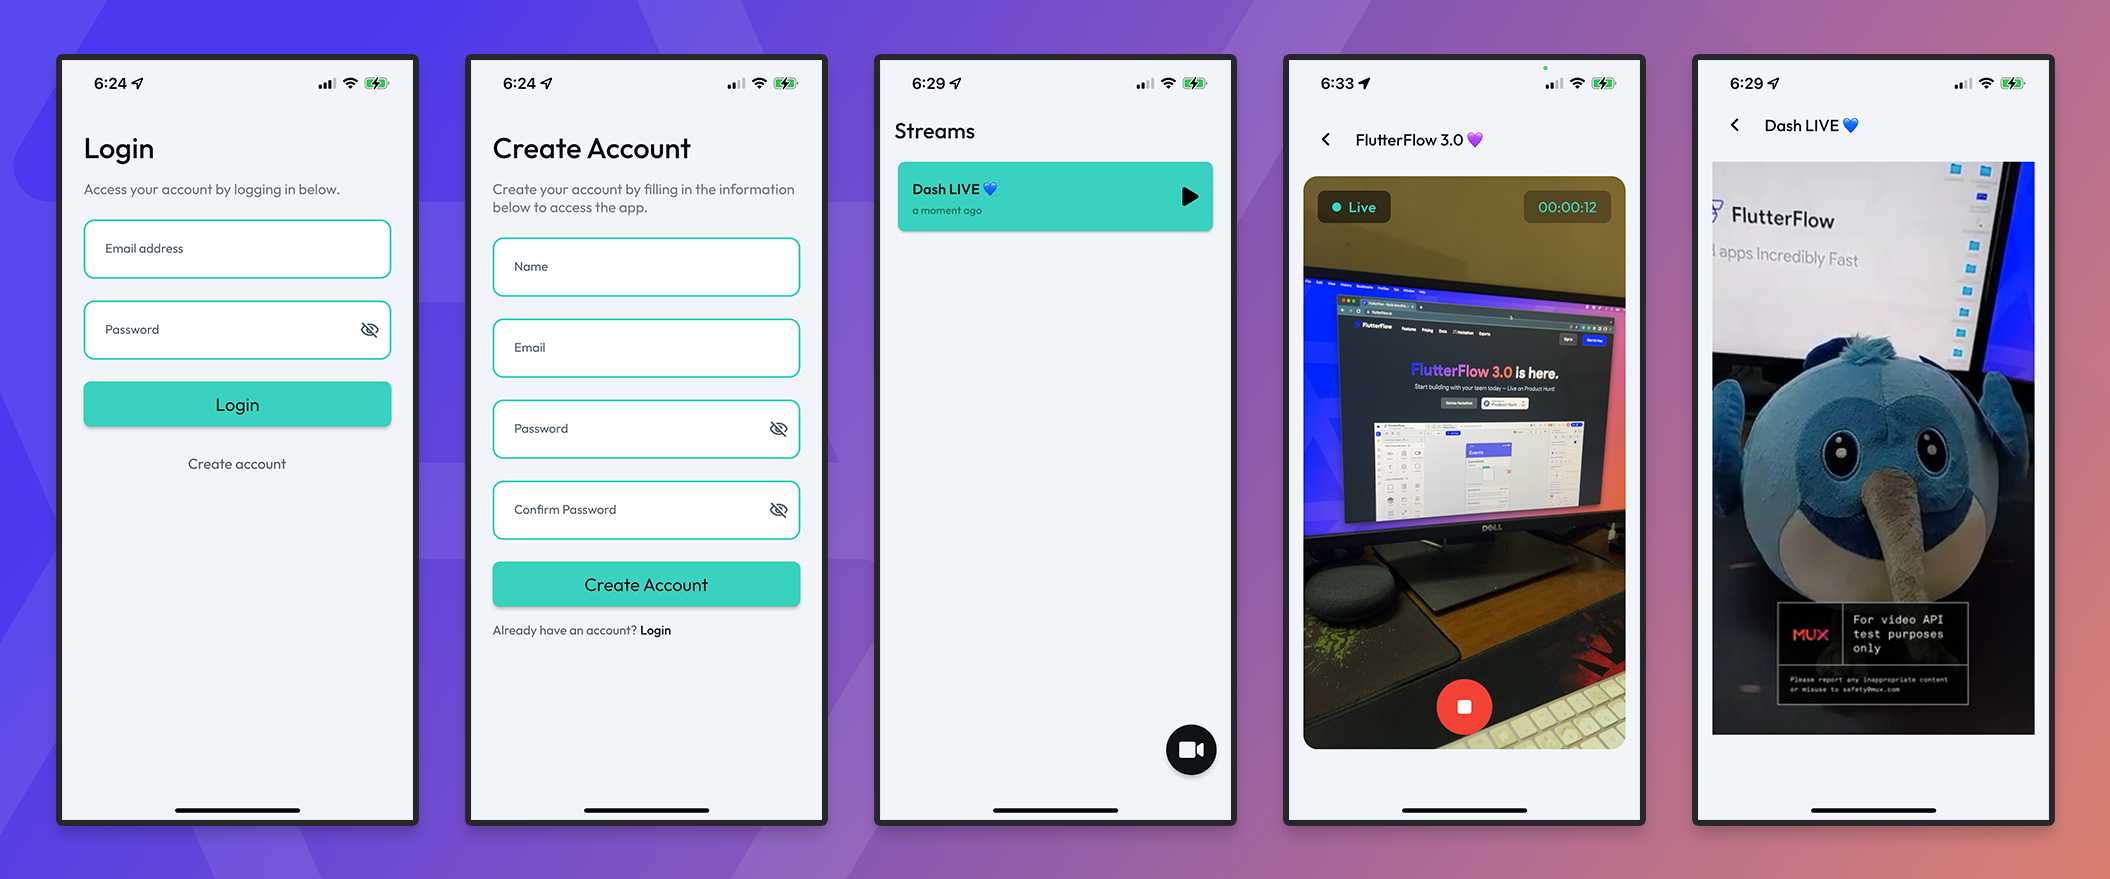
We'll be focusing on the Streams, Broadcast, and Live Video pages in this article. If you need help in setting up authentication (Login and Create Account pages) inside a FlutterFlow, check out this article.
Clone the starter project for this tutorial to follow along: Mux Starter.
Configuring Mux
Follow the steps below for connecting Mux to your FlutterFlow project:
1. To access the Mux APIs, create an account here. If you already have an account in Mux, just use that to log in. Once logged in, you will be navigated to the Dashboard page.
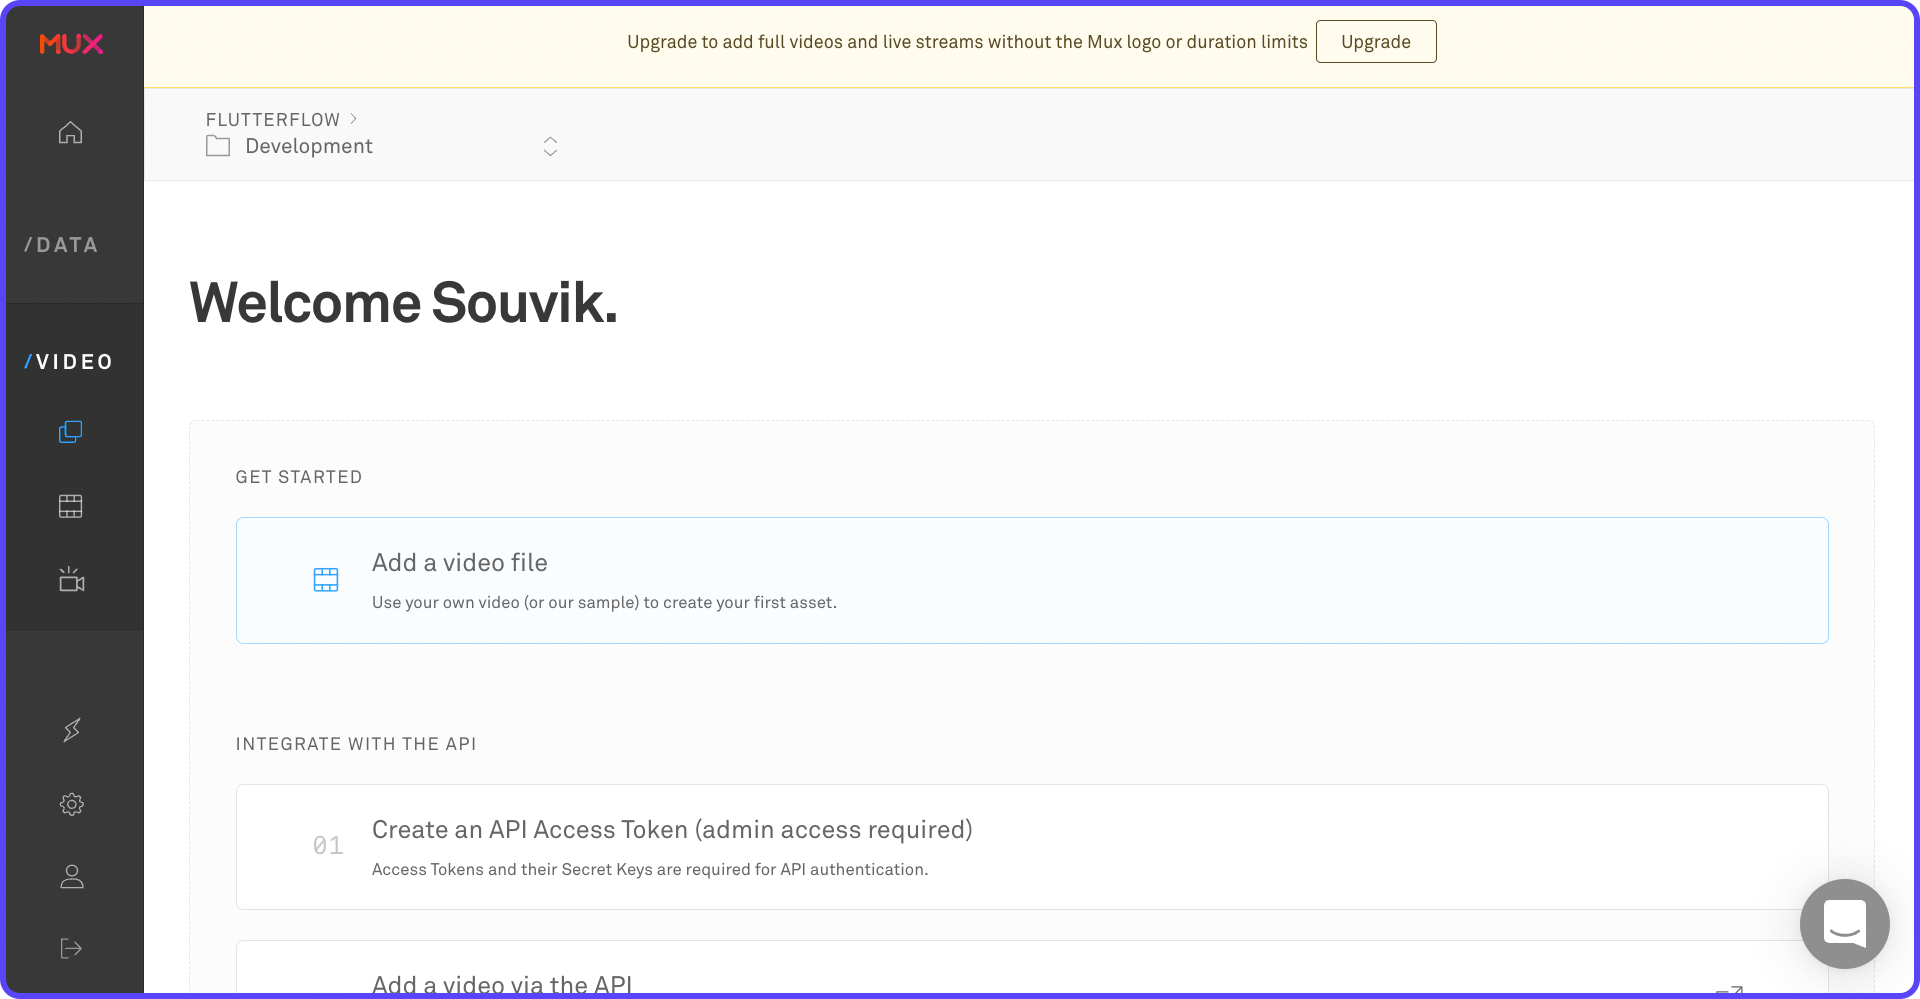
2. Generate Mux API Access Tokens from here. You can also navigate to this page from Settings > API Access Token.
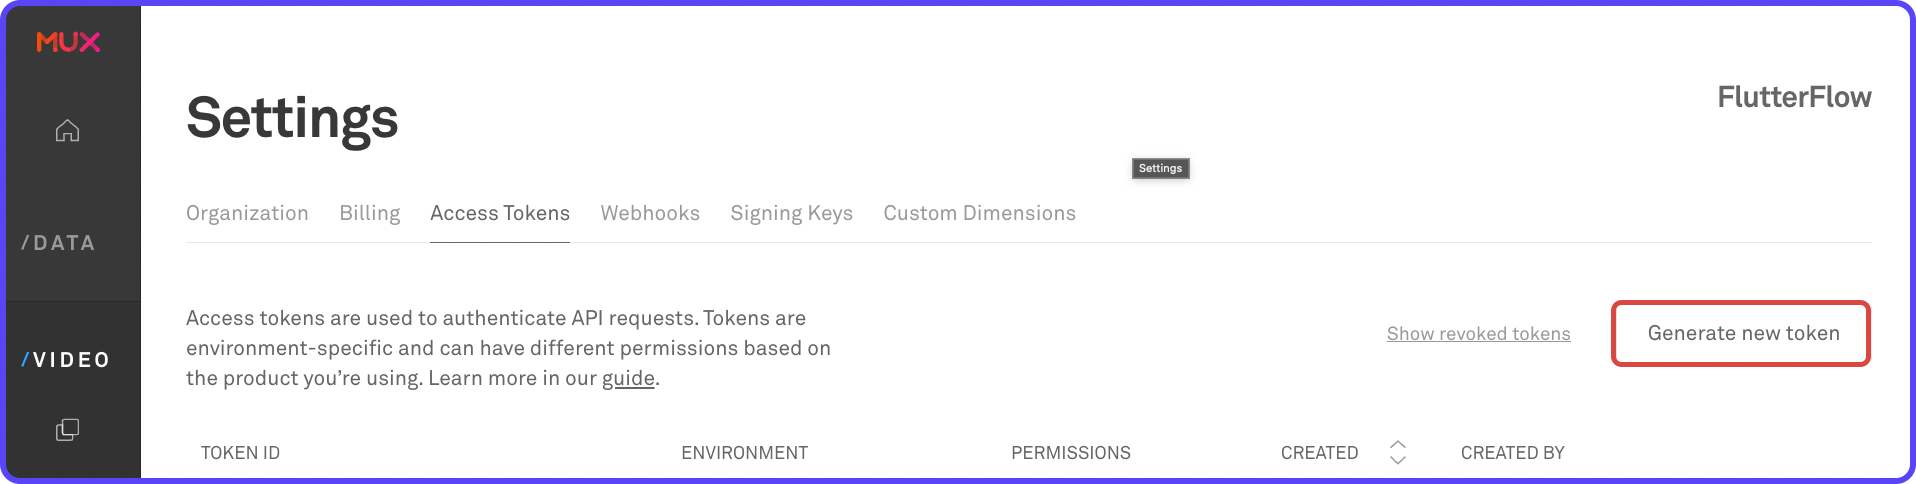
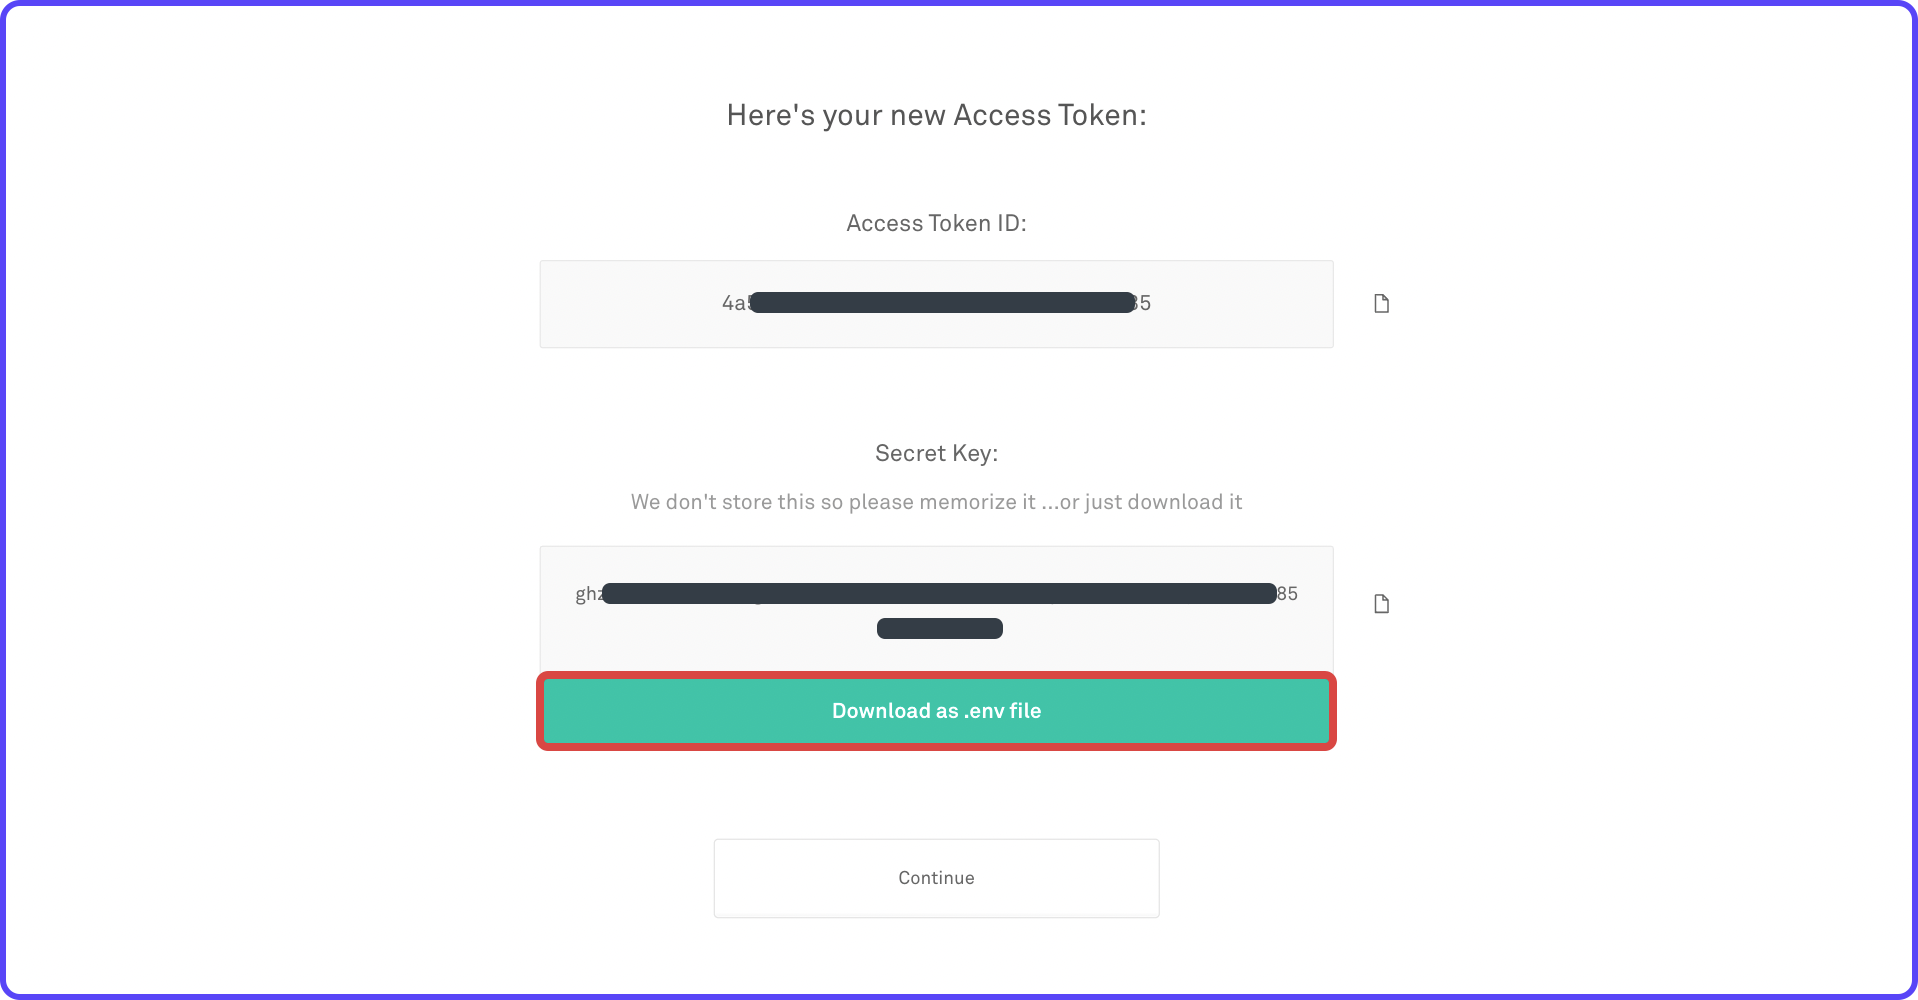
3. Click Generate new token:
- Choose the Environment as Development.
- Check the Mux Video checkbox and make sure Write is also checked.
- Enter a name for the token, for example, Live Stream Token.
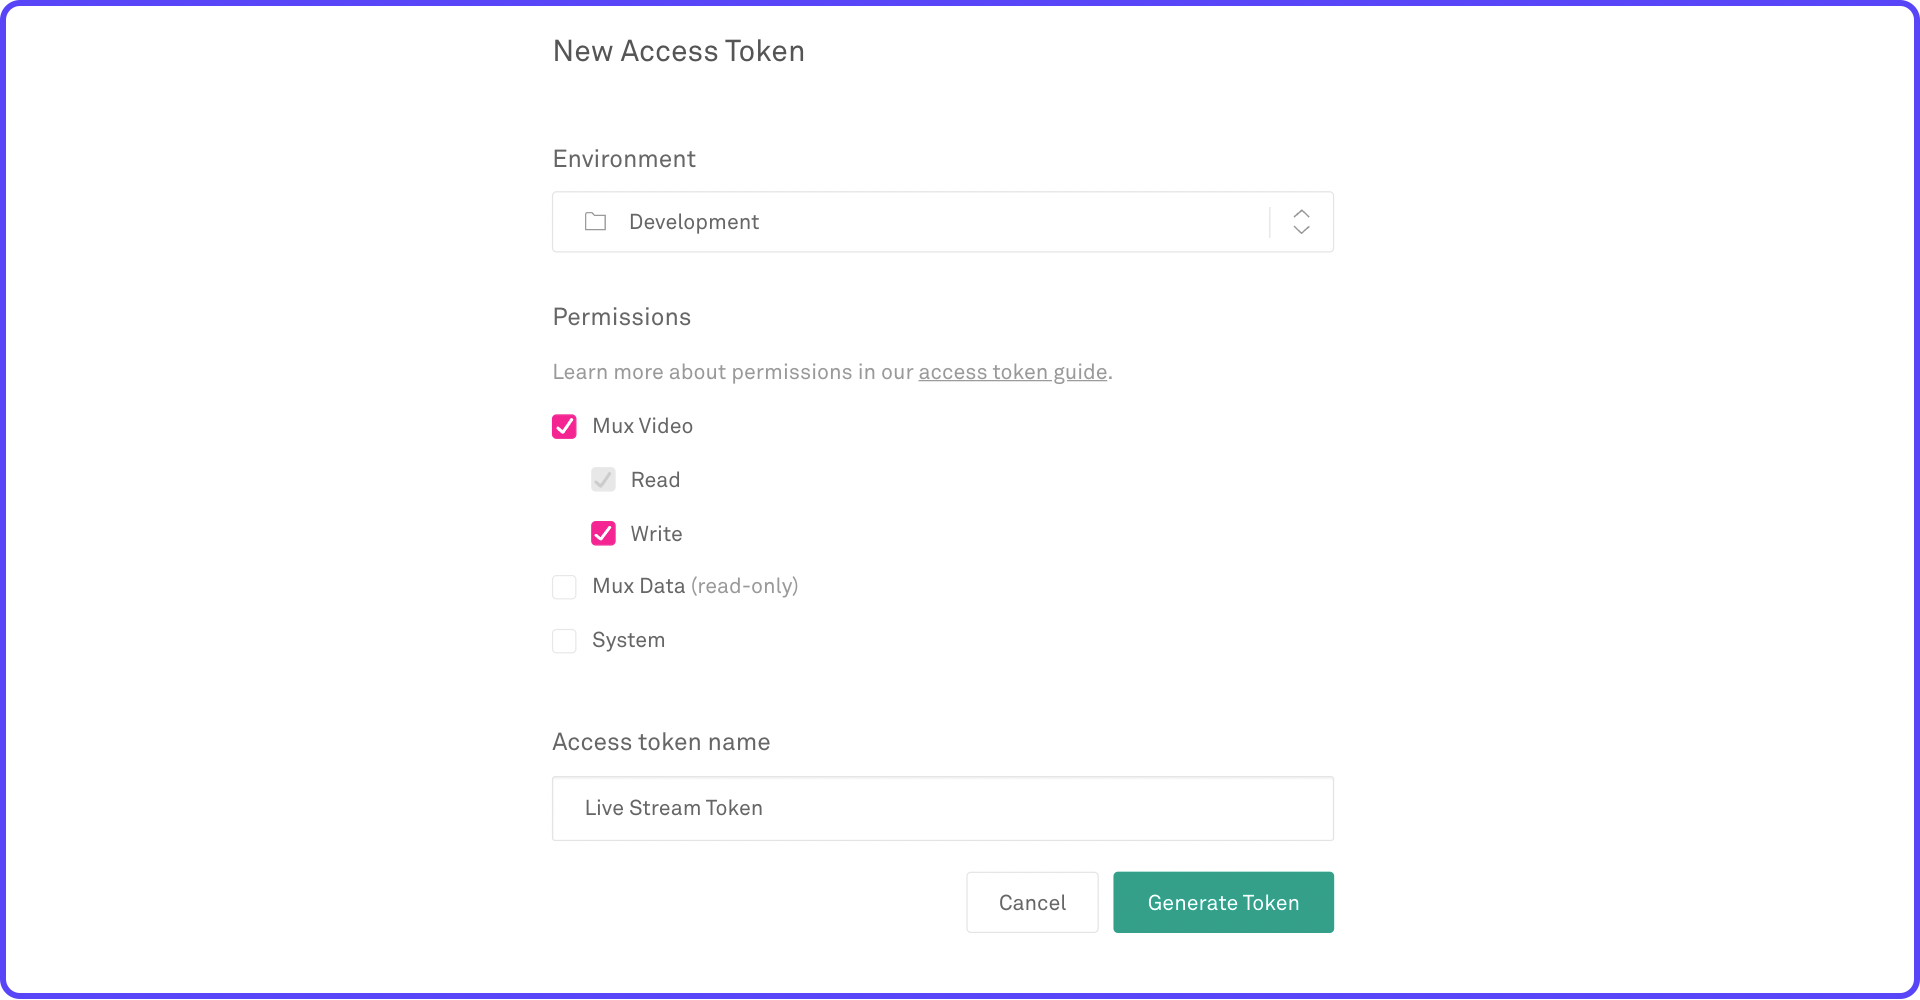
4. Click Generate Token. This will generate new access tokens and display them temporarily. Click Download as .env file and store it in a secure place. You will need these tokens to configure Mux inside FlutterFlow.
5. Go to your FlutterFlow project and navigate to Settings and Integrations > Mux Livestream.
6. Enable Mux. Enter the Token ID and Token Secret. Click Deploy.
This will deploy the Cloud Functions required for controlling a broadcast. Once the deployment is complete, you are all set to move on to the next section.
Firestore Structure
We'll create a new Firestore Collection called streams to store the primary information about each stream. This will be helpful while displaying the list of currently ongoing broadcasts.
- Go to the Firestore page from the left menu.
- Click on the "+" button beside Collections.
- Enter the name of the collection as "streams". Click Create.
- Use the "+ Add Field" button to add the following fields:
| # | Field Name | Data Type | Is List |
|---|---|---|---|
| 1 | is_live | Boolean | False |
| 2 | playback_name | String | False |
| 3 | playback_url | Video Path | False |
| 4 | timestamp | Timestamp | False |
| 5 | uid | String | False |
Now, go to the Settings tab from the Firestore page. Update the Firestore Rules to the following and click Deploy:

Displaying streams
Create a new page in your FlutterFlow project called StreamsPage. On this page, we'll display the list of all the records from the streams collection.
- Add a ListView widget inside the Column.
- Then add a Card widget inside the ListView containing the two Text widgets (Video name and timestamp) and a play Icon.
To show the data from the streams collection, define a Backend Query on the ListView widget:
- Select the ListView widget.
- From the Properties Panel, go to the Backend Query tab.
- Choose the Query Type as Query Collection.
- Select the collection as streams.
- Keep the type of query as List of Documents.
- Click + Order By button.
- Choose the timestamp field and select the order as Decreasing.
- Click Confirm. A dialog will appear telling you that this will generate the children dynamically, click Confirm.
Now, you can use the result of the query inside the widgets:
- Select the Video name Text widget, click Set from Variable and choose the value from streams Document > playback_name. Click Confirm.
- Similarly, select the timestamp Text, set the value from streams Document > timestamp > Timestamp Format > relative. Click Confirm.
- Select the play Icon, set a Conditional Visibility from streams Document > is_live. This will only make the icon visible if the video is currently streaming live.
Let's add a Floating Action Button (FAB), using which we'll open up a bottom sheet to take the video stream name as an input and then navigate to the BroadcastPage.
First, create a new component by following these steps:
- Go to the Components tab, and create a new component by clicking on the "+" button.
- Name the component as BroadcastNameComponent and click "+ Create New" under Blank Component.
- Design the component, add a TextField and a Button widget.
Create a new page called BroadcastPage. On this new page, define a page parameter as videoName with type String and click Confirm.
Go back to the BroadcastNameComponent, and define an action on the Continue button:
- Select the Continue button.
- From the Properties Panel, go to the Actions tab.
- Click on "+ Add Action" button.
- Select the action as Navigate To > Broadcast Page.
- Click Pass under Parameters.
- Pass the value of the videoName parameter as From Variable > Widget State > Stream name (i.e., the TextField).
Navigate to the StreamsPage, add a floating action button, and set an action to open up the component as a bottom sheet:
- Add a Floating Action Button (FAB) widget to the page and add a video Icon inside it.
- Select the Floating Action Button. From the Properties Panel, go to the Actions tab.
- Click "+ Add Action" button.
- Select the action as Bottom Sheet.
- Choose the Display Component as BroadcastNameComponent.
- Customize the rest of the properties (optional).
Building Broadcast UI
Navigate to the BroadcastPage. Add a Column and place the MuxBroadcast widget inside it.
MuxBroadcast widget has a ton of properties that you can explore. Here's a walkthrough of customizing some of the properties that come with this widget:
You can switch between the Idle View and the Streaming View by using the Show Streaming View toggle.
Adding the MuxBroadcast widget also adds two Widget States variables:
- Mux Playback URL (Video path): This is set only when the broadcast has already started. You can use this to play the live video using VideoPlayer.
- Mux Is Live (Boolean): It's set to True when a broadcast is currently ongoing.
We'll be using the Playback URL later in this article.
Let's add one more component to this page to display the video name along with an icon button for navigating back.
Adding Broadcast Actions
You can define two types of action on the MuxBroadcast widget:
- On Broadcast Start: The actions defined under this type will get triggered when a broadcast is started using the
MuxBroadcastwidget. - On Broadcast Stop: The actions defined under this type will get triggered when a broadcast is stopped.
When a broadcast is started, we will create a Firestore record under the streams collection. Follow the steps below:
- Select the MuxBroadcast widget.
- From the Properties Panel (left menu), go to the Actions tab.
- Click "+ Add Action" button.
- Choose the Type of Action as On Broadcast Start.
- Set the Action as Database > Create Document.
- Choose the Collection as streams.
- Use "+ Add Field" button to define the values of the following fields:
- is_live > Specific Value > True.
- playback_name > From Variable > videoName (page parameter).
- playback_url > From Variable > Widget State > Mux Playback URL.
- timestamp > Global Properties > Current Time.
- uid > From Variable > Authenticated User > User ID.
- Enter the Action Output Variable Name as muxStreamOutput.
Now, let's define an On Broadcast Stop action to update the Firestore record and set the is_live field to false:
- Select the MuxBroadcast widget.
- From the Properties Panel, go to the Actions tab.
- Click Open beside the Action Flow Editor.
- Go to the On Broadcast Stop tab.
- Click + Add Action button.
- Set the Action as Database > Update Document.
- Select the reference to update from Action Outputs > muxStreamOutput > Reference.
- Click + Add Field button to define the
is_livefield value as Specific Value > False. - Click "+" on the bottom of the Backend Call action, select Add Action.
- Set the action as Navigate Back (pop). This will navigate back to the StreamsPage once the broadcast has ended.
- Click Close.
Previewing Streams
Let's create another page for previewing a live video stream called LiveVideoPage.
- Define a page parameter called streamData of type Document and choose the collection as streams.
- In StreamsPage, define Navigate To > LiveVideoPage action on the Card and pass the
streamDataparameter value from streams Document > Document. - Go back to the Live Video Page, add a row with a back button and the video name text.
- Then add a VideoPlayer widget inside the Column and set the video path using Set from Variable > streamData > playback_url.
Finally, add a condition before navigating from the StreamsPage to LiveVideoPage that will check whether the video is currently live and will only navigate if it's live; otherwise will show a Snack Bar.
- In the StreamsPage, select the Card widget.
- From the Properties Panel, click on Open.
- Add a condition as streams Document > is_live and move it to before the Navigate action.
- Move the Navigate To action under the TRUE branch.
- Define an action under the FALSE branch to show a Snack Bar with the message "This live stream has ended" (you can customize other properties of the snack bar as well).
- Click Close.
Running the app
As the video streaming functionality only works on Android and iOS platforms, so you won't be able to try out the video streaming feature on the Web using Run/Test mode of FlutterFlow.
It's recommended to try out this app locally on a physical mobile device, you have two options:
- Download the code from FlutterFlow.
- Push the code to GitHub and pull the changes locally on your system.
Steps for downloading the app's source code:
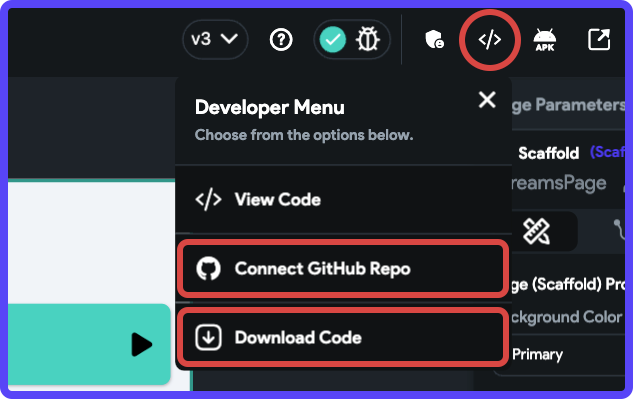
1. Click on the Developer Menu button present on the Tool Bar (top menu), and select Download Code.
2. Once the project is downloaded, extract the contents from the .zip file.
3. Run the following commands from the project directory:
flutter pub get
flutter packages pub run build_runner build --delete-conflicting-outputs
4. To run the app on a device, connect a physical device, and use this command:
flutter runHere's a glimpse of the live video streaming in action:
Wrapping up
Insane that it's just a matter of a few hours to implement a scalable live video streaming app using Mux and FlutterFlow.
We have just covered the basics of building a live streaming platform. You can improve upon it by adding more features like rating system, live chatting, streaming groups, and much more!
Get the clonable version of this app here.
